
Depending on your location, Starlink will offer you different hardware options. For Residential and Roam orders in the US, the choice comes down to “Standard” or “Standard Actuated”. The Starlink website doesn’t give much information on the differences between the two models, but there are a lot of things you should be aware of before making a decision.
In this guide, I will break down all the differences between the two equipment options, Standard and Standard Actuated. Learn about the hardware, mounting options, installation process, and available accessories. I will talk about performance, reliability, and offer my overall recommendation for which hardware you should get.
Table of Contents
Starlink is going from Gen 2 to Gen 3
Although Starlink refers to the equipment options as simply Standard and Standard Actuated, the reality is that they are two different generations of Starlink hardware. Standard Actuated is Gen 2, and Standard is Gen 3.
The Gen 2 Standard Actuated dish was released in late 2021, and has been the default equipment option for Residential and Roam since it was released. The Gen 3 dish, aka Standard, was released in December of 2023. Standard is the newest hardware version, with several important changes over the Gen 2 hardware.
Starlink is currently in the process of transitioning from Standard Actuated to Standard. Production of the older Standard Actuated dish has stopped, and Starlink is working to clear out all of their inventory before making their Gen 3 Standard dish the only available option. Standard Actuated won’t be available for much longer, because it is older hardware that will soon be retired. Standard will replace it as the default Starlink equipment.
Price

The cost of both Standard and Standard Actuated is identical, at $599 plus taxes and shipping.
Hardware comparison
The hardware between the 2nd generation Starlink and 3rd generation Starlink is different in many ways. Starlink upgraded the power supply, router, cables, and dish with Gen 3 Standard. In this section, I will detail all the important changes between the Standard and Standard Actuated models.
Dish
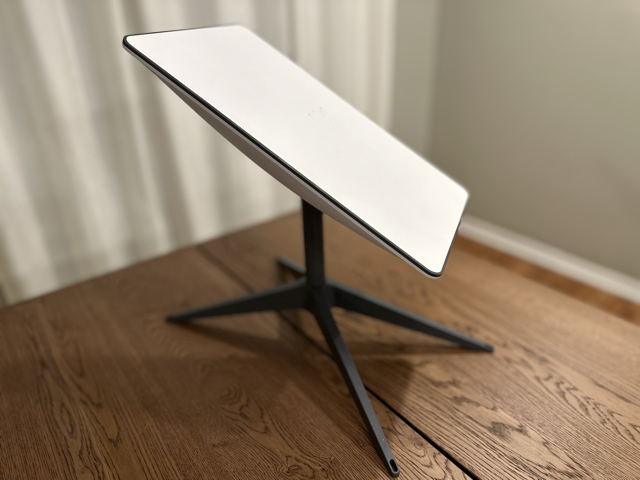
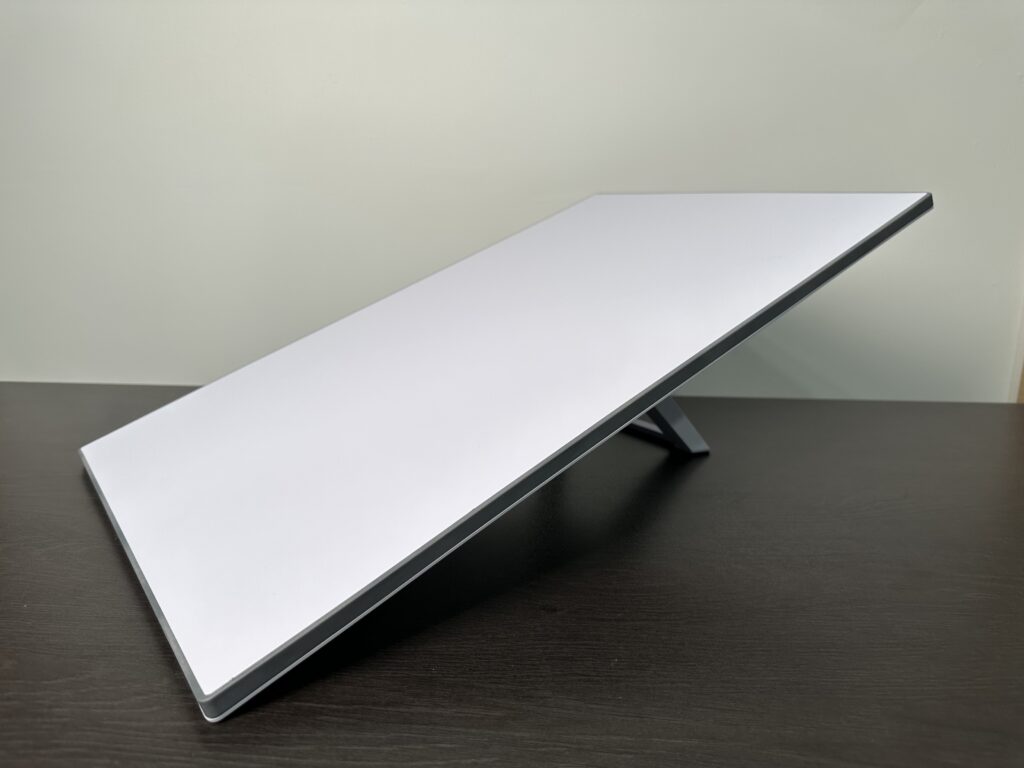
The Standard dish is slightly larger than the Standard Actuated dish. Standard Actuated is about 12″ wide and 20″ long, while Standard measures 12″ wide and 24″ long. The increased antenna surface area gives the Standard dish a higher field of view (FOV), 110 degrees vs 100 degrees. The Standard Actuated dish has a much thicker and taller form factor because of the built in mast and motors.
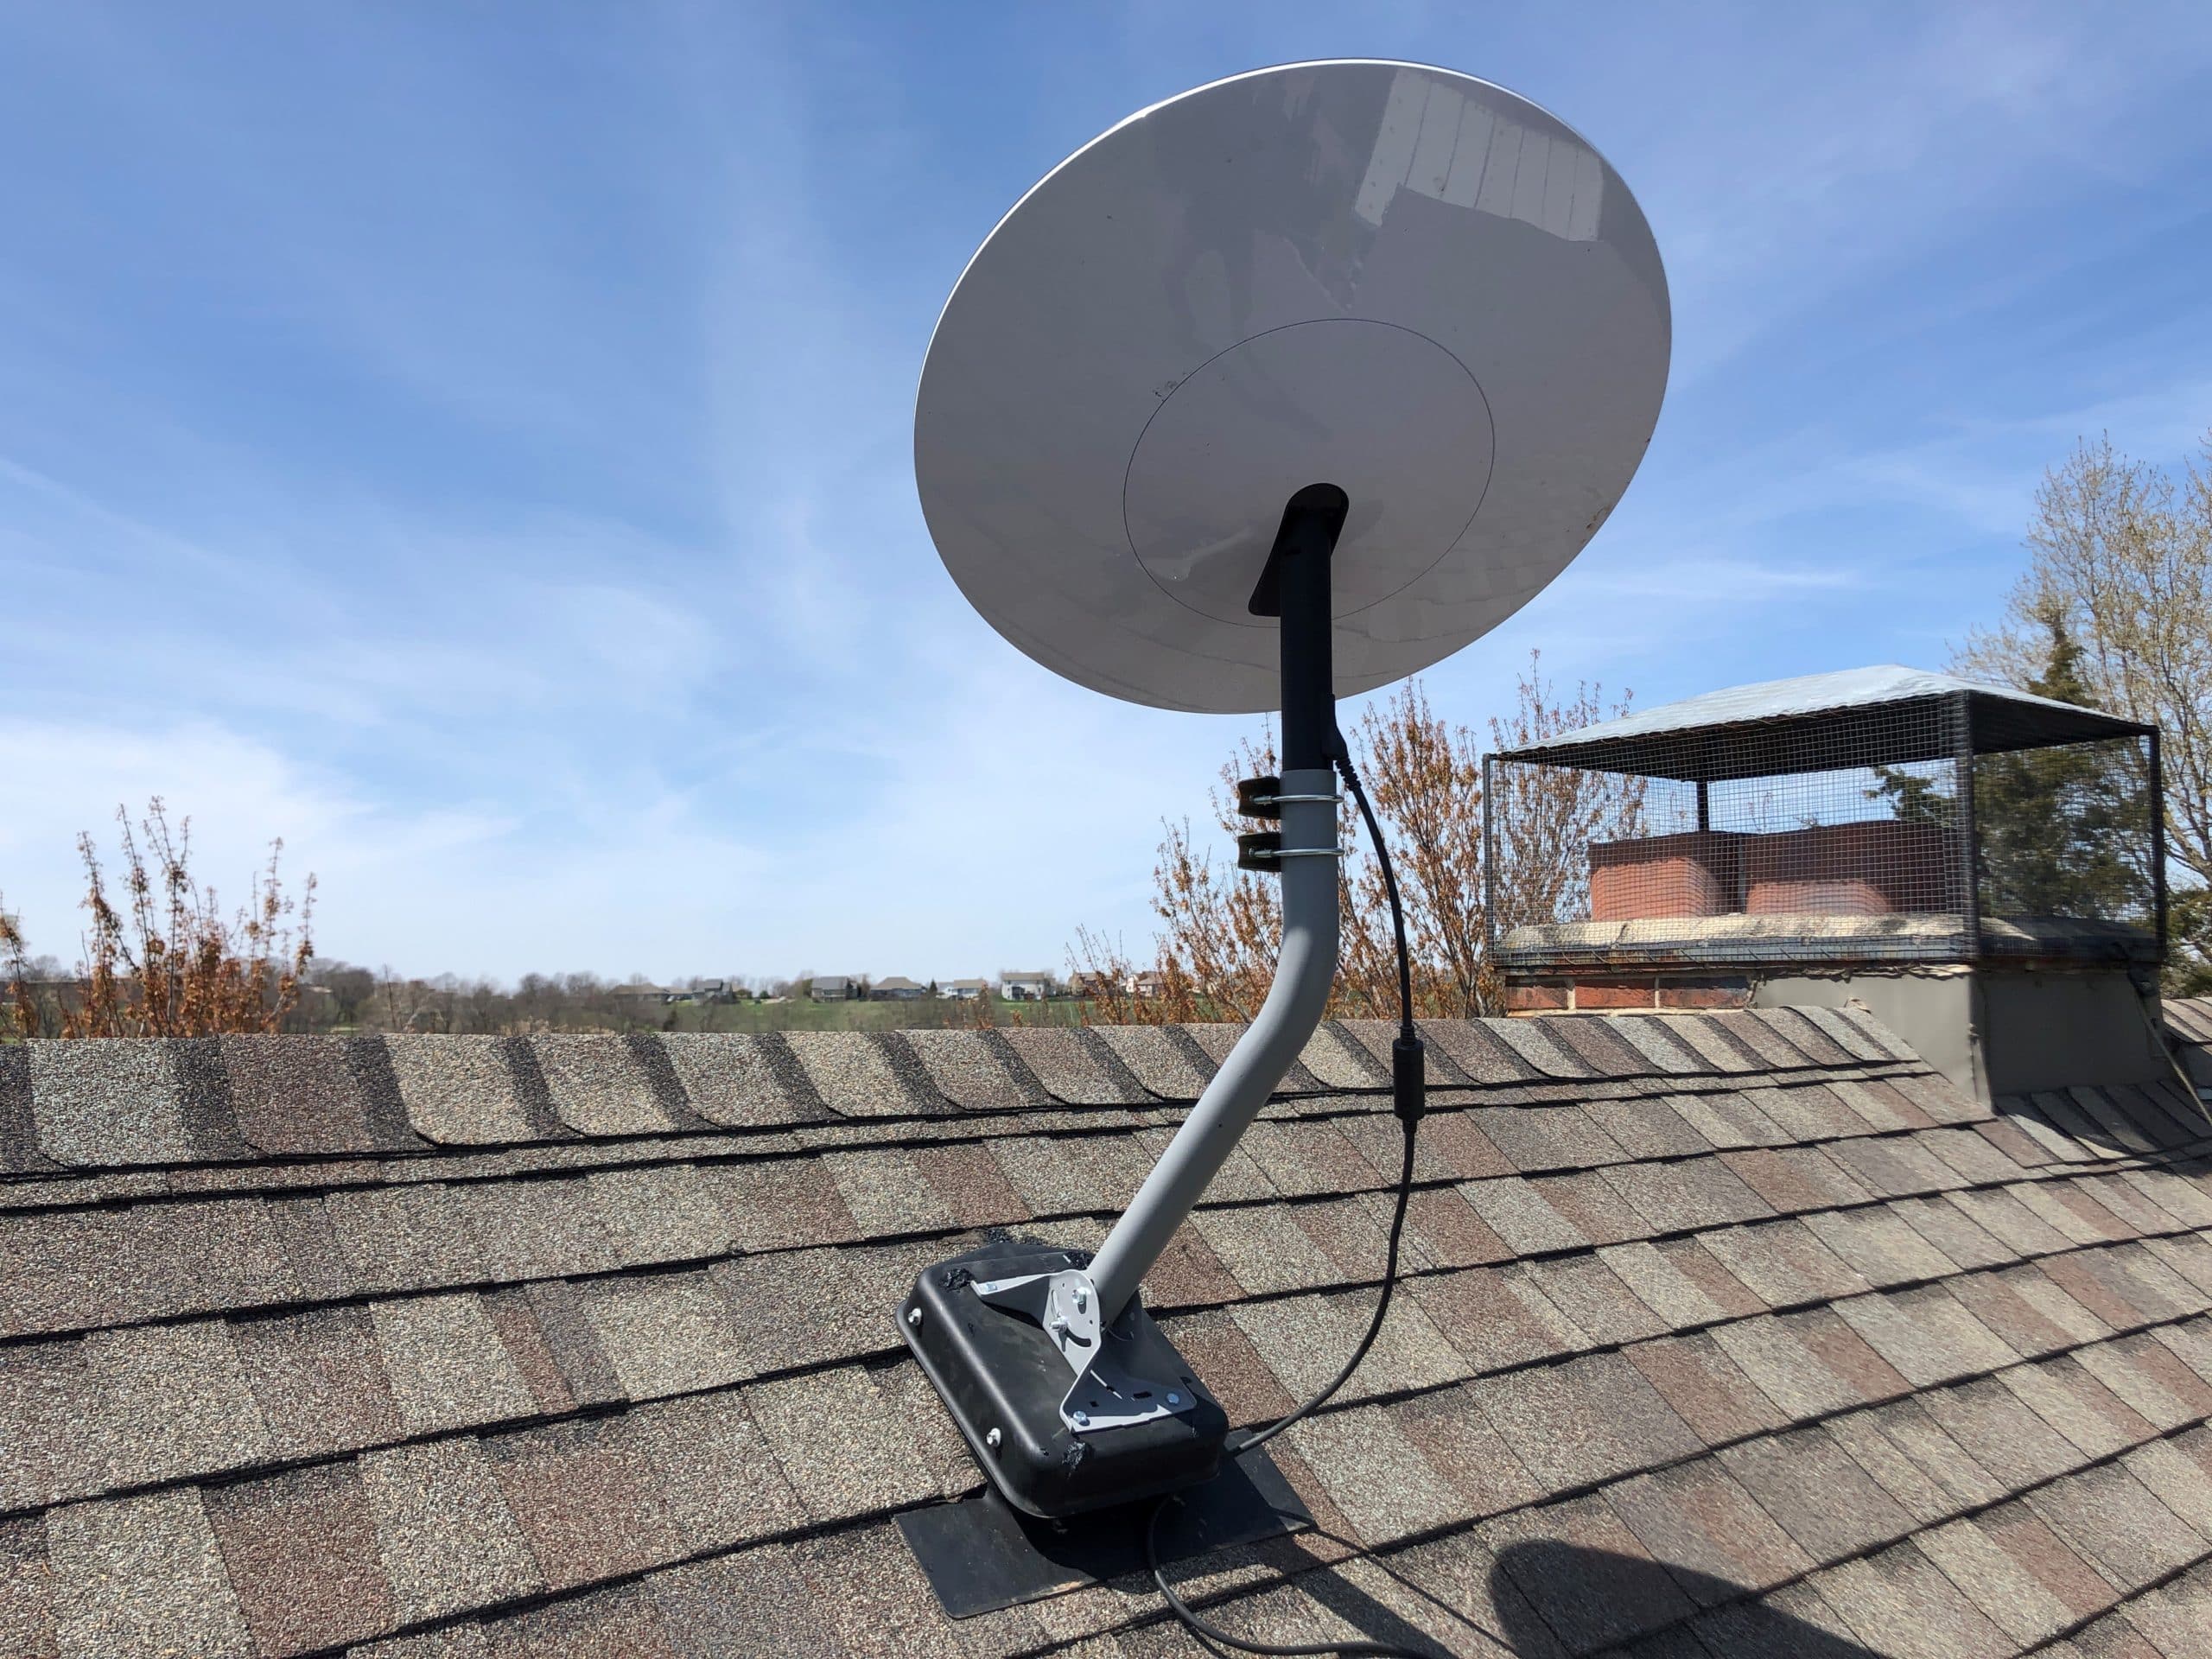
The “actuated” part of Standard Actuated refers to the electric motors inside the antenna housing. The motors, which are connected to the mast, can rotate and tilt the Standard Actuated dish, enabling it to self-align to the Starlink satellites. In contrast, the Standard dish has done away with the built in mast and motors. The Standard dish must be manually rotated during the initial installation, with the help of the Starlink app.
It’s important to understand that both the Standard and Standard Actuated dishes are electronic phased array antennas, that can track and get a signal from the Starlink satellites without physically moving. They both use their wide field of view to digitally “steer” signals to and from the satellites. Beyond the initial alignment during installation, having motors isn’t really an advantage, as the Standard Actuated dish won’t continuously move or adjust. Both antennas work electronically, without having to constantly move to follow the satellites.
Router
The Standard Actuated hardware kit comes with the Gen 2 Starlink Wifi router, which uses Wifi 5 technology. It is mesh-enabled, meaning you can wirelessly pair additional Gen 2 or Gen 3 routers to increase the coverage area of your Wifi network. The Wifi radio is dual band, meaning no dedicated 5Ghz channel for mesh. The Gen 2 router doesn’t have Ethernet ports to directly connect devices, but Starlink does offer an Ethernet Adapter to give you a single LAN port. The Gen 2 router in the Standard Actuated kit can cover up to 2000 sq. ft.
The Standard hardware kit includes the upgraded Starlink Gen 3 router. The Gen 3 router uses Wifi 6 technology, allowing for faster Wifi speed and better range compared to the Standard Actuated router. The Gen 3 router can cover up to 3,200 sq. ft., and has a tri band radio for improved mesh performance. Starlink listened to customer feedback regarding the lack of Ethernet ports on the Gen 2 router, and included 2 Ethernet LAN ports on the Gen 3 router. Other improvements over Gen 2 include a physical reset button and a multi-color status LED on the front of the router.
Starlink Cable
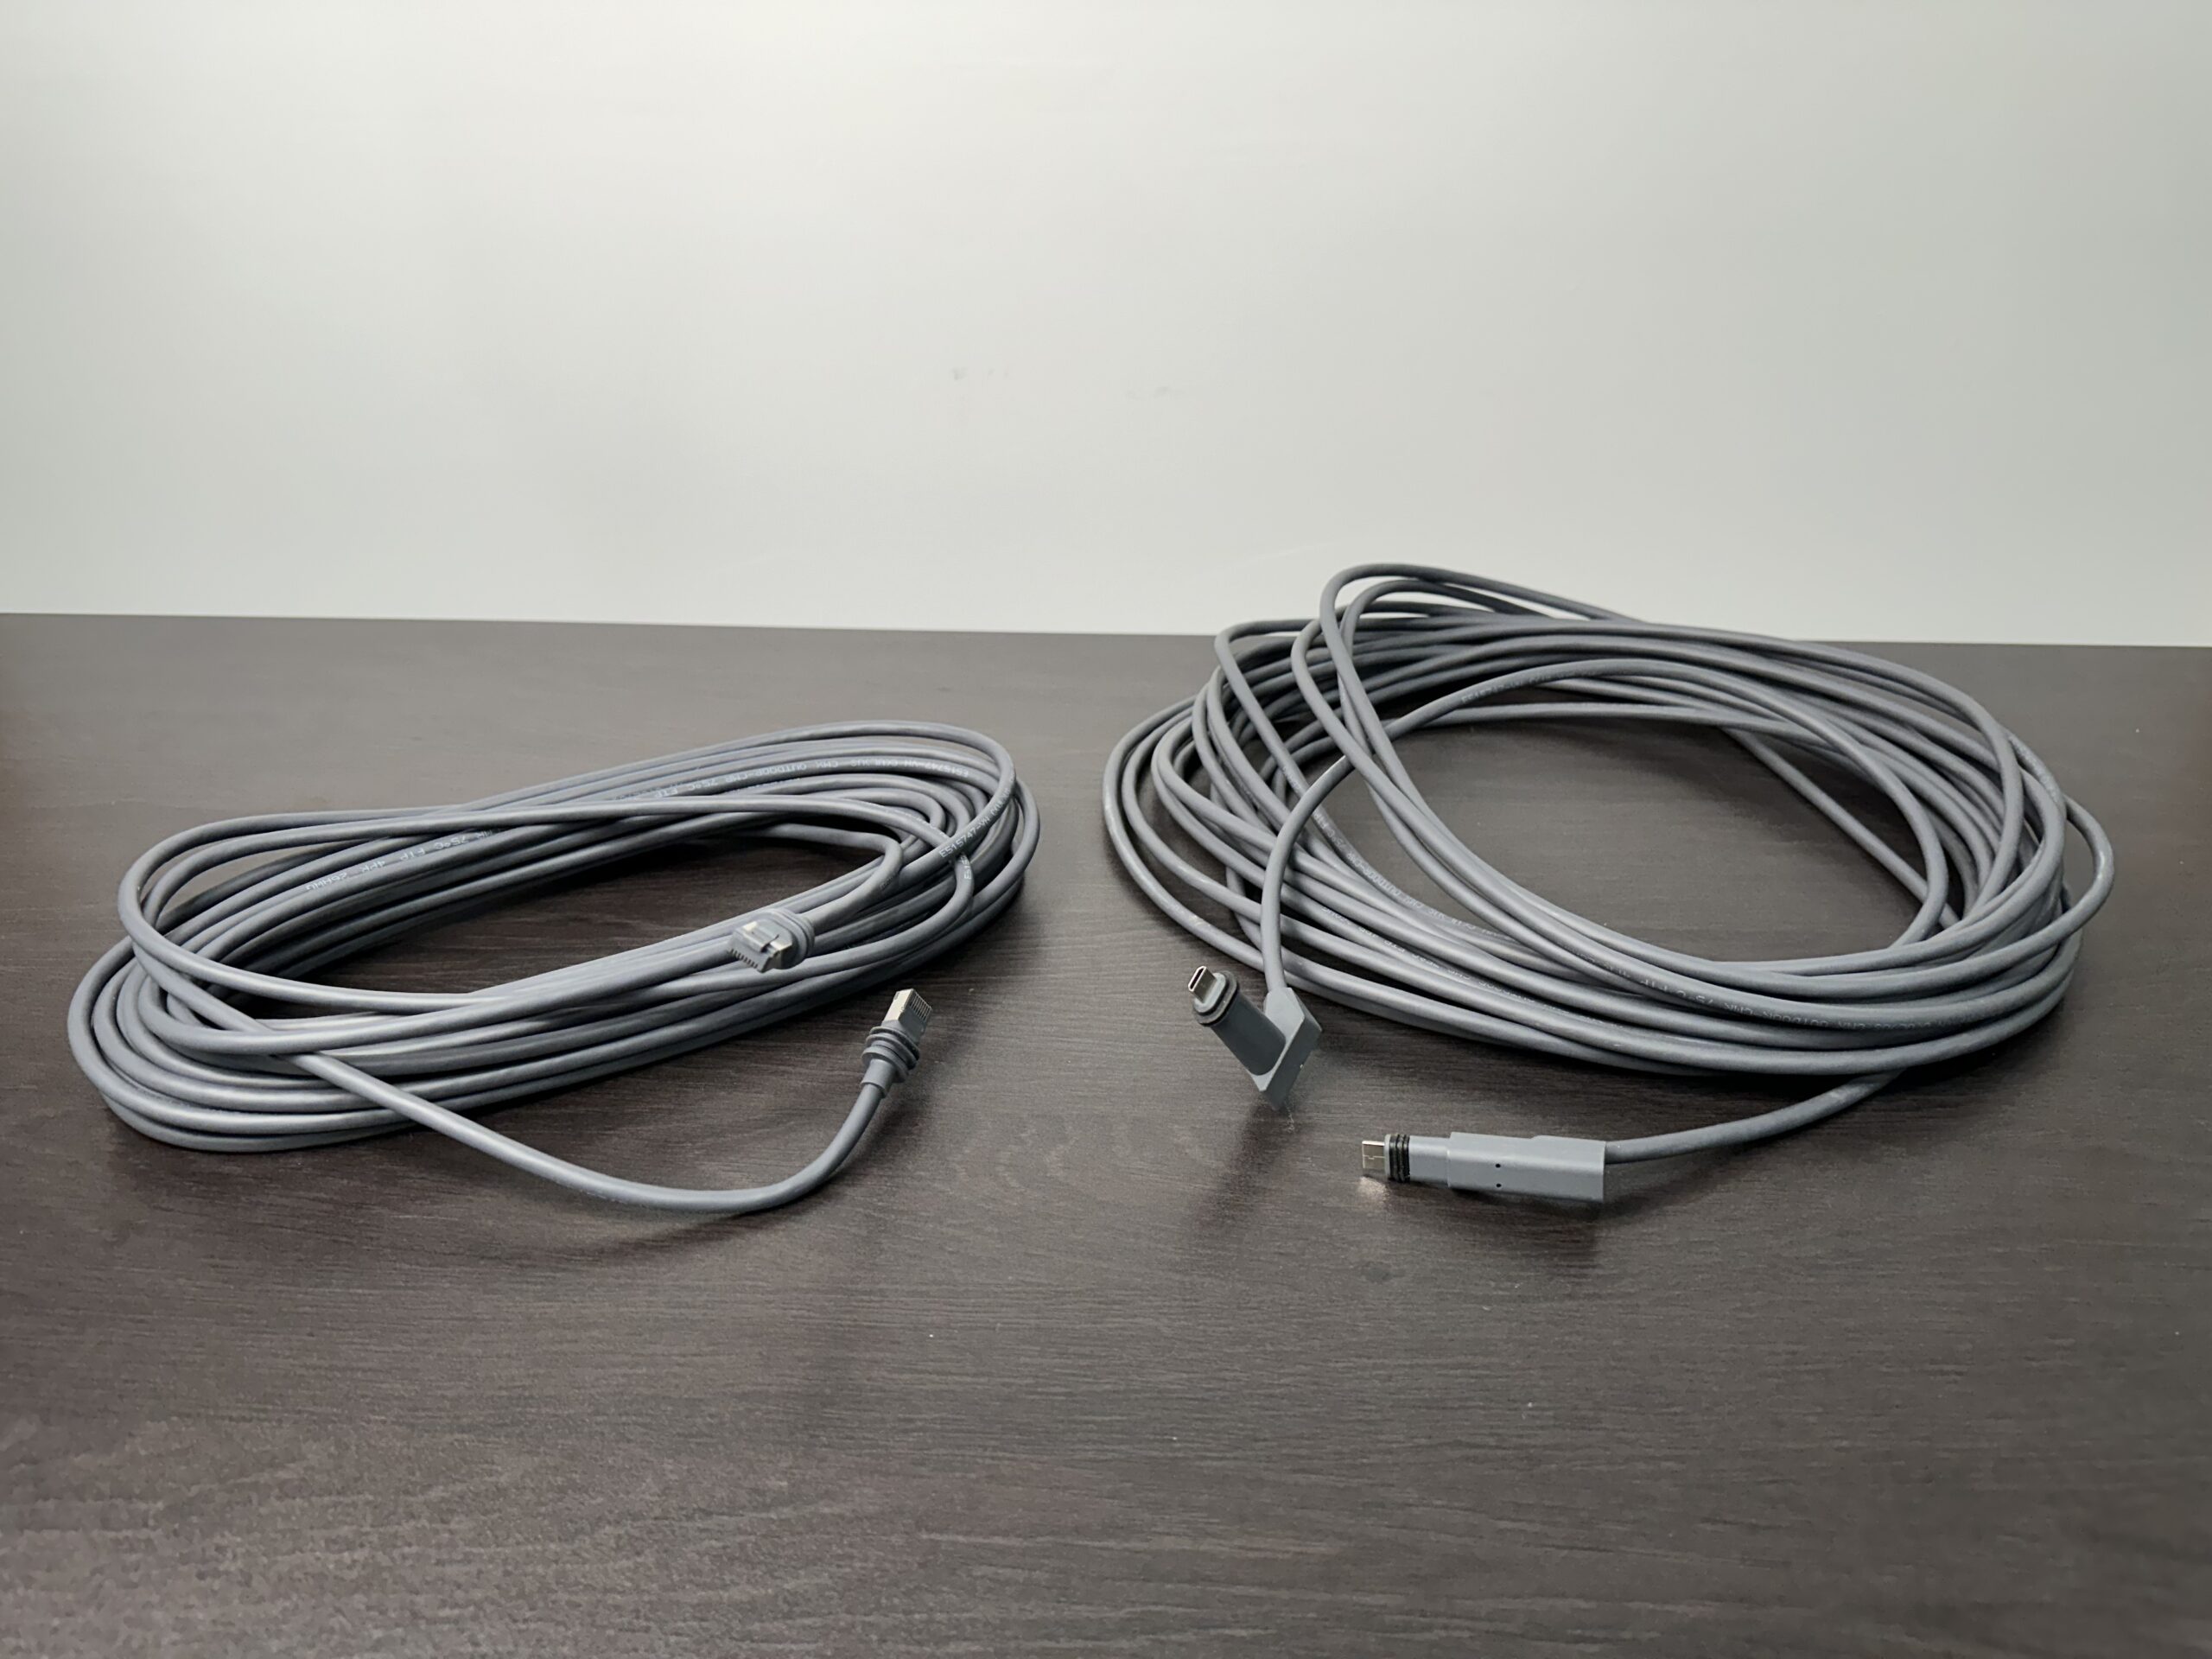
A single cable connects the Starlink dish to the router, with all models of Starlink. The Standard Actuated kit includes a 50′ Starlink cable, which uses proprietary connectors on each end. One end plugs into the Gen 2 router, and the other end plugs into the Standard Actuated dish. Longer cable lengths are available if needed, but aftermarket cables are not available.
With the Standard dish, Starlink has changed the Starlink cable back to standard RJ45 connectors. The Standard hardware kit includes a 50′ Starlink cable, with identical RJ45 connectors at each end. One end plugs into the router, the other end connects to the dish. A longer 150′ Starlink cable is available for the Standard dish, and thanks to the RJ45 connectors, aftermarket cables can be used.
The proprietary connector design on the Standard Actuated dish has been a source of many issues and failures. One of the most common problems with Starlink is the Starlink Unplugged or Rebooting message, which occurs when the cable or connectors fail. Many customers using the Standard Actuated dish have had to replace the Starlink cable or router. Time will tell if the change to standard RJ45 connectors on the Standard dish will solve the cable and router issues.
Mounting Base
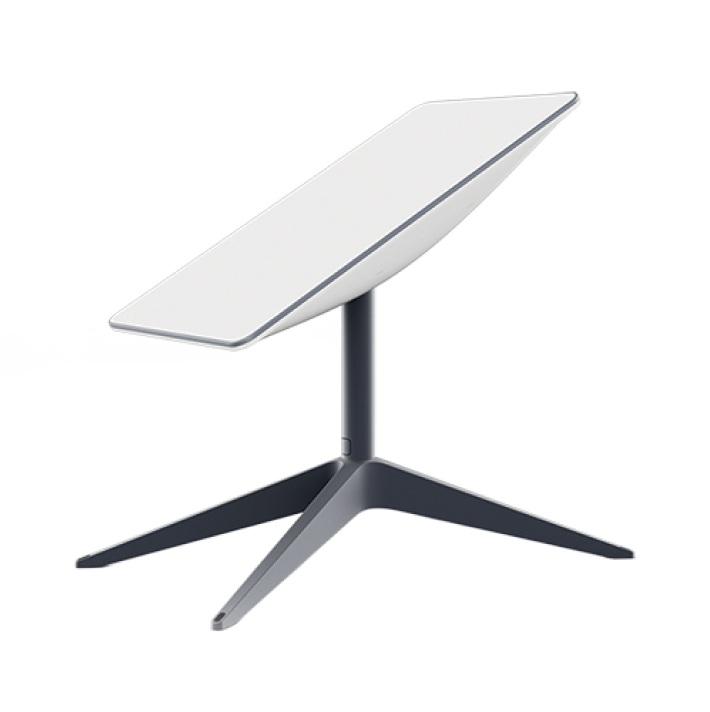

All Starlink kits include a temporary mounting base, best for portable use, or for mounting to a flat surface. The Standard Actuated kit contains a mounting base with four legs, each containing a hole for mounting hardware. The Standard kit has a much smaller footprint, thanks to an integrated “kickstand”. The kickstand can fold away for storage, or flip out for a quick deployment. Like with the Standard Actuated base, the kickstand on the Standard dish can be attached to a flat surface with the included screw holes.
The mounting base included in Starlink kits is not designed for permanent installation on a home. Starlink sells several different mounting options for both the Standard and Standard Actuated models. I will cover mounting options a bit later in the guide.
Accessories
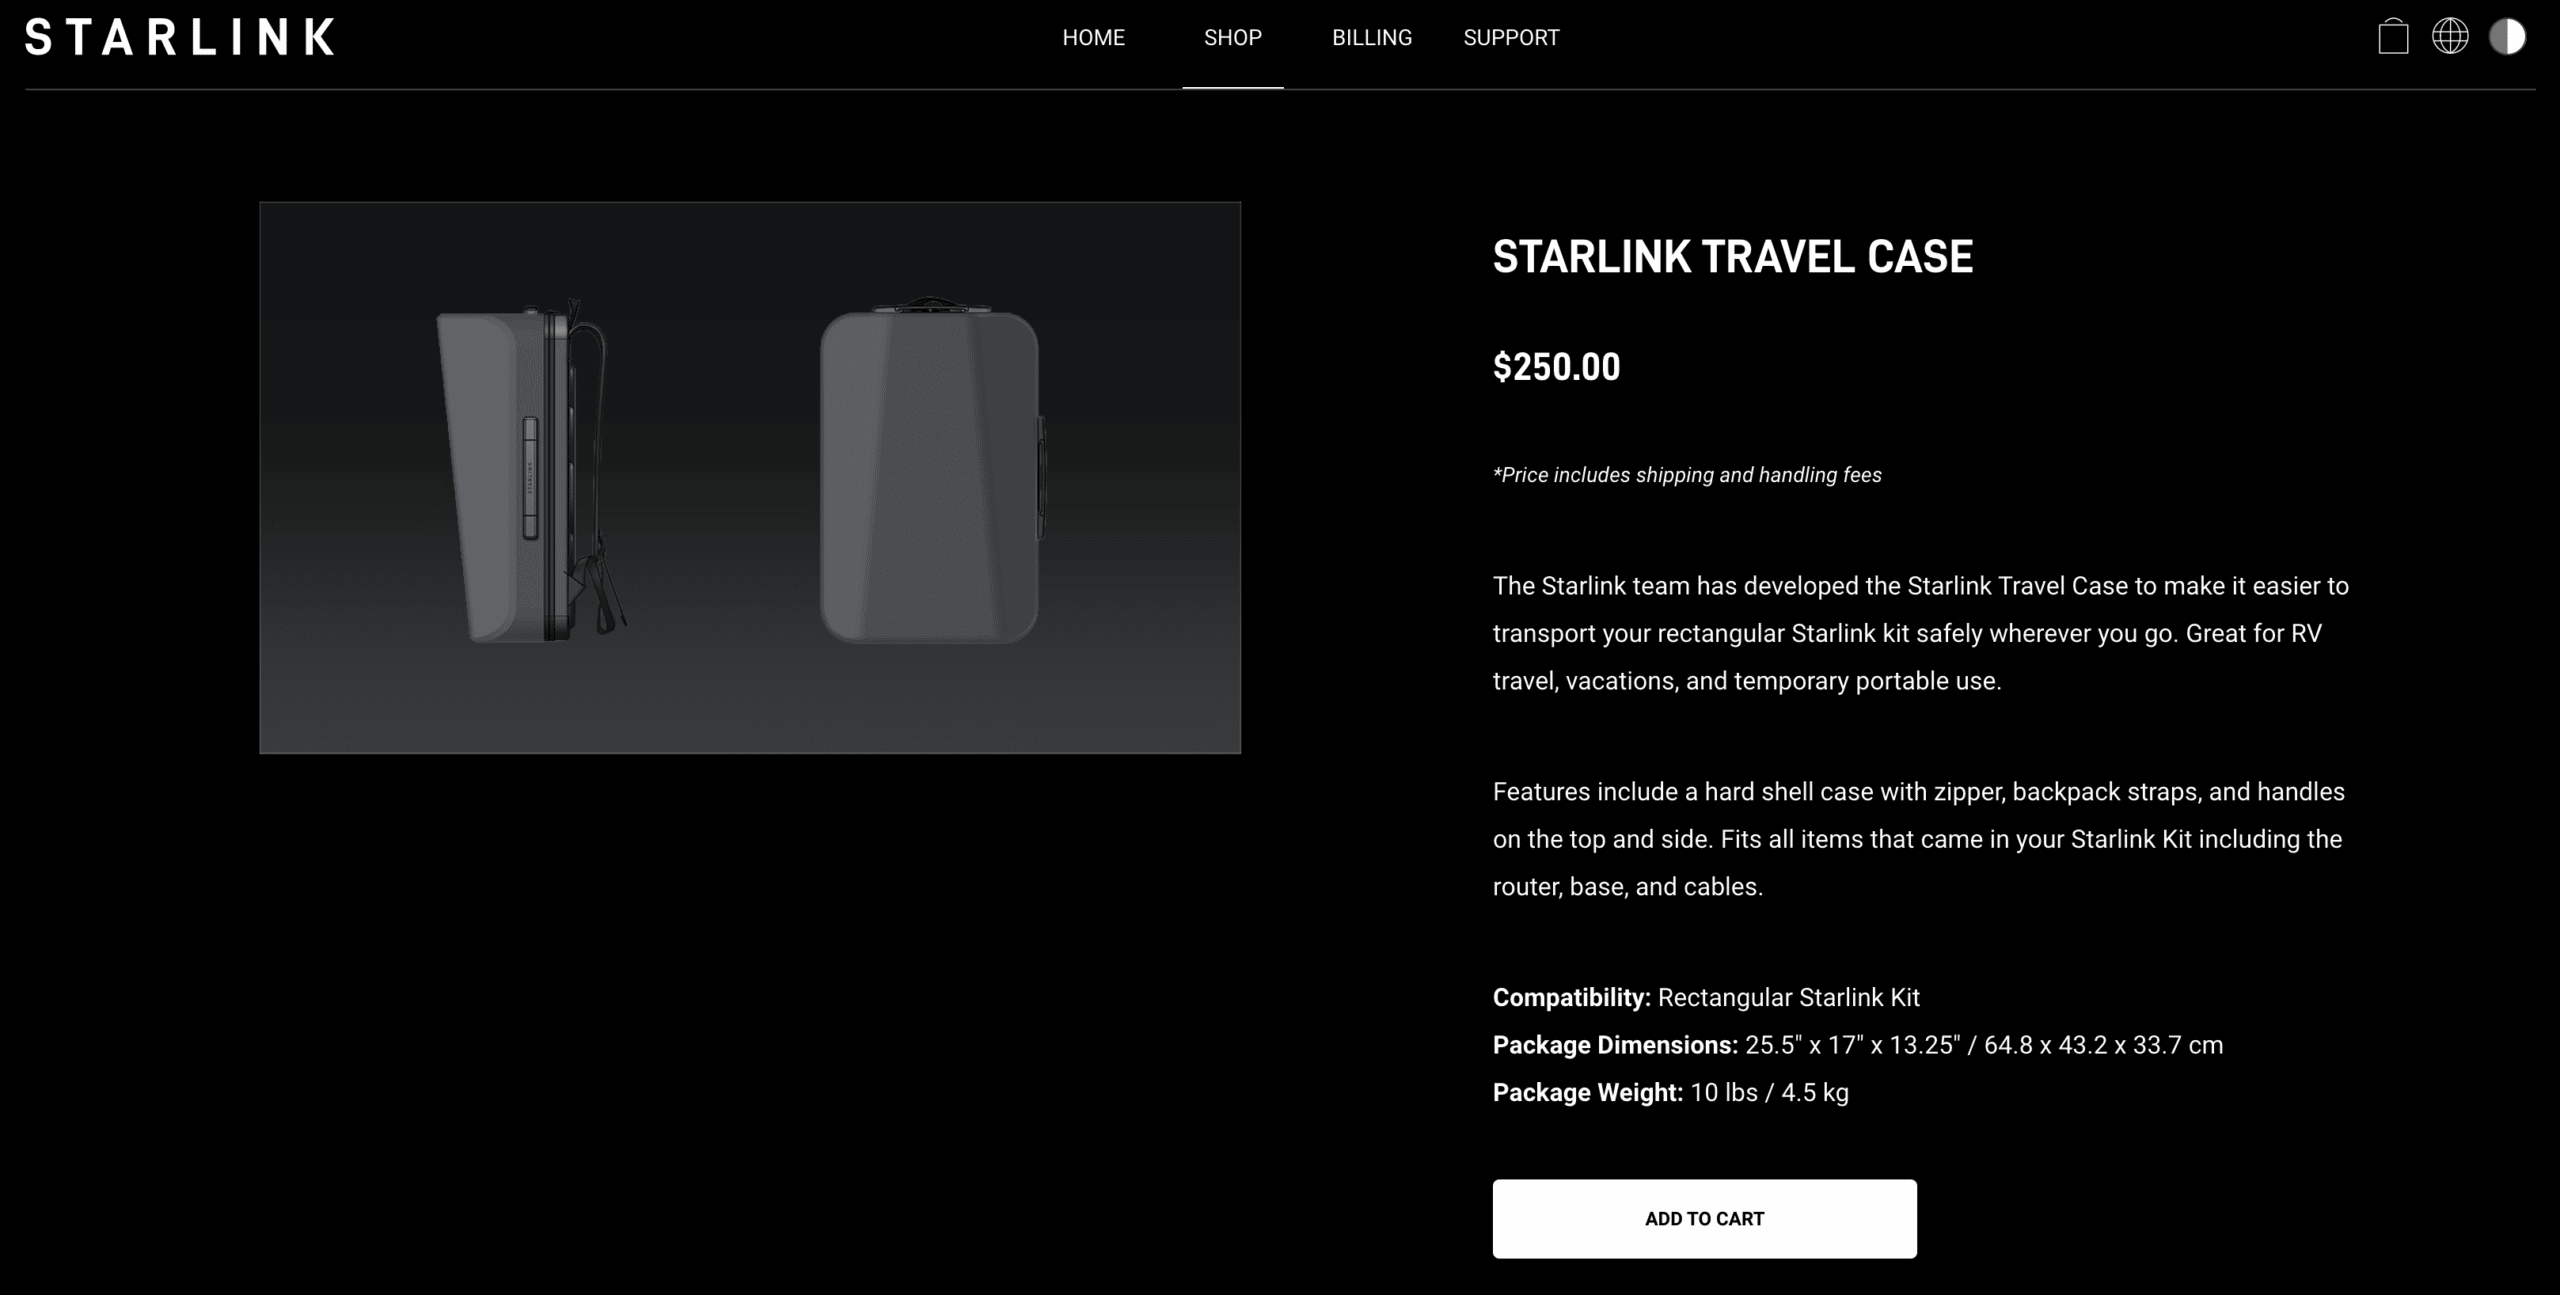
The accessory options for the newer Standard dish aren’t quite as extensive as the accessories offered for the Standard Actuated dish. That will change as time goes on, but right now, accessories like the Starlink Travel Case aren’t available for Standard. Other accessories, like the Ethernet Adapter, aren’t applicable or relevant to the Standard dish because the Gen 3 router has Ethernet ports built in.

Both Standard and Standard actuated have different cable length options available, and both have mounting accessories for roofs and walls, which I will cover in the next section. The Standard Actuated dish has an available mesh system, while the Gen 3 mesh nodes haven’t been released yet.
For more on accessories, check out our Starlink accessory guide.
Setup and installation differences
Because the design of the Standard and Standard Actuated dishes are so different, setup and installation is different too. In this section, I will cover the differences with mounting and installing.
Mounting options

No matter which hardware option you pick, you will have several mounting options to choose from. Starlink offers several types of mounts for both Standard and Standard Actuated. You can also use aftermarket mounts and poles with the Starlink Pipe Adapter, which is available for both models.

Both hardware kits can be installed directly to a roof, facia board, eave, or exterior wall, with the appropriate mount. Although the design of the new Standard kit doesn’t include a mast, a mast is included with most of the Starlink mounting accessories.
Be sure to check out our Starlink mounting guide for more detail on how to mount your Starlink dish.
Installation and aiming

No matter which Starlink model you pick, installation is pretty simple. Just plug everything in, perform the setup using the Starlink app, and you can be online in minutes. But one of the biggest differences between Standard and Standard Actuated is the initial aiming of the dish to the Starlink satellites.
Like I mentioned before, the Gen 3 Standard dish doesn’t have motors. The Standard dish has to be manually rotated during the initial installation process. Thankfully, the Starlink app tells you exactly which way to point it. If you live in the US, that direction is generally north. You don’t have to manually adjust the tilt/angle of the Standard dish. All of the mounting options put the Standard dish at about a 20 degree angle.
The Standard Actuated dish has built in motors that automatically aim the dish, based on your location. When you first power on the Standard Actuated dish, it spends about 15 minutes calibrating to its location. At the end of the boot up process, it will move to a final position, determined by where the most Starlink satellites are in your area. The Standard Actuated dish does not try to aim away from obstructions, and beyond the occasional adjustment from Starlink, it doesn’t move again after the initial calibration.
For more detail, check out our Starlink Setup and Installation Guide.
Performance and reliability
Generally, the Starlink dish model you pick doesn’t affect your internet speed or reliability. The bigger factors for performance are your location, service plan, and obstructions. The Standard dish does have a more powerful antenna, with a beefier power supply. But that doesn’t necessarily mean faster internet speed.
The Standard hardware kit does have a slight reliability advantage in weather. The bigger power supply and more powerful antenna in the Standard kit allows for better performance in rain and snow, where satellite internet generally struggles to maintain a good connection.
The performance capabilities of all Starlink models, from the original Gen 1 dish to Gen 3 Standard, are about the same. The equipment isn’t that different in regards to internet speed. I’ve tested every model of Starlink dish, on various service plans. In my experience, hardware doesn’t affect speed as much as the other factors I previously mentioned.
Standard or Standard Actuated – Which hardware should you buy?

At this point, I’ve covered all the important differences between the Gen 2 “Standard Actuated” and the Gen 3 “Standard” hardware options. So, which one should you pick if you are buying Starlink for the first time?
In my opinion, the Standard dish is the best option. Not only is it the latest and greatest technology from Starlink, it has the following advantages vs the Standard Actuated dish:
- Better Wifi router – The range and Wifi speed of the Gen 3 router in the Standard kit is a big upgrade over the Gen 2 router in the Standard Actuated kit
- Ethernet ports – The Gen 3 router has two built in Ethernet LAN ports, compared to no Ethernet port on the Gen 2 router
- Better form factor – The Standard kit is a better option for portable use cases, like camping and RV’s. The included kickstand makes the Standard dish very thin and packable, compared to the bulky mast and profile of the Standard Actuated dish
- Standard RJ45 connectors – The standard cable and connectors of the Standard hardware kit should solve the reliability issues that plagued the Standard Actuated kit. Also, it gives customers more options for cabling, since aftermarket cable products are compatible with the Standard dish, unlike with the Standard Actuated dish
- Cheaper accessories – The mounts and accessories sold by Starlink for the Standard model are generally cheaper than the equivalent accessories for the Standard Actuated dish. Starlink has refined the design and manufacturing process for their newest accessories, passing some savings on to the consumer
The Standard Actuated dish is still a good option if you don’t like some of the design changes with Gen 3. If the self-aiming feature seems very important to you, the Standard Actuated dish is the way to go. That guarantees you won’t have to climb back up on your roof to make adjustments.
Another advantage of the Standard Actuated dish is the lower power consumption. The Standard Actuated dish uses 50-75 watts on average, compared to 75-100 watts for the Standard dish. If you live off-grid or plan to power your Starlink with solar or a battery system, Standard Actuated is the better choice.
What about upgrading from Gen 1 or Gen 2?
If you currently own a Gen 1 or Gen 2 system, and are wondering about upgrading to the Gen 3 Standard dish, I don’t think it’s worth it. The upgrades I listed above for Gen 3 are nice to have, but won’t really change your internet experience drastically if you already have a working Starlink system.
Final thoughts
The Standard Actuated hardware option is Starlink’s 2nd generation hardware, while Standard is the 3rd generation dish. There are several design changes between the two generations, including the elimination of the motors, an upgraded Wifi router, and different mounting accessories.
I recommend people pick the Standard dish for almost all applications, whether you are using Starlink for home internet, or for portable use. The upgrades make it a no-brainer for new customers. But if the self aiming motors are a top priority for you, Standard Actuated is going to deliver similar internet performance.
Hi can I use the flat high performance dish with the Gen3 router for in motion use on a vehicle? Can I order the Starlink Gen3 with the flat high performance dish?
Yes, the Gen 3 router is compatible with the HP dish. The HP dish no longer comes with a router, so you will have to add a Gen 3 router to your order to get one.
Hi Noah,
Can I pause the Residential service plan like the Roam.
kind regards
George
Hi Noah,
this is the most straightforward blog on the different models I’ve come across and has reduced rather than added to the confusion. So thanks for that. My dilemma on purchasing a gen 2 or gen 3 hasn’t been resolved, but there are some excellent gen 2 deals currently (eg 50% off hardware in Germany), and would use it occasionally for travel to remote places (with month to month contract).
I’m based in South Africa where Starlink hasn’t rolled out yet and users on local roam services are being cut off (if contracting via neighbouring countries where Starlink is available). To avoid this for an upcoming trip to Namibia and Botswana, can I source the hardware (kit) in Germany through own channels – but still via the Starlink website / shop – and would I then have to take out a global roaming package (month to month) to ensure it definitely works in Namibia and Botswana for a month?
Where can I first activate it – must this be in (say) Germany where the hardware kit is obtained, or can it be in a country without official Starlink representation yet? Since it wont be RV rooftop mounted, the flat mount of the gen 3 is less of an issue, happy for it to be on the ground with clear view while vehicle is parked in the shade.
Would appreciate hearing from you on the roaming service and place of first activation (given possible constraints by Starlink on users with regional roaming services in Southern Africa, when used in unauthorised localities).
It doesn’t have to be activated physically in any specific place, however, to activate and pay you would need a bank account in the country you are trying to activate in.
Thank you, that is helpful. In other words, I can import it to South Africa from a European country (where I have a bank account), and use that card to pay, yet do the unboxing and initial activation from South Africa. The mobile roaming plan would then apply – quite costly – but it would work. And there’s no need to take it back to any home country periodically, if on the global mobile plan.
Sorry, edit: I misread your response.
I would need a bank account in the country where I first activate it, not the country that I source it from (e.g. source it in the UK or in Germany, take it to South Africa, and activate it there with a SA bank account).
I’m thinking about installing one in my boat, but I’m in doubt about how the gen 2 actuators would work on a boat. Do you think the antenna will keep realigning as the boat moves, even at anchor? I’m abroad and here they still sell the gen 2 antenna. The less power hungry gen 2 is a plus, but I don’t know if this is the best option (due to the presence of the motors) or if it’s better to wait for the gen 3 antenna. Disabling the motors would not be the ideal solution for me as I intend to also use the antenna at my house.
From what I’ve seen, it will occasionally adjust itself if the alignment is way off from where it wants to be pointing. I think Gen 3 is a better option for sure, but if it’s not available, plenty of people have been using Gen 2 on boats for years. Should work fine.
Noah….. understanding that the standard dish “mounting options put the Standard dish at about a 20 degree angle” how important will it be that the dish be placed in a “level” position in order to make a connection? Often RV sites are less than level so placing boards beneath the front wheels becomes necessary to properly level our motorhome. Is it safe to assume that minor leveling issues with the placement of the standard dish would not be a problem?
Minor variations of the ground won’t be an issue for the angle of the dish. The Standard has a wider field of view, and as long as it is aimed according to the app, you shouldn’t have any issues.
Noah….given that the antenna “mounting options put the Standard dish at about a 20 degree angle” how important will it be that I place the antenna on level ground? Often RV sites are less than level. At times leveling a motorhome requires placing boards under the front wheels in order to get “close” to level so that air leveling, using the airbags on the MH, is possible. Would I be correct to assume that minor level issues in placing the dish would not cause connection issues?
Correct. I would not worry about the angle of the ground unless the slope is severe, and generally, people wouldn’t be camping on that kind of slope anyway.
Thanks for this. I downloaded the Starlink app, but there is no box to click for the find a location feature. Did they make it so that you have to order first and go through the setup process before you can test a location? Also, we don’t want to put it on top of our house. Can I mount it on the ground? We have a fairly open field, and when I used the old app to test location a few years ago, that was the best spot. Would need about 100’ of cable to get it to where I need. What is the best way to set that up? And have you ever seen anyone build some sort of “cage” around it to keep dogs and wild animals out? Thanks!
Open the app, click Start Setup. Then click Skip Setup when it asks which dish you have. Confirm you want to Skip. In the menu, select Obstructions, then hit the button that says Scan For Obstructions. Select the dish you will be ordering.
You can mount it in the open if you wish. If ordering the Standard Actuated, Starlink actually makes a pole mount for this. With any other model, you can use the Starlink Pipe Adapter accessory to adapt the dish to any mast/pole you can find. Starlink sells up to 150′ of cable, so that should work for your application. You will need to bury the cable in conduit, it cannot be buried directly in the ground.
I haven’t seen cages or anything. My recommendation would be to install it on a tall enough pole or post that nothing can get to it from the ground.
I am trying to order the 3rd Gen (Standard). When I try to order Starlink Residential, and put in my address, it doesn’t give me the option of Standard or Standard Actuated. The picture shows the Standard Actuated. But, if I choose Roam, and put in my address, it gives me the option to choose Standard or Standard Actuated. How do I know that I will get the Standard 3rd Gen? Do I need to purchase the Roam, and pay the $150 for the first month, and then switch my plan to residential, the $120 plan, to ensure that I get the 3rd Gen?
Thanks!
Standard (Gen 3) isn’t yet available on Residential for all areas of the US. So you would need to order it on Roam and convert later.
Does the new dish have a regular ethernet cord or does it still have the non-standard one used in the Gen 2 actuated dish? I am planning to run it from 12v with 12-48v converter and POE injector without the starlink router. Wondering if I can use standard POE injector without any cable adapters or cord re-wiring.
It has standard cables, but the dish operates at 57V DC, not 48V like the previous generation.
Have you tried a standard Ethernet cable to see if they work? I haven’t seen anything on that yet in my internet searches. By the way, I attached my gen 3 system to a watt meter, I averaged 55 watts for my first week of using it in South East AZ. Full time RVer. I am happy with my purchase and glad I got the early adopter deal with 2 months free service. I am waiting on the improved pole adapter to come in a week or so to mount to my portable flag pole.
I haven’t tested it fully yet. I’m working on a post about aftermarket cables. There are two applications I can see. For an RV or other short run situation, an aftermarket cable completely replaces the Starlink cable, and is much shorter to prevent having excess cable. For home installations, people need longer runs. The longer Starlink cable is expensive compared to aftermarket options. And aftermarket offers much more lengths to choose from. But instead of completely replacing the Starlink cable, I’m going to suggest leaving the 50′ Starlink cable connected to the dish, and simply using a waterproof coupler to connect an aftermarket cable extension. That way, the Starlink moisture seal remains on the dish end, but you still get the benefit of using the cheaper aftermarket cable to extend the length. I’ll send out a newsletter update when the post is finished and I have all the details.
Just a question. Should I still use an external router on the new standard Gen 3?
In my opinion, only if you need more advanced networking features that the Starlink router doesn’t offer.
Noah
Can I order direct from you?
Live in Namibia, Africa, but work in different counties in Africa.
Currently we have to buy from Zambia.
No, I don’t sell Starlink and I am not affiliated with them in any way. This is just a fan run blog covering Starlink news and topics.
I think that without obvious optimization of network speed, lower power consumption and automatic alignment function must be more suitable for our needs. Especially for those RV customers, the increased power consumption is simply fatal.
Also, the fact that 12v DC conversions for Gen 3 are very limited. Gen 2 is still a great option for RV customers who are worried about every watt.
Thanks. Very helpful overview.
I assume they are planning on replacing the Gen 2 system completely. I hope they plan on making it a slow transition by offering both Gen 2 and Gen 3 at the same time. I am a full time installer in the field and I have many customers who get very confused by what they need. I got to play around with the Gen 3 for the first time today and I am happy with the built in ethernet ports and new cable design. The mounting bracket options are very limited and seem to be designed for low wind areas.
Update on my previous post, they are not planning on replacing Gen 2 systems with Gen 3. The inside scoop is they are trying to replace the Gen 1 High Performance antenna. They are still operating Gen 1 Beta systems so i don’t think there is any hazard of people getting disconnected with the upgrade. Starlink has a good track record of not screwing over their customers so far, however they are terrible at communicating to the public.
Thanks for the info!
Hi Eric,
I install in central Texas. The Gen 3 dish doesn’t appear to have much to secure it to a roof. The self actuated dish allows it to lock onto the satellite at whatever angle is needed and is secured to the mast. I never mount the base it comes with as 99% of the roofs we have are pitched, not flat, so getting the mast plumb with the stand is impossible. Other than learning the system by experience, I haven’t found any training materials. I have been using a 2” Directv mast with an adapter that allows the dish mast to snap in secure. What are your thoughts for mounting to insure the dish can lock on well to the desired satellite?
Suspect this might NOT be what you wanted to say: In my opinion, the Standard dish is the best option. Not only is it the latest and greatest technology from Starlink, it has the following advantages vs the Standard Actuated dish:
If the Gen 2 is being phased out, how does that affect those who already have Gen 2? I purchased mine just a couple months before the Gen 3 came out. What if I have problems with my Gen 2?
You will still be able to find spare parts for some time. But a couple years down the road, if your Gen 2 dish breaks, you will likely have to change to the next generation. This is what happens to current Gen 1 users. If they have a problem with equipment, Starlink doesn’t service Gen 1, so Starlink simply sends them an entire Gen 2/Gen 3 kit as a replacement.
Thanks for helpful info. A few more questions on Gen 2 vs 3, if you have the answers:
1. How long does it take to boot the Gen 3 dish (you say 15 minutes for Gen 2). I use it while roaming, and have it semi-permanently mounted, it may point in different directions each day, so I want to know how long the gen 3 would take to reboot each day:
a. Rather than having either dish mounted to be pointed 10-20 degrees to a certain compass heading, how would performance be degraded if I mount it parallel to earth’s surface at all times, so I don’t have to rotate it each day? Would restarting it take longer this way?
b. What if it’s aimed 10-20 degrees in a certain direction, and the mounting surface changes direction, as with an RV or boat?
2. Can either or both have the dish heater turned off for warm-weather use, and how much power would that save?
3. For use while in motion, I understand I’d need a more expensive disk and plan, with data caps that cost more for more data. But what if I use it on a slow-moving sailboat, moving about 6-7 mph, would regular ROAM service work then? Would it have to constantly be re-aimed as v=boat sails at that speed and changes directions, to receive service, or perhaps its just be a somewhat reduced Ookla speed?
1. I haven’t had a change to time it exactly yet, but I can say that the boot time is less, because the dish doesn’t have to move.
1a. In my experience, flat mounting, where it points vertical all the time, works just fine. I haven’t done it with the Gen 3, but I have a Gen 2 dish that has been pointed straight up for months without any issues. The Gen 3 should be even better, due to a larger field of view. There are enough satellites now that it shouldn’t be a problem to be aiming straight up at all times, assuming you don’t have obstructions. When the dish restarts, it just needs to establish an initial satellite connection, and then you are good to go. Unless the dish is aimed at trees, the orientation doesn’t really matter that much at the time you restart it. It won’t significantly affect boot times.
1b. It’s an electronic phased array antenna, so exact direction doesn’t matter that much. The signal is electronically steered. It has a 110 degree field of view, so it is able to see satellites in a large area of the sky even if the direction is always changing in motion. That said, obviously the Flat High Performance, which is the only dish meant for in-motion, would be ideal for this situation compared to Gen 3. But for stationary use, Gen 3 would be just fine.
2. Both can have the heat function turned off. But auto works just fine as well. It’s not really a dedicated heater. When the dish signal level reaches a certain low point, the dish will start transmitting with increased power output in order to maintain a better signal. This is automatic, which is why sometimes even in light rain and warm temps, the dish will indicate “heating”. It’s not really heating, it’s just using extra power to be able to get the signal through the rain/fog/snow/dense clouds/etc. When you turn heating off, the dish won’t use extra power, and performance might be reduced in some weather situations as a result. You save energy because the dish will rarely hit those high wattage numbers on the consumption range for that model.
3. Yes, below 10 mph, Starlink doesn’t consider that in-motion. It doesn’t need to be re-aimed, there are enough sats that it should be able to maintain a connection without being optimally aimed all the time.
So, I live off grid here in Copalita, Oaxaca, Mex, near the tourist area Huatulco, and have a Gen 2 standard actuator. This and all the people here I know rave about the performance, we have a cool group and help new people with answers. Should I/we have a problem, how does starlink help us, get us maybe new cables or whatever might go wrong, and/or warrant the equipment. Who might we contact as to be without net is a BIG problem. So far been the best since carnitas tacos!
Thanks, feel free to email me.
For any issues you reach out directly to Starlink, via the Starlink app or website. You can also log in to your account on Starlink.com to order replacement parts like the cable or router. Here is how to contact Starlink if you need to in the future: https://www.starlinkhardware.com/how-to-contact-starlink-customer-support/
If I mount the Gen 3 dish on the roof, will the dish ever need to be rotated? Should I mount with an antenna rotor?
In my opinion, no, you won’t need to adjust the dish after the initial aiming. But it is certainly possible that Starlink will update your area to want dishes to point slightly one way or the other. If getting back to the roof is not an option after installation, a rotor might be worth it just to be prepared down the road.
What is a rotor for Starlink
They make antenna rotors that are designed to work with TV and other types of antennas. You can use one of these rotors to turn the antenna. Someone asked about using them for Gen 3 as a way to get actuation for the Gen 3 dish, that doesn’t have built in motors. I don’t recommend it, as re-aiming is not really a concern.
I am using my Gen 2 system at home in pass through mode with a Netgear router connecting to my home Cat 6 network. The main reason for this is that I need to have a static IP address for a large format printer the is turned off most of the time. Does the Hen 3 router still support pass through mode? Does the Gen 3 router allow you to assign static IP addresses?
Yes, the Gen 3 router still supports bypass mode to allow you to use your own router. The Gen 3 router doesn’t have any advanced networking features, it’s the same as Gen 2 in that regard. You would need to keep using your Netgear if you need to be able to assign static IP’s.
I have a Gen 2 kit with one mesh router. Would it increase speed to buy a Gen 3 router to use with my Gen 2 dish?
If you use the Gen 3 router as your main system router (bypassing the main Gen 2 router), you would see better Wifi speed and range. Internet speed likely wouldn’t change.
If I buy the roam, can it be converted to a standard fixed plan at a later date?
Yes, here is a guide explaining how: https://www.starlinkhardware.com/how-to-switch-from-residential-to-rv/
Can either the standard or the standard actuated be mounted facing straight up (like on top of a van) and work reliably without being further pointed? I know there is another version that is designed for fixed mounting but I have gen 2.