
The next generation Starlink hardware is right around the corner. Starlink recently got FCC approval for two new dishes, and they are also giving some customers a chance to try out the new Gen 3 router. It’s backwards compatible with previous Starlink generations, so I bought one to test out.
Learn all the features and specs of the new Starlink Gen 3 router, and see how it manages to be more than 4 times faster than previous generations, in this review. I will also walk you through the installation and setup process for each generation of Starlink.
Is it a worthwhile upgrade for your old Gen 1 or Gen 2 router? Is Starlink Gen 3 going to be a big leap in performance? Let’s find out!
Table of Contents
Overview
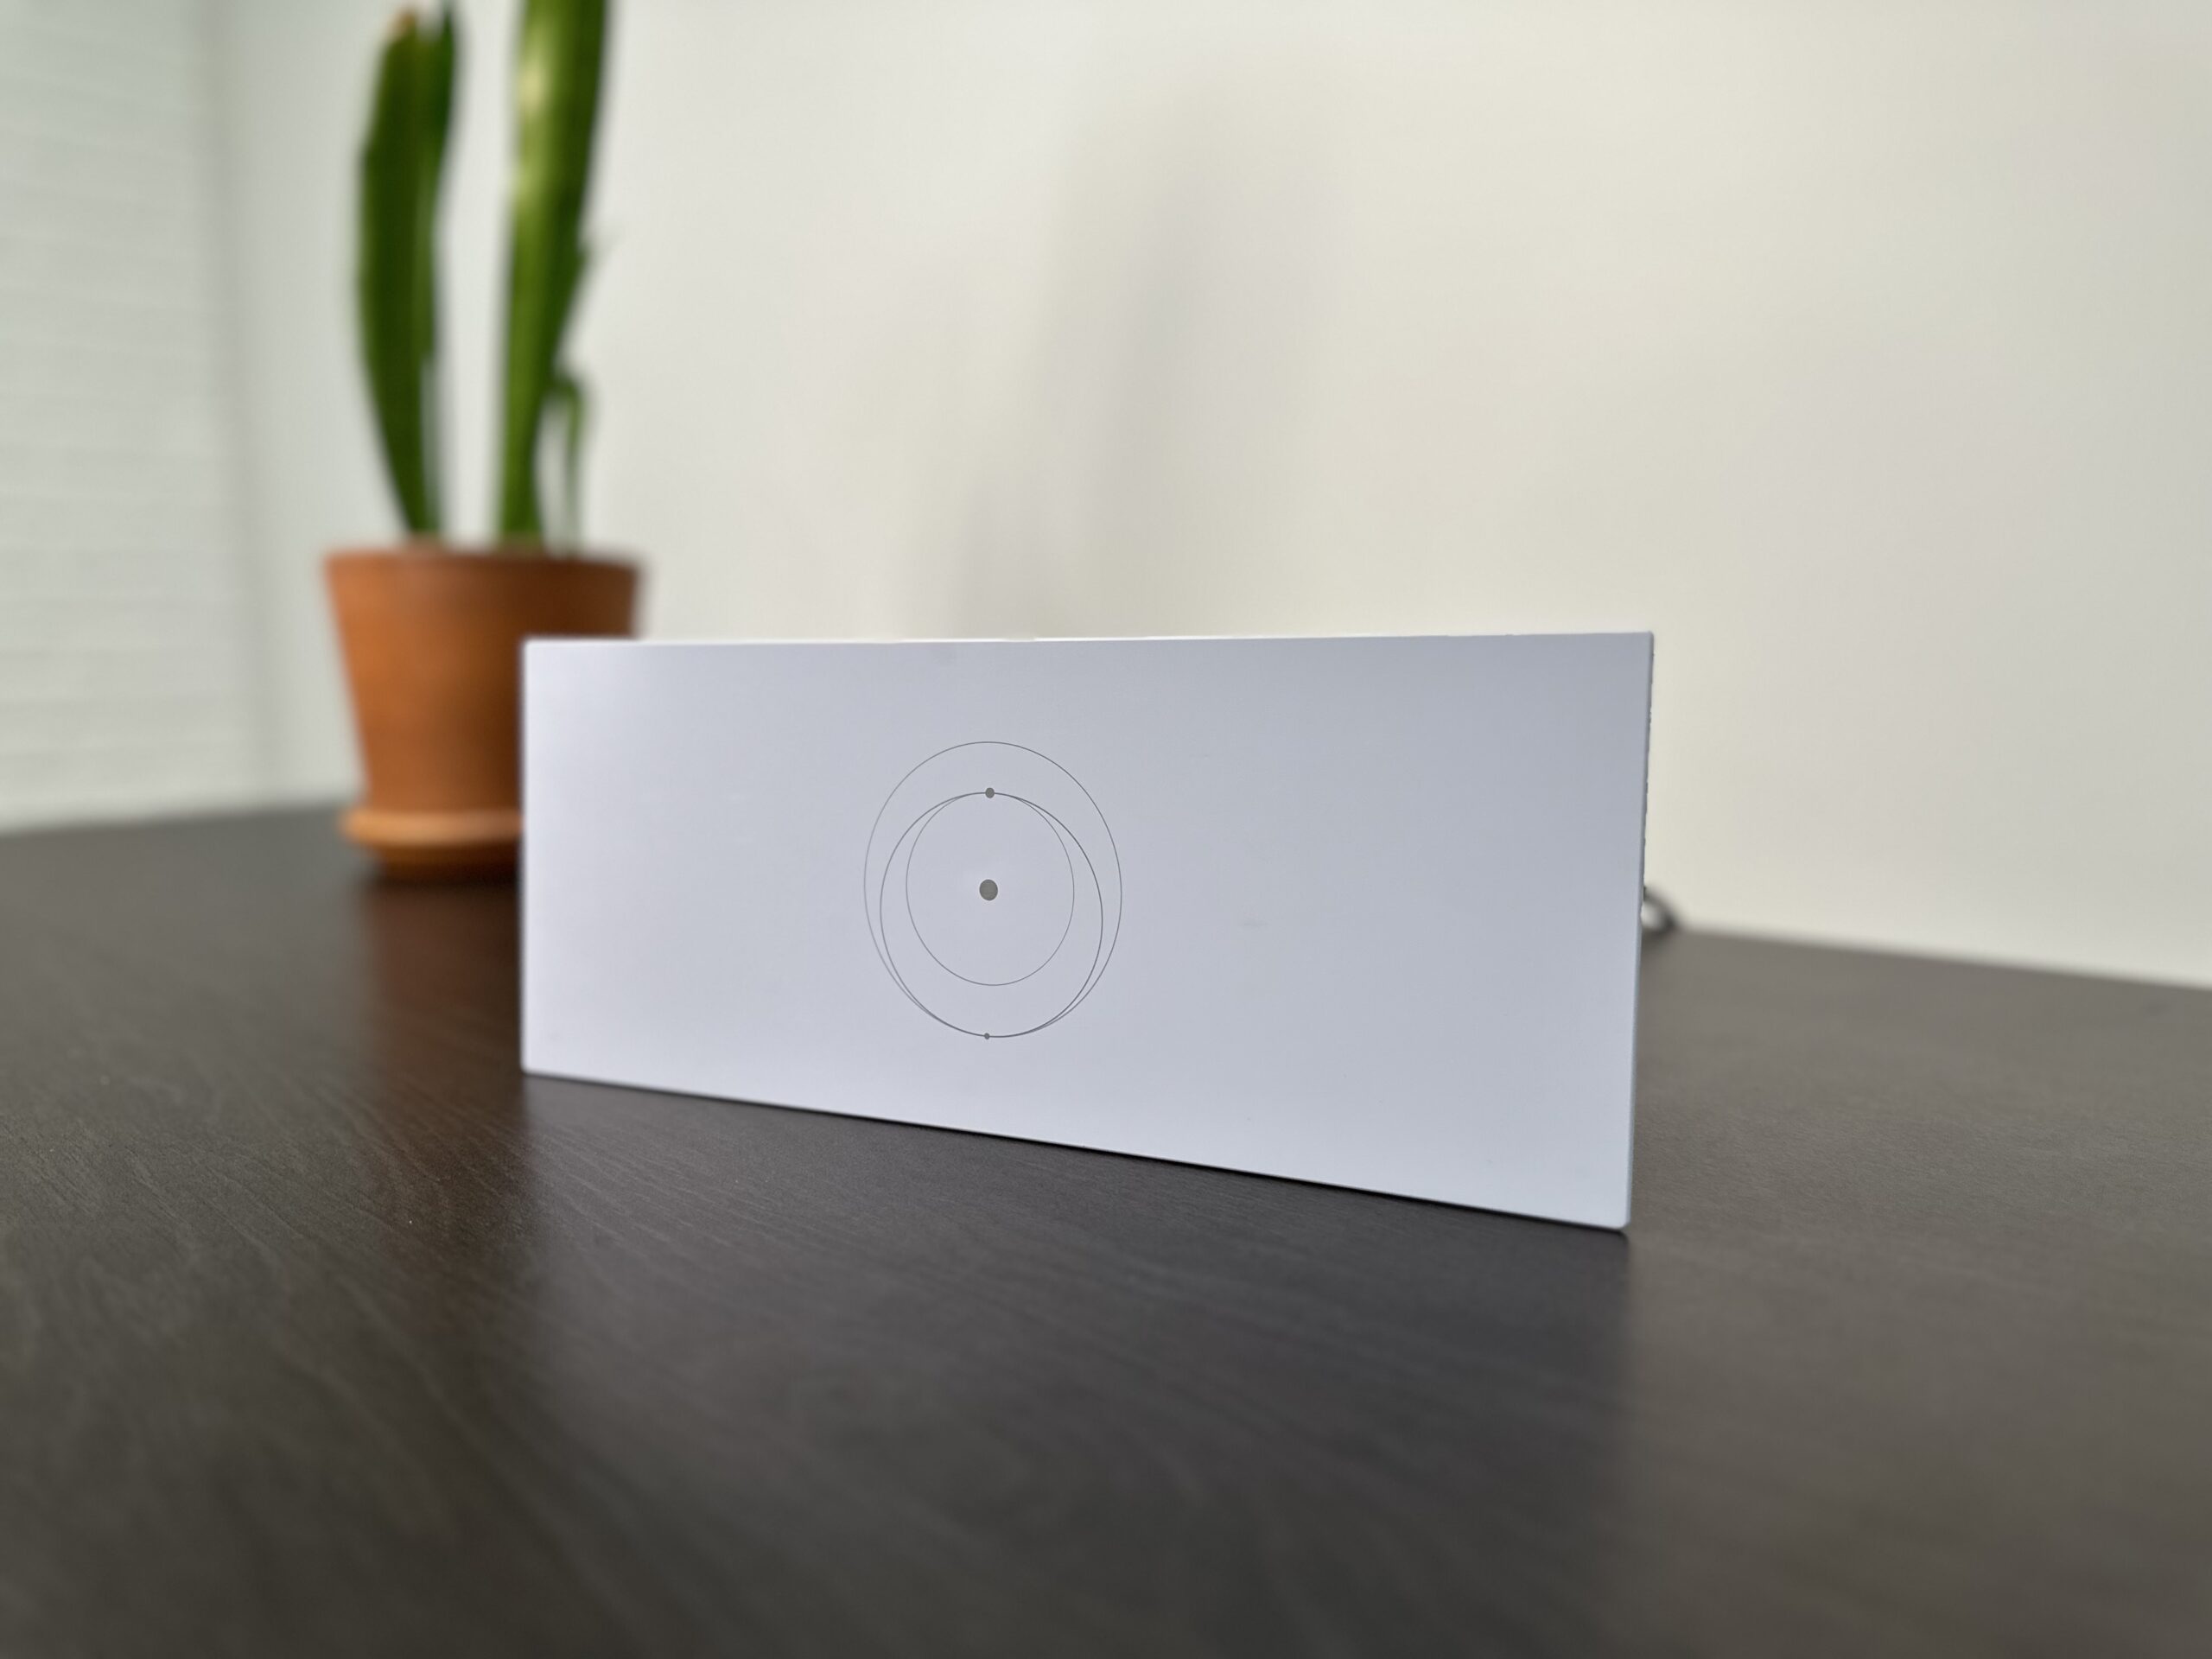
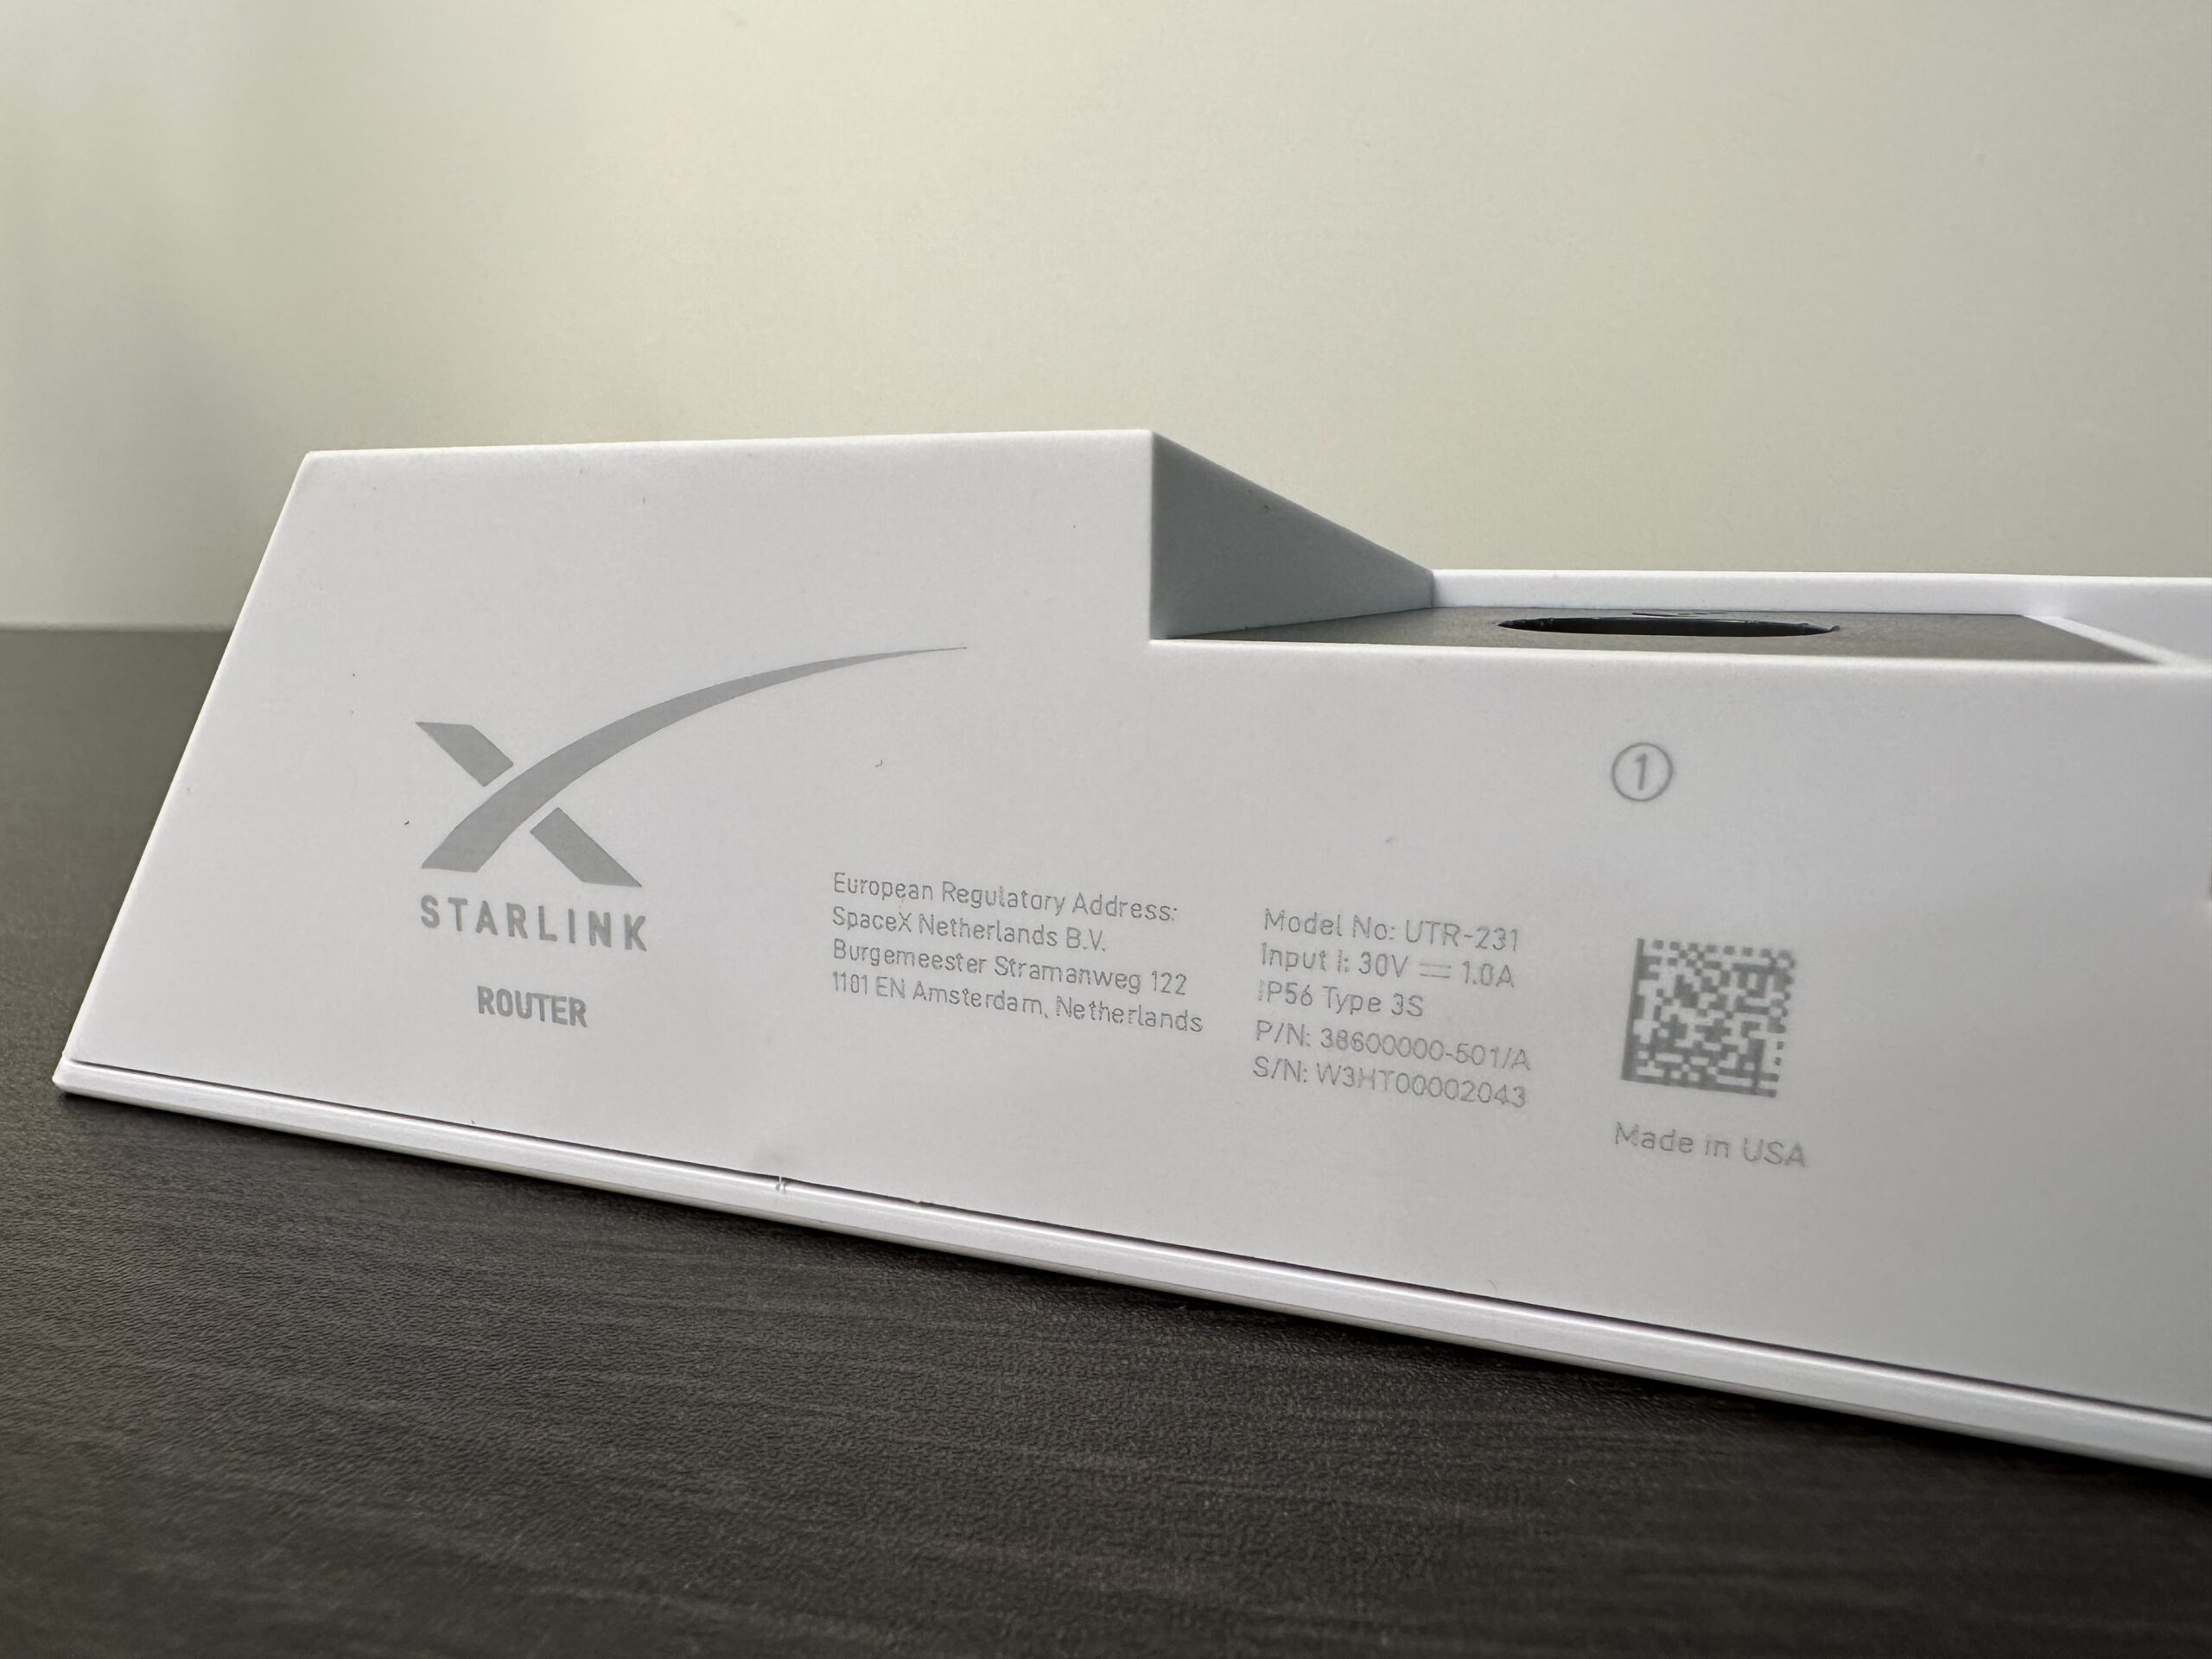
The Starlink Gen 3 router (UTR-231) is a complete redesign, with better technology, new styling, and more features compared to previous versions. The new Starlink dishes aren’t out yet, but the Gen 3 router is backwards compatible, so it’s available as an upgrade for Gen 1 and Gen 2 hardware.
Price and Availability
The Starlink Gen 3 router costs $200. It hasn’t been publicly released yet, so you won’t find it for sale in the Starlink shop just yet. Starlink is offering some customers the chance to test it out, but it’s by invitation only.
Features
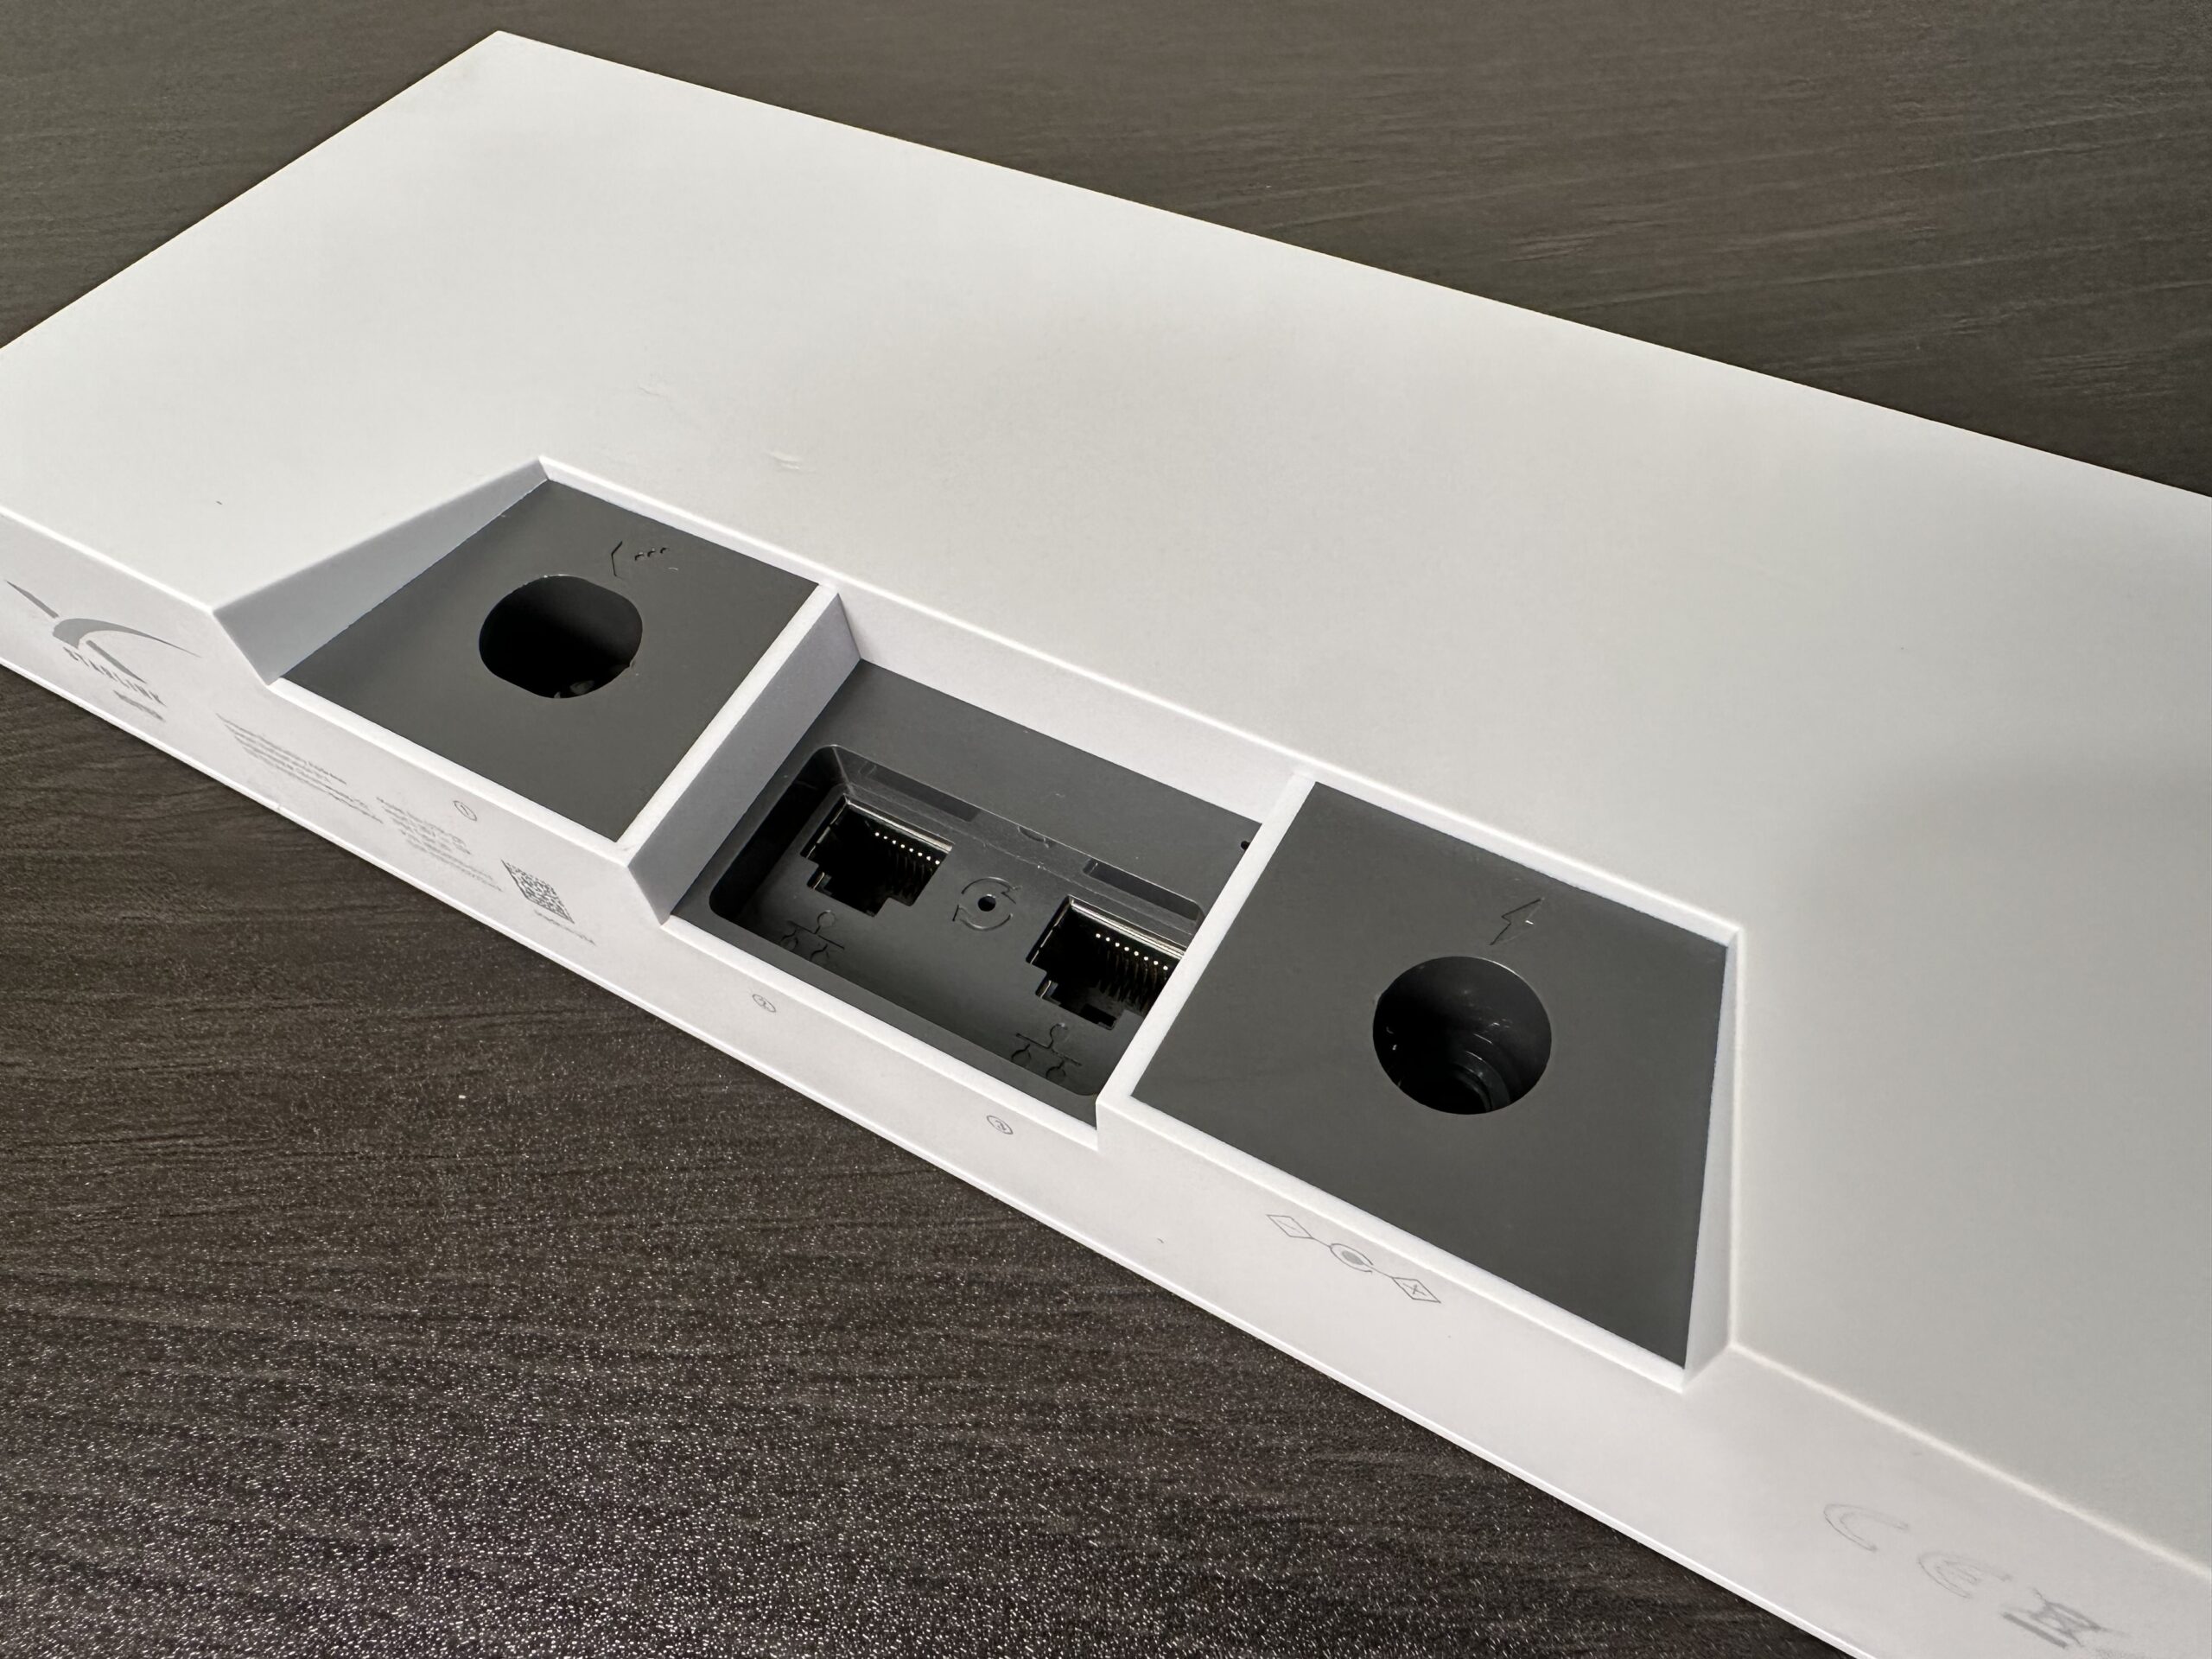
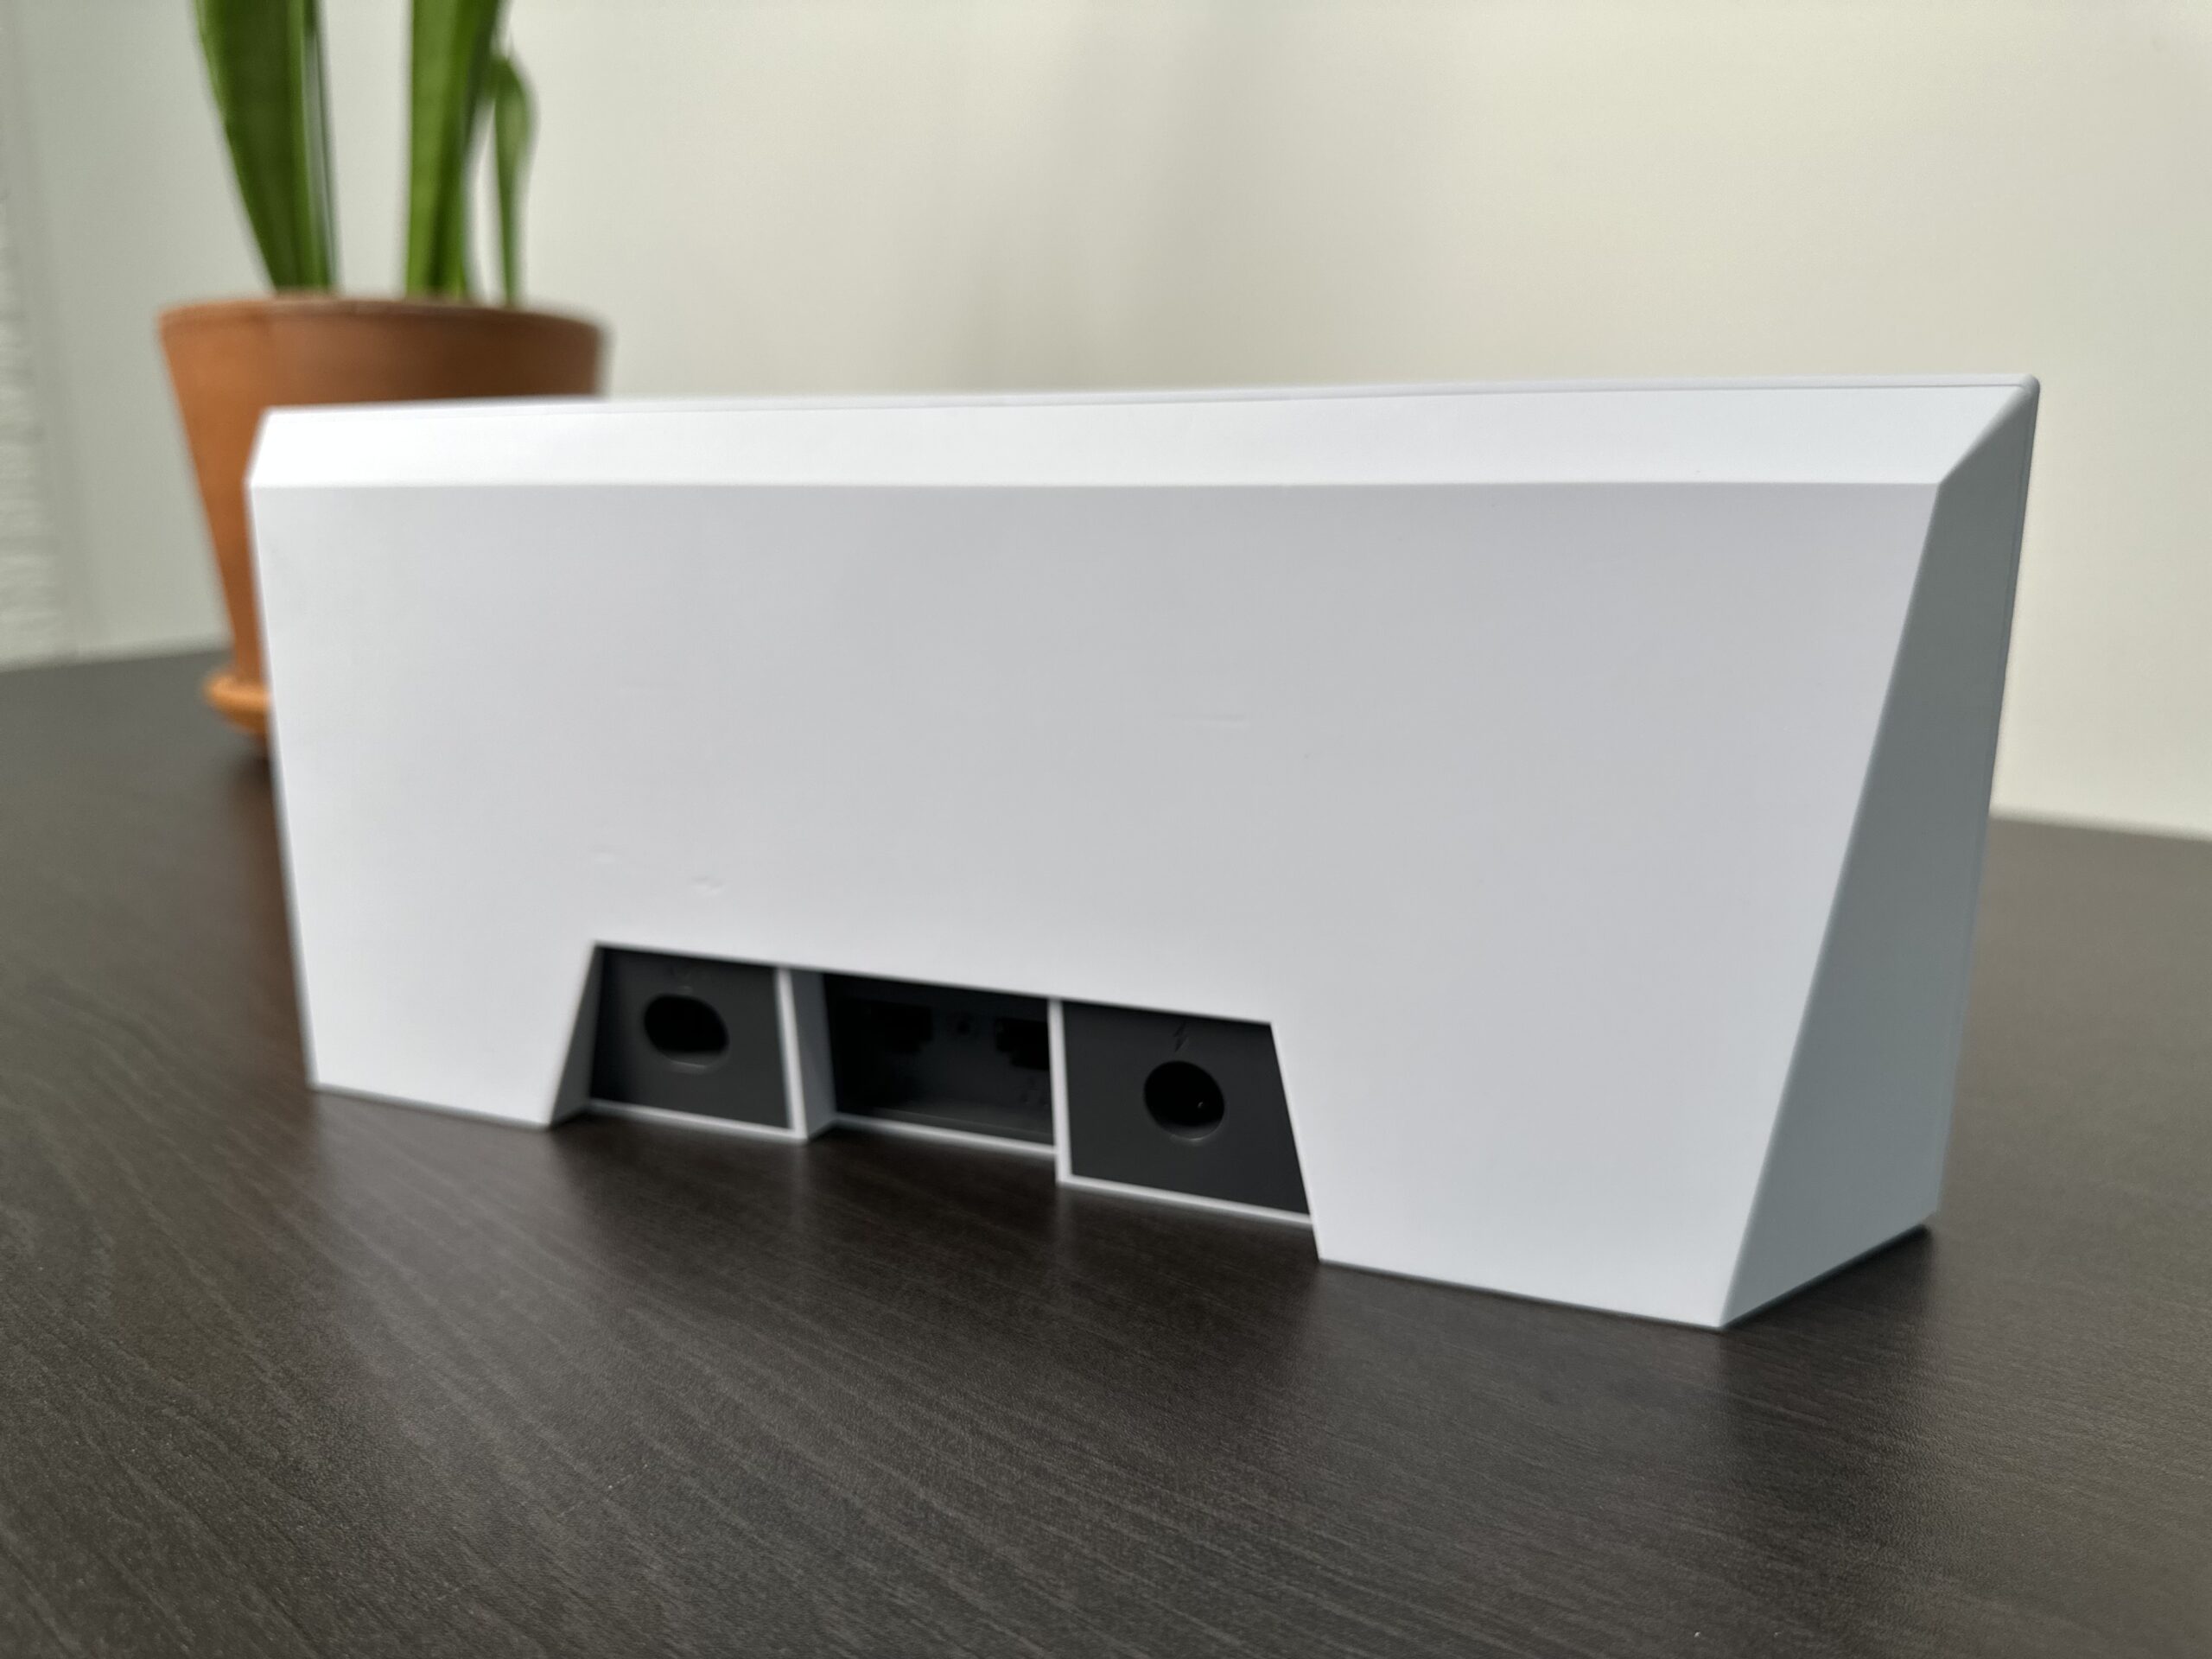
Ethernet ports are back! Starlink listened to customer feedback regarding the lack of LAN Ethernet ports on the Gen 2 router. The Gen 3 router features two Ethernet ports so that you can easily connect your devices.
They also added an LED status indicator to the front of the router. With Gen 2, there was a LED power indicator on the bottom of the router, which wasn’t very useful. On the Gen 3 router, the LED can change colors, go solid, or flash to indicate the status of the Starlink system.
Like I mentioned earlier, Starlink made the Gen 3 router backwards compatible with all previous dish versions. So, whether you own the current rectangular dish or the original round dish, you’ll be able to upgrade if you want. If you are using Starlink mesh, the Gen 3 routers are compatible with Gen 2 mesh nodes.
Specs
By far, the biggest upgrade over the Gen 2 router is the Wi-Fi 6 technology. Wi-Fi 6 offers much better speed and range compared to the Wi-Fi 5 tech in the previous routers. The Gen 3 router also features a tri-band radio for better mesh performance. Gen 1 routers weren’t mesh compatible at all, and Gen 2 just had a dual-band radio.
Here are some additional specs:
- Dimensions: 2.4” x 11.8” x 4.7” (55 x 300 x 120 mm)
- Weight: 2.2 lbs (1 kg)
- Wi-Fi: Wi-Fi 6, 802.11 a/b/g/n/ac/ax
- Device Limit: Connect up to 235 devices at one time
- Security: WPA2
- Radio: Tri-Band 4 x 4 MU-MIMO
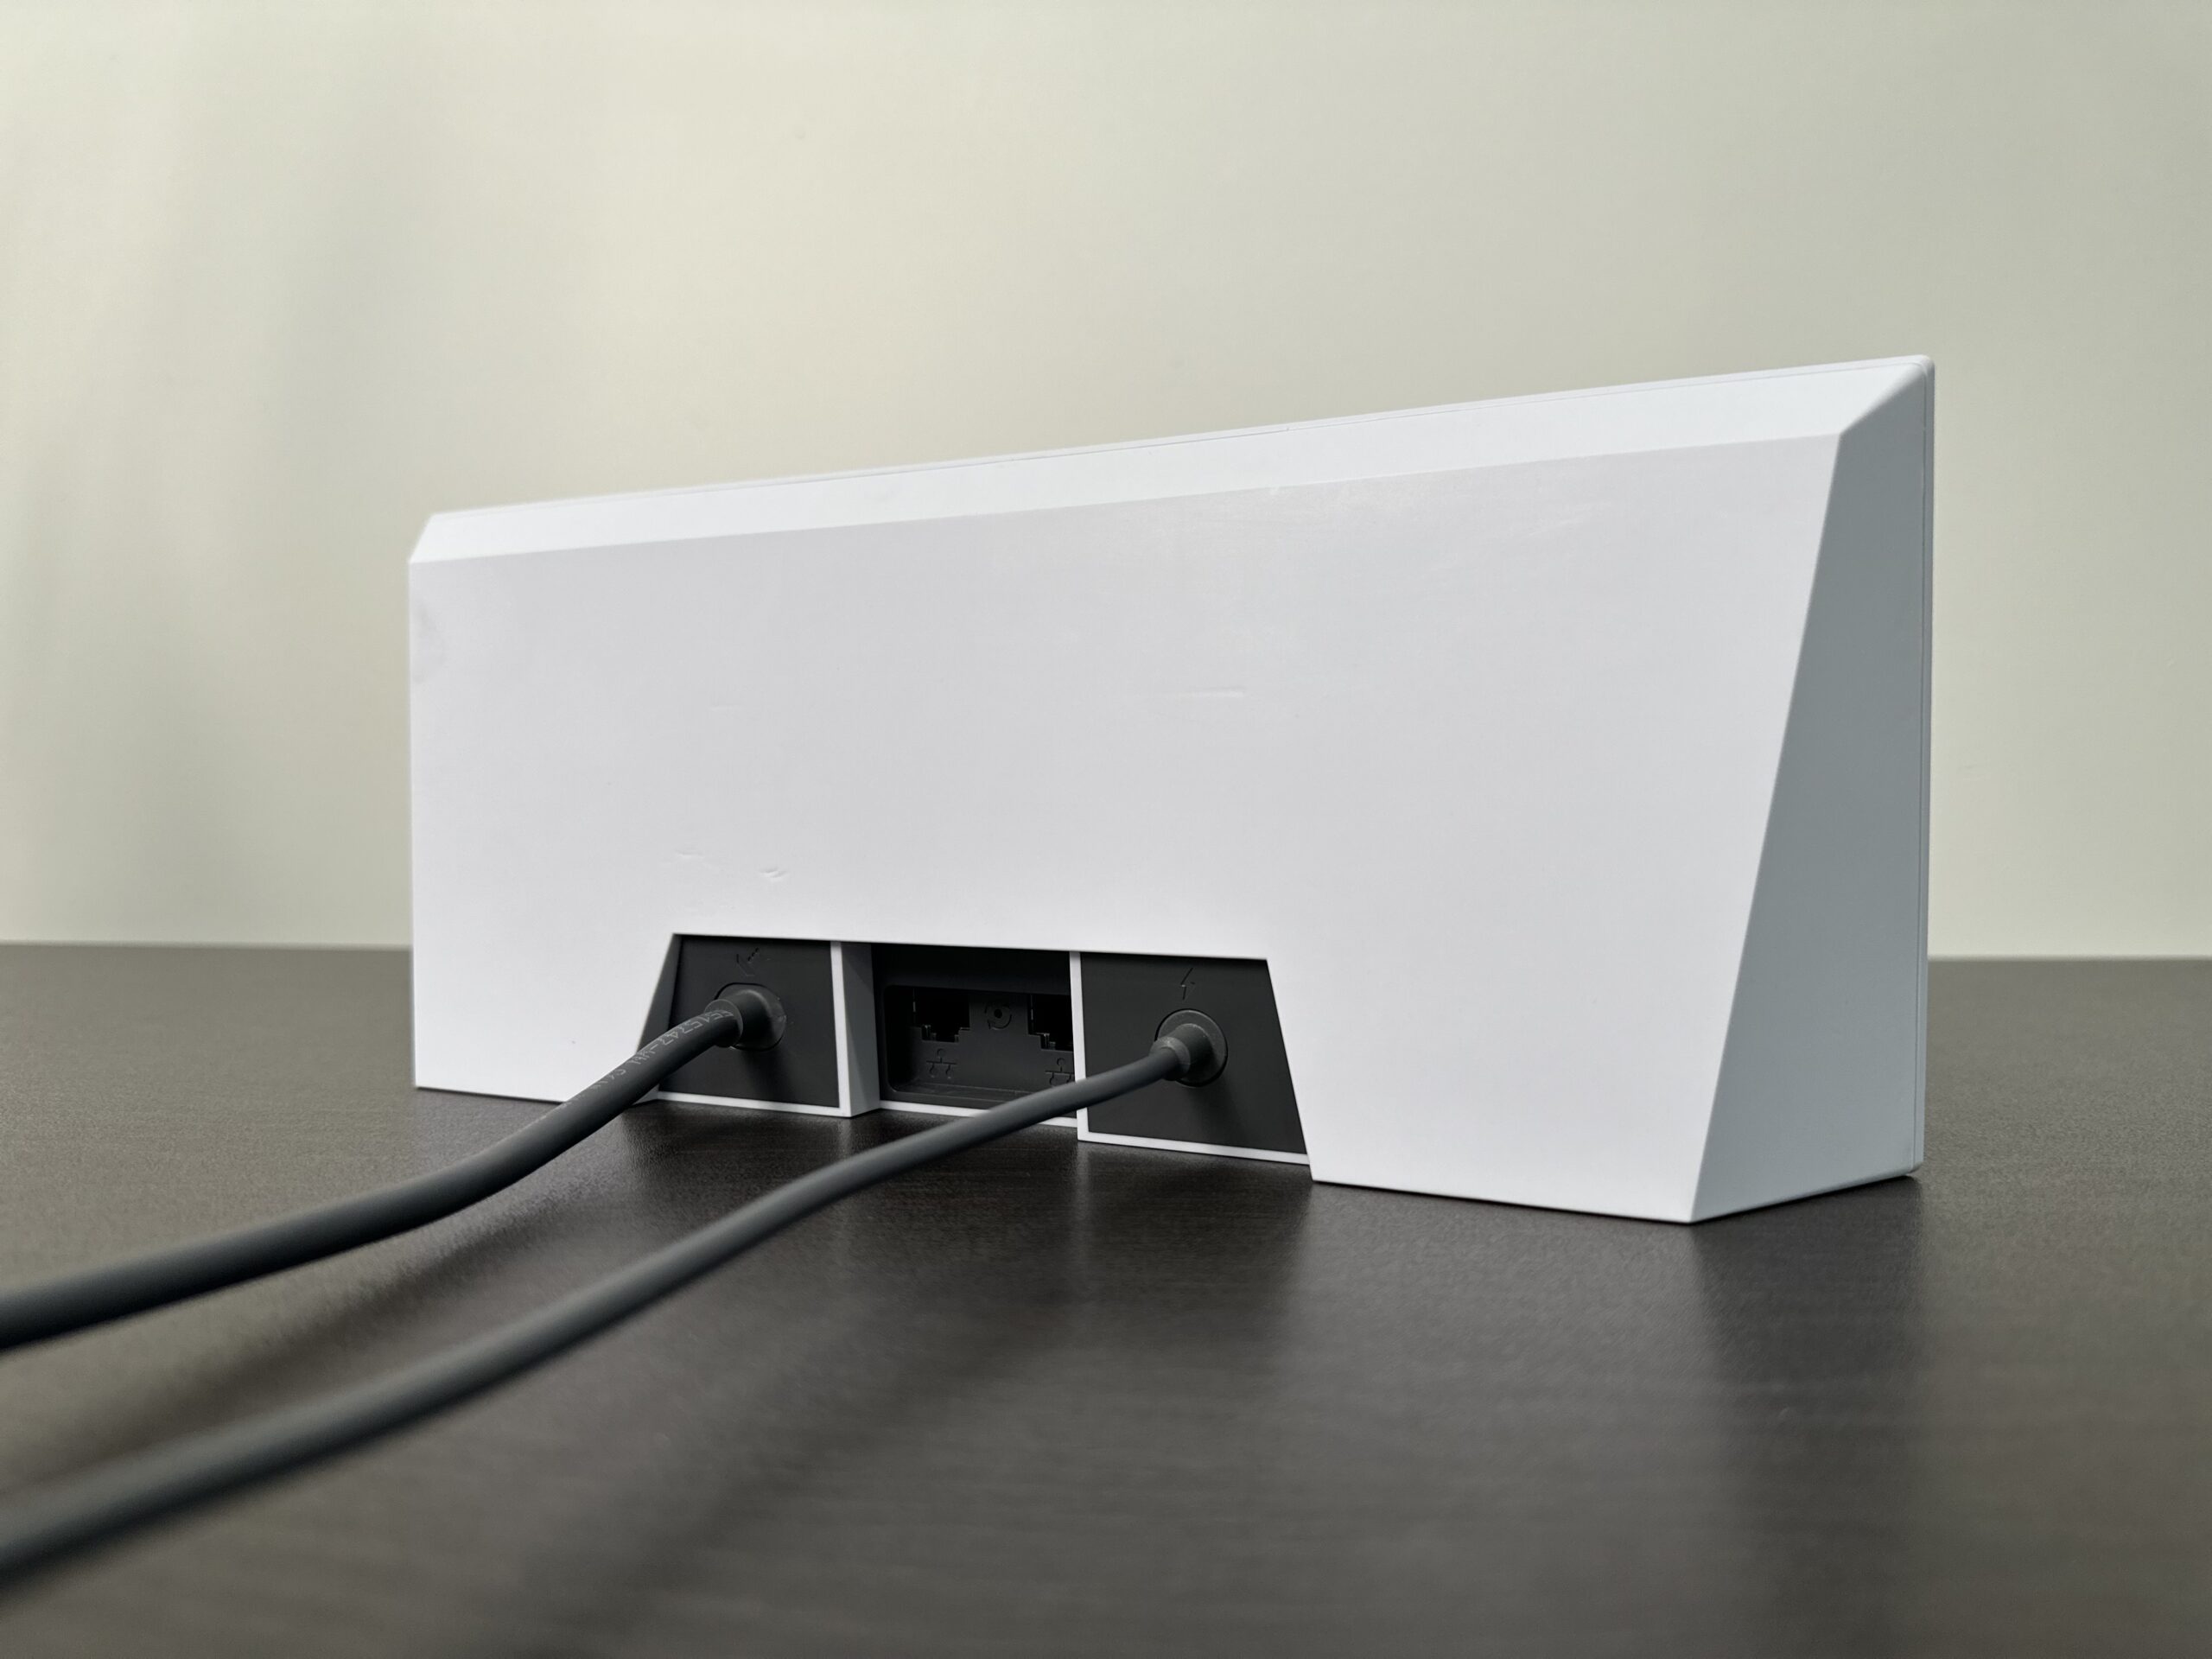
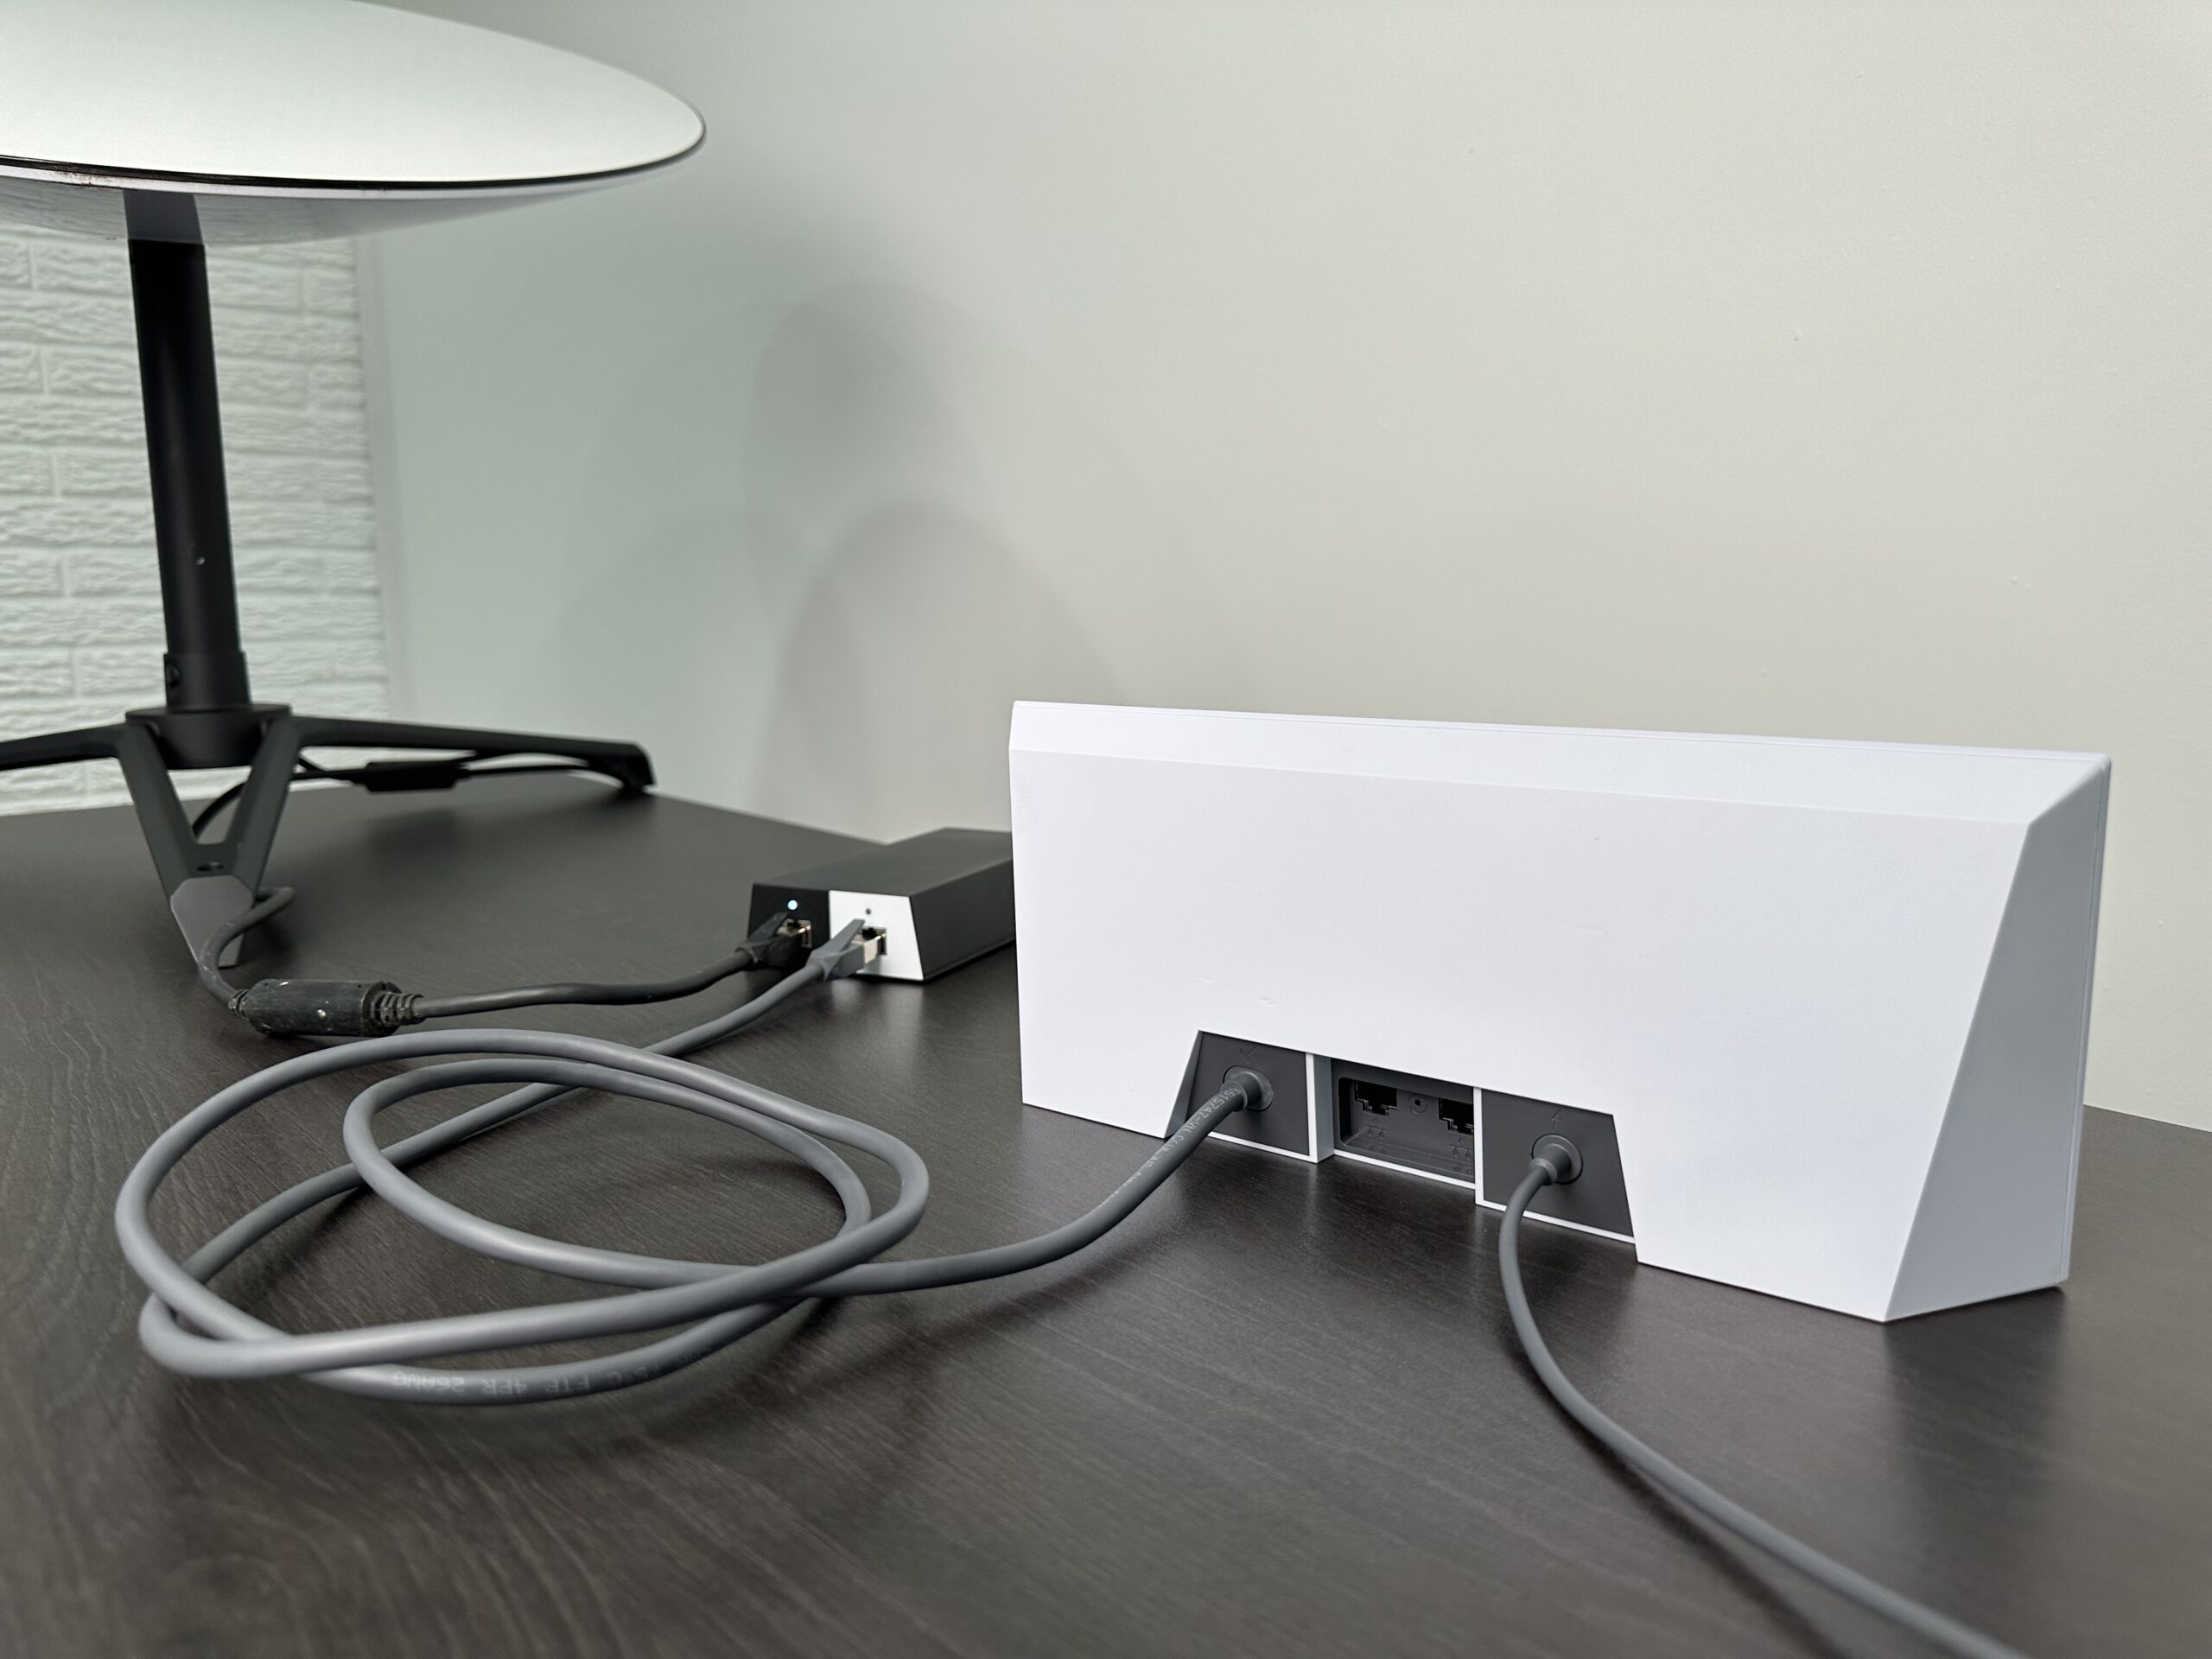
- Input Ports: Starlink dish connection, power adapter
- Output Ports: 2 x LAN Ethernet ports
- Operating Temperature: -22°F to 122°F (-30°C to 50°C)
- IP Rating: IP56 (Water Resistant), designed for indoor use only
Setup Guide
The Starlink Gen 3 router works as the main router for any kind of Starlink dish. Here are the setup and installation instructions for each version:
Gen 1 Round Dish
For the Gen 1 hardware (round dish), the Gen 3 router will completely replace the old Gen 1 router. Here is how you plug everything in:
- Plug in the Gen 3 router power cord. The LED indicator on the lower left of the router should light up and flash white.
- Unplug the Gen 1 router from the Gen 1 power supply brick.
- Use the included Starlink router cable to connect the Gen 3 router to the white side of the Gen 1 power supply brick.
- On your phone, connect to the STARLINK Wi-Fi network. Open the Starlink app to finish the setup by choosing a new network name and password.
- Connect to your new Wi-Fi network using the password you set in step 4. Open the Starlink app and check to make sure you are Online.
The LED indicator on the Gen 3 router will turn solid white when you are connected to the internet. The LED will turn off automatically after an hour. If it ever turns red, that indicates an issue with your connection.
Gen 2 Standard Dish
Using the Gen 3 router with the Gen 2 Standard dish is a little more complicated. Since the Gen 2 router also serves as the power supply for the dish, you can’t get rid of it completely. Instead, you’ll need to connect the Gen 3 router using the Starlink Ethernet Adapter accessory, and then put the Gen 2 router in bypass mode:
- Plug in the power supply cable for the Gen 3 router. An LED indicator on the lower left of the router should start flashing white.
- Install the Starlink Ethernet Adapter on your Gen 2 router. See this guide if you need additional details.
- Plug the Gen 3 router into the Ethernet Adapter using the included cable. The LED indicator should change to solid white.
- While still connected to your existing Gen 2 Wi-Fi network, open the Starlink app. Enable bypass mode by going into the router settings. Here is a tutorial if you need more help.
- Connect to the STARLINK Wi-Fi network. Open the Starlink app and complete the Wi-Fi setup by setting a name and password.
- Connect to your new Wi-Fi network by entering the password you set in step 5. Check that you are Online in the Starlink app.
The LED on the Gen 3 router should turn solid white. It will turn off automatically after an hour. If you see a red indicator light, that means there is an issue with your connection.
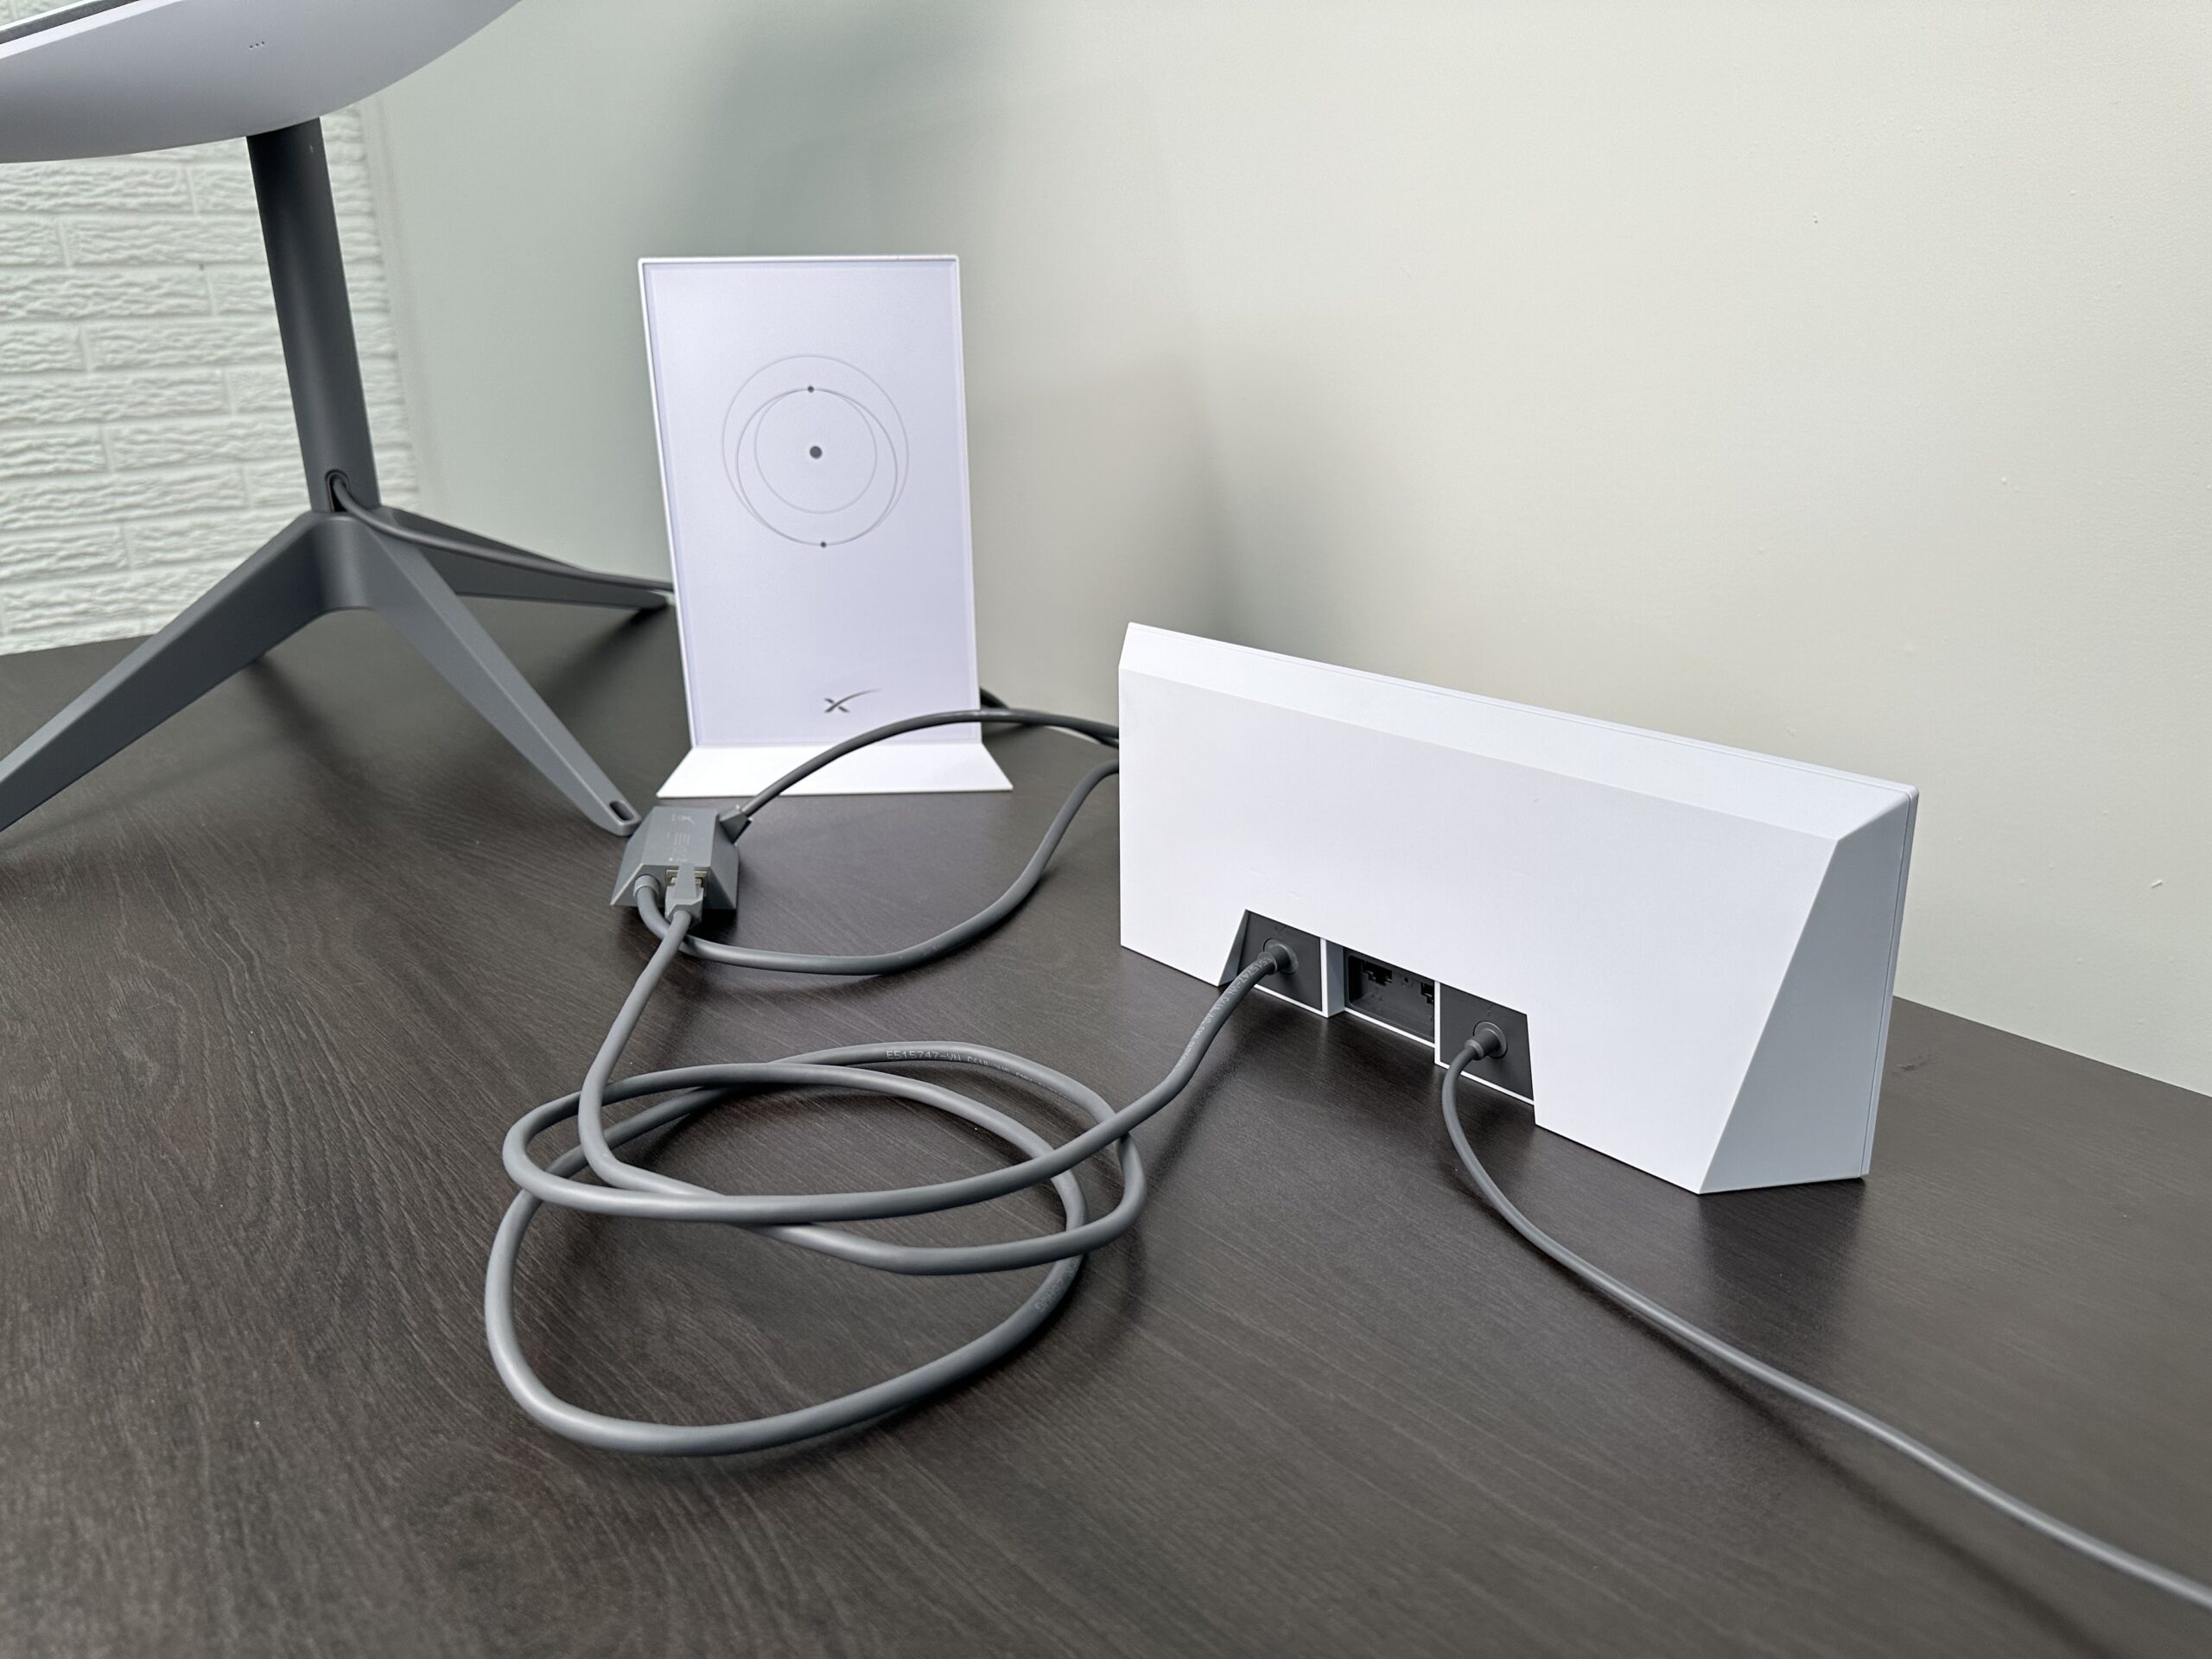
Gen 2 High Performance Dish
Using the Gen 3 router with the High Performance dish (or Flat High Performance dish) is pretty easy. Here are the steps to hook everything up:
- Plug in the Gen 3 router power cord. The LED indicator on the lower left of the router should light up and flash white.
- Unplug the Gen 2 router from the High Performance power supply brick. If you were using the Ethernet Adapter, it can be removed as well.
- Use the included Starlink High Performance router cable to connect the Gen 3 router to the High Performance power brick.
- On your phone, connect to the STARLINK Wi-Fi network. Open the Starlink app to finish the setup by choosing a new network name and password.
- Connect to your new Wi-Fi network using the password you set in step 4. Open the Starlink app and check to make sure you are Online.
The LED indicator on the Gen 3 router will turn solid white when you are connected to the internet. The LED will turn off automatically after an hour. If it ever turns red, that indicates an issue with your connection.
Using the Gen 3 Router as a Mesh Node
The Gen 3 Starlink router can also serve as a mesh node. You can add the Gen 3 router to your existing Gen 2 mesh network, or create a Gen 3 mesh network by purchasing multiple Gen 3 routers. The process for adding the Gen 3 router as a mesh node is the same as with Gen 2. Check out this tutorial for more information.
The Gen 1 router is not mesh compatible. If you have a Gen 1 system, you can purchase additional Gen 2 or Gen 3 routers to use as mesh nodes, but you can’t use the old Gen 1 router.
Review
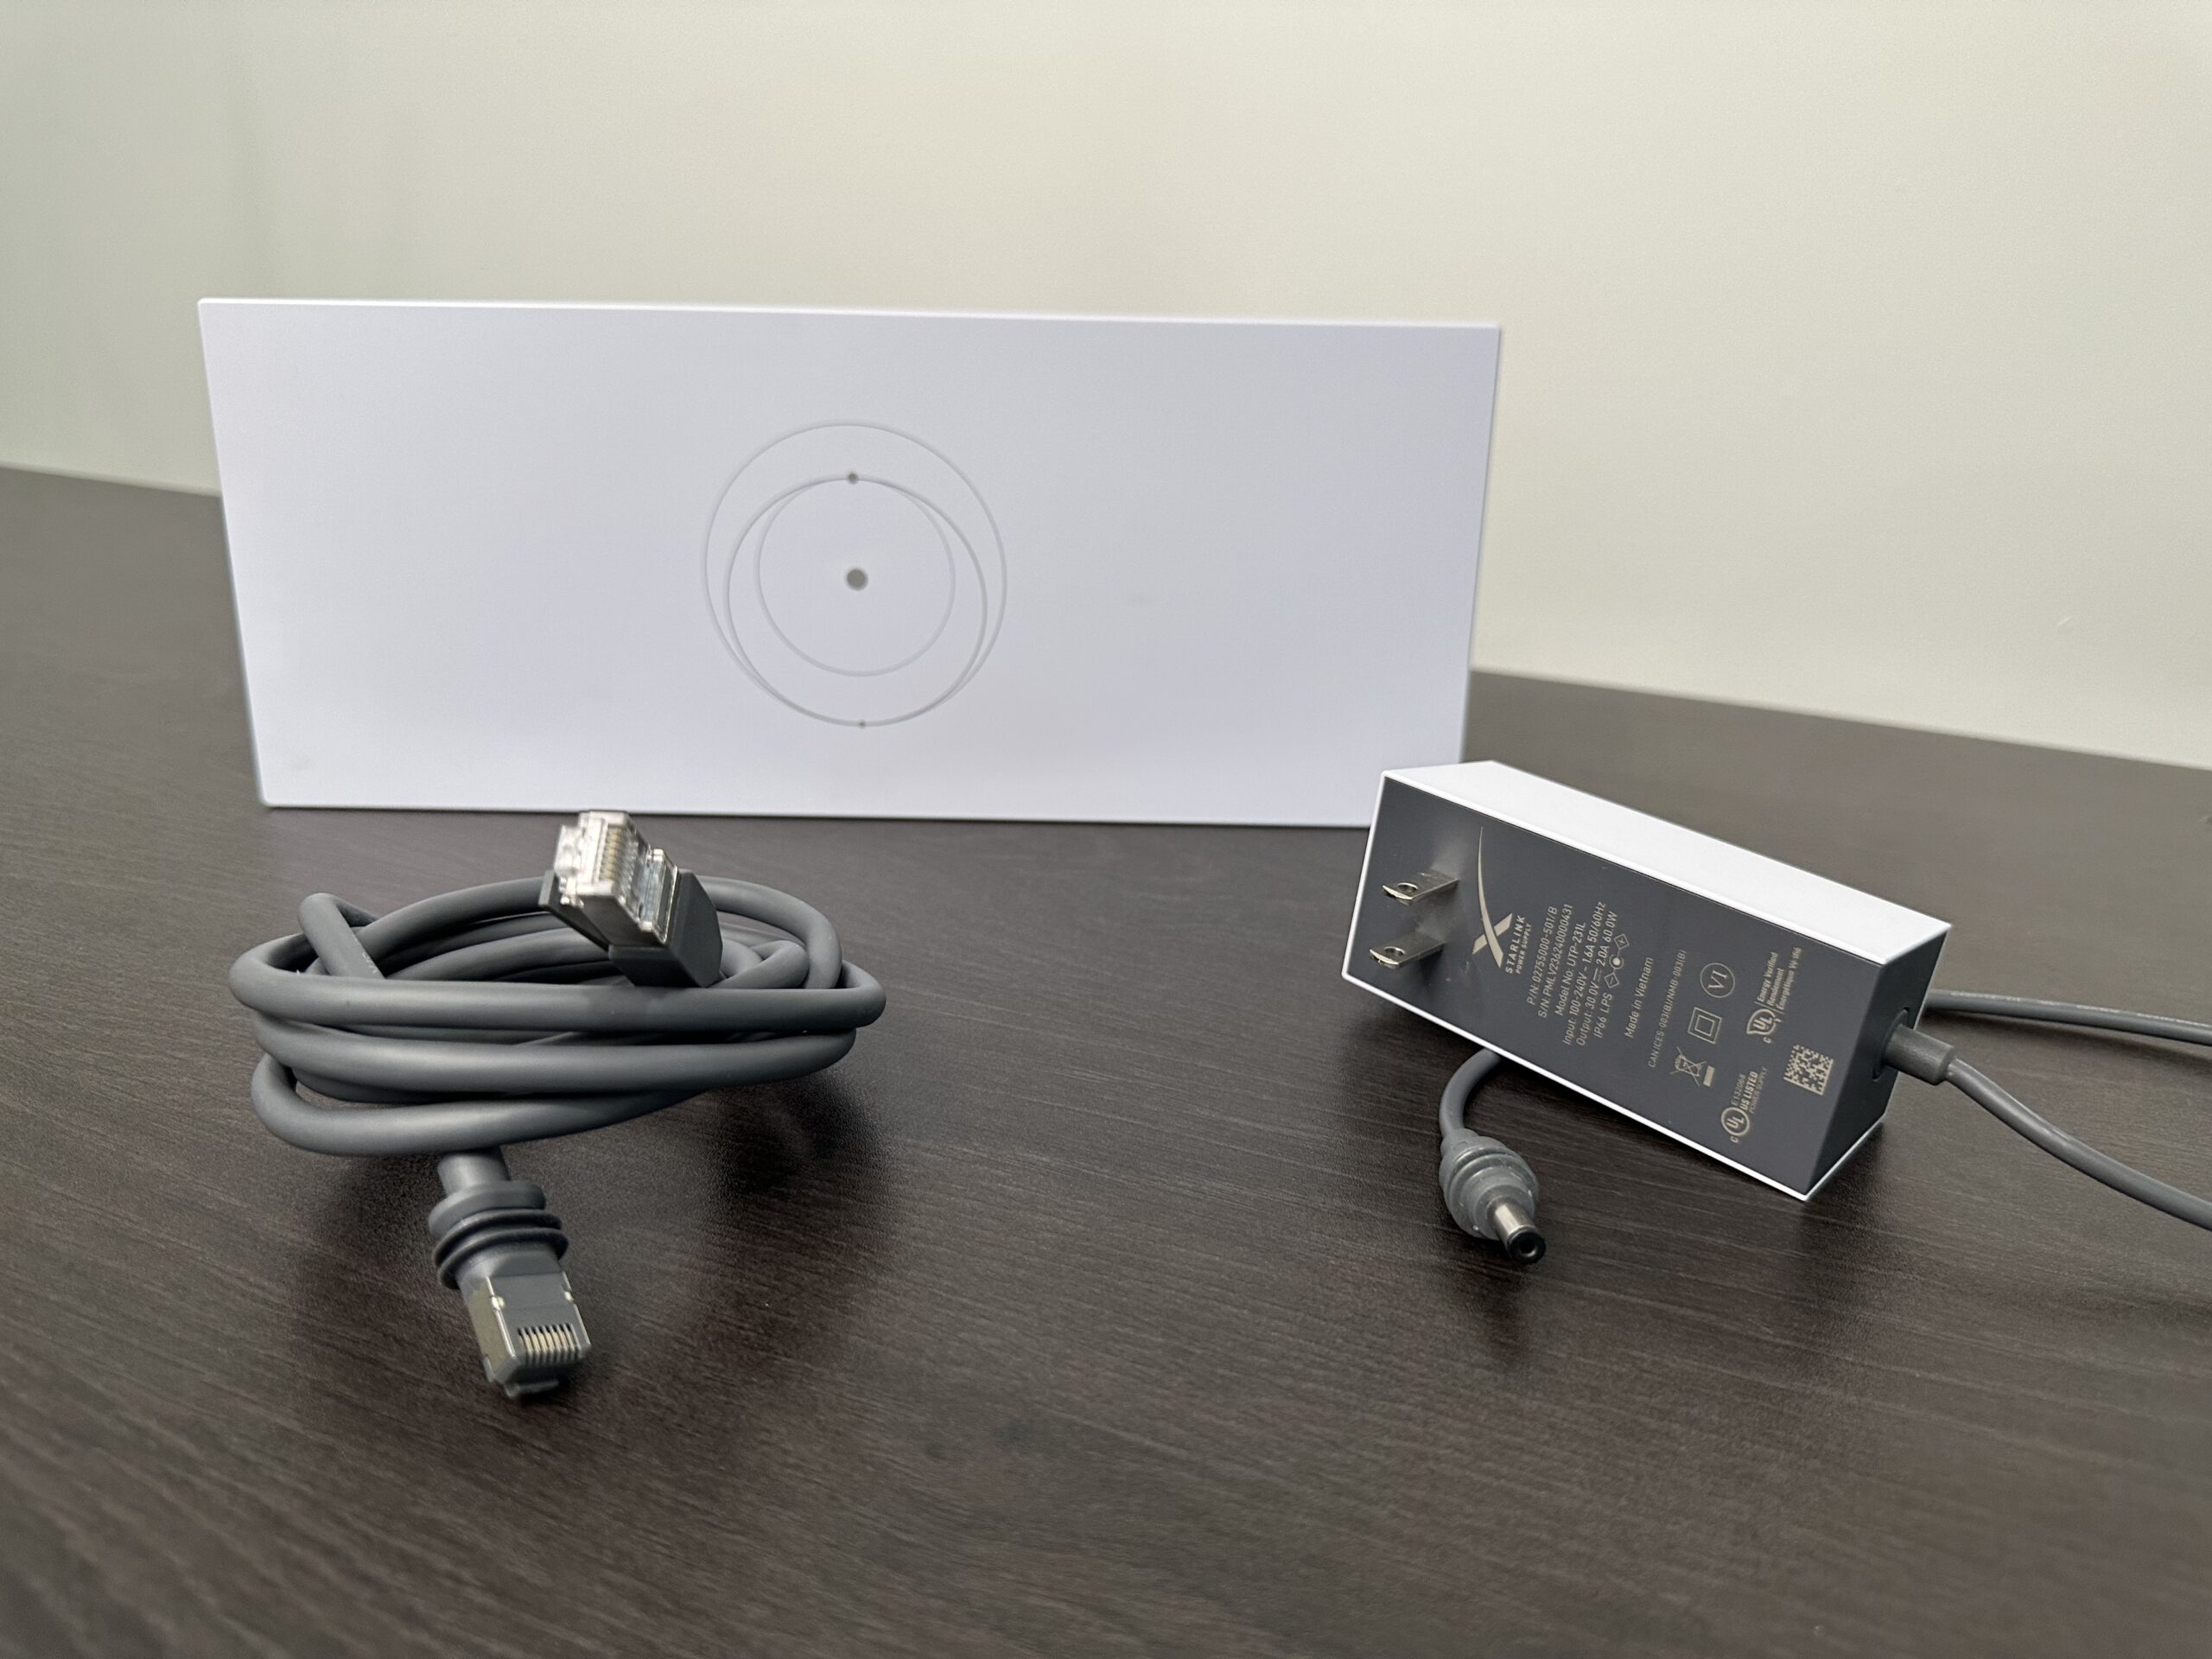
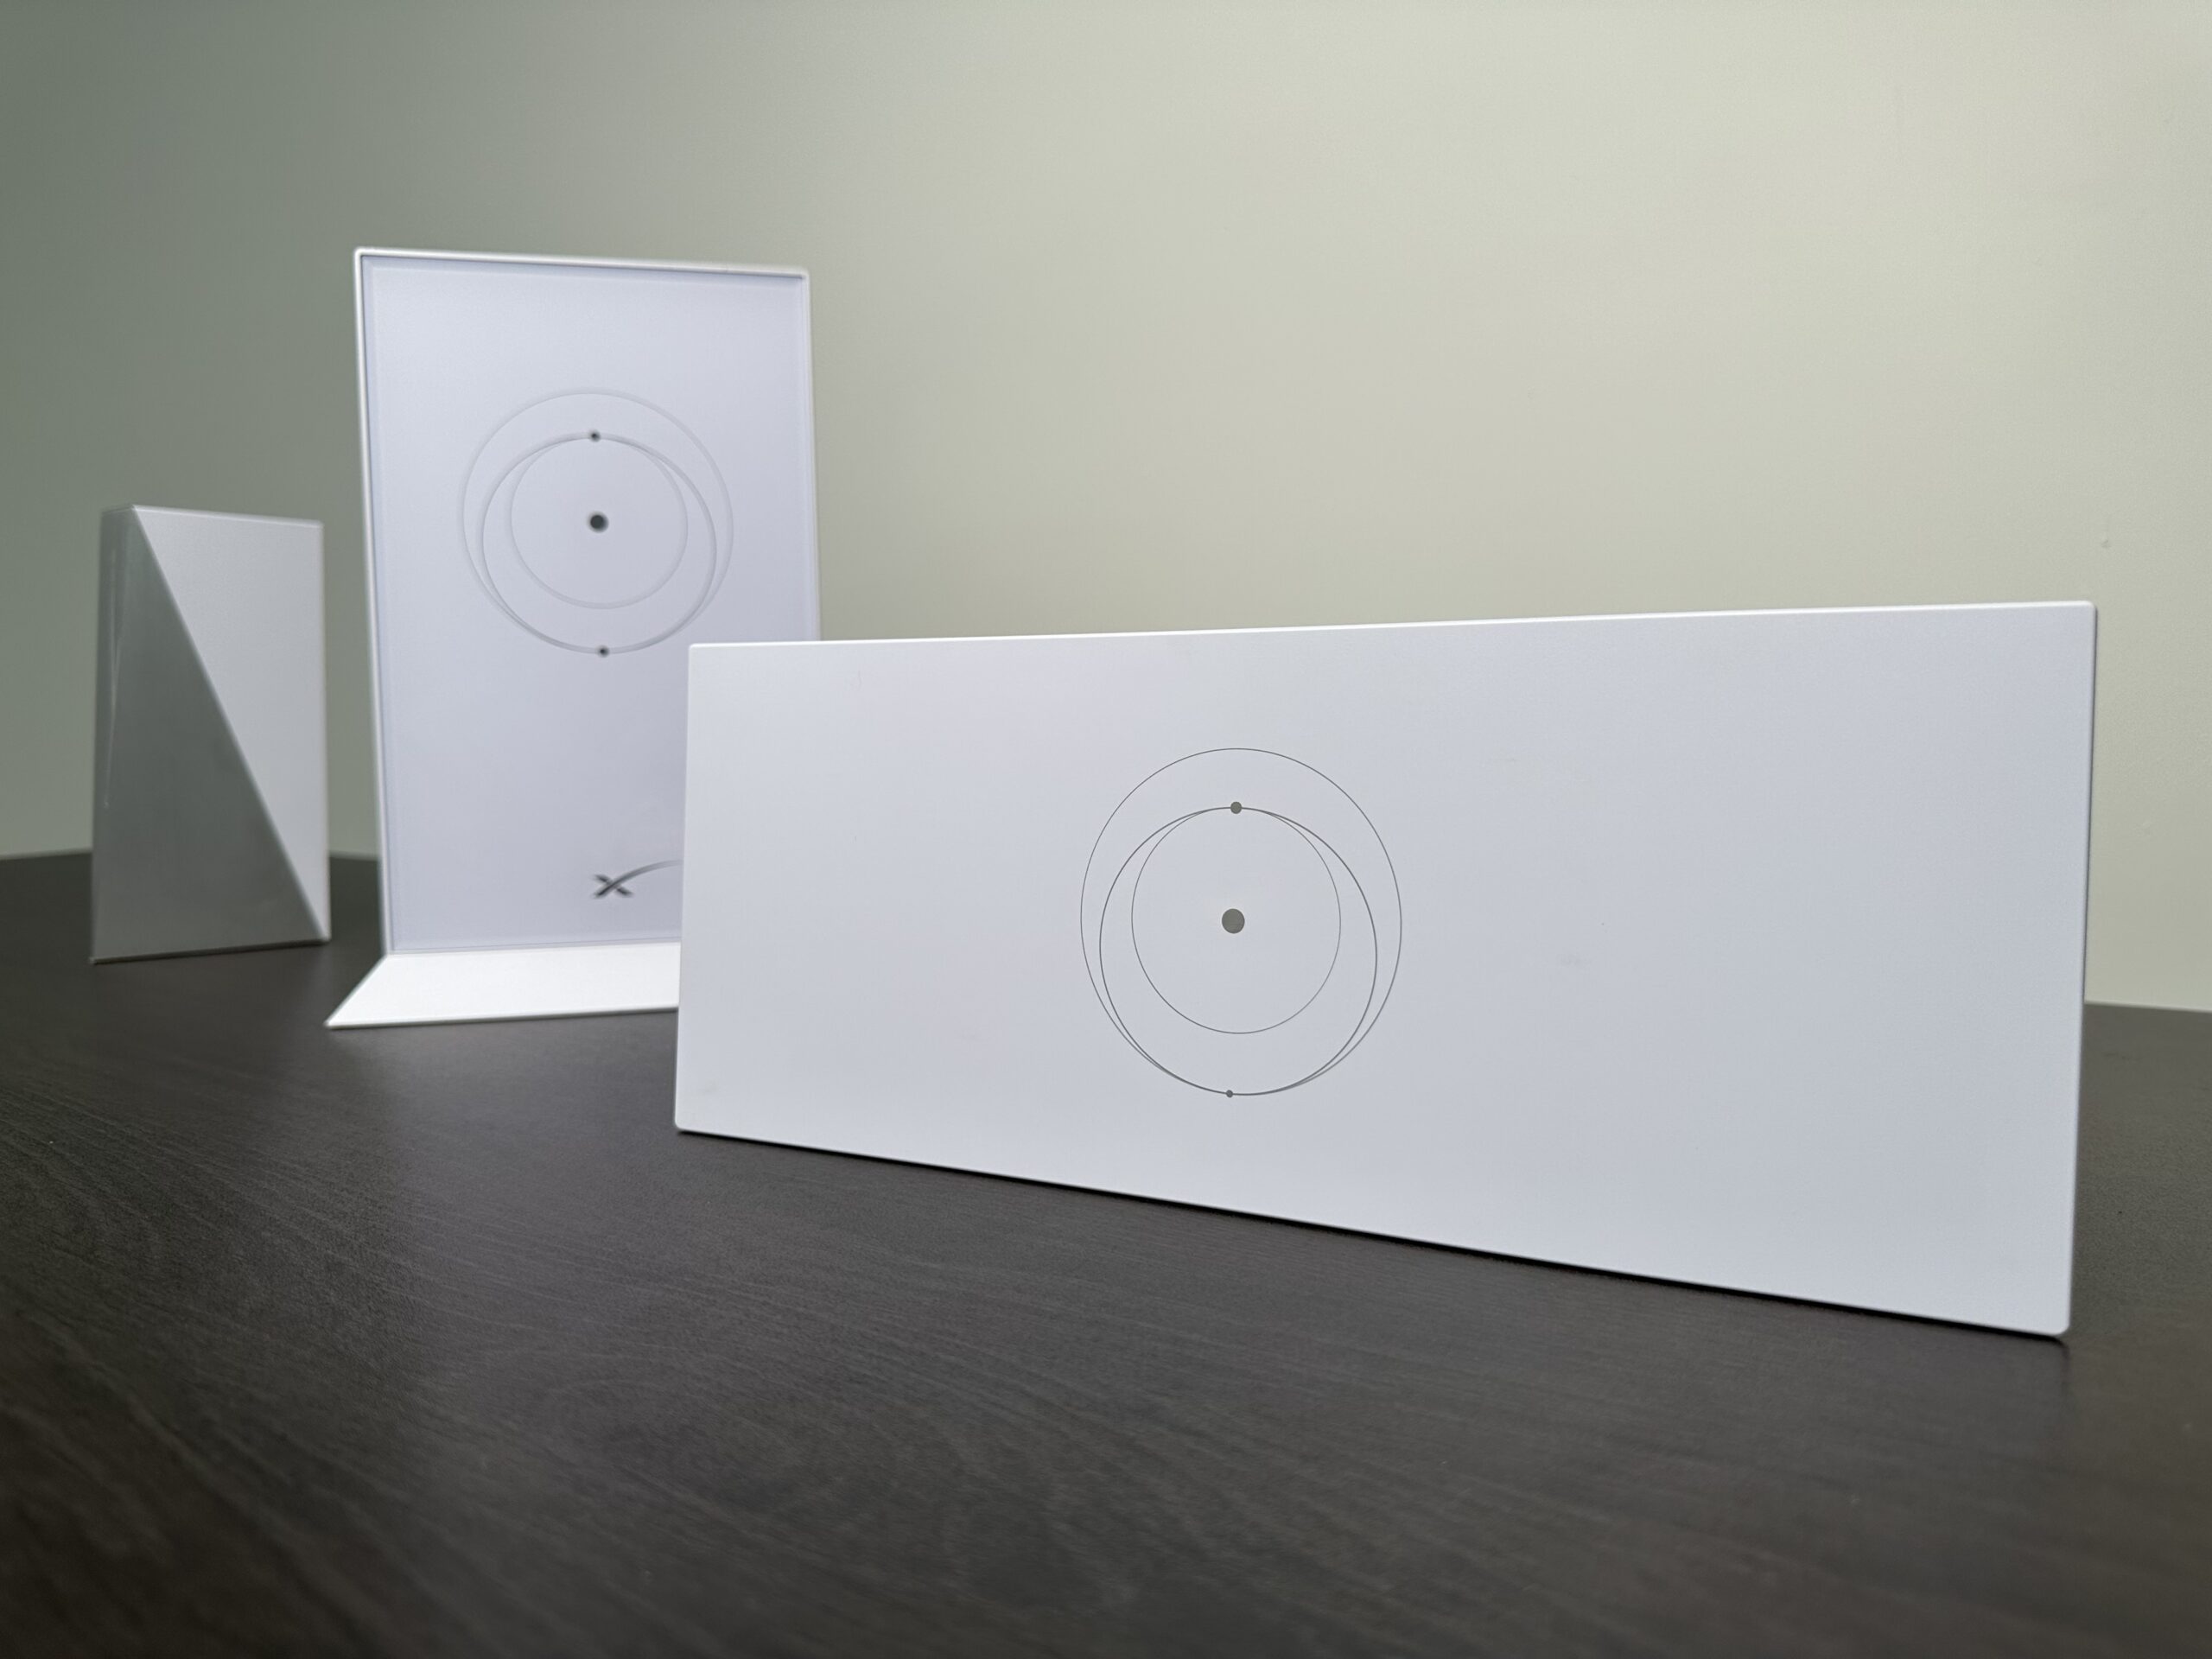
The Gen 3 router has a similar look to the previous generation. It’s all white plastic, with the familiar orbital transfer ellipse pattern on the front. The back has a sort of rubber texture to it. All the ports are on the back this time, instead of the bottom like Gen 2. And I’m also happy they moved the LED status indicator back to the front so that you can actually see it.
It’s an odd shape, I’ll admit. I’m sure it will take on a nickname like the “hotdog” router eventually. But despite the weird wedge shape, it looks pretty boring straight on. It just looks like a long rectangle from most angles. That’s not a con in my opinion. It is a router, after all, not a design statement for your living room. You’ll be able to tuck this into any space without too many issues.
Upgrades Over the Gen 2 Router
Overall, the Gen 3 router has some great tech upgrades over the Gen 2 (and Gen 1) router. What it boils down to is the change to Wi-Fi 6. Wi-Fi 6 brings faster speed and better range. More on that in the next section. The mesh performance is also better thanks to the addition of a third radio channel, making Gen 3 tri-band. That extra channel frees up bandwidth for devices, and allows the mesh nodes to talk to each other more efficiently.
Another change from Gen 2 is that the Gen 3 router isn’t a power supply for the dish. It appears that Starlink is moving back to a separate power supply brick design for the next generation hardware. The Gen 3 router does need power from an outlet, though. It comes with its own power adapter, which takes AC from the outlet and converts it to 30V DC for the router.
Wifi Speeds and Range
Now let’s talk about the fun stuff, the performance! The main reason to upgrade to the Gen 3 router is the performance and range. I’m happy to report that the Gen 3 router is much faster than Gen 1 and Gen 2, in terms of Wi-Fi speed. It also has a lot better range. The Wi-Fi experience with Gen 3 is much more consistent thanks to Wi-Fi 6.
I performed some testing, putting the Gen 3 router up against the previous generations. Each router was set up, one at a time, in the same spot in my house. Then, I used the Starlink app on my iPhone 14 Pro, connected on the 5 Ghz channel, to test the Wi-Fi speed at two distances. One test was performed 3 feet from the router, and the other test 50 feet from the router, 2 rooms away. I ran each test multiple times, and picked the best result for each router model.
| Router | Wi-Fi Speed (3 feet away) | Wi-Fi Speed (50 feet away) |
|---|---|---|
| Starlink Gen 1 | 436 mbps | 47 mbps |
| Starlink Gen 2 | 670 mbps | 47 mbps |
| Starlink Gen 3 | 864 mbps | 203 mbps |
In my testing, the Starlink Gen 3 router was more than 4 times faster at a distance of 50 feet, compared to the Gen 1 and Gen 2 routers. In my opinion, the 50 ft test is a realistic example of how a Wi-Fi router would be used. Because the speed is much higher, it shows that the Gen 3 router has much better Wi-Fi range and performance.
Of course, your results will vary. Wi-Fi performance depends on a lot of factors, like your house layout, building materials, etc. This wasn’t a scientific test by any means, but I still think it shows in a general way that Wi-Fi speed and range is much improved on the Gen 3 hardware.
Is Upgrading to the Gen 3 Router Worth It?
I have access to an original Starlink dish, Standard Gen 2 dish, and also a High Performance unit. Setting up the Gen 3 router on each type of dish was pretty straightforward, but using it with the Gen 2 Standard hardware was very odd. Since the Gen 2 router is also the dish power supply, you can’t really replace it. To use the Gen 3 router, you have to go through the bypass procedure as if you were using a 3rd party router with Starlink.
In my view, the Gen 3 router is a great upgrade for owners of the original round dish. On the Gen 1 system, it completely replaces the old router, and gives you access to the latest and greatest Starlink router. It refreshes your old system to perform like the newest Starlink equipment.
For owners of the Gen 2 Standard dish, especially those with multiple Gen 2 mesh routers, I would pass on the upgrade to the Gen 3 router. Although the performance improvement is significant, adding the Gen 3 router is a workaround at best. You can’t take advantage of the tri-band radio, which improves mesh performance, unless you upgrade all your mesh nodes to Gen 3. And if you don’t currently have mesh units, you might as well go for an aftermarket mesh system. You’ll pay less, and get similar features. The installation is the same between aftermarket routers and the Gen 3 router on a Gen 2 Standard system.
If you own the High Performance Gen 2 hardware, the Gen 3 router is a great upgrade. If you’re using the Gen 2 router with a High Performance dish, I highly suggest making the switch as soon as the Gen 3 router is released. After all, what’s the point of having the best dish and service plan if your router is only running Wi-Fi 5 technology?
Will the Gen 3 Router Make My Internet Faster?
It’s important to understand that upgrading your router won’t necessarily make your internet connection any faster. The speed of your Starlink internet connection depends on your service plan, location, obstructions, and other factors.
What the Gen 3 router will do is increase your Wi-Fi network speed. Devices connected to Wi-Fi will be able to experience higher internet speeds if they were previously limited by a poor Wi-Fi signal. My speed test results are a great example of that. With the Gen 2 router, my phone was limited to 47 mbps download when it was 50 feet away from the router. 47 mbps is below what my Starlink internet can provide. By upgrading to Gen 3, my Wi-Fi speeds increased enough to fully utilize the speed of my Starlink internet connection.
Final Thoughts
For $200, the Starlink Gen 3 router provides a great upgrade opportunity for owners of older Starlink systems. You’ll get modern technology, like Wi-Fi 6 and a tri-band radio. That means much faster Wi-Fi speed and improved range. Although it hasn’t been publicly released yet, you’ll want to stay tuned to the blog for the release of the Gen 3 router, and also the release of the next generation Starlink dish that it will accompany.
What do you think of this new router? Do you see yourself upgrading, or will you pass? Let me know in the comments!
Don’t know if anyone can manage to see this comment and assist…
How do I subscribe to Starlink internet services? Which bank card should I use? Am in Zimbabwe.
If you bought a dish from a 3rd party, you can activate a subscription at Starlink.com/activate. If you haven’t already ordered, you can order and subscribe at Starlink.com.
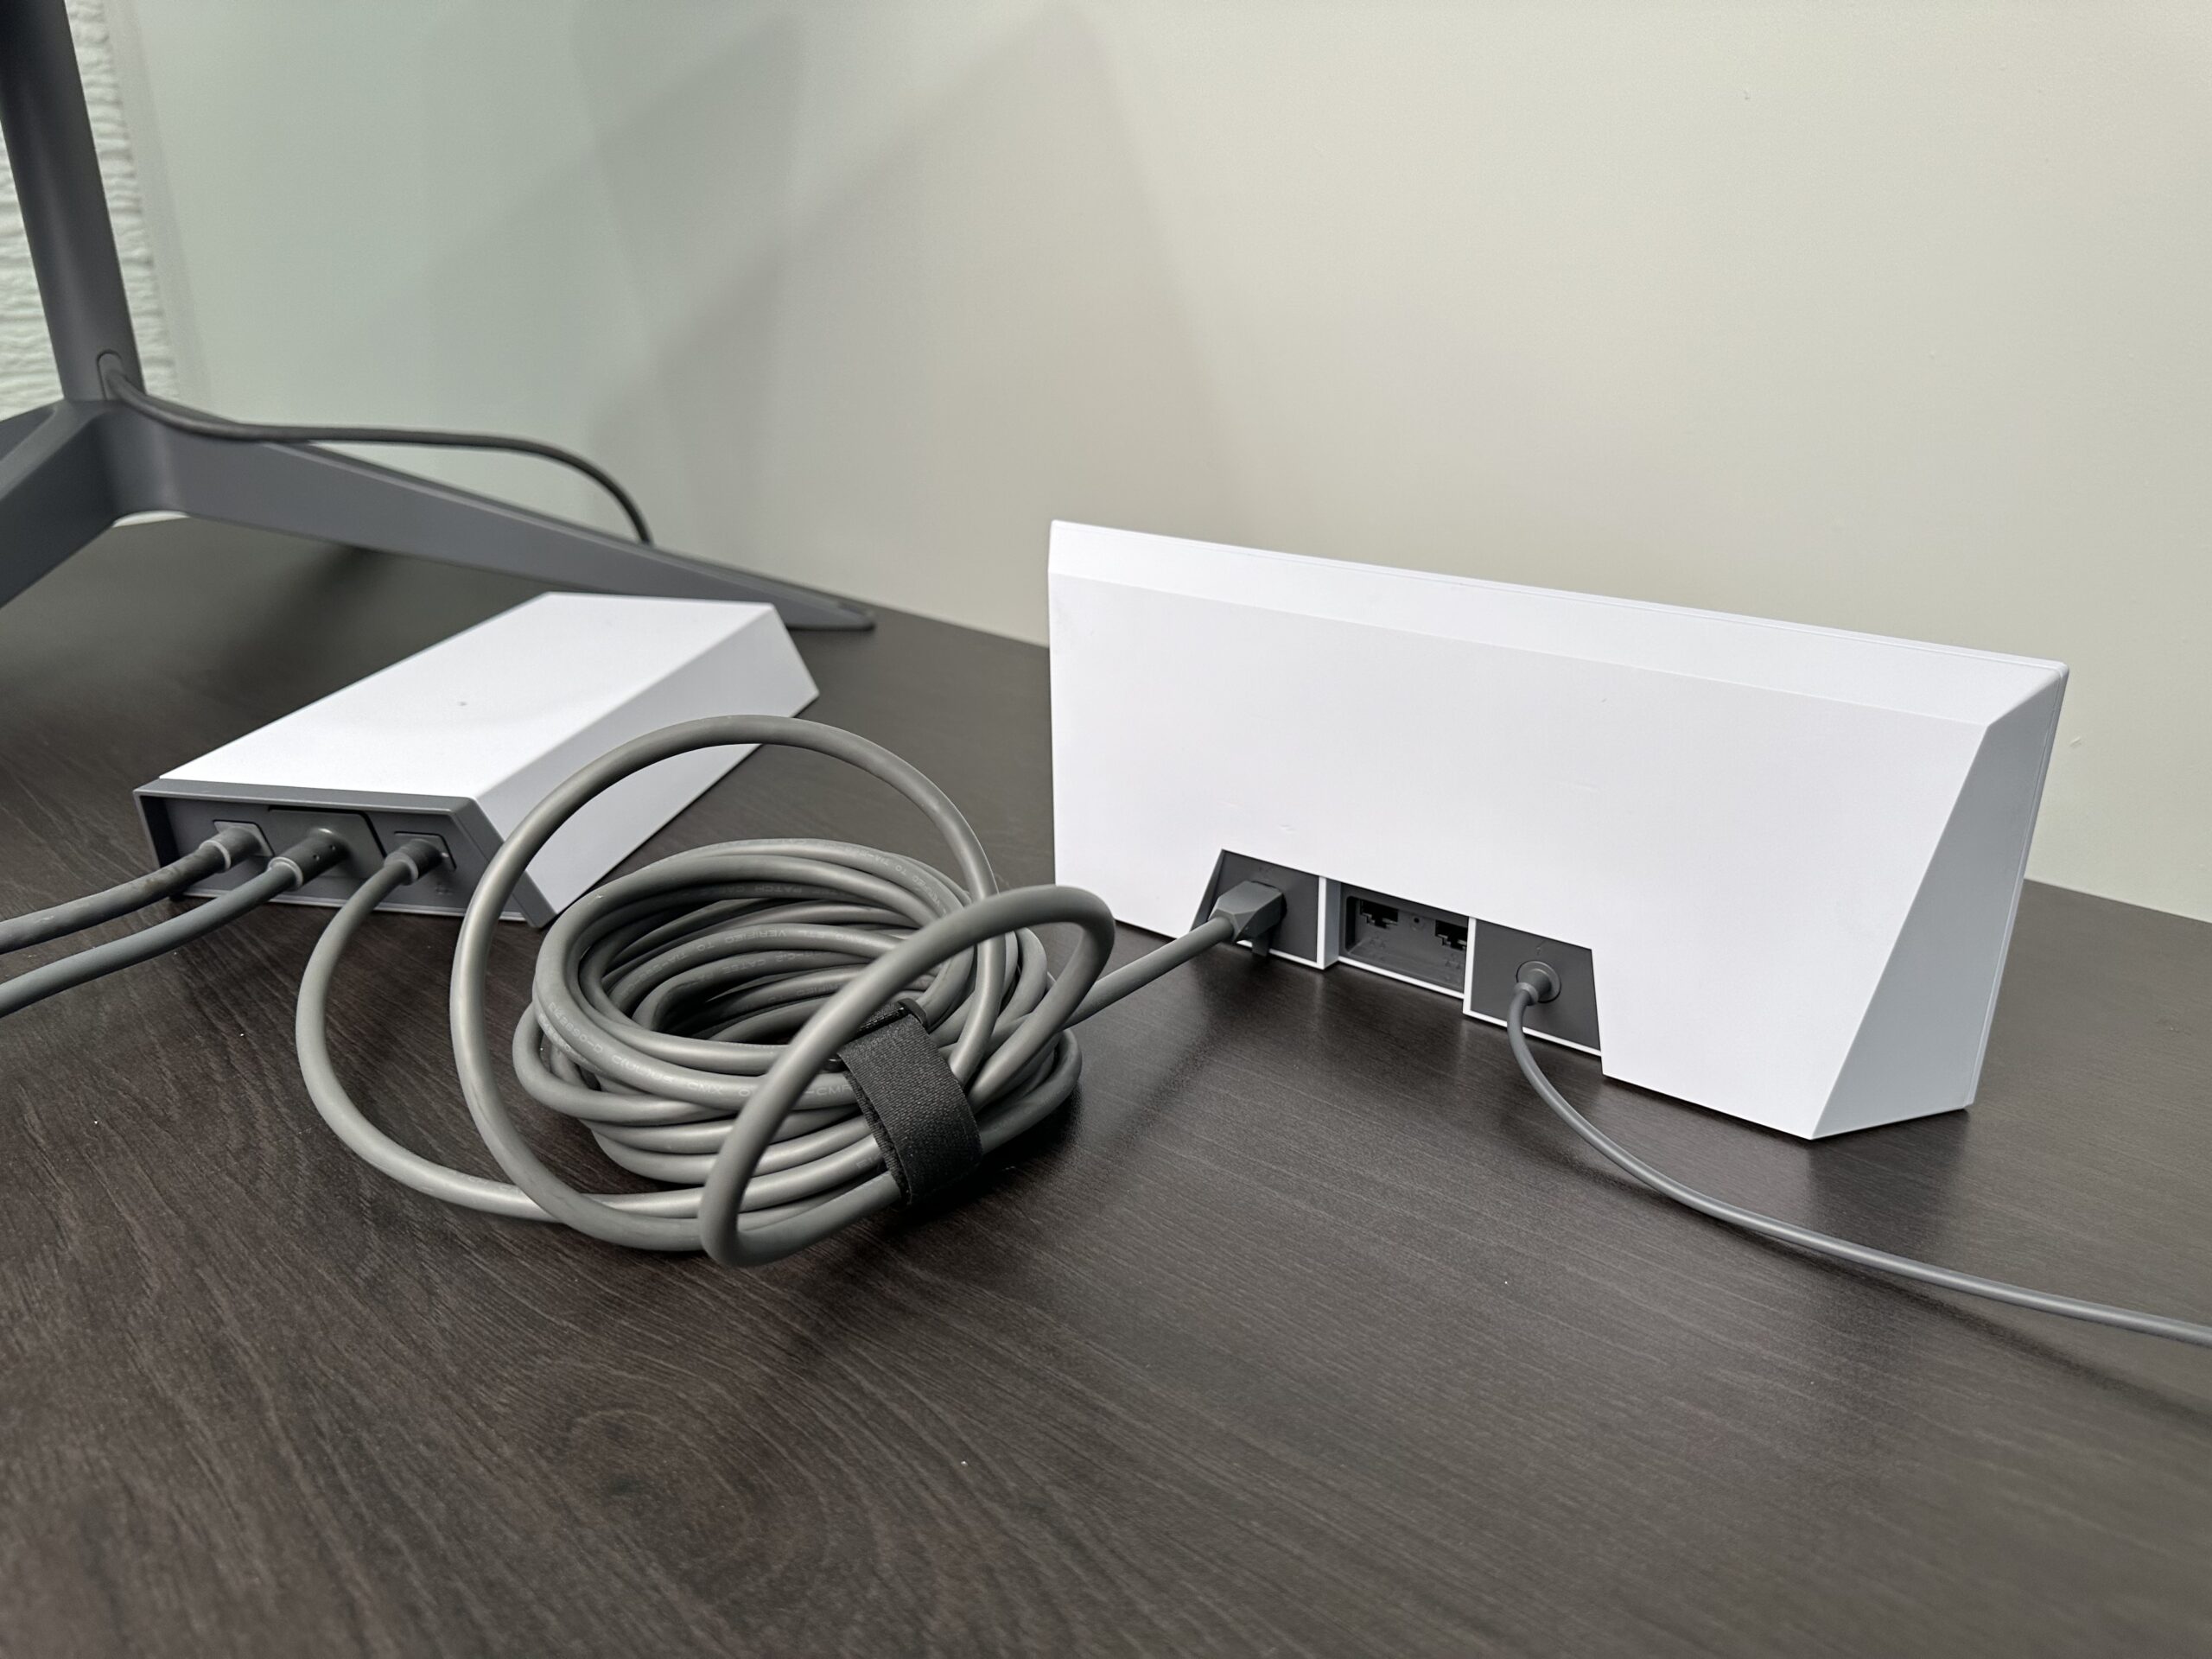
In your photo for Gen 2 High Performance system with Gen 3 router, how did you get the square ethernet head to fit into the round female port? That does not connect right? Im having a hard time finding the cable to connect the Gen 3 router to my High Performance Maritime Kit.
The High Performance kits come with a special cable that goes from the power supply to an RJ45 connector. That’s the cable you see connected to the Gen 3 router. The port on the Gen 3 router is round, but it’s still an RJ45 connector, so the High Performance cable connects without an issue even though it looks kind of odd due to the round shape of the plastic on the Gen 3 connector housing.
Starlink has been nothing but trouble for me since I bought in in mid January. I’m that guy who reads directions before starting an assembly project. That’s what I did with my Gen 3 Starlink. Step by step and word for word I followed the instructions to set this up. It worked perfectly for about a month. It was fast and I had great speeds.
Shortly after that it suddenly went offline. I have network, but no internet.
I created a ticket and someone got back to me a day later (not acceptable). After four days we got it back up.
Four days ago, after two weeks of running, the internet fell offline again. I immediately created another ticket, but as of this writing no one from Starlink has reached out.
I have sent a Customer Complaint email to Starlink to see if that helps.
If you’re thinking of buying, think again. There is no phone number to call (no, the one mentioned in some sites is not Starlink). There is no way to speak to anyone. I just have to wait until they’re ready to contact me.
I realize that today’s customer service does not include actually speaking to customers, but it is completely inefficient to attempt troubleshooting via messaging over several days vs. speaking over the phone for 30 minutes, but that seems to be the new normal. If this isn’t fixed soon I will need to terminate my service. I hope someone who works at Starlink will read this and pass it on.
Thank you for explaining in terms that I can understand (mostly!).
We are in a metal sided home in rural Montana, USA also with a metal roof.
I am ready to order Starlink and after reading your information, will go with Gen 3(i think!).
It’s only my husband and me, we surf the web alot (too much!), and if Starlink is good enough, we’ll cut the cord on Direct TV.
I have a few questions: our home is 1500 sq ft, with an attached 2500 sq ft shop (also metal siding and roof). We have an outbuilding about 400 feet away.
will i need a mesh router? (i’m still not quite sure what that does).
also, if i put the antenna on the roof 9(it’s 20′ high) will the Gen3 need power up there?
also, is the monthly fee the same for Gen2 and Gen3?
i almost feel gen3 is an overkill for us, but i like the idea of newer technology.
Thanks for helping me decide!
For the home, the Gen 3 router is plenty to cover that area. The Gen 3 router says it can cover up to about 3,200 sq. ft. You may or may not get a good sign in the attached shop. If you notice a low signal in the shop and you need Wifi there, you can add a mesh node in the house, on the wall shared with the shop for the best performance. A mesh node is just another Wifi access point that you add to your network, that wireless talks to the main router. It is called mesh because it creates a web of Wifi coverage.
You don’t need power where the dish is installed. The Starlink cable that comes with your kit is 50 ft. (they have 150′ version too, in the shop if you need it). You will route this cable from the router inside, to the dish on the roof. That cable supplies power and data to the dish.
Costs are the same for Gen 2 and Gen 3. In the US, you can’t even buy Gen 2 anymore unless you grab leftover stock from Best Buy or another authorized retailer. Starlink isn’t offering Gen 2 to customers in the US anymore.
please send
We just upgraded from Gen 1 to Gen 3. Our Gen 1 cable connecting the power supply to the dish (roof-mounted) goes through walls. Will the same cable work for our Gen3 system, or do we need to re-feed the Gen 3 cable from the dish to the power supply?
LOVE your videos — SO helpful!
The Gen 1 cable is not detachable at the antenna, so you would need to run it again for Gen 3. Thanks for the feedback, glad the videos help out!
Unfortunate….thanks, though!
We just got the new Gen3 system and purchased the ridge mount for it; however, just found out that we need the pipe adapter for the new dish. Hope this comment saves some folks time when purchasing the new kit. The pipe adapter is $35.00.
Correct, Gen 2 mounts like the Ridgeline Mount are not compatible with Gen 3. Luckily, the Gen 2 Ridgeline Mount has enough of a pipe sticking up to be able to use the Gen 3 Pipe Adapter.
I have a gen 1 dish. works and does all we need it to do……except the range. will the gen 3 router improve the range? if not what is my best option to extend the range
?
Yes, the Gen 3 router is much better than the Gen 1 router. You can also purchase almost any aftermarket router with Wifi 6 and use it with the Gen 1 system easily. Upgrading to a better router, or a mesh system, is the best way to improve Wifi range.
Best option buy a wifi 6 router toss the star link router in storage save a few hundred bucks even the one network port could be used to hook up a better router and you can get the best router for 500 don’t see why a router isn’t offered separate at a much lower price.
Is it possible to switch off wifi in the router settings and just use network cable?
There isn’t a setting to turn the Wifi off only. There is just bypass mode, but that turns off DHCP in addition to turning off Wifi.
It sure would be nice to know how much additional power it will consume on the gen 1 system since the router will also need a power supply?
The power supply for the router itself is rated up to 60 watts, but I doubt it uses anywhere near that most of the time.
Thanks for the analysis. When available I will upgrade to Gen-3.
I was offered and accepted the Gen3 (had Gen1 previously). No problems setting it up but I’ve not seen much increase in speed or range. I have noticed streaming issues that I’ve not had before, getting error messages about not being able to play the video at this time. If I reset my Dish I can get one episode or maybe a movie before I get kicked again. In talking with Starlink. they offered to sell me the New Gen3 dish when it comes out, $600 I believe. Could using the Gen3 router with the round dish be contributing to this? Full disclosure, I’m not a techie, live in BFW, with no experts I can ask/hire for help, Any suggestions would be appreciated.
The Gen 3 router probably wouldn’t cause any of these issues. It was offered to Gen 1 users mainly for beta testing, so it’s mean to be paired with the Gen 1 hardware as well as become the Gen 3 dish router. But to check, hook your old Gen 1 router back up, and see if the issues are still there. Interesting about the Gen 3 hardware. Did they give any indication or info as to when that would possibly be?
Starlink is available in my area but if the Gen 3 router is imminently coming to the new kits, I may hold off until it is generally available. Usually, companies know that upgrade announcements tend to cannibalize existing sales while customers wait for the latest and greatest to be released so I’m thinking they might make the new router available sooner rather than later.
Hi Noah,
Thanks for your very informative review of the Gen3 router. We just recently ordered Starlink with a Flat HP dish in Malaysia because we will use it on a boat most of the time. Just days after we ordered we heard about the new dishes, and I was wondering if you have any info on whether the new HP dishes are supposed to be better than the current HP/mobile dishes? Our routers are outdated and so I’m thinking of getting a new wifi6 router anyway so not too worried about buying now & wishing I had waited for the Gen3 router, but at the price of the HP dishes necessary for global mobility I’m wondering if we should return the equipment under the 30 day guarantee window and wait for the newer HP dish. Any info you might have on that would be much appreciated!
So far the details on the next gen dishes is very limited, so it’s impossible to say how much or in what ways they will be better. General performance is not limited by the hardware, but the Starlink network itself, so I think it’s safe to assume that the current HP dish will be good for many many years.
I currently have a Gen 1 setup and received an invitation for a gen3 router which I decided to purchase. I had a TP-Link AC2600 WiFi Extender (outdated I know) that I used to extend the range to an outdoor patio area and it worked pretty good until it died. I wondered if the gen3 router might be sufficient to extend the range (we will see) or whether rather than purchase another range extender I should consider another gen3 router to create a mesh network or go with a non-Starlink mesh router to connect to the gen3 router? I am a novice at mesh routers so not sure. I am also not sure if a second gen3 router would be able to connect wirelessly or whether it would need an ethernet cable?
The range on Gen 3 is much better. I would try it with just the new router, and add another one or an extender if you notice weak spots. The Gen 3 routers can mesh wirelessly.
I have been having a Starlink performance issue and I have my own mesh given I have Gen-2 router given my house size and ethernet network I have. Without the Starlink router I get 0 support from Starlink so going forward keep this in mind. I really want to buy the Gen-3 and hoping it becomes available soon.
I had to sell my original starlink as my pos system needs to be hard wired to it. Does the new router help with that or is it wifi only as well?
The new router has Ethernet ports, but so did the original Gen 1 Starlink router. And the Gen 2 Starlink had an Ethernet Adapter that added access to a LAN port.
Availability of this product?
There has been no word on a release date. It’s currently sold by invitation only.
Meh. If you need a stronger wifi signal just get a third party router/mesh. It’ll have wifi6E or wifi 7. Wifi6 is already old. Itll also likely have faster backhaul, etc.
E.g. netgear orbi or the Asus ROG.
I’m no techie but, my gen 2 was abysmal in terms of range, I added an engenius switch, two access points(soon to be three) now I can get great signal 150 ft from the house (new one for my barn and nearby field). BUT, I cannot use bypass mode for some reason. Without bypass mode my setup works fine….however this hybrid worked out is beyond me, but I had no internet (phones only) for 20 years, ill take the win.
What engenius switch and what access points?
What engenius switch and what access points did you use ?
You need a router on the system somewhere if you enable bypass mode. If you just have a switch and access points, you would need to turn on routing functions on one of the AP’s (if they have that capability) or add in an aftermarket router that plugs into your switch.
When can we expect Starlink kits in Zambia?
No idea, but you can use Roam there.
I’ve been running my own mesh with the gen 2 dish since the first week of getting my kit. Dishymcflatface to a Fortiwifi 60e and a ubiquiti u6-lr, no way would I downgrade my mesh to add this new router. I can see for the majority of people this would be a good upgrade but its a bit too late for me.
Hey Elon, how about a 12 volt power supply option before you do all these other, less important improvements??
I already have a Netgear AX2400 (RAX30)… Do I need the Starlink router? I don’t have Starlink yet, waiting for the new antennas to be available…
Rick
No, you can use your own router with any Starlink kit, but each kit will come with one anyway.
I am still on a waitlist to get Starlink. When I get approved for the service, dan I just order the new router? How does that work. I have been having trouble with my internet and email so I am hoping I did not miss them telling me I can hook up, no way to reach them, so I don’t know
It depends on what kit they are offering at the time. If your spot opens up 6 months from now, you will probably buy the next generation kit which will include this new router. If you become eligible tomorrow, you’ll purchase the current gen kit with the Gen 2 router. There is no way for the public to buy the Gen 3 router as of right now. It is unknown if Starlink will release it earlier than the next gen dish as an accessory in the shop.
How might I apply or ask to try out the Gen 3 router, as I live here in S. Mexico in Huatulco, a smaller tourist area? We have a number of Starlink users and many others are always asking us how it is. Yet we only have 1 ground station the performance is good.
I think it would be a good test/evaluation of what we have compared with others who might have more ground stations, for example.
Let me know if possible.
There is no way to request an invitation. They sent out a single batch as far as I know, and haven’t expanded. I think they just want a few people to test it out before the public launch. If you haven’t received the invitation by now, you will have to wait until launch. I’ve seen them pop up on eBay and other places, but you’ll pay a premium since they are rare.
I have the Gen 2 dish and router here in S. Mexico. How might I get an invitation to try the new router here? There are a lot of people here in Huatulco who have Starlink, and many more who are interested, and seeing as it has only 1 land station, might be interesting to see how it functions.
There is no way to request an invitation. They sent out a single batch as far as I know, and haven’t expanded. I think they just want a few people to test it out before the public launch. If you haven’t received the invitation by now, you will have to wait until launch. I’ve seen them pop up on eBay and other places, but you’ll pay a premium since they are rare.
Thank your for the specific details delivered in a clear manner that I can grasp with only medium knowledge of these systems. A teacher myself I give you good teaching grades. Starlink is something I will be adding in the near future at my remote off the grid property. Details like 30 volts DC needed for the router and mbps graph amounts compared at different distances are awesome. Following along with your component explanations is a great learning preparation for me,thank you again.Walt
I have a Starlink Rv dish. Will the Gen 3 be a benefit?Im concerned about the hookup of the modem
The Gen 3 router gives better Wifi speed and range, but for the RV dish, it’s just an extra piece of hardware that you need. If you aren’t having any noticeable issues with Wifi speed or range, I don’t recommend upgrading. If you have some dead spots in your home or when you travel in your RV, upgrading might be worth it.
Are you having performance issues right now?