
The standard base that comes with every Starlink dish isn’t going to be a permanent solution for most people. If you plan to install Starlink on your roof, it’s best to get a mount designed for that purpose. Ultimately, how you end up mounting your dish will depend on many factors, including obstructions, roof type/angle, and budget.
In this guide, I will walk you through various Starlink mounting options. I’ve tested and reviewed most of the mounts in this guide. I’ll cover different types, including the official Starlink products. I will also recommend some aftermarket mounts. By the end, you should have a good idea of what type of Starlink mount will work best for your application.
Pick a good mounting location
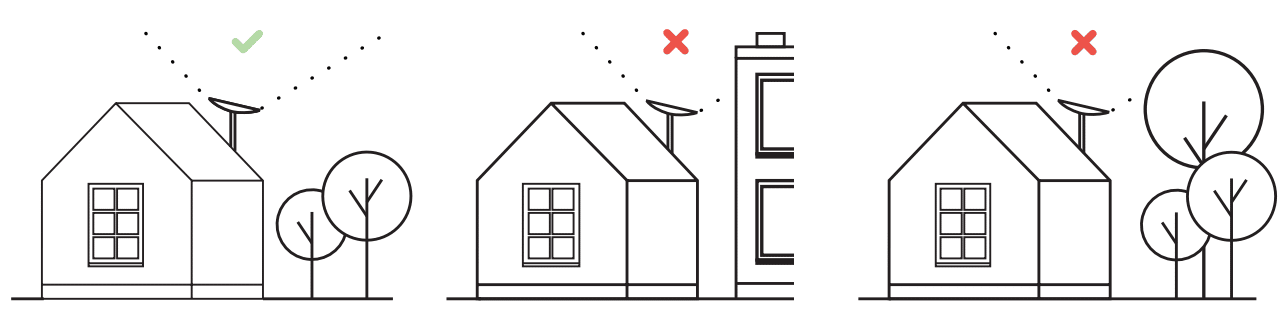
The very first thing to consider is whether you have obstructions at your desired mounting location. Obstructions can be anything that block the view of the sky. In most cases, it will be trees that cause issues. Utility poles and other buildings could also obstruct Starlink’s view of the sky.
Best places to mount Starlink
The best place to mount a Starlink dish is at the peak of your roof. You want it mounted as high as possible so that the signal won’t be impacted by trees and other obstructions. You can attach mounts directly to the roof surface, to the facia/eave, on the ridge, or even to a chimney.
Sometimes, the peak of your roof isn’t the best location if you have tall trees nearby. You can also mount Starlink in a clearing using a pole mount, or on a tower if you have very tall trees. Depending on where the obstructions are on your property, mounting on a garage or outbuilding might be the best solution.
How to check for obstructions
The Starlink app has a neat tool that uses your phone camera to search for potential obstructions at your desired mounting location. Stand in the area where you want to mount Starlink, open the app, and use the obstruction finder to see if Starlink has a clear view of the sky. This will give you a general idea about obstructions in that location.

Once you’ve found a suitable location for your Starlink dish, that is free of obstructions according to the Starlink app, you can proceed to picking a mount for a permanent installation. I will cover various types of Starlink mounts in the following sections.
Roof mounting options
Like I mentioned before, the roof is typically the best place to mount Starlink. You can attach mounts to an exterior wall near the peak of the roof, to the fascia or gable, or even directly to shingles. Starlink even offers a non-penetrating mount that you can use on your roof, without having to drill holes or use fasteners.
Starlink Wall Mounts

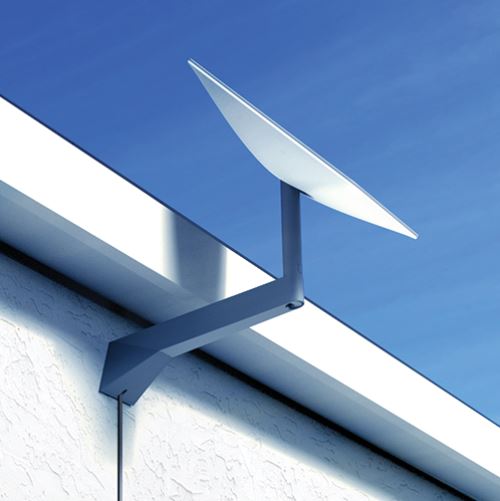

Starlink’s Wall Mounts are the most popular mounting accessory. They can be attached to an exterior wall, fascia, or gable. The kit has everything you need, including the mounting hardware. This type of mount is great because you can avoid drilling holes in your roof. Instead, you drive lag screws into a wall or fascia board. Cable management is easy thanks to the included cable clips.
Starlink makes wall mount kits for every kind of dish they offer. The prices range from $32-$72 depending on which Starlink you have. You can buy a wall mount kit directly from the Starlink shop, but they are also available from retailers like Home Depot and Walmart:
Short Wall Mount (Gen 2 Standard Actuated, High Performance)
Be sure to check out my full review and installation tutorial of the Standard Wall Mount to learn more about how wall mounts are installed.
Starlink Pivot Mounts


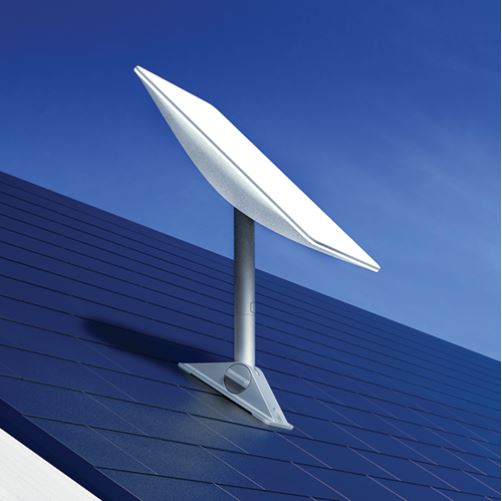
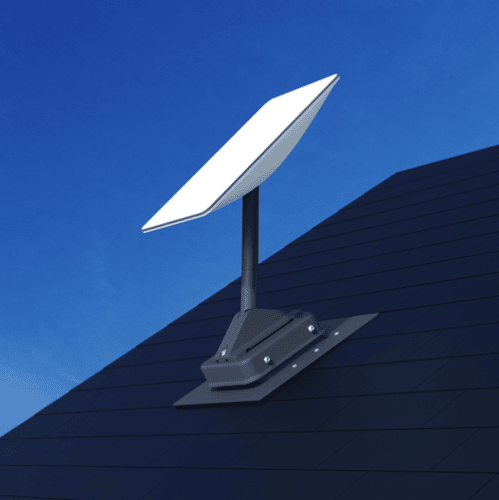
The Starlink Pivot Mount is designed to attach directly to a shingled roof. The mast angle is adjustable up to about 90 degrees, so it works with almost any roof pitch. The kit includes everything you need, including lag screws and roof sealant tape.
Prices range from $38-74, and Starlink makes the Pivot Mount for all dish models. To buy, visit the Starlink shop page for your dish, or pick one up from a retailer like Home Depot/Walmart:
Pivot Mount (Gen 2 Standard Actuated, High Performance)
I did a review and installation tutorial for the Standard Pivot Mount, so check that out to learn more about the setup process and how it works.
Starlink Ridgeline Mounts


Don’t want to drill any holes in your roof? The Ridgeline Mount kit from Starlink is a great solution. It’s a non-penetrating roof mount, using weights (included) to secure Starlink on the ridge. The legs adjust to just about any roof pitch. They can even go to 180 degrees for flat roofs.
Starlink sells the Ridgeline Mount for the Gen 3 Standard, Gen 2 Standard Actuated, and High Performance dishes. Prices start at $250, and you can only get it through Starlink directly:
Ridgeline Mount (Gen 2 Standard Actuated, High Performance)
I did reviews on both versions. Check out the latest review and tutorial for the Gen 3 version here.
Aftermarket J-Mounts

#CommissionsEarned

You don’t have to use official Starlink mounts. J-Mounts have been used to mount satellite dishes for many years. They are widely available, affordable, and extremely versatile. In fact, you might already have an existing J-Mount from another satellite service, like Dish Network. You’ll want a J-Mount that has a pipe diameter of around 1.5 inches to use with Starlink, such as the Proxicast Pro-Grade J-Max that is pictured above.
Depending on which Starlink dish you have, there are several adapters on the market that allow you to connect your dish very easily. If you go with the Proxicast J-Mount above, you can get the Proxicast Starlink Antenna Adapter to make it plug and play with the Gen 2 Standard Actuated dish. Another option is to purchase the Starlink Standard Pipe Adapter to use with the Gen 3 Standard dish.
Check out our full guide on using J-Mounts with Starlink for more on this aftermarket mounting option.
Flashing Mounts

#CommissionsEarned
For a professional and worry-free roof installation, consider a flashing mount. A flashing mount installs under the top layer of shingles, and secures to your roof structure for a very strong and leak-free solution. Flashing mount installations will require not only the flashing mount itself, but also an aftermarket J-Mount or Starlink Pivot Mount.
Starlink sells their own official Flashing Mount if you plan to pair it with another official Starlink mount, such as the Pivot Mount. The Starlink Flashing Mount is only compatible with the Gen 2 Standard Actuated and High Performance. If you have another model, you want to use an aftermarket J-Mount and flashing mount, such as the CommDeck Flashing Mount pictured above. If you have the Gen 3 Standard dish, you’ll also need the Standard Pipe Adapter.
Ground mounting options
Sometimes, mounting a Starlink dish to your roof isn’t an option. Maybe you have too many tall trees, or you just prefer to have the dish be more accessible. If you would rather install your Starlink at ground level, either temporarily or permanently, check out these ground mounting options.
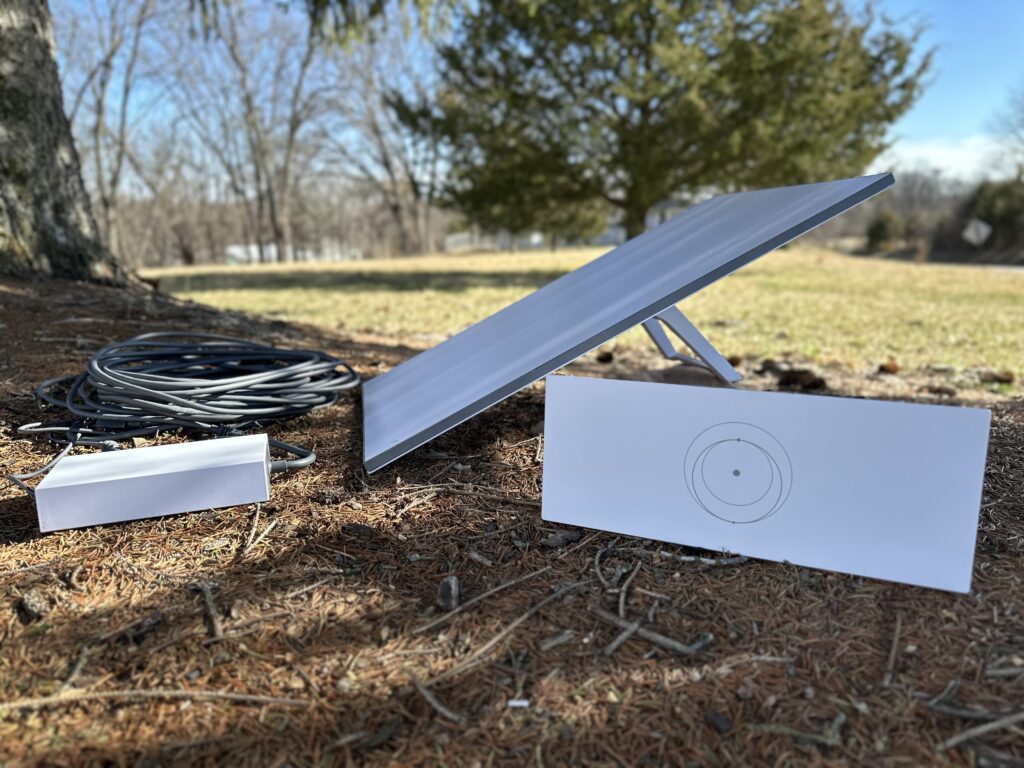
Starlink Ground Pole Mount
The Ground Pole Mount is designed to be installed directly in the ground, and the Gen 2 Standard Actuated or High Performance dishes snap directly on top. With the Ground Pole Mount, which costs $75 in the Starlink shop, you can locate your dish in a clearing, or anywhere you like.
Using the included Starlink mounting base

If you are using Starlink as portable internet, you might not need to purchase any additional mounting accessories. Every Starlink dish comes with some kind of mounting base.
The Gen 3 Standard and Mini kits come with kickstands. They are great for placing your dish directly on the ground for temporary use, but using the screw holes, you can also use it to permanently mount your dish on a flat surface.
Gen 2 Standard Actuated and High Performance kits come with a mounting base that is also suitable for portable or permanent installation on the ground or flat surfaces. Each leg has a hole for fasteners.
RV and vehicle mounting options
Starlink can be mounted to an RV or other vehicle in a variety of ways. Whether you want a permanent installation for in-motion use, or just a temporary solution for when you arrive at camp, here are a few ideas.
Starlink Standard Mobility Mount

Starlink’s Mobility Mount is compatible with the Gen 3 Standard dish. It’s designed to attach to a variety of surfaces, like wood, metal, fiberglass, etc. This is the perfect option for RV and vehicle roofs.
The Mobility mount creates a waterproof seal, and puts the dish at an 8 degree angle for aerodynamics and signal optimization during in-motion use.
You can grab one from the Starlink shop for $38.
Flag poles and masts

#CommissionsEarned
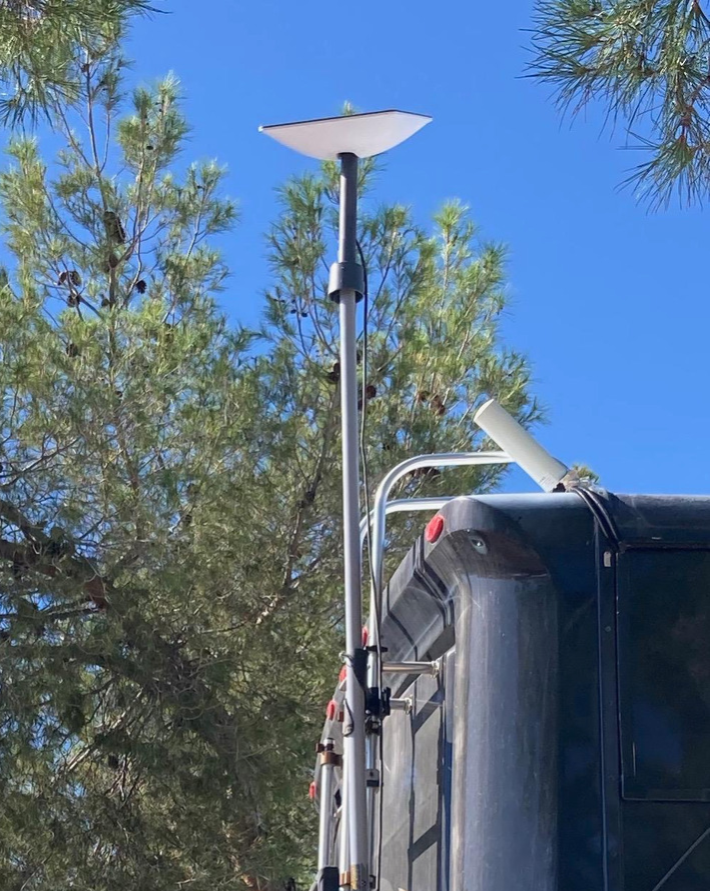
Have an RV with a ladder? One popular option is the FlagPole Buddy Starlink RV Mounting Kit, that includes a pole, mounts, and Starlink adapter. The FlagPole Buddy system attaches to an existing ladder on your RV.
Maybe you have some other kind of existing pole or mast you want to use. In that case, all you would need is the Starlink Pipe Adapter, which can be used to mount the Starlink dish to any mast/pole up to 2.5″ in diameter. Just be sure to get the right adapter for your dish model.
Other mounting options
I’ve covered all the model specific mounting products, but there are many other ways to mount a Starlink dish. Here is a collection of ideas for you to consider, if the options above don’t work for your application.
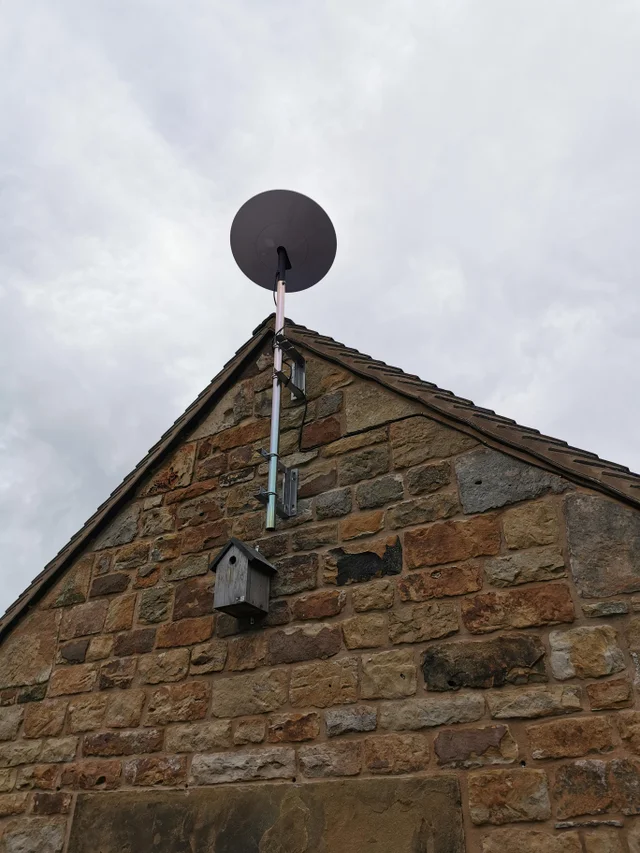
Tower Mounts
#CommissionsEarned
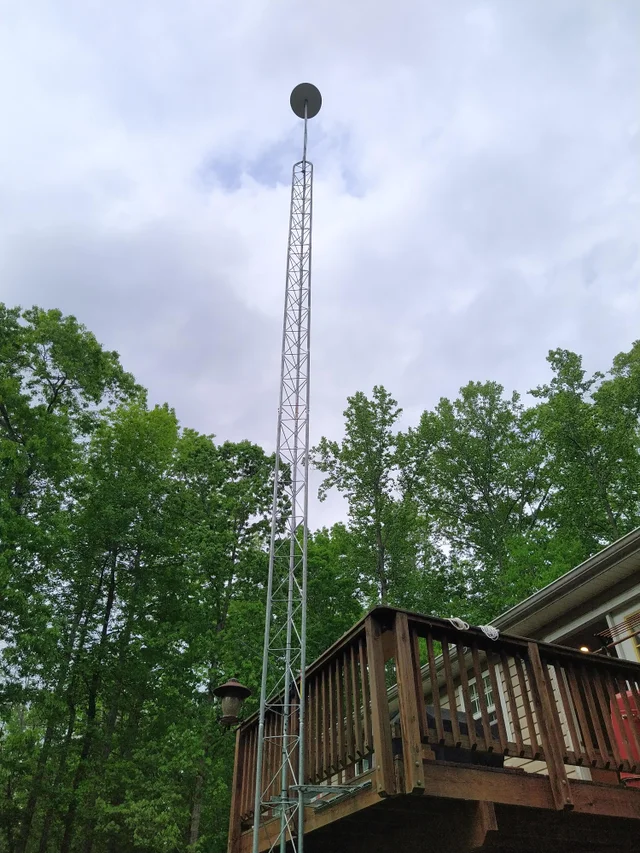
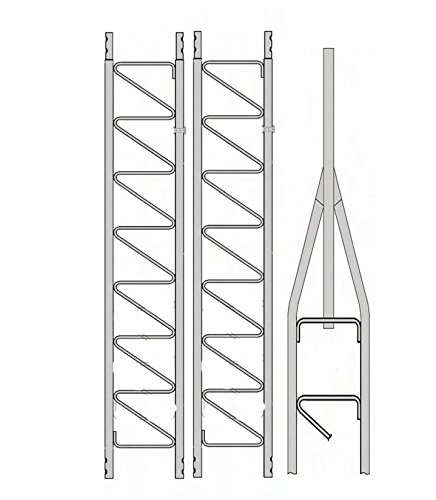
In some locations with tall trees, you might need a tower mount to clear obstructions. Towers are great because you can mount your Starlink dish higher than your roof, to clear the tallest trees. Tower mounts are definitely the most difficult to install, and the most expensive mounting option in this guide. But if you have lots of trees, and need fast internet, it might be the best solution for you.
There are several tower mounts available on the market. I recommend one of the Rohn towers, such as the Rohn 30' Basic Tower Kit, pictured above. They make several other versions with varying heights. The best way to attach your Starlink dish to a tower mount is using the Starlink Pipe Adapter that is compatible with your dish model.
Chimney Mounts

#CommissionsEarned
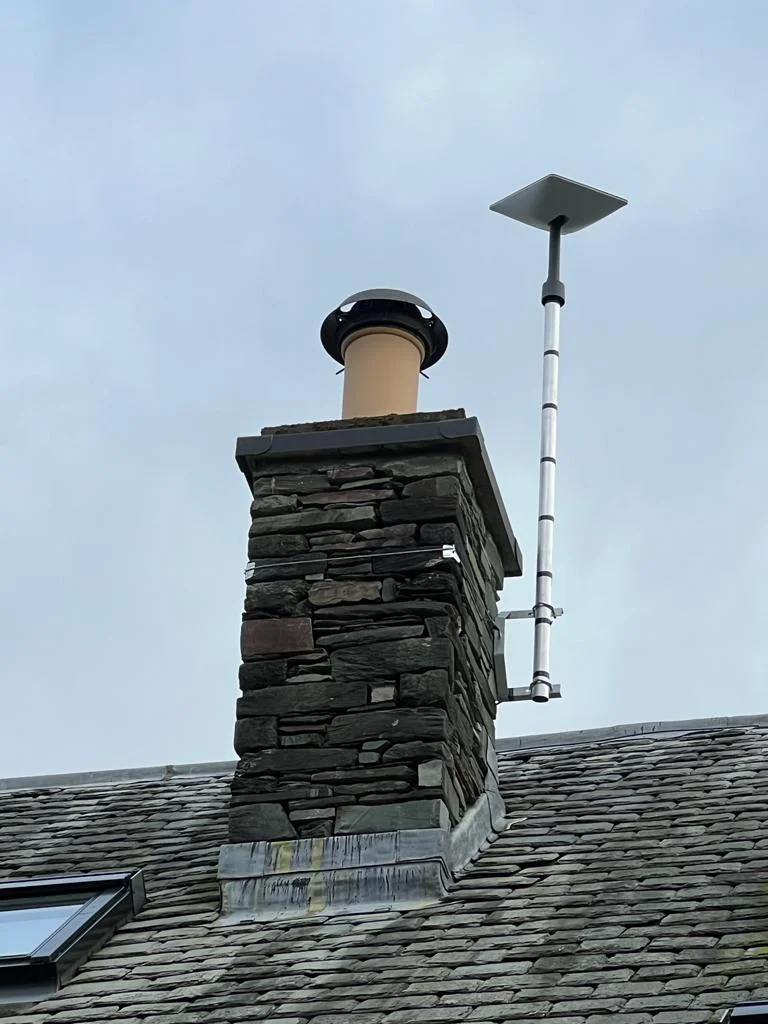
For installations where you might need more height than the roof peak offers, or for those without shingle roofs, a chimney mount might be a good solution. Chimney mount’s use your existing chimney to secure a pole for mounting the Starlink dish.
For the Chimney Mount Install Kit shown above, you will just need to supply a mast that is up to 2″ OD. It’s also a good idea to measure the diameter of your chimney to make sure the straps are long enough. To make installation a breeze, be sure to pick up the Starlink Pipe Adapter for your dish model, which will adapt any existing pole/mast up to 2.5″ OD to the Starlink dish.
Tripod Mounts

#CommissionsEarned
If you want to install your Starlink dish on a flat roof, or perhaps temporarily at your RV camp site, consider using something like this Heavy-Duty Tripod Base. A Tripod mount is useful for both temporary and permanent installations. You can stake the tripod directly into the earth for a stable temporary mount. Or perhaps you have a flat roof that you can permanently secure it to.
Most tripod mounts include a mast that will accept the Starlink dish mast with a bit of modification (using pole clamps or drilling holes for bolts). You can also supply your own mast of any length you require. To make adapting the Starlink dish super easy, purchase the Starlink Pipe Adapter and use it with your tripod.
Custom Pipe/Pole Mount
If none of the above options work for your situation, there are many different custom options available. With a Pipe Adapter and the right size piping, the Starlink dish can be attached to a variety of structures in a variety of ways. If you are a do-it-yourself type of person with extra materials laying around, it might be worth designing your own mounting solution using a variety of brackets and pipe that can be sourced from the hardware store.
We are looking at installing the Flat High Performance antenna on a sailboat. We have a 24″ KVH dome. Are there mounting options that would allow us to mount it inside the dome (with KVH components removed), or replace the dome with the starlink antenna?
Is is possible to mount the as supplied X mount onto a wall using the holes at the ends and connect the gen 2 to it. Ie instead of the legs being on the ground they are bolted to the wall.
Would the Starlink suffer from this orientation?
It wouldn’t work because the Starlink dish can only tilt so many degrees. It needs to be able to look up, and a horizontal orientation would cause an error message in the app, and it wouldn’t be able to aim to the optimal position. Also, it wouldn’t provide any heigh to see over the roof, so you would likely have a big obstruction anyway.
Hello – i bought the Gen 3 Starlink recently (Dec 2023). We bought the long wall mount, pipe adapter and masonry kit. Where can we find a pole mast that will insert down into the end of the long wall mount? There is a small notch inside the whole where the mast goes. So frustrating. Spent the money for Starlink and having to spend more money just to get it up on the roof. I don’t think the J mount will work unless the actual pole goes up into the pipe adapter on the back of the sat. In the meantime, it’s sitting in my front yard with the kickstand up. I submitted a ticket to Helpdesk a few days ago and nothing yet. thank you.
The Gen 3 hardware has its own mounts. The Long Wall Mount, and anything else ordered from the Gen 2 shop page, is not compatible with Gen 3. You will have to return those items and order the “Standard Wall Mount” for Gen 3. I just did a review on it here:
https://www.starlinkhardware.com/gen-3-standard-wall-mount-review-and-installation-tutorial/
I bought the Gen 3 Starlink and want to know if I can use the standard wall mount with a Ridgeline mount together
Gen 3 isn’t directly compatible with the Gen 2 Ridgeline Mount. However, there is enough pipe on the Ridgeline Mount that you can use the Gen 3 Pipe Adapter to work with it.
Hi Noah,
We had a problem with the mounting base and there is no option to get a new one soon. Do you think that putting it in a bucket with sand could work? Or some other DIY option that is not difficult to do (not a lot of materials or stores over here).
Thanks!
I wouldn’t recommend putting the mast in sand or dirt, as it could get into the Starlink cable connector and cause issues.
Great tips and recommendations on your site. I live with a lot of trees on my property. We have taken down many but it’s very expensive and I can’t take them all down. Best location is in the center of my roof ridgline. We also took down $8,000 worth of trees to open up the signal path to the north specifically recommended by Starlink to get our best signal. Initially, we had a great connection despite some remaining obstructions to the east and West. Then, Starlink changed their programming and our dish has moved more and more in a Northwest direction. Customer service said it improved service for the majority of customers & there is no way to individually redirect or re-program my dish. They also said they can’t promise they won’t change the established direction from my house in the future. To avoid taking down another $8,000 worth of trees and then risk the possibility that Starlink may reprogram to point NorthEast towards more trees,I think my best option is to install the tallest roof top mount that I can. I was relieved to read that a little swaying won’t affect the signal. I saw the recommendations for the pipe adaptor which is part of the solution. Your site recommends J mounts but the ones I can find seem to be suitable for poles no more than 36″ in height. I’d love to go up 10′ or higher. What’s your recommendation for the most robust J or other style mount for a roof top that would allow me to construct the tallest possible pole mount on the peak of my roof?
For 10′, you are looking at a more custom install with a mast and guy lines to support the height, or possibly a dedicated tower that is ground mounted. This is a bit beyond my scope and experience. But with the Pipe Adapter, you can use Starlink with virtually any pole/mast as long as the pipe is under 2.5″.
i put mine ontop of an aussie iron bark tree 27 metres in the air my man, you can do it all with little problems. only needs to be above the obstruction.
Do you know yet what the mounting options for the Gen 3 dish will be?
I’m working on my reviews before I update the guide, but yes, Starlink offers a Gen 3 Pivot Mount for direct roof mounting, as well as a Wall Mount for eave or exterior wall installations. They have consolidated a lot of the mounts. In my opinion, the best thing to do is get an aftermarket J-mount, and then buy the Gen 3 Pipe Adapter to adapt it to the J-mount. People that started off with J-mounts have been able to reuse it for each Starlink generation, thanks to the Starlink Pipe Adapters. If you bought a Starlink Wall Mount, though, you have to replace them for each generation upgrade since they aren’t backwards compatible.
Thanks for making this site! I have one question. I bought the long mount from Starlink. As I measure it, I see that the rectangle dish would hit the eave if the dish wants to move in that perpendicular direction. On the regular stand, it sits in a position that would work fine on the long mount (parallel to eave), as long as it does not change direction. Does this mean I might be able to install it like I planned? I also understand it might tilt if snow accumulates, but I assume that would just be an up/down pivot.
Thanks for the advise!
Hi, just following up. Thanks again for your advise.
Sorry, I missed your original comment. The dish auto rotates and tilts, typically at around a 20-30 degree angle to the North. I recommend installing it with enough clearance so that it can freely rotate and tilt without hitting the roof. You never know when it could reboot or change direction, and you don’t want to damage the motors by having it obstructed from movement.
If clearance is an issue, you could also attach the Long Wall Mount directly to the fascia board, instead of to the exterior wall. This should give it plenty of clearance from the roof.
The dish is angled. Is there any direction it should face that works better than another.
If you have the Gen 2 Standard dish, which most people do, it has motors that automatically aim it the direction it should face. It does not need to be manually aimed.
Wow, glad I found your very informative site!
I do have an issue to be solved. I have a steel roof and my gable ends face east/west. Looking for advice on a mount.
My favorite mount is the Ridgeline Mount. If you don’t have ridge vents, it’s a good option that doesn’t require any holes in the roof. Otherwise, I’m a big fan of using the Starlink Long/Short Wall Mount secured to the fascia at the roof peak. You should try to install Starlink at the highest point you can on the roof, so that it won’t matter which side or direction you install it. It should have a clear view all around ideally.
Hello Noah,
I am looking to build a 4′ pole extension and was wondering if you have the inside measurements of the pole end the little gap you can see on the picture ?
This should help:
https://www.starlinkhardware.com/starlink-dimensions-dish-and-mast-measurements/
Hi Noah,
What would you recommend for fixing my starlink to a mobile home? There are no obstructions, but I am in a very windy area.
Many thanks.
I’m a big fan of Starlink’s Flashing Mount + Pivot Mount if you want to install it on the roof. Otherwise, you can use their Short/Long Wall Mount to attach it to the fascia.
Looking for a 3 to 6 foot pole extension that clicks/locks into the existing dish pole and the base mount or wall-mount. Female end for the dish mast and male end for the mount side.
I’m not aware of any kind of extension that is plug and play. The Starlink mounts won’t hold up very well with that kind of extension anyway. Adding that kind of length increases the forces on the mount by a lot (the extension is acting as a lever). It’s best to use a 3rd party mount that is already designed with the length you need.
I am wanting to mount my dish on a 30 ft tv antenna tower. Seems to move with the wind some. Will that cause any reception issues? Should I be mounting to the roof instead?
No, swaying with wind will not cause any issues, as the Starlink antenna is an active phased array. It can track satellites electronically without physically having to move. The antenna has the capability of being used in-motion. In other words, if the antenna can connect mounted on a truck going 80mph down the highway, a little wind movement isn’t going to affect anything.
just got my starlink running.
i have been looking at various mount options but i want to run the cable inside the mount itself.
by grinding off the triangle bit of plastic from the cable i was able to get it to slide through the x mount that comes with.
i cannot tell from the diagrams if this is possible with the pivot mount, or any other mounts.
I will not run a cable outside my house, thats just wrong haha!
Yes, it is possible to run the cable on the inside of most mounts. The Pivot Mount + Flashing Mount would be what I recommend for a roof install, or a J-mount/Long Wall Mount for side or fascia install. The connector on the dish side unplugs, you should route this end through the mount to avoid having to grind off anything.
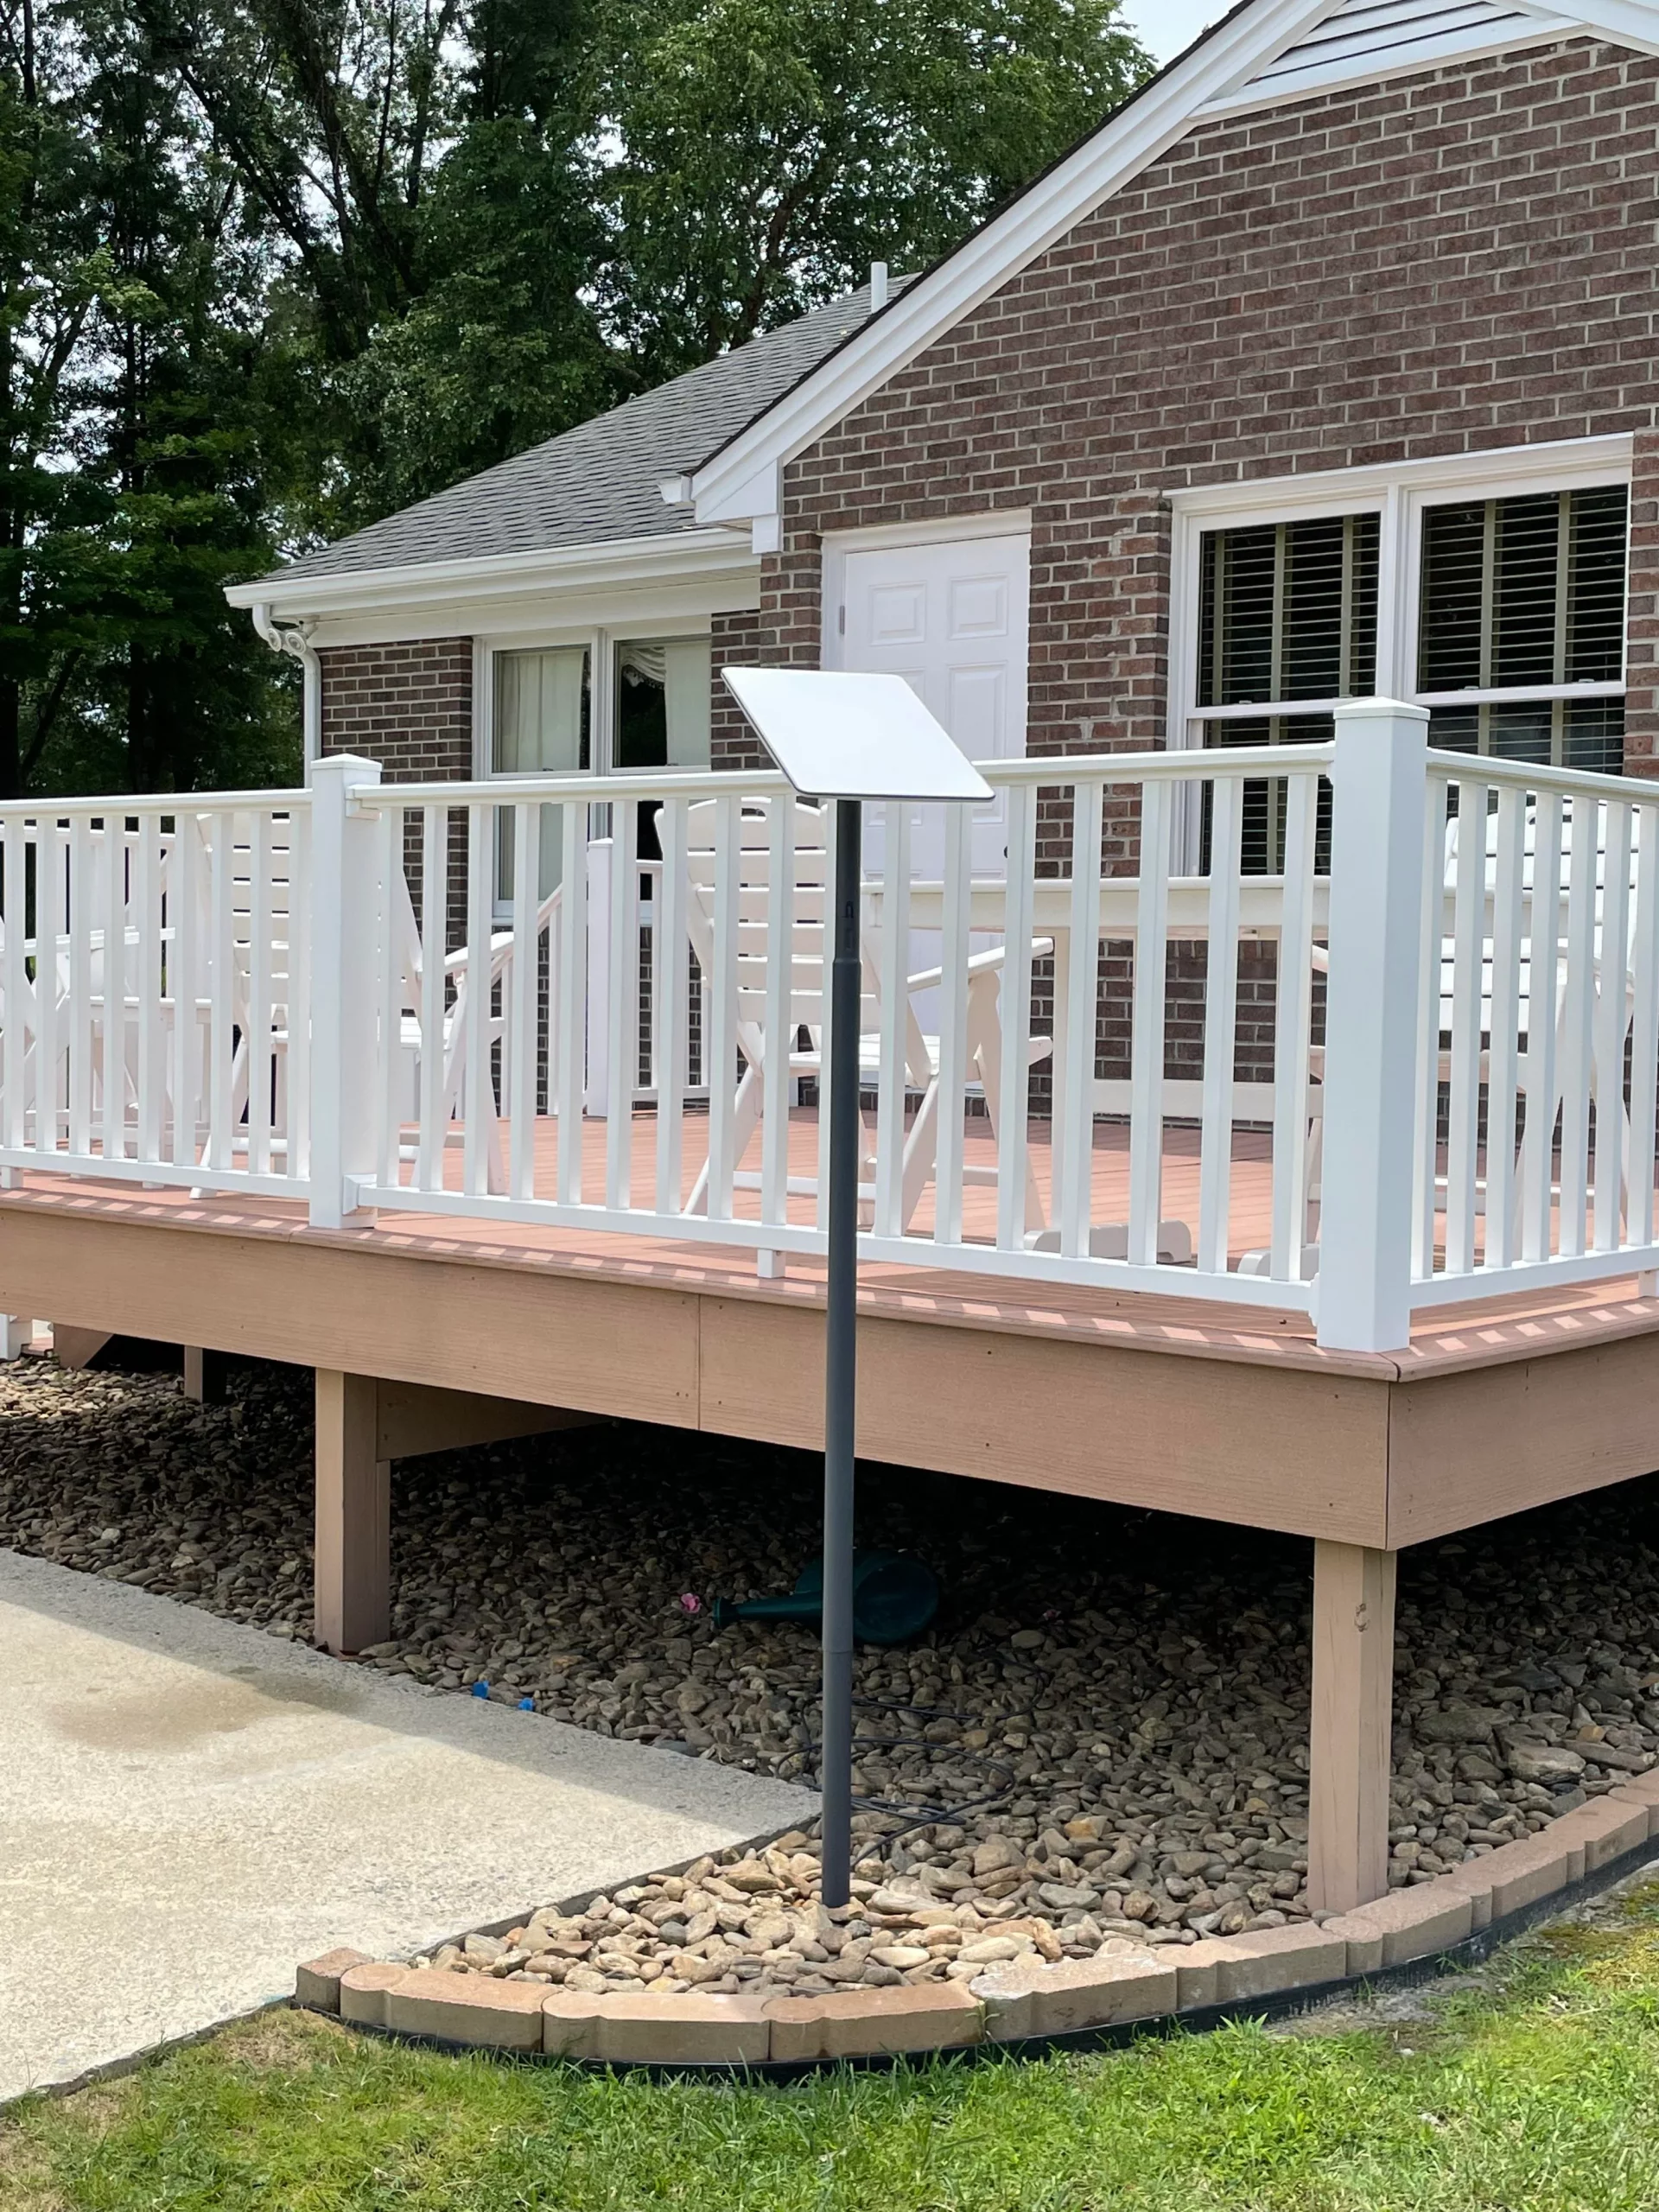
I’m interested in using the Pole Mount but fastening to a 20′ tall 6X6 Post on my deck. I realize the pole itself will not reach to the ground. But I’m hoping to fasten it to approximately the upper 4 feet area of the post to result in some extra height.
What is the best fastener to use? U-fasteners?
That’s what I would do in that situation. Some kind of U bracket from a local hardware store. I can’t remember the specific name, but the bracket is a U shape with tabs for screws/bolts on each end. They come in a variety of sizes, so you should be able to take the outside diameter from the Starlink Pole Mount and find something close.
Are there known dimension on the mounting bracket for the SL long or short mount? I got specs from Winegard on the DS2000A and 3000. The bracket is 7″ from top/bottom. I’m curious as the 2x facia I have currently has 6″ of space to hold a bracket. So a winegard would overhang the bottom by 1 inch. Curious about the ST mount.
I know the Short Wall Mount bracket is less than 4 inches from top to bottom. I’m confident that the Long Wall Mount also requires less than 6″ of mounting space for the lag bolts. I have the Short Wall Mount in front of me right now, but currently do not have a Long Wall Mount to look at. The Starlink documentation doesn’t include specifics on the mounting area dimensions. But from what I remember when working with the Long Wall Mount, it’s not going to be over 6″.
I reread this guide and I may be missing it. what is the approximate offset of the winegard ds200a, and the starlink short and long mounts. I am considering mounting on facia. The roof is a bit steep in pitch. the SL long mount would likely have the dish somewhat out of the roof line just in the air. I dont know the offset or the height the short and winegard have. Can you share?
The Winegard comes in 18″ (DS2000) or 38″ (DS3000). The exact offset depends on the various factors of your roof install, but generally, the aftermarket j mounts are going to get the dish much further away from the roof than the Starlink wall mounts.
Hi Noah
I’d love to send you one of our Starlink roof mounts that we have available here in Australia. We have them available for both metal and tiled roofs.
Let me know if you would like one to test.
Cheers
Rob
Great site. Planning the type of mount that would work. I think the J mount and adapter. We have a metal rook, but the peak is 30+ feet in the air. its extremely hard to get onto. In fact I was briefly on the rook only because scaffolding was in place. not sure how to get up there again later. that said. J pole on the 2x6fascia should work. The facia is aluminum wrapped. Thoughts on how to seal that? Silicon into the holes an onto bolts/screws before fastening it?
second issue, we’re so far north, the walls are actually 12″ think before exterior sheathing and interior finishing. the starlink exterior wall kit might need to be MacGyver’d any thoughts on that?
thanks for GREAT site
Silicon into the holes and over the fasteners would be sufficient. As for routing the cable through the wall, the wall kit will still work. The only caveat for 12” walls would be that the drill bit and the cable pulling tool might not reach all the way. When drilling, you might have to measure and go from each side separately and hope the holes roughly line up. Then you just have a 3/4” hole for the grommet on each side. Besides the cable, nothing else needs to be installed in or through the wall, so the kit would work for you.
hi Noah! Thanks for good info. I am in Philippines with roam plan for starlink. I need to install on metal peaked roof for my home base but want an easy way to remove for travel. The starlink roof line kit is just too expensive. Any thoughts?
Are there any collapsible poles for mounting on our flat deck roof?
For a flat roof, the standard mount works fine and is portable. If the ridgeline mount is too expensive, I would just weigh the standard base down with whatever you have on hand. Maybe even magnets attached to the base legs instead of weights.
Hello! To encourage my husband to mount this so we can try it, I am trying for a temporary solution (and to see how well it works), as the box has been sitting in our living room for a while now. Also, I ordered it, so this is entirely my fault! I ordered the heavy-duty tripod mount you linked and probably will add to it a grounding rod, but I’m not sure what 5/16 stakes to best stake it to the ground with, and I’m not sure what pole I could add to it to raise it up higher. I just don’t want to overlook anything or go down the wrong path, which may already be too late. Thank you!
Editing doesn’t seem to work here for me, so I’m trying to add to this tha I do also have the Starlink pipe adapter.
I am attaching a long arm mount under the gable end. It is attached to lapped siding so not 100% vertical. Maybe 2-4 degrees off vertical. Do I need to shim with washers to make it vertical or will dish adjust.
The specifications say to mount the mast within 5 degrees, so 2-4 should be fine.
We have decided to order Starlink for our rural home. Where I want the physical satellite delivered is not at the address I am entering for the service area (no mail service there). Is that a problem? So many things I want to know/order seems like you can only access after you have purchased. Thanks for any help.
Nope, it is not an issue. On the order form, you can specify a separate shipping address if desired.
I’m in an off grid aplication with tall trees – can side mount on top floor to extend (home made adapter) what precautions for lightning?
I would ground the mast, there really isn’t a good way to ground the Starlink cable.
Great info! Noah have you heard or seen anyone that has attached starlink to a full size flag pole? There is one on our property previous owners installed. I’m thinking about using the long wall mount to attach the the side of the pole at the top. Not sure if that mount will work. The top of the flag pole is a ball, so maybe an attachment like the chimney option may work?
If the ball is removable, the Pipe Adapter from Starlink seems ideal.
Hello Noah,
Two questions. Is the ground pole mount already configured to accept the Starlink antenna or do you need the pipe adaptor? Also, will the ground pole mount work with the Flag Pole Buddy mounting system? I will be using on an RV so wanting to mount the pole to my rear ladder. Thank you!
Steve
The top of the pole mount is designed to accept the Starlink dish, no adapter needed. I’m not sure on the Flag Pole Buddy, I am not familiar enough with the product to say. The Starlink Pole Mount diameter is 1.88″ if that helps you determine compatibility.
Thank you! Appreciate the response.
My best location is on our dock by the water. I could pole mount it or mount it flat to the bench on the dock but then I have to run the cable on the ground up to the house. Can the cables just lay on the ground?
Did you find a solution? I have the same issue…
I live among the Rocky Mountains where we get a lot of snow. The problem this past winter was snow build up around the dish. It melted just fine on top if it, but the snow was so deep that the dish sat in a hole. I wasn’t able to climb up on the roof so resorted to duct taping a ski pole onto a painter’s pole to knock down some of the snow build up.
Is there a product that simply extends the pole for my dish using the existing Starlink mount? If so, where can I get one?
Thanks,
Rick
I don’t know of any plug and play type of extension. Most of the Starlink mounts are not designed to deal with the weight that adding multiple feet of height would add. What about the 38″ Winegard J mount? Would that be enough clearance for the snow? If you need more than that, you would have to look into some kind of custom chimney mount, or another type of custom pole/mast setup that you could attach Starlink to. With the Starlink Pipe Adapter, it’s pretty easy to mount Starlink on any mast up to 2.5″ in diameter.
Noah,
Thx for the reply. I’ll check into the Winegard J mount. I really don’t need to raise it that much higher… perhaps another 8 – 12″ would do. We had some record amount of snow this past season, so I don’t expect to continue each season. But do want to be prepared for it.
Hey, Noah. I plan to mount Starlink flat on top of my RV permanently. Bad idea? Signal loss? Ideas for the hardware? (Basically a water-tight box, right?) Great article! THANKS!
I would recommend the Flat High Performance if you are going this route. It comes with everything you need to mount it flat to the top of an RV. If you are using the Standard Starlink, flat mounting would require removal of the mast, and the motor disable mod. The Standard dish also cannot be used in-motion. Overall, there is very little benefit of permanently mounting the Standard dish to an RV.
Do you know if it’s possible to buy a replacement insert tube that goes into the ground base and inserts into the rectangle dish down tube? Mine has gotten torn/broken and I have yet to get a response from support and not finding one on the “Shop” of the Starlink page.
I’m not picturing which part you are talking about. Is this a part of the dish mast itself, or an accessory? Closest thing I can think of is the Pipe Adapter. Other than that, the mounts are all just one piece, the dish slides right into all Starlink mounts, no other components.
It’s the piece that slides into the base and has the cut out for the cable to connect. It’s part of the dish mast itself that shipped with the dish last month. The metal itself is torn/broken. So, instead of the pole being upright at 90 degrees, it is now canted at about 60-70 degrees. It’s holding enough for now that the dish can still track and move. I put in a Support ticket a week ago that included pics but have yet to get any response at all.
Gotcha. Ya that isn’t something that can be ordered or replaced in the field. You’ll need support to send you a new dish.
Thank You! Any suggestions on how to get a response if they don’t reply to support tickets? It’s been 6 days now.
There is really no other way to contact them. Typical response times can be up to 2-3 weeks.
i have an empty existing electrical mast that I want to mount the pipe adapter to, but I want to run the cable inside the mast not the outside like it is shown how it is mounted most of the time. Is this an option or a DIY kinda thing?
The cable can be routed down through the mast. Shouldn’t be an issue to do it that way.
I have a new Starlink with the four-leg base mount.
I found the recommended location using the Starlink App.
Is it possible to mount the base backward? I don’t want to do this, but I mounted it so the cable inserts on the south side of the antenna. The instructions that came with the unit – none.
The online Starlink.com Help – is worse than useless.
You can mount the base in any direction you wish. The dish has motors, and it will aim itself from any direction. The caveat is that the mast has to be near vertical, and the dish movement can’t be obstructed.
Is it safe to drill into / through the rectangular dishy’s mast pole to secure it to the extension of the Channelmaster Universal J-Mount (CM-3090)? The ID of the top extension is 1.38in, only .04in larger than the outside diameter of the dishy mast. My preference would be to bolt through, but I can also live with a couple of set screws if drill-thru is contra-indicated
The Starlink cable runs through the mast, so I would recommend set screws or u-bolt style clamps.
I have 18″ deep eves. Is the J-mount long enough to allow the dish to clear around it?
The 38″ Wineguard DS3000A would do the trick.
I am using Starlink’s standard Long Wall Mount but I need to get the dish higher. Is there an extension pole that would fit into the Starlink mount?
There isn’t anything that would be plug and play. You would have to get creative with some kind of pipe/mast material. Are you still within the return window? I think the 38″ Winegard J Mount would be better for more height above the roof, compared to the Long Wall Mount.
I will likely be getting a starlink this summer for use in a remote and heavily wooded area. We do however have power. We probably would mount the starlink to a pole. I’m researching two things. How do try to verify where to place the pole (again tall trees all around) to ensure I get good signal. Second. Once I have a pole location, how should grounding work? The poll itself is grounded? An elevated starlink is possible lightning target I would think
You can use the app to check for obstructions in a specific spot, but it would be hard to check at any significant height. You can ground the pole, but there really isn’t any way to ground the Starlink dish without modification to the cable, which wouldn’t be supported by the Starlink warranty. Starlink says that the grounding through the AC power cord is code compliant.
great thank. Until i came to this site (and I have more reading here to do) I was thinking stand alone pole (like a flag pole type of thing) But maybe a poll mounted on upper floor of that house that would allow starlink to be proud of the roofline. That might work. As for grounding good answer. makes sense, glad I asked though.
I see info on on the 75 vs 150 cable. Until the house is built I dont really have any sense what sort of length. I presume there is no noticeable signal loss 75 vs 150. Is that an issue if you needed to go above 150, to say 200 (assuming such a cable could be found)
Signal loss isn’t a concern between 75 and 150 ft. 150 ft is the maximum length cable that Starlink makes.
Hi Noah, I was just told that the router shouldn’t be close to other electric devices ie, I shouldn’t place it beside a fridge, freezer, tv, computer etc. If this is correct, how much distance from other electric devices is best?
It’s best that they aren’t right next to other electronics that could cause interference. Give at least several feet of space.
I’m in country Australia and have been reading your information on installing Starlink. I think I can set up a pole for the dish. The pole would be attached to the side of the house. I was going to use one of the many poles here but then I read that the top of the pole should be sealed. Is this essential?
I have terrible satellite internet, mobile phone and TV reception.
I don’t think it’s essential, depending on how you mount the Starlink dish. If you use the Starlink Pipe Adapter, the top of the pole is covered anyway by the adapter.
Do I need to use the pipe adapter?
The pipe adapter makes it easy to adapt any pole up to 2.5″ to the Starlink dish perfectly. You don’t need to use it, you can use other types of clamps which would be a DIY solution.
is there any way to run the cable inside the pipe adapter to run through an existing (empty) electrical mast?
Yes, the connector has the ability to run the cable straight down through the mount instead of hanging from the outside.
can it be mounted upside down on a soffit?
The dish mast has to be upright and vertical.
I have a Dish satellite on a J mount on a pole next to my house. Could I replace my Dish satellite with the Skylink? Thanks
You should be able to. If the J mount has a 1.5″ diameter, the Starlink mast should fit and just need to be clamped down somehow. If it’s a larger J mount, you can use the Starlink Pipe Adapter to make the connection.
Does the ground pole mount fit into the base that comes with the dish, I know the top end of pole clicks onto the dish and the other end is buried, my question is does the end you bury fit the base that comes with the dish?
No, the ground pole outside diameter is larger than the inside diameter of the standard mounting base.
We just purchased the Starlink RV and plan to use it as our primary unit at our home and since we camp a lot, take it with us. Is there a quick disconnect mount for when we use it at our primary residence and then just easily disconnect it to take it with us when we go camping? If not, what do you suggest? We have no obstructions at all around us (we live on a few acres, and there are not many trees near us). Thank you!
If you don’t have trees around your house, I’d recommend something like the Starlink Pole Mount. If you plan to split usage between home and RV, you will want the dish in an easily accessible location. Roof mounting is ideal for clearing tree tops, but if you don’t have trees, you can install a Pole Mount in the ground near your house. The dish just locks into the mounts with a push tab, so removing it is as easy as pushing in a button.
I would also recommend purchasing an additional cable and router. Install one cable and router permanently in the home, and the other set in the RV. That way, when you want to go, you just need to grab the dish, unplug the cables, and go. Use the included base as your RV mount. Just stick it on top of the RV when parked, or in a clearing if there are lots of trees around the site.
What is the minimum elevation angle above the horizon that is required for Starlink to get reception? Also, does it need to point exactly O° or is there a range? We live near Albuquerque New Mexico.
Thanks
The dish self aligns, there is no user adjustment of the angle. In order to check a location, you can either use the obstruction checker in the app, or temporarily install the dish and let it collect 12 hours worth of data on obstructions. The antenna itself has about 100 degrees field of view when stationary. So even in a vertical orientation, you would need clear sky about 50 degrees from vertical in all directions. Right now, the antennas mainly point north, but obstructions from any direction can cause issues.
I just ordered an Starlink Ground Pole mount to use with the HP array. Is there any tip how to connect the cable to underground conduit (eg HydroMaxx 2-in x 50-ft Non-Metal Liquid-tight Conduit) mainly what connections to use to seal it. The snow will most likely cover half of the Pole
I would run the conduit up the side of the pole to a junction box near the top. Then run the cable into the box with rubber grommets to help seal out water. If you put them on the bottom side of the box with a drip loop on the cable, that should prevent any moisture from getting in. That way the entire cable up until near the dish is protected from the snow/water.
I am installing on to a cypress post. I am wanting to seal the buried SL cable which is in conduit so moisture doesn’t go in there. So if I bring the cable up the post in 32mm conduit, would the conduit feed through a rubber grommet into the bottom of the junction box?
Would the cable then come out the bottom through a second rubber grommet hole?
And then the drip loop go after this once out of the junction box further on towards the dish . Also the rubber grommet would need to have a big hole to get the connector plug through, so wouldn’t moisture likely get into the junction box as a result?
There are lots of ways to do it, but I wouldn’t worry so much about the conduit being 100% sealed. As long as rain can’t get in you are going to be ok up on a post. Your plan sounds good, you would have a junction box with the entry point from the dish on the bottom, sealed as best you can with a rubber grommet. Then the conduit would exit from another hole on the junction box, and would be sealed via a thread, compression, etc.
Thanks for your response. I notice some people when installing have run the SL cable down the centre (interior) of the pole they are mounting on. Others appear to have it loose coming out over the outside of the pole, (or adapter mount on pole). Is there a correct way or will either be ok do you think? The cable would be much more exposed to heat and frost if outside the pole, one would think? Thanks.
Either way is fine. The only difference is if the cable is routed down through the mounting base or not. The connector itself is located within the mast.
I’d like to utilize an existing tv antenna with tripod on my roof. If I replace the current 3 ft mast with the 8 ft Pole Mount, should there be enough separation for the new dish (5ft) ?? Is the Pole Mount suitable for a non-burial installation ??
I’m sure it would work fine for non-burial mount. At 8 ft, I would be worried about the strength, might need some guy lines to secure it at that height. The distance between the TV antenna and the dish should be sufficient.
Thanks for the great info! I’m curious how tall of a pole I can put on the peak of my roof and any advice around that. It seems the pole options are for ground or chimney mounts vs roof mounts. Trying to clear Doug fir and Ponderosa Pines that surround our home. What are the challenges of putting a tall pole on our roof? Wind? Lightning?
The challenges are the wind, lightning, and lack of structure to secure the longer pole. I wouldn’t want anything over several feet mounted to the roof. If you require a longer roof mounted pole, it would need to be secured with guy wires for stability. As long as the installer grounds the mast, lightening wouldn’t be that big of a concern. The Starlink would be damaged, but a properly grounded pole is what is needed for safety.
What did you end up deciding? We have heavily wooded property far north in the UP. The house being build will be in the trees, and the trees will most assuredly be taller than the home. Looking straight up we’ll be ok. I am very uncertain about 50 degrees either side of vertical. I would hate to drop all the money on SL only to find my reception is poor.
I have a metal shop 3,000 sq ft in size it is 25 ft from my home. Will a mesh system reach inside my shop?
It should be able to reach the 25 ft from your home. I would try to get the main router as close to the building as possible, but I don’t think you’ll have any issues.
Will the starlink long wall mount fit the same screw holes drilled for the starlink short wall mount? Also, is there a “pole extender” to get another few inches pole height?
I checked the installation details, and they do not provide any measurements on hole spacing. The mounting base does look different, so it’s likely the holes won’t line up perfectly. You’ll obviously be able to re-use one hole from the short wall mount. The other hole should be covered by the mount if it’s not the same pattern as the short wall mount, so I wouldn’t worry about it as long as you seal it before installing the new mount.
Starlink doesn’t have any type of extender for these mounts. Might consider an aftermarket J Mount if you need some additional height over what the Starlink mounts can provide.
I have the rectangular dish. My roof has a low pitch with a large eave overhang. In regard to having minimal obstructions, the peak of the roof above the eaves works. Unless there is something I’m missing, it seems like lag bolting or through bolting the base that came with the dish would work fine. Is there some reason it would not work?
As long as the mast is within 5 degrees of vertical, the standard base should be ok. Are you planning to bolt it right to the roof shingles? A J Mount would be another option if you need an adjustable angle. Starlink’s Pivot Mount is another similar option.
I would temporarily try the standard base, weighed down with some sand bags or something, to make sure everything will work ok without errors.
Thank you for this. We purchased the Starlink pole mount and want to attach it to our wooden fence – in case we need to move it in the future instead of cementing it into the ground. What’s the best way to do this?
Probably some U-bolts or a pole clamp that you can pick up at a hardware store, with lag bolts right into the wooden fence post.
Hi we have house and granny flat, what can I do to improve the signal rang of the modem to cover both as signal range on covers about 5 metres at moment
You could try a mesh system:
https://www.starlinkhardware.com/starlink-mesh-nodes-mesh-networks-made-easy/
how do i remove the existing legged factory Starlink mount to replace it with a wall mount. i see a button on the pole just above the legs but it doesn’t appear to do anything. How do i get the mount off?
Press the button and pull up on the Starling dish mast.
Is there any way to install starlink on the back of a big rig where a typical satellite tv antenna for big rigs goes? Or any way to install it on a rig so it’s permanent? If I put it out at the truck stop it will get stolen.
Is it typically a vertical pole that TV antennas will mount to on the back? There are plenty of ways to do it, but if I had a description of the existing hardware on the rig or a picture as an example, I could recommend some ideas.
Thanks for the info! Any ideas on extending the distance of the cable from the dish to the modem and or how far away the modem can be from where you use it? Thanks
Starlink sells is 150ft cable that can replace the 75ft cable. The connections are unique to Starlink, so aftermarket options don’t exist. 150ft is the maximum cable distance. The router coverage depends on a lot of factors, such as the materials your house is made of. In a wide open area, you’ll get a signal from the router from quite a bit away. With a lot of walls, metal, or concrete, Wifi signals don’t travel as far.
We just purchased our system yesterday and it doesn’t look like we will be receiving our kit until sometime next year. Is it a possibility of getting the 150 ft cable in place of the 75 ft cable for an upcharge?
The kit comes with the 75 ft cable as standard, and you can order the extra 150 ft cable from the Starlink shop.
5 months ago was your original post. are you still waiting? Waiting a year is, WOW, a long time.
Just got our 2nd gen dishy and it’s looing like our best option is to perch it up in one of our trees. Would love and tips/insights into mounting system suggestions! The plan currently is to take off the top 1/4 of a smaller Ponderosa then attach a pole to the tree extending it up between 5-10 feet above the (cut) top of the tree. Would love any thoughts or guidance!
These links have some ideas that can get you started:
https://www.reddit.com/r/Starlink/comments/lq9398/final_tree_mount_plan_i_think/
https://www.reddit.com/r/Starlink/comments/l9lfp9/obstruction_advice_tree_mount/
https://www.reddit.com/r/Starlink/comments/kdhzgr/final_mount_plans/
just got a gen. 2 Starlink dish, and have had a tough time trying to find a Ridgeline Non-penetrating roof mount for it. Unfortunately, just sticking it on a pole, will not comply with my HOA. 🙁 Any ideas?
I’ve updated the article to remove the obsolete Starlink ridge line mount. I replaced it with an aftermarket option that can be installed at the ridge, and weighed down with blocks. It doesn’t come with a mast, so you’ll also need a J-Mount or some kind of mount to attach to the ridge line mount base plate. Here it is:
https://amzn.to/3yYdwuL
I believe FCC law protects you from any HOA interference for any receive antenna. I could be wrong but as a broadcast engineer this has always been my understanding for conventional satellite dishes and even TV antennas.
Hi Noah,
Thanks for all the great info. We just received our Starlink yesterday. We are super excited about installing it. We thought it was going to be easier but it’s not. We live in a very rural place. Our home is not surrounded by trees, cables or buildings. My son climbed the ladder yesterday to the side of the roof. The message said it was a decent spot. Not sure if it says great or better spot. We currently have HughesNet, we had an old pole the technician used that pole. (We had our previous satellite internet attached to a huge beam on our deck.) So I am wondering can we use that pole? What can we use to secure it? It’s not to low for the Starlink satellite? If we do decided to secure it on our roof we are thinking right at the peak. But should we use the mount it came with? We have an old satellite still stuck to our beam can we use any of that stuff to secure the Starlink one? We get some pretty good winds and some snow. Please any help would be awesome. I don’t want to send it back.
If you have a pole from a previous satellite dish, that should work. It depends on the diameter of the pole. If it’s around 1.5 inches, the Starlink mast should slide right in. You’ll need U-bolts or some other type of clamp to secure it. If the pole is a larger diameter, you’ll need the Starlink pipe adapter:
https://shop.starlink.com/products/us-consumer-mount-pipeadapter-gen2
This adapter will allow you to mount to poles up to 2.5 inches in diameter.
Hi Noah – thanks for all the information, very helpful. I got the SL confirmation email but now am struggling on where I’ll put it; we live in a very wooded area with lots of tree obstructions. Additionally have a metal roof. I think chimney install might be best, but I’m concerned about heat, smoke, etc. as we have a wood burning fireplace that we use in the winter. Have you heard of that being an issue before? If not chimney, our metal roof has several good spots without obstructions but I’m hesitant to drill into the roof… Thanks again.
I wouldn’t recommend the chimney mount unless it’s a brick chimney. The heat/smoke shouldn’t be an issue as long as you can get a good distance away, like what is pictured above.
For a metal roof, one option would be magnets. If you can source some strong magnets, several people have been able to use the standard base with the magnets attached to the legs:
https://www.reddit.com/r/Starlink/comments/v7fzet/diy_metal_roof_mount_magnets/
https://www.reddit.com/r/Starlink/comments/u83c9e/dish_just_arrived_held_in_place_by_magnets_till/
Magnets! That’s a great move, thanks again Noah.
We have a new metal roof also and I love this idea, thanks.
we also are starting a home build in a very heavily wooded area (actually a forest and we’re cleaning just enough trees to put the house in). Its will also have metal roof. In far north in the UP. magnets a interesting. I’ll have to brush up on my Physics to recall how heavy snow/ice could impact such a mount. That said, I’m more concerned with trying to determine if a SL would even work. I wish they could rent them so I could see if a good spot could be found, then shell out full price. Not sure the phone app will give us satisfactory confidence that the SL will work.
The cable that’s hooked to the “dish” should be removable. Having to drill a 1 3/8 “ holes all over the place to route the cable is unacceptable. I am an electrician by trade and have to do installs all over the place and if other companies have a huge end that’s required, the other end is always much smaller to make installs easier. You just pull the cable from the other direction, then plug the small connector into the dish. I believe this cost me an extra 4 hours time just drilling holes in top plates in my home with a hole saw because a hole saw will only drill 1 1/2 deep before bottoming out. There are 4 1/2” of wood on interior walls in most houses for top plates. Makes it almost impossible for such big holes ……get the point? Jeff hill
The cable that hooks into the dish end on the rectangular dishes is indeed removable.
How do I release my gen 2 square dish from the tripod? I want to put the pipe adapter on it however I cant seem to remove it from the tripod
There are a couple of spring tabs near the bottom of the mast that need to be pressed in to release the dish from the base.
I am going to mount my starlink to my metal roof using the J-mount. What does J-Mount connect to? In the pictures there’s a small box between the mount & the roof. Where do I get that?
That’s a flashing mount. For a metal roof, that isn’t going to really work, since you don’t have shingles for the flashing to slide under. You can still use the J-Mount and just screw right into the rafters. Make sure to water seal any hardware and holes that you make in the roof, and check them periodically as weather will deteriorate the sealants. Ideally for just a J-Mount, you attach to the eave, exterior wall, or fascia to limit the possibility of roof leaks over time.
I made a video showing how the flashing mount works if you are interested in learning more about it, even though it won’t really apply to metal roofs: https://www.starlinkhardware.com/guide-to-using-a-j-mount-with-starlink/
Excellent informative website, thanks for the info and your efforts putting this together.
Hello we just got our Starlink and are planning our install. We think a wooden post would work best for us. We get very deep snow (often over 5 feet) so roof mount and Eve mount are out and we don’t want to cement in a pole. What would be best for securing our Gen 2 dish to the post?
Aftermarket J-mount, or the Starlink short wall mount. Either one you go with you just secure right into the post. I have a guide to using aftermarket J-mounts linked below, but go with OEM starlink mounts if you want the easiest plug and play and OEM fit an finish:
https://www.starlinkhardware.com/guide-to-using-a-j-mount-with-starlink/
https://shop.starlink.com/products/us-consumer-mount-shortwall-gen2
Hello– I have a 2nd gen and live in high desert, Spring winds, Summer monsoons, and very light snow. My roof is PBR metal panel. My eaves are 2ft out which seems a bit much for mounting on the structure. I’m afraid of the “no drill” clamps with 30-40 mph winds in Spring. The chimney mount is tempting but this is an old adobe structure and I’d be concerned about any additional strain on it during high winds. I found a great video on the Volcano Mount on the same PBR metal roofing, which seemed perfect– but it looks like Starlink stopped selling them. Right now I’m looking about 20ft away from the house at an electrical pole to possible attach there and just run the line to the house along the same bramble of electrical wires connecting from the pole–house. Do you have any thoughts or better recommendations than what I’m considering? Thank you!
Lot’s of people are using the standard mount and attaching strong magnets if your type of metal is suitable. That would be one way to go:
https://www.reddit.com/r/Starlink/comments/v7fzet/diy_metal_roof_mount_magnets/
https://www.reddit.com/r/Starlink/comments/u83c9e/dish_just_arrived_held_in_place_by_magnets_till/
Hey, does anyone know where we can purchase the Gen 1 Volcano Mounts now that Starlink isn’t selling them on their website?
They are still available:
https://shop.starlink.com/products/us-consumer-mount-volcano-grey
Can you recommend an after market kit or list of supplies to replace the cable routing kit? I have an instillation planned in a couple weeks and don’t think I can depend on getting the Starlink kit delivered before then.
Really just depends on what you are drilling through. For wood, a spade bit is what you want. Measure the diameter of the largest part of the cable you need to route through the hole, and size up an 1/8 inch or so to select the right size bit. To seal the hole, hardware stores sell several options of rubber grommets. The cable routing kit is a nice all in one solution, but most of that kit you won’t use. If you do your measurements and visit a hardware store, you’ll be able to find a few basic supplies to complete your own installation.
Thanks. I found some hard plastic grommets at Lowe’s that I think will work.
Am I able to purchase an extra Starlink RV “Base”? If so how and how much? I will install one Base on top of my Motor Home with the cable that comes in the kit. I have ordered a second cable to use if I wish to place the Dishy away from the Motor Home and I require a second Base.
I would reach out to Starlink customer support to ask about purchasing another base. I don’t see one in the online shop, but I’m sure they would send you another one if you ask. For support, access any of the support topics on the website or app, and then click the thumbs down icon on the answer. That takes you to an email form.
You would need solar + battery + inverter in order to provide enough stable 120V power to the router. The rectangular antenna version draws around 30-60 watts normally, and can go higher in snow/rain/ice. I’m not an expert by any means with solar, but I would think you would need at least double/triple that capacity in solar panels in order to provide some wiggle room when the sun is not directly on the panels, and for recharging the battery. Also, you would need the battery to provide power when the sun is down, or on rainy days.
Fortunately, solar is very scalable. So you could start off with a 100/150W panel and see where that gets you, and add more if needed.
As far as harming the antenna, I don’t think that is a concern. You don’t want to be powering it off all the time because it takes a few minutes for it to boot up and find a signal. And that uses more power than just operating normally. I think as long as you have a good battery + inverter that can consistently run it without power interruptions, you are good to go.
Hi Noah
Where I want to install my antenna does not have electrical service. No power. If you would like to use a solar panel for power. Do you know how many watts it would have to generate? Is it a solution that does not harm the proper functioning of the antenna?
Thanks
Non roof penetration Starlink two pole mount
2 10ft sections of 1 1/4 conduit
1 4 foot section of 3/4 conduit or pvc
1 1 1/4 conduit but connector
5 1 1/2 bolts
10 washers
5 lock nut washer
1 impact gun or some strength
1 Stand Off Wall Mast Mount – Y Style Antenna Mast Bracket – amazon
Note i used grade 5 bolts
The dish is fairly tight when dropped into the 1 1/4 inch pipe
first drill your hole for the dish I drilled below the bottom button
After mounting the pole, place a washer one each side of the bolt and tighten up, i didnt crimp this one, but if there is any wobble crank away
two Conduit poles together , i first drilled two holes about a foot apart on the 10 foot pipe, these will be below where your putting the but connector, start pilot hole then drill the holes bigger
Insert the 3/4 inch pipe and finish drilling the hole through the first one, place a bolt in the hole to keep it from moving and drill the second hole and place bolt washer then nut and washer in both holes
Take your impact gun and tighten theses up the strength here is slight crimping or bending the metal to eliminate any play in the 3/4 inch pipe.
Slide you but connector over the 3/4 pipe and onto the 1/4 pipe
Join the two pipes together and repeat the process on the pipe above
To strength but connector, I did this after it was installed
Drill a slight small hole than the screw through the mounting hole
Place some locktight on the screws and use a large phillips screw bit and your drill or impact and tighten it down, what i was looking for was for the screw to penetrate into the metal and add some extra holding power.
Now your ready to mount the pole using the Stand Off Wall Mast Mount – Y Style Antenna Mast Bracket
Do you have any photos?
Question:
What is the best mounting system for portability? Example: from roof to my trunk so
that I can take it camping with me.
Many thanks. We have the system and anxiously await your advice
The included stand is actually the best option in my opinion. Not having it permanently mounted gives you the ability to move the dish around to avoid obstructions at your camp site. If you had it mounted to your RV or vehicle, that limits how much it can be moved around to avoid trees. Also, it’s such an expensive device that it’s best to store it away in the cabin when driving, and then deploy at camp. Having it mounted to the roof exposes it to damage from rocks, etc.
That said, if you have a roof rack, that’s going to be your best option. There isn’t any accessory right now that is plug and play, but it would be possible to secure a J mount to the roof rack rail with some kind of fastener (u-bolts, for example). This would also give you the ability to lay the dish down flat for transport with a simple adjustment of a bolt.
I was hoping to find some recommendations for Vanlife usage. Ok to leave mounted while traveling if attached appropriately? Thinking of mounting to a roof rack but would like it as low profile as possible. Recommendations on hardware? Thank you
I think a J mount would be perfect for a van installation. If you want to install to a roof rack, you could potentially just use some U-bolts to secure the J mount to the rail. Or figure out some other type of bracket on the rail where you could bolt it to. Either way, a J mount would give you the ability to stow the dish during transit. J mounts have the ability to swivel at their base. With Starlink, you simply tap the “Stow” option in the app, and it moves the dish to a vertical stowed position. Then you would just need to loosen the J mount swivel bolt, lay it down as flat as possible, and then secure with a bungie cord or something for transit. When you arrive at your new spot, just reverse the steps.
We recommend the Wineguard J mounts, which I have reviewed and detailed in our Guide to Using a J Mount With Starlink. The video there should give you some idea what it would take to mount one to the roof rack.
I’m hoping more companies and maybe even Starlink start producing RV/van mounting accessories soon! Until then, it’s very much a DIY project.
Yep – just got one for my HughesNet pole. https://lonepinetechnology.com/ has one that should fit. Tom Mattheisen has been awesome.
Is there anyway it can be mounted on an abandoned satellite pole? We have a Direct TV satellite pole that is still located in my yard since we changed to Dish.
Yes, and how you do it depends on the diameter of the existing pole. If it’s around 1.5″, the Starlink dish mast should slide right in, and you can secure it with U-bolts. If it’s larger than 1.5″, you can use a pipe adapter. Starlink sells one on the website. Aftermarket options also exist, as Douglas pointed out in the comment below.
No problem at all. Our house had an old J-mounted DirecTV dish attached to the eaves when we bought it. I purchased the pipe adapter from Starlink, removed the old DirecTV antenna, attached the pipe adapter, and then inserted the SL dish mast. Was even able to thread the SL cable through the J-mount for a cleaner look.
For those having problems reconnecting the cable to the base of the antenna… take a 1/2″ wide sliver of a business card, fold it in half for a double-thickness 1/4″ wide sliver of paper. Put that under the cable as you slide it into the antenna base. You’ll be soooooooooo pissed at how easy it goes in.
Starlink’s engineering team apparently didn’t think correct alignment mattered.
Any Starlink mounts for attaching to a tree that you can recommend?
In general it isn’t recommended. Trees sway, it’s not a stable base for the dish. A tower would be better, but I understand that sometimes the trees are way taller than any tower, and a lot cheaper to just top and mount to also. Reddit has some good info:
https://www.reddit.com/r/Starlink/comments/lq9398/final_tree_mount_plan_i_think/
https://www.reddit.com/r/Starlink/comments/l9lfp9/obstruction_advice_tree_mount/
https://www.reddit.com/r/Starlink/comments/kdhzgr/final_mount_plans/
So it’s going to be kind of custom. Really depends on the diameter of the tree. But in general, I think it’s best to attach to the side of the tree like what is pictured in the installs on Reddit.
This is mine – I can fully recommend! no movement in the wind and survived the snow.
https://www.ebay.co.uk/itm/154890477365?mkcid=1&mkrid=710-53481-19255-0&siteid=3&campid=5338919841&customid=&toolid=10001&mkevt=1
Are the mounting options the same for the new square dish listed above or do they differ at all from the original dishy?
For aftermarket products, they will be the same. The round dish mast outside diameter is 1.4 inches and the square dish outside diameter is 1.3 inches. The square dish will be a little less snug in the universal 1.5 inch mounts like a J-Mount but will still work. Many people have decreased the gap with tape, and then secured the mast to the mount with a bolt or two for a really tight fit. Pipe clamps can also work.
For Starlink OEM mounts, they redesigned them for the slightly smaller mast diameter so I would recommend getting the correct version for a perfect fit.
Hello I got the StarLink package and put on the roof, tested the obstruction and it says it is very good clear view. Then I plugged in and it worked fine connection-wise to Internet. Then I unplugged (just to move the router/cable around) then replugged and now it is not able to find satellites, tried factory reset and all of that and still no diff. Please help thanks!
Disclaimer: This is a fan-made Starlink website, not affiliated with Starlink
I would try to leave everything unplugged for awhile. Go grab dinner or something and come back and then reconnect. Make sure the cables are plugged in where they should go. The dish should try to align itself. It could take awhile to establish a connection.
If that doesn’t do it, I highly recommend opening a support ticket with Starlink. You can go to their website https://www.Starlink.com or also contact support through the app. They will be able to help you out.
I have 2homes on my land,can this app furish 2home on one router or do I need two kits,please send info
Disclaimer: This is a fan-made Starlink website, not affiliated with Starlink
If you have two buildings at the service address, you could set it up in a number of ways. How far apart are the buildings? If it’s within a reasonable distance, you could connect the buildings with a buried cable. You would need to set up a basic home network with an unmanaged switch and extra wireless access points to cover both buildings. The Starlink router could live at one of the buildings to serve both. If you wanted the networks to be separate, that is more complicated but doable. There are also powerful wireless systems that can basically extend your Starlink wifi signal to another building. Lot’s of ways to go about it depending on distance and whether or not you want both homes to share one network or not.
Hi
I need some help on gen 2 dish from starlink. I cannot get my cable to connect to my dish. Brand new. It was plugged in and working for my temp spot. I then took out cable to rerun wire and it will not plug back in.
Any help would be greatly appreciated.
It sounds like the connector is possible bent? Can you see any of the pins or metal on either connection side that might be bent? If that isn’t it, your best bet would be to contact Starlink using the Support page on the website or in the app.
Ok
Thank you
I agree something must be bent. Just can’t see it.
I been trying starlink since Sunday and no response.
I will keep trying them
Thank you