
Starlink has launched their next generation hardware, Gen 3. Customers in the US are the first in the world to be able to order the new “Standard” dish.

There are numerous improvements over the Gen 2 hardware, as well as a few unexpected changes to the design of the kit. In this article, I’ll explain what is new, what changed, and whether or not Gen 3 will be worth the upgrade over Gen 2 or Gen 1.
Table of Contents
Gen 3 returns to standard connectors

The most welcome change is the return of RJ45 connectors to the Starlink cable, which connects the antenna (installed outside) to the router (installed inside). Previously, Starlink used their own proprietary connectors and cables, which were prone to user error and failures.
The new cable is reversible, meaning you don’t have to worry about routing the cable incorrectly. The connectors have seals that help to prevent water from damaging the dish. The Gen 3 kit will come standard with a 50′ cable, but a 150′ version is available for purchase separately.
Slightly larger, but easier to pack down

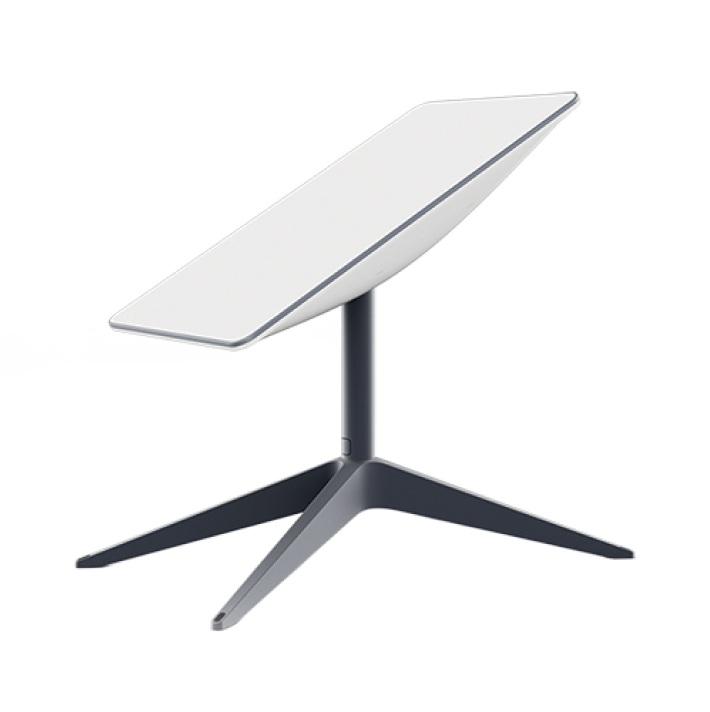
Gen 3 is much easier to pack down, thanks to the elimination of the built-in mast and alignment motors. It comes standard with a kickstand mount, which, when folded, makes the Gen 3 dish just 1.5″ thick. The overall surface area of the new dish is a bit larger, with the length of the antenna increasing from 20.2″ to 23.4″. The width remains the same as the previous generation, at 11.9″. Weight remains the same, at about 7 lbs.
Starlink Gen 3 router
A brand new Wifi router will come with the new Gen 3 hardware kits. I’ve already tested and reviewed the Gen 3 router, which was originally launched in an invitation-only beta test. Be sure to check out that post for all the details, but here is a quick summary of what is different from the Gen 2 Wifi router:
- Wifi 6, compared to Wifi 5 on Gen 2 routers
- Tri band radio, vs dual band on Gen 2
- 2 LAN Ethernet ports
- Compatible with all Starlink dish models
- Can be used as a mesh node with other Gen 2 or Gen 3 routers
Overall, the new Gen 3 router has much better range and Wifi speed. In my testing, I saw 4x improved Wifi speed. Mesh performance should be improved, thanks to the addition of a tri band radio. The physical reset button and LED status indicator are welcome features that were missing on Gen 2.
Gen 3 requires manual alignment

One shocking and unexpected design change for Gen 3 is the elimination of the motors inside the dish. With previous generations of Starlink, the dish could tilt and rotate on its own. The dish would align itself automatically for the best signal.
With Gen 3, manual aiming is now required. There are no motors in the dish, so users will have to rotate the position of the antenna if instructed to do so by the Starlink app during setup. Whether you are using the included kickstand, or one of the mounting accessories, the Gen 3 dish is intended to be at a 20 degree angle. Users will just have to rotate the dish horizontally to point in the direction that gives the best signal.
The Starlink app was updated to include a new alignment tool, so users can check to make sure their dish is pointing the right way. A message will pop up in the app if adjustments are necessary.
The power supply is now separate
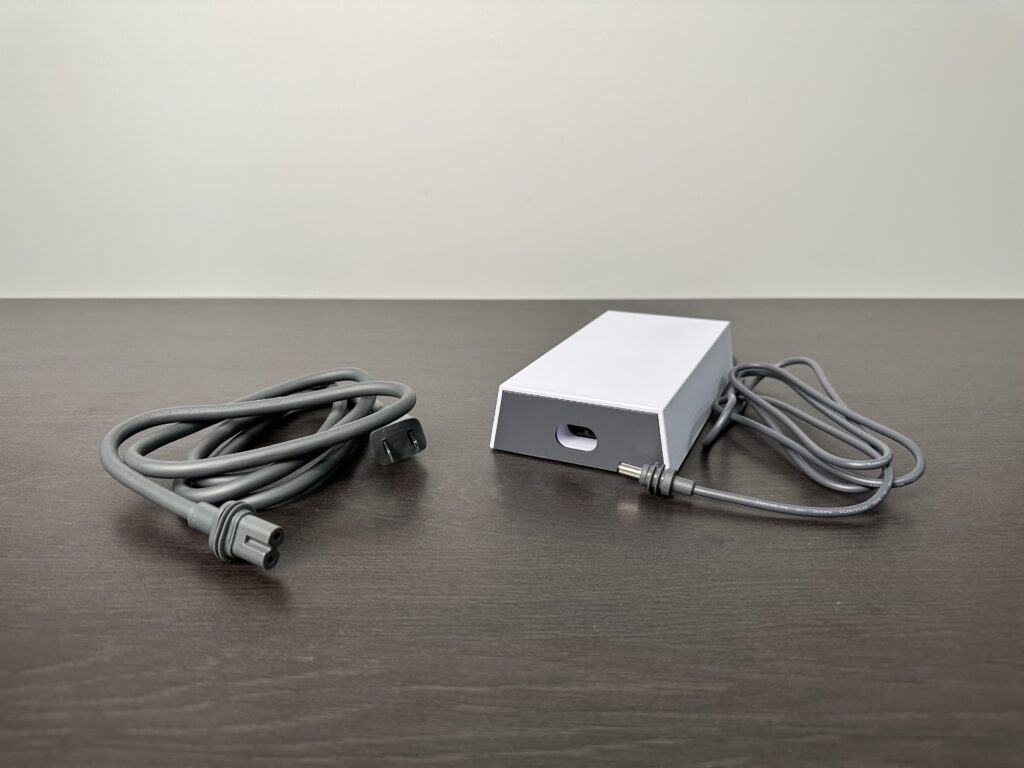
Gen 3 uses a separate power supply brick, similar to the Gen 2 High Performance dish and the original Gen 1 dish. The Starlink cable will connect the dish to the router. Another cable connects the router to the power supply. The power supply plugs into an AC outlet.
Power consumption goes up for Gen 3. The Standard hardware uses 75-100 watts, compared to 50-75 watts for Gen 2 Standard. At this time, Starlink still isn’t offering a DC power supply. This Gen 3 Standard model is intended for residential users anyway. A Gen 3 “mini” is also expected to be released soon, and could offer DC power options for portable use.
Simplified mounting options

The mounting accessories for Gen 3 are simplified a bit, with just a few options to choose from. Like I mentioned earlier, a kickstand mount is included with every kit. The kickstand can be used as a portable mount, but also for permanent mounting on a flat surface.
Users will have two roof mounts to choose from for Gen 3. The Starlink Pivot Mount is ideal for roof installs, with its adjustable base that can account for any roof pitch. The Starlink Standard Wall Mount is the other roof mount, designed to attach to an exterior wall or eave.
The final mounting option is the Starlink Pipe Adapter. The Pipe Adapter allows you to use existing mounts or poles, from 1.25″ to 2.5″ in diameter. If the limited mounting options from Starlink won’t work for you, the Pipe Adapter is your key to using aftermarket mounts.
Starlink Gen 3 price and availability

The price of the Starlink Gen 3 Standard kit is $599, unchanged from the previous generation hardware. At this time, the Starlink service plans remain unchanged, so that means no cost increases associated with the next generation equipment.
Currently, Gen 3 is only available in the US. According to Starlink, the rollout of Gen 3 to other markets will be gradual. Subscribe to our newsletter to stay up-to-date on the latest Gen 3 news.
Gen 3 speed and performance
I don’t expect there to be any significant difference in terms of internet speed or performance for Gen 3. The number of Starlink users in your area and your service plan are the two biggest factors that determine speed. However, the Wifi speed and range is improved over Gen 1 and Gen 2. I saw about 4 times faster speed in my testing of the Gen 3 router. Wifi 6 technology in the Gen 3 kit allows much faster Wifi speed, and better Wifi coverage.
The Gen 3 dish has some other hardware upgrades that will affect overall performance and reliability. It will handle snow and rain a bit better thanks to a beefier power supply. It has a higher 110 degree field of view (vs 100 degrees for Gen 2) to deal with obstructions more efficiently.
Is it worth upgrading from Gen 1 or Gen 2?
In my opinion, Gen 3 isn’t worth paying for if you have a Gen 1 or Gen 2 system that is in good condition. Not only will you have to buy a new mount, you’ll also have to run the cable again if you upgrade. And like I mentioned in the last section, don’t expect faster internet speed. The best part of the Gen 3 kit, the router, is also compatible with the Gen 1 and Gen 2 hardware. So if you are considering an upgrade, just buy the Gen 3 router for your current system.
More: Starlink Standard (Gen3) vs Standard Actuated (Gen 2)
So if you buy a Gen 3 Roam package, and head off to the middle of nowhere where there’s NO other service (here in Australia, that’s not hard) and you set it up, how do you activate it to get it working?
Apparently, you NEED the App.
Where do you get the App? Off the Internet.
How do you connect to the Internet? You use your new Starlink.
How do you connect your new Starlink to the Internet? With the App…..
So it seems you have to download the App, to activate Starlink, so you have Internet, so you can download the App….
The key is to download the Starlink app before you head out. You should also set up your Starlink before heading out, just to make sure it works. That’s the best time to activate everything, so all you have to do when you go the middle of nowhere is plug the dish in.
You don’t need internet or cellular to use the app.
To manage your account, you can connect to Starlink.com and the app through the dish connection, even if your service is inactive.
Hi, I live in England in a rural location, my ISP has decided to cut our small village off in mid June. I want to buy the latest generation hardware for Starlink asap. How would I order that and how soon would it arrive over here, I am happy to pay for the fastest delivery.
Thanks
You can order directly from Starlink.com. I believe delivery is at 1-2 weeks right now.
I ordered mine on the 28th May and it arrived two days later.
Can I use Starlink Residential Kit to small business type office composing of not more than 100 computers.
Yep, nothing preventing that, although that’s a lot of devices for one Starlink connection. But for low data activities it should work fine. You would also need a professional level network with switch, router, firewall, etc. I wouldn’t rely on the Starlink router.
In my area cannot be used any type of WIFI or radio signal.
Why WIFI cannot be deactivated in the Starlink router, without go in bypass mode ?
Most of routers can, no matter if are cheap.
It seems as if Starlink has learned nothing from router builders and market experience, having to make all the mistakes of a newbie.
Is sad…
Can you turn off wifi and use only the ethernet connections on the Gen3 router? A friend is sensitive to wifi and would prefer using ethernet only.
Thanks!
Starlink routers don’t have the ability to only turn off the Wifi radio. There is bypass mode, which disables Wifi, but also disables all DHCP and routing functionality. The Ethernet ports will work, but there is nothing to hand out IP addresses automatically to devices plugged in. So what your friend needs to do is purchase a 3rd party router that supports just turning off the Wifi radio (most of them do). Plug it in to the Starlink router Ethernet port, and then turn on bypass mode.
looking to get a dish for my rv in canada. wish one is the best ? thanks .
Definitely go with Gen 3. Better router, better cables and connectors, better FOV.
Greetings,
Wondering if you have a recommendation on which Starlink to go with, Gen 3, Gen 2 Acuated or the business dish?
We live in Northern Idaho, so we definitely get snow and some rain during winter months and then warm/hot summers.
We live on a houseboat, but think more a 2 story tiny home on pontoons and primarily stationary, so won’t need the RV or Marine version. We live full time on the boat and I work remote so need reliable internet for online meetings, connecting remotely to SaaS platforms, etc. Of course we stream movies and have the various smart devices that require internet, etc. I have an existing Netgear Orbi Mesh Wifi system and currently use a couple Orbi satalites around the boat mainly to hard wire a laptop into one of the Orbi satellites to improve quality of connection. We currently are using a wireless internet service but will be moving to another Marina on the lake that does not have this service, so satalite is the next and possibly only option.
Being on a docked boat it does rock and can have some movement while docked/moored at a Marina. Due the type and size of the boat, we likely won’t take it out much on the lake, but when we do, won’t necessarily need internet whilst out on the lake.
I’m assuming the new Standard Gen3 dish is the way to go and will mount it on the second level of the boat/house.
Appreciate any recommendations.
Thanks!
I would recommend the newest Gen 3 dish. The High Performance Business dish is the best in terms of reliability (due to its beefy power supply to power through rain/snow), however, the increase in performance isn’t proportional to the price. In other words, it costs over 4x the amount, but you aren’t getting 4x or even 2x the performance to justify the cost. Gen 3 has a much better power supply compared to Gen 2, plus a wider field of view, better router, and standard connectors/cable. It’s definitely the way to go if you are buying Starlink right now.
You can keep your existing mesh system. You’ll just plug into the Netgear router using one of the Ethernet ports on the Gen 3 Starlink router, and then turn on bypass mode in the Starlink app. Should be a pretty seamless transition.
Is the Gen 3 Starlink able to work outside of the US presently?
Yes, people have shipped them out of the US and activated in other countries.
The article says that the Gen 3 cable has RJ45 connectors at both ends. If you currently have a Gen 2 system and you want to upgrade to a Gen 3 router, How do connect the current Gen 2 cable to a Gen 3 Router?
To use a Gen 3 router with a Gen 2 dish, you have to connect it with the Ethernet Adapter, and then put the Gen 2 router in bypass mode. The Gen 3 router won’t power the Gen 2 dish.
But why use a Gen 3 router at all? I purchased the ethernet adapter for my Gen 2 system and connected my existing mesh network system in my home (which, for example, allows connecting to printers, scanners, storage and other networked devices), but you can connect any router once you have that adapter. And there are many very good third party routers and mesh systems, though since I am happy with my existing one I haven’t spec’d any against the Gen 3 router.
I agree, it doesn’t make a lot of sense to buy the Gen 3 router for a Gen 2 system. Aftermarket options are cheaper and better. But some people just like sticking with all OEM Starlink hardware, so at least it’s an option.
If I order now do I get gen 3? Their site for standard residential still shows the gen 2.
If your address is eligible for Gen 3, you will see a hardware choice between Standard and Standard Actuated on the order page. The main site still shows Gen 2 everywhere, it’s the actual order page to pay attention to.
Will this unit work in Accra Ghana as I have a condo overthere
You can look at Starlink.com/map for coverage details. The new dish is the same as the other generations, in terms of where it will work.
Does the Gen 3 dish use a 1gbps lan port or is it higher say 2.5 or 10gbps? Wondering how future proof it is.
The max speed of the dish to satilite is less then 500mbps.. ive never seen ANYONE get a higher speed connection even on the “high performance” dishes.
I would guess the port is simply 1gig eathernet as there is no reason for the system to include higher speed ports.. it would be a waste of money.
I am considering Starlink for use in my RV.. Gen 3 requires the phone app for aiming but many of the places I go there is no cell service. How would I aim the dish without the app?
Thanks
The app doesn’t require cell service or an internet connection. It connects and talks to the dish over the Starlink router Wifi. So you will be able to aim it without cell service or internet.
I just picked up a Starlink at Best Buy last night but have not opened the box. I was unaware of the Gen 3. I purchased to use on our RV mounted on a pole. Not happy about the Gen 3 not having motors to self align. How can I tell what version I have, from markings on outside of box?
If you bought it from Best Buy, it’s a Gen 2 Standard Actuated kit. The box for Gen 2 is very thick, while the box for Gen 3 is very thin, just a few inches.
Can we use the gen 3 if on the Starlink Roam plans? If on a boat can you switch to $2/GB for ocean crossing…..or similar? Thanks
Yes, Gen 3 is compatible with any service plan.
Being that the “Gen 3 dish is intended to be at a 20 degree angle. Users will just have to rotate the dish horizontally”, does this mean that the dish looks more upward than previous dishes & thus mitigating some obstruction issues? My concern is that I have 70 ft tall redwoods in my yard that obviously create obstruction issues. I have my doubts about successfully using Starlink at home because of this. Does Starlink sell additional dishes allowing me to mount a fixed location dish here at the house & also have a 2nd dish that I could use when traveling in my RV?
The best thing to do is download the Starlink app now, climb on your roof near the peak, and use the obstruction scanner in the app to see if it would be a good spot. You can have multiple dishes, but they each require a subscription.
Gen 3 has more beam steering capability to make up for the loss of the motion. Hard to tell whether the software will still try to steer the beam to where it wants to look …. through your trees, or will decide to look straight up. The Gen 2 if you took away its ability to steer.. put it in a bucket, or modify it, with it’s smaller beam steering was kind of forced to look straight up.
How do we order just the Gen3 router?
It should be in the Starlink shop starting sometime in January.
Is it the Gen 3 compatible with the ridgeline mounting kit? Since it has no mast I’m curious how it can be adapted…
No, it won’t be compatible with any Gen 1 or Gen 2 mounts. You could potentially adapt Gen 3 with it using the Gen 3 Pipe Adapter.
Hey Noah – nice site. My Gen 1 drops a lot when rainy/cloudy hence the Gen 3 beta seems like a positive upgrade. Plan is to resell the gen 1 system. The roof mount sold on the Starlink site doesn’t bother to say if the Gen 3 is supported with the kick stand replacement kit – is that just me being hyper?
Dougbo
None of the Gen 1 or Gen 2 mounts in the store are compatible with Gen 3. When you visit the store, click the link that says “Don’t see your Starlink?” and see if Gen 3 is available for you. They might not show it unless you currently own it. The Gen 3 shop page has all the compatible mounting options.
What do you do with the old setups if you get new ones? Any value there for resale? As of this time I have gen 1 mounted and in use, gen 2 in a box (they set free of charge when I inquired about using mesh system).
Is the gen 3 worth the hassle of the the cost and upgrade is gen 1 seems to work fine.
If you have a working system, I don’t think the upgrade is worth it unless you just want the latest tech for the sake of having it. Gen 1 and Gen 2 are still on the same technical and performance level as Gen 3. As mentioned in the article, the router is the big improvement, but you can just buy the Gen 3 router if you wish.
There is a resale value for Gen 1 or Gen 2 systems, so it wouldn’t be too hard to recoup some of the expense of the new system. I expect resale values to drop considerably when the Gen 3 system is publicly released and being sold as default with new orders.
Very useful info for understanding the differences between Gens 1, 2, 3. We have a Gen 1 dish and a Gen 3 router. Starlink just emailed with the offer to upgrade to a Gen 3 dish and router combo for $599 and offer two months free service as an inducement. No significant issues with the current setup. Speed is fine for streaming movies and live sports. Biggest limitations are content providers that don’t play well with Starlink or our LG tv. Sling is the worst.
We would like to extend our wifi to our shop and add a node or two for locations in the house that have weak signal due to our massive stone fireplace column going through two floors. Do you think it is possible to use two Gen 3 routers: one as the main router and the other as a wired node? For further extension we are considering an eevo mesh system.
Jeffrey, for the outbuilding you might consider setting up a wireless bridge. I did this at our church using four Ubiquiti NanoBeam 5AC transmitter/receivers. Our situation is a bit different as we wanted to mount the Starlink on the roof of a centrally located three-car garage to provide internet service in two other buildings. One NanoBeam sends the Starlink signal to the router in the church building to the east, and another sends it to the parsonage to the west. It took me a while to figure it all out, but it has been rock-solid ever since. The Starlink router is mounted on the wall inside the garage, so it provides WiFi there too. You would need just two NanoBeams if you wanted to send it to one building only.
The Starlink routers don’t support Ethernet backhaul, meaning they can’t be connected via Ethernet cable. They only talk to each other and the main router wirelessly. That being said, the Gen 3 routers are much improved, and have better range. If the shop isn’t too far away from the house, it might be possible to place a node in the shop and get a decent mesh signal from the house. If range is an issue, I would look into a 3rd party mesh system that supports Ethernet backhaul.
Thanks for the update. I have been waiting for the Gen 3. I was able to get my Gen 1 as an early adopter #5000. I just sold it so I could get the smaller dish. It looks like the 2 is smaller, so I think I’ll stick with that. It would be nice to know what the Gen 3 mini is about. I’m using it for my RV and around the house when the power goes out.
Just got my invite – Dec 8, 23
I got an invitation on 12/8 as well, but when I follow the link to order, there is no option for ordering the Early Access hardware. I opened a support ticket but time is running out.
Same thing happened to me. I created a ticket and support manually ordered the Gen 3 kit. They responded in about 2 days. I’m sure if your original ticket was submitted before the deadline, they will honor that.
I don’t own Starlink yet. I’m building a house and my router closet is about 80′ from where I would mount a dish. I need to run a cable before drywall. I may wait for V3 to purchase the dish. Do I purchase a long SL cable? I don’t have a SL account so I’m not sure where to purchase the cable. Any other options like CAT 6?
Do you have more information on the Mini you mentioned in the article? I may subscribe to the Mobile and take it in the RV with me. However, cabling is important now with my new build. I need to wire it properly for the future. Thank you for all your expertise, I really appreciate it.
The cable that comes in the Standard kit is 50′, so you would need to purchase the 150′ cable to make that run. You have to wait until you order the kit to be able to access the online shop and purchase the cable. There are Amazon listings from 3rd party sellers that are also selling the cable if you don’t want to wait.
If it were me, I would plan to install the Starlink router/power supply in a utility closet. Install some kind of cable pass-through with 1.25″ conduit that goes from the exterior, to the utility closet. This way, no matter what kind of cable is required, you can always run and re-run the Starlink cable from the dish to the utility closet. From there, your options are to connect Starlink to an existing Ethernet network in your home. Or if you aren’t going wired, use Starlink mesh or 3rd party mesh to get the signal throughout your house, starting from the utility room where the Starlink router is located. This way, you don’t have to worry about having everything ready for drywall.
Do yourself a favour and run a conduit (flexible plastic smurf tube) between your closet and your mounting location. That way when you have to change your kit and therefore your cable (you know Elon will do that), you won’t have to open your wall to pull new cable. It’s always smart to put data cables into conduit.
May want to have a closer look at that cable, yes they have changed the plug away from the horrid proprietary mini USB cross mini HDMI, however that it not a standard RJ45, it is a proprietary design that looks similar to an RJ45. You will find that plug will most likely fit into a standard RJ45 socket, but I bet a week’s wages a standard RJ45 plug will not lock into that socket. Zoom in on the back of the plug, it has a catch full width without the tag to press in to release. I would be the socket does not have the cutout for the release tag meaning a standard RJ45 would not lock in and simply fall out. Of course will have to wait until someone is able to test that theory!
Cheers, Dave.
It’s a standard RJ45 connection, but the Starlink cables have a water seal that is designed to hold the connector in. As you mentioned, the traditional latch system isn’t there, you can simply pull the Starlink cable out with force. the same will apply to aftermarket cables, they won’t necessarily lock in and stay put.
Will need to see the socket, but I would guess there is no cutout for the release tag which means a standard RJ45 plug will push in but simply fall out as there is no latch to hold it in. I would say a very intentional design change to a standard that’s been around for a very long time!
Thanks for your great articles!
I just wanted to order a Starlink set, but I am in no rush at all. Would you advise to wait for the gen3 to become available?
If you aren’t in a rush, like if you were waiting for your remote home to be built, waiting is an option. But if you could use Starlink now, I don’t see any point in waiting for this new version. There is no timeline, so it could be 3 months or a year, nobody knows.
Hi,
Will an existing Gen2 wall mount fit the new Gen3 or do I need the pipe adaptor? I wasn’t sure if the pipe adaptor was only required for aftermarket mounts. Thanks!
The Gen 3 dish won’t be directly compatible with Gen 2 mounts. You would only be able to use the Gen 3 Pipe Adapter if the Gen 2 mount has a mast/pole. I think the Pivot Mount and Pole Mount are the only ones. With the rest, the Gen 2 mast slides down into the mount, so those wouldn’t work with Gen 3 even with the Pipe Adapter.
Any insight as to the how the gen 3 will work mounted on a mast on an RV?
I am wondering if it will be more difficult in that setup to get the proper orientation without the motor.
The new orientation tool in the app should make it pretty simple. If your mast isn’t accessible or adjustable, you could always just aim the dish directly north, and it should work without any issues (except obstructions like trees, of course).
Thank you! Very much appreciated!
You should consider having a “donate” or “subscription” button to support your work. Starlinkhardware.com is the first place I look for reliable and helpful info, tips, and tutorials about my Starlink system. I’d chip-in and I’m sure others would too. I try to buy parts etc from your links because it supports your work and to make sure I get the correct parts and supplies. For instance I cut my cable and installed RJ45s. Without your “cheap way” tutorial and links I wouldn’t have had a clue how to do it and what connectors and crimper to buy. But most of the time I don’t need tools or supplies so I cannot support your incredibly useful site.
Thanks for the feedback, it is appreciated! Simply visiting the website or using my product links is all that is needed to support the website. The kind words and the support are all the tips I need!
same here!
“cheap way” saved my bacon for many of my professional installation jobs.
so glad they finally accepted they made a mistake!
Feels like a apple move.
Aw the genius of Starlink engineers! Those RVing often must set up in forests or other obscuring features requiring elevating the antenna; thus the widely used pole solutions. This summer we camped in a dense forest in which the only way to achieve (a still partly obscured) sat view entailed elevating 30ft. How will anyone be able to manually aim the new motorless antenna when entirely beyond reach?
In my experience with a motor-disabled Gen 2 dish, the direction it points doesn’t really matter that much anymore. I have had mine pointing straight up without any drop outs or error messages. I’m assuming the new Gen 3 dish will perform similarly, even if pointed in the “wrong” direction according to Starlink. It has a wider field of view that helps. I recommend trying to align it north if possible when deploying the pole mount.
Thanks for the great v3 update! If we Gen 2 users want to upgrade to the Gen 3 router only, how does that work with the different cable ends (proprietary vs.RJ45)?
With a Gen 2 system, you basically do the same thing you would do using a 3rd party router. You have to hook up the Gen 3 using the Ethernet Adapter. It doesn’t actually power the dish, it’s just a router with a Gen 2 system. You can check out my review of the Gen 3 router to see how I had to hook everything up:
https://www.starlinkhardware.com/starlink-gen-3-router-review/
My Gen 2 dish works perfectly fine in good weather, but it loses signal when there’s heavy, but ‘not stormy heavy’ rains. I wonder if this gen 3 dish might be able to solve this. I see people in forums saying theirs works fine in some storms
The Gen 3 dish has a beefier power supply, and has more power to get the signal through weather. I don’t think it will be a significant improvement over Gen 2 in that area. The High Performance dish is the best if you want more rain and snow reliability.
Just installed Gen2 set up made my own pole mount adapter. Had Viasat spending $250 a month for 100 gig and could not stream on Hulu with out buffering . Had to increase Starlink plan after 1 st Day used 10 gig right off the bat. Upgrade to 1 Terabyte Day 4 already 68 gig in. One thing I can Stream Hulu with out buffering.
We have a Gen 2 system which we purchased at the special price of $199.00 Australian dollars a couple of months ago. It was a real upgrade to the NBN available here, speeds 4x greater most times. Coverage was the only downgrade, we have a complex house design with a crossover between an existing house and new addition involved. We purchased a TP link Ac1200 mesh system and this worked fine with the old setup. It also works with Starlink after buying the RJ45 adapter but the speed plummets to 60 to kbs. My query is rather than spend $1000 or so on a new wifi 6 equipped mesh system, could we just purchase the new Gen3 router and utilise the Gen 2 router as a mesh modem and could this be done wirelessly? Apologies if the answer is obvious but we are not at al tech savvy!
The Gen 2 router would have to remain, in order to power the dish. The Gen 3 router cannot be used to power a Gen 2 dish. On a Gen 2 system, you have to put the Starlink router in bypass mode, and hook the Gen 3 router up exactly like you do with your aftermarket router.
If you are having speed issues with your own router setup, that sounds more like a defective Starlink router or Ethernet Adapter.
I have a lot of dropped calls with WiFi calling. I have gen 2 here in the mountains of W.Va. I don’t have any issues with internet speed. I wasn’t impressed with the gen 2 routers WiFi performance. I bypassed it and went with a Nighthawk gaming router. Still not having reliable WiFi calling. Would gen 3 be a fix?
Are you seeing drops in the outage statistics on the Starlink app?
Hi Edgar, I too am in the mountains of WV and have a Gen 2 setup with, strangely enough, a Nighthawk R9000 running in bypass mode. I don’t have much in the way of issues with WiFi calling. We’re running iOS devices, about 8 of them and over time, the latency has been dropping and call quality has been improving including FaceTime calls. Are you clear of all obstructions? Any network outages being recorded in the logs that correlate with the time of your calls?
How much is your monthly statement?
Service prices vary depending on which plan you select, and which country you live in. You can type your address into Starlink.com to get prices for your area.
Not related to the gen 3 but, a question that you may use/answer in a future blog post. I have the gen 2 and absolutely love it. The question is, how often do you recommend to reboot the router/dish? Haven’t seen any recommendations for that. Also, should we reboot both at the same time or one or the other and in which order? I really appreciate your emails/blogs and look forward to them! Extremely useful information in each! Thanks again for keeping us informed.
There is no need to reboot either the dish or the router periodically. Rebooting it is good for troubleshooting if you are having an issue. The dish will actually reboot regularly on its own, every time it updates the firmware. You can check the “uptime” in the Advanced menu of the app to see the last time it rebooted. If you do want to reboot, you can just unplug the router AC cord. That reboots the dish and router at the same time.
Thanks for the feedback, I appreciate you reading and commenting!
was able to switch from RV to Residential with no issues a month ago. We are happy with our Gen2 system and because it is mounted on my roof by a friend who is not afraid of heights, that will remain. Thank you for all your help.
I almost signed up for SL about a month ago for a remote cabin location. But since we wont have much time up there until spring we waited. So now it seems that gen3 could be out. I wonder if I should attempt to try and get it. two thing worry me. First: gen2 had heater to help melt snow. does the gen3 also have that? Second: the gen two with it motors seems useful. especially since you could dock the disk vertical to essentially allow excess snow to come off. We have very remote, very snowy location in the further north part of UP on lake superior. also is the mounting location is on hazardous roof. I hope to only climb that steep 40′ peak once. having to no motor to adjust. Has me wonder if I would need that in the future. wouldnt the motor help continually adjust the dish if needed? without motor might the orientation need adjustments later? thanks for insight
The Gen 3 has the ability to melt snow. The dishes don’t actually have a heater, heat is just a byproduct of the phased array antenna. Software in the dish can increase the transmission power if you set it to pre-heat, which will also be available on Gen 3. With the ability to melt snow, the stow feature isn’t really that useful. Snow shouldn’t accumulate on the dish, and if it’s snowing hard enough that it does, that would affect Gen 2 and Gen 3, and stowing likely would just cause the motors to get stuck due to the snow around the antenna. The Gen 2 antenna doesn’t continually move or adjust. Usually it’s just one time and then it never moves again unless you reboot it. As the satellite constellation is deployed, there is less of a need of manually aiming in any particular direction. Take for example the High Performance Business dish. Starlink got rid of the version with motors, and now exclusively sells the fixed Flat High Performance even for businesses needing fixed installations. With Gen 3, the field of view isn’t as high as the Flat High Performance, so a small rotation might be necessary at the time of install. No further adjustments should be necessary unless it is physically moved.
Have 1 and 2 with NO issues….if 3 is less parts should be cheaper ? Think we’ll not change…I think if the only time u would need faster speed is if you’re a stock trader….
It should be cheaper, but I think instead Starlink will use the reduced costs to increase revenue, rather than lower the consumer cost. That’s just my guess at this point, we will have to wait and see what they are charging for it when the first reports come out from the limited invitations.
If my Gen 2 dish and router are working just fine, why would I want to upgrade?
In my opinion, it’s not worth the upgrade to Gen 3 if you have a working system at this time. Really the only part of the Gen 3 system worth looking at is the router. You can upgrade a Gen 2 or Gen 1 system with a Gen 3 router, which gives you much better range and Wifi speed. But as far as the dish itself, I wouldn’t rip out the Gen 2 mount, dish, and cable to replace with Gen 3 unless it broke down the road.
I bought the Gen 1 when starlink first started up, auto-rotating dish and have it connected to ethernet. Love it all. Have literally had no problems with connection or speed at all in 1 yr & a half give or take. it’s mounted on the roof because we live in a deep canyon, in the mountains. We get very high winds and below 0 deg in winter. Has never even blipped. I think having to manually go up on a ladder to adjust the dish is ridiculous. We can relax knowing it’s doing it’s thing and the self-heater for ice and snow is beyond wonderful as with Viasat , we had to manually brush off dish with a broom after wading through snow. I work at home, so extremely satisfied with starlink so far and the new stationary dish is a down-grade for sure. Maybe others have had problems, but living where we do, is a testament to starlink quality and endurance.
Gen 1 is a solid model, mine is still going strong after nearly 3 years. I’m not sure how big of a pain the manual aiming will be. According to the setup guide, you should only have to manually rotate it once during the initial setup, when you are already up at the dish location. You shouldn’t have to touch it again. If that’s the case, it doesn’t sound that bad. But if it ever requires further adjustment or gets knocked out of alignment by wind, Gen 3 customers are going to be wishing for those Gen1/Gen2 motors!
My Gen 2 has performed flawlessly here in S. Oaxacan coast. Even no problems when hurricane Agatha(cat 2) came our way. Might in the future they have crossover connectors for gen2 cable to 3 for the router? Otherwise, just keep us updated, but over a year now and system is best as I tell everyone to dump the local network(TelCel, TelMex).
They probably won’t, because the setup guides for the Gen 3 router on a Gen 2 system are currently published. You have to keep the Gen 2 router powering the dish, and hook it up to the Gen 3 router using the Ethernet Adapter. It’s a workaround for sure, might as well just go aftermarket at that point. Cheaper and more features, and just as easy to install.
We had our Gen 2 dish alignment motors/gearbox fail about a year ago. Starlink replaced it immediately with no cost or hassle, but the Gen 3 design seems brilliantly simple. Yeah!
Thank you for the superb blog. It has been very, very helpful.
Thank you for the feedback! I agree, the simple design is nice, and reduces manufacturing costs for Starlink as an added bonus.
Please keep me updated. Thanks.
For sure! I can’t wait to get my hands on one for a full review.