

Starlink satellite internet is a game changer for people in rural areas who don’t have access to high speed broadband services. It’s also great for digital nomads, RV travelers, and other people who like to escape to remote areas, but stay connected. I’ve had Starlink for about 3 years, and it’s allowed me to do things I was never able to do before.
If you are reading this, you probably just received your Starlink kit. Or maybe you are still researching Starlink, and want to know if it’s hard to set it up. I created this guide to show people the process of setting up a Starlink system. Specifically, Starlink’s 3rd generation hardware, the Standard kit.
I’ll show you what comes in the kit, how I found a good mounting location, and how to hook everything up. I will also detail how to properly aim the dish, a process that is brand new for the 3rd generation hardware. Finally, I’ve compiled some common questions and concerns at the end, which hopefully answer any lingering questions you may have after reading through this guide. Let’s get into it.
Have a Gen 2 "Standard Actuated" dish? Check out our setup guide for that model here.
Table of Contents
Kit Unboxing

Tearing into a box filled with exciting new technology is my favorite part! Starlink makes the unboxing process pretty simple. Their packaging is minimal for the Gen 3 Standard kit. All I had to do was tear off the perforated strips found on 3 sides of the box. After that, I flipped back the lid and found the following contents:
- Dish
- 50′ cable for the dish
- Wifi router
- Power supply
- AC power cord
- Safety information and instructions
To my surprise, everything was already hooked up. The cables and connectors all look pretty self explanatory, but it’s nice that they ship everything connected, so you have some idea of where everything plugs in right from the beginning.
Starlink App
The first thing that the included infographic says to do is download the Starlink app. Like I mentioned in the introduction, I’ve had Starlink for years, so I already have the app installed on my phone. If you don’t, you can scan the QR code on the infographic, or just search for Starlink in your App Store. Here is what the icon looks like:

You need the app to set up and manage your Starlink system. You’ll use it to find a good location for your dish, to aim the dish, and also to set up your Wifi network and password. After you’ve installed Starlink, you can manage everything from the app. It has a built in speed test, statistics, and troubleshooting information.
Choosing A Good Location
Starlink is satellite internet, so the dish needs a clear view of the sky for optimal performance. Things like trees and buildings can interrupt the signal and cause issues. Starlink makes selecting a location really easy with the obstruction scanner tool in the app.

I chose to install my Starlink at the peak of my roof, directly on the fascia board. The higher the dish, the less chance trees will obstruct its field of view. To see if my roof was a suitable spot, I climbed up with my phone to use the obstruction scanner tool in the approximate location that I planned to mount the dish.
To use the obstruction scanning tool:
- Open the Starlink app
- Tap Start Setup, then select the Gen 3 Standard model
- Select Check For Obstructions to open the tool
- Follow the instructions on the screen, rotating your phone around to scan the entire sky
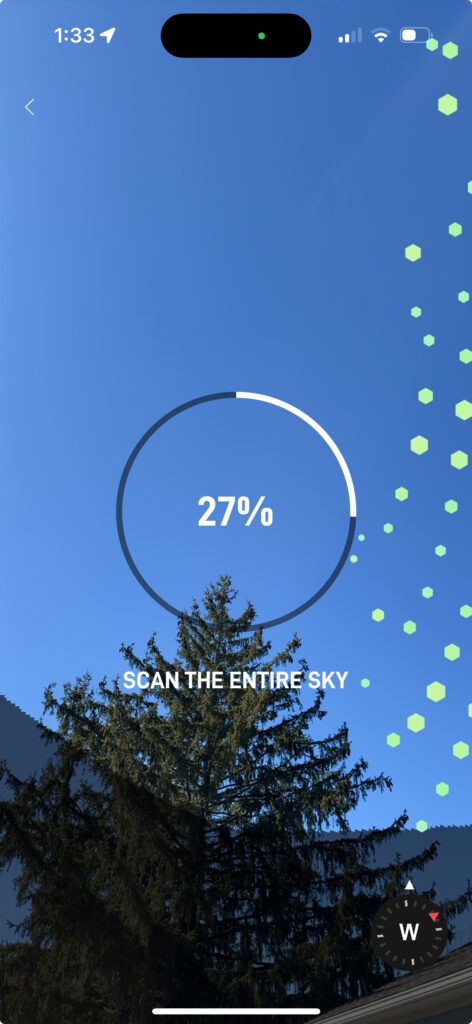
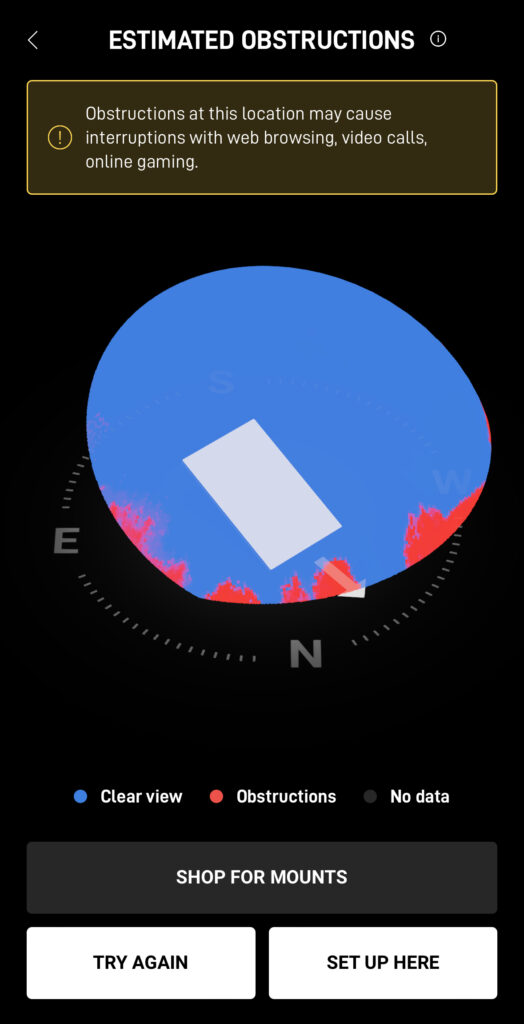
Once you’ve scanned enough of the sky, you’ll see the results. Red areas on the graphic indicate potential obstructions. I performed a scan on the ground to show you what obstructions look like, which is why there is red in the image above. Blue area is clear sky. If you have red areas, the app will tell you what kind of interruptions to expect if you chose to mount it in that location.
I recommend searching for a location until you find one with no obstructions. In my situation, I didn’t have any trees nearby, so the results were clear when I ran the scan again up on the roof. With a good location selected, I tapped Set Up Here to proceed with the setup.
Mounting The Dish
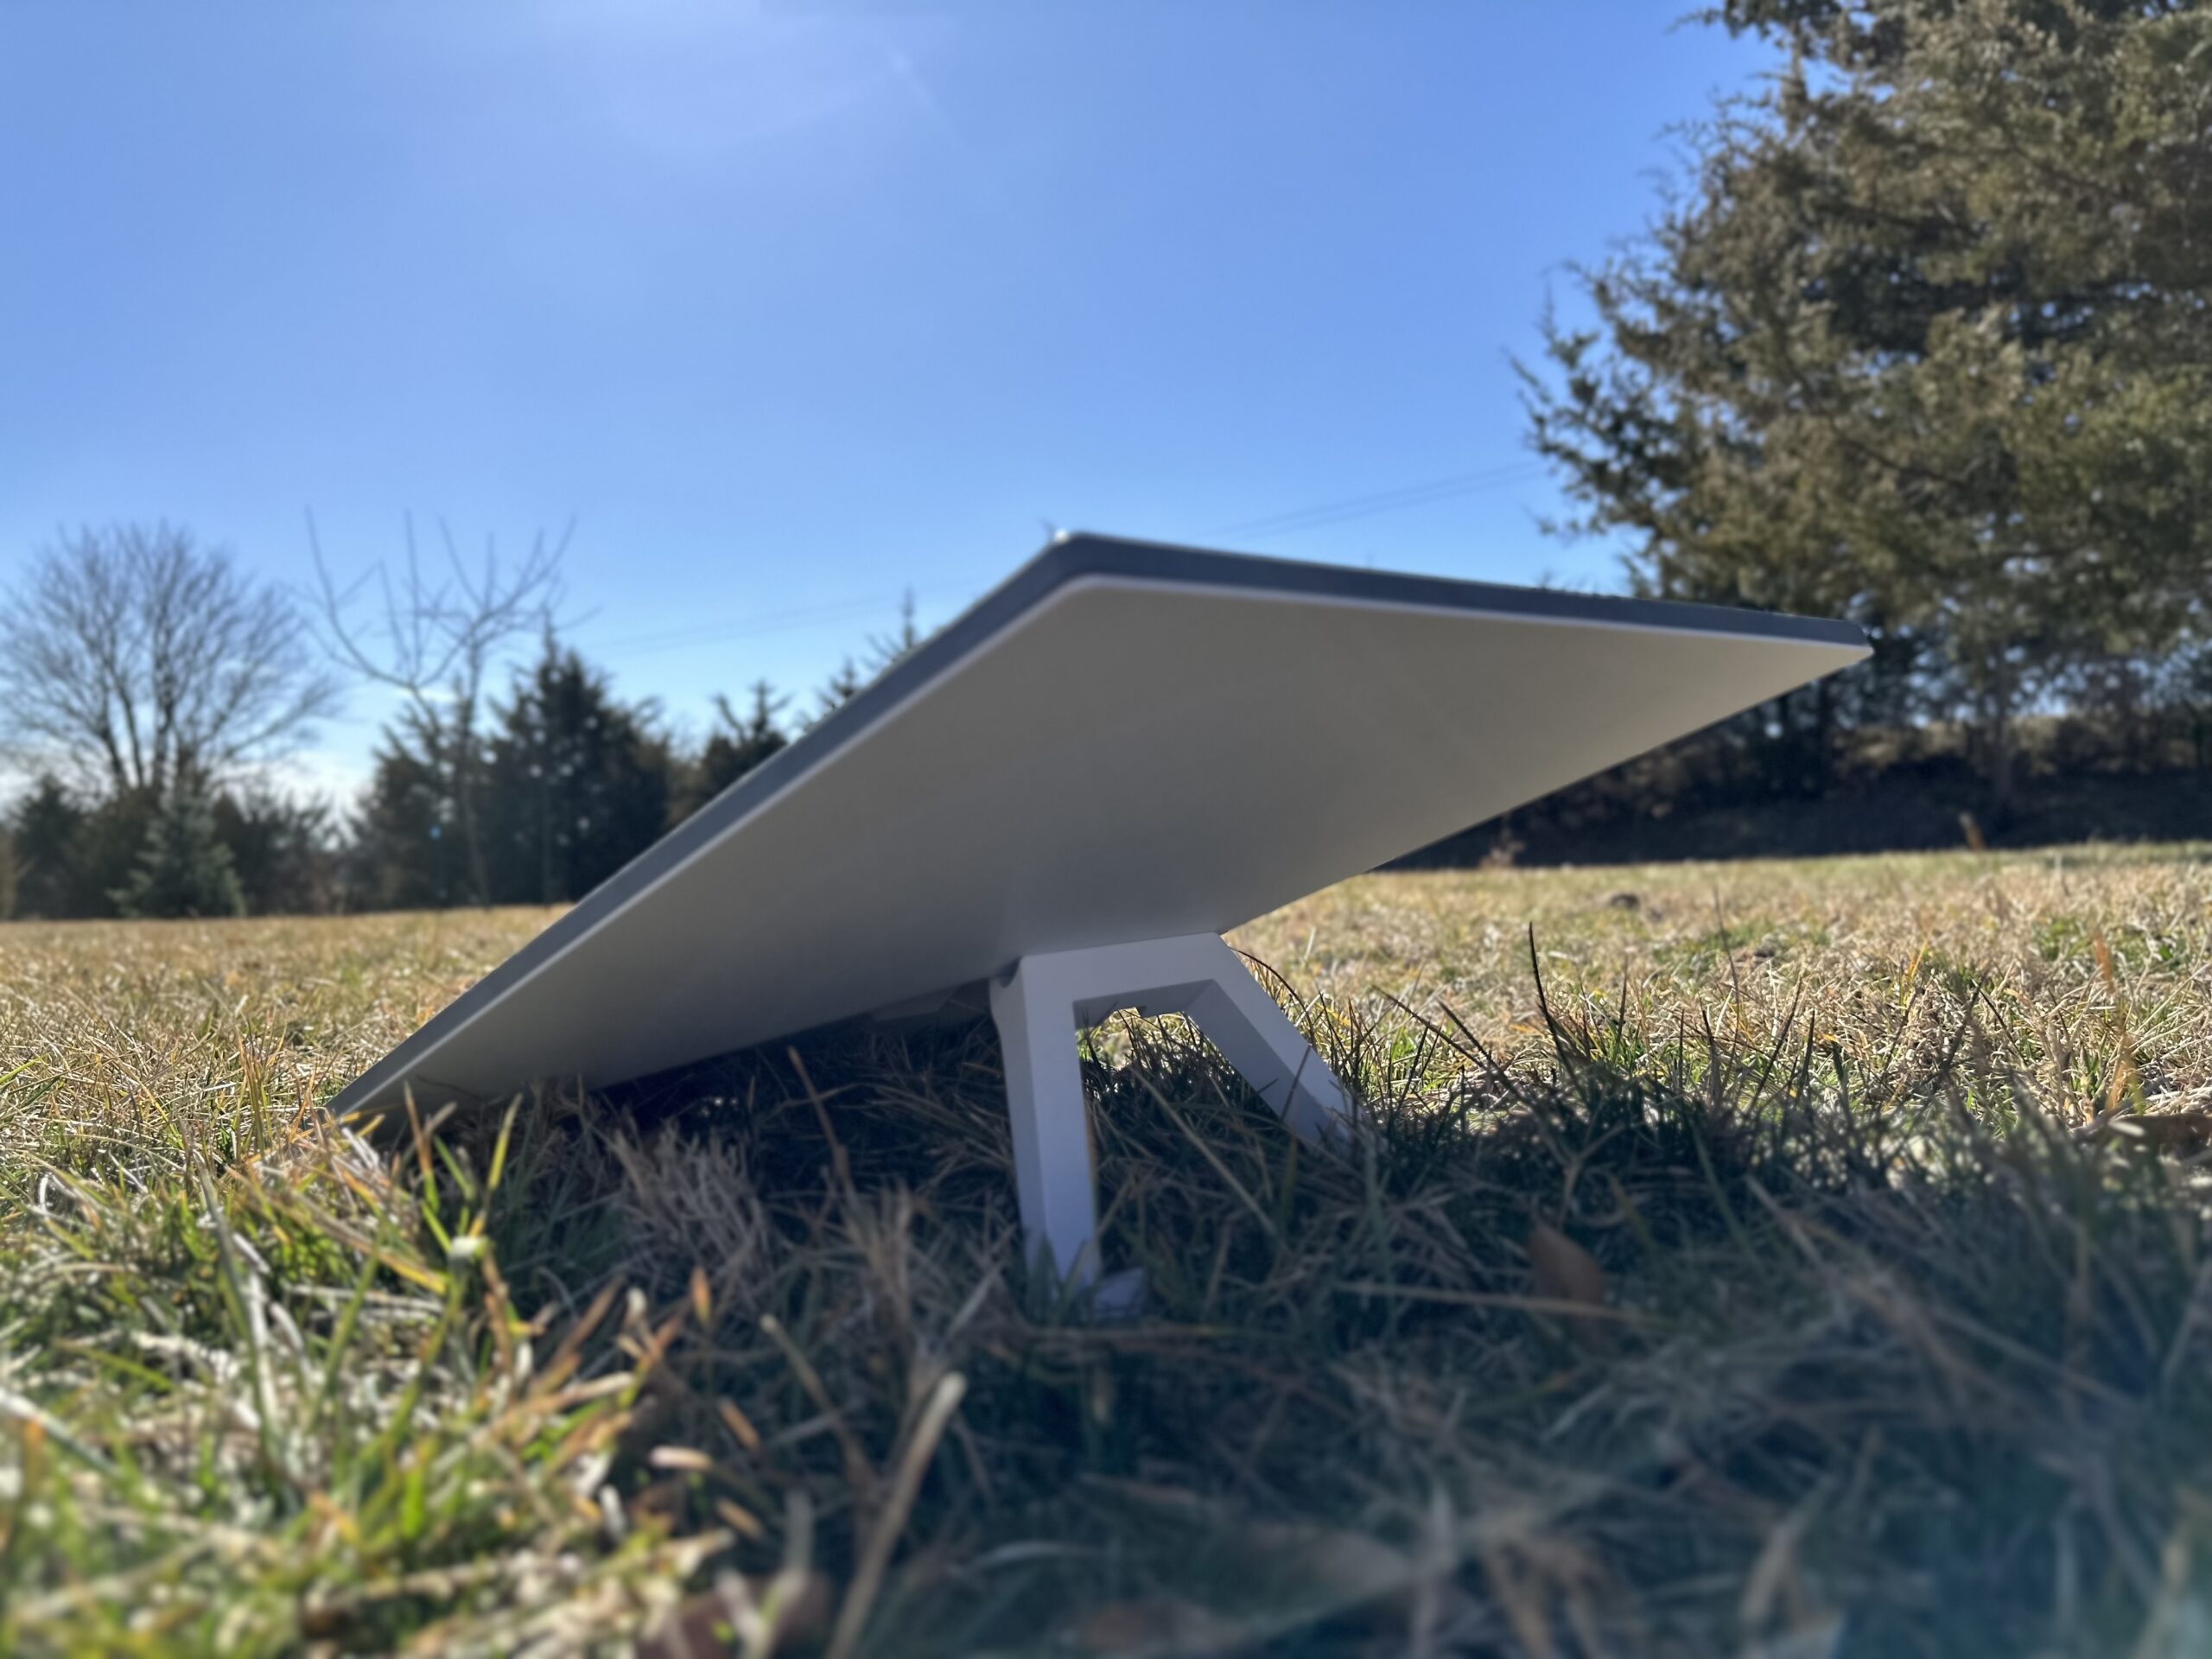
Starlink is extremely versatile. You can use it as a portable system, like for camping in an RV. For portable use cases, you don’t have to permanently mount the dish. You can just use the included kickstand, and place the dish on the ground, a table, or maybe even on the roof of your RV.
For home internet, you’ll want to permanently mount the dish in a place that has a clear view of the sky, free of obstructions. Hopefully, you’ve already found such a spot by using the obstruction scanner that I went over in the previous section. Now let’s talk mounting.

I decided to use one of the mounts offered by Starlink for a permanent install. I selected the Standard Wall Mount when I purchased my kit. The Standard Wall Mount allows you to mount the dish to an exterior wall, fascia, or eave. In my case, I attached the mount to the fascia board at the peak of my roof. For more info on this mount and why I chose it, check out the full review and tutorial.
Every setup is going to be a little different. The details of every type of Starlink mount is out of the scope of this guide, but be sure to check out our Starlink mounting guide if you need help deciding which type of mount is right for you. In the guide, we compare official and aftermarket mounts, and list various methods people have used to install Starlink.
If you are using the kickstand, place your dish in a good spot, and then tap Continue With Kickstand in the app. For permanent setups, install the mount of your choice, and then proceed with the setup process by selecting Mount Is Installed. Tap Starlink Is Set Up to continue.
Finding A Spot For The Router
The Starlink Wifi router should be installed indoors, as close to the center of your home as you can get it. You’ll need an outlet nearby to plug in the power supply. If you are forced to put the router in your basement or a corner room, that’s fine, there are other ways to improve Wifi coverage. Starlink offers a mesh system of their own, but you can also use aftermarket mesh systems and Wifi repeaters.
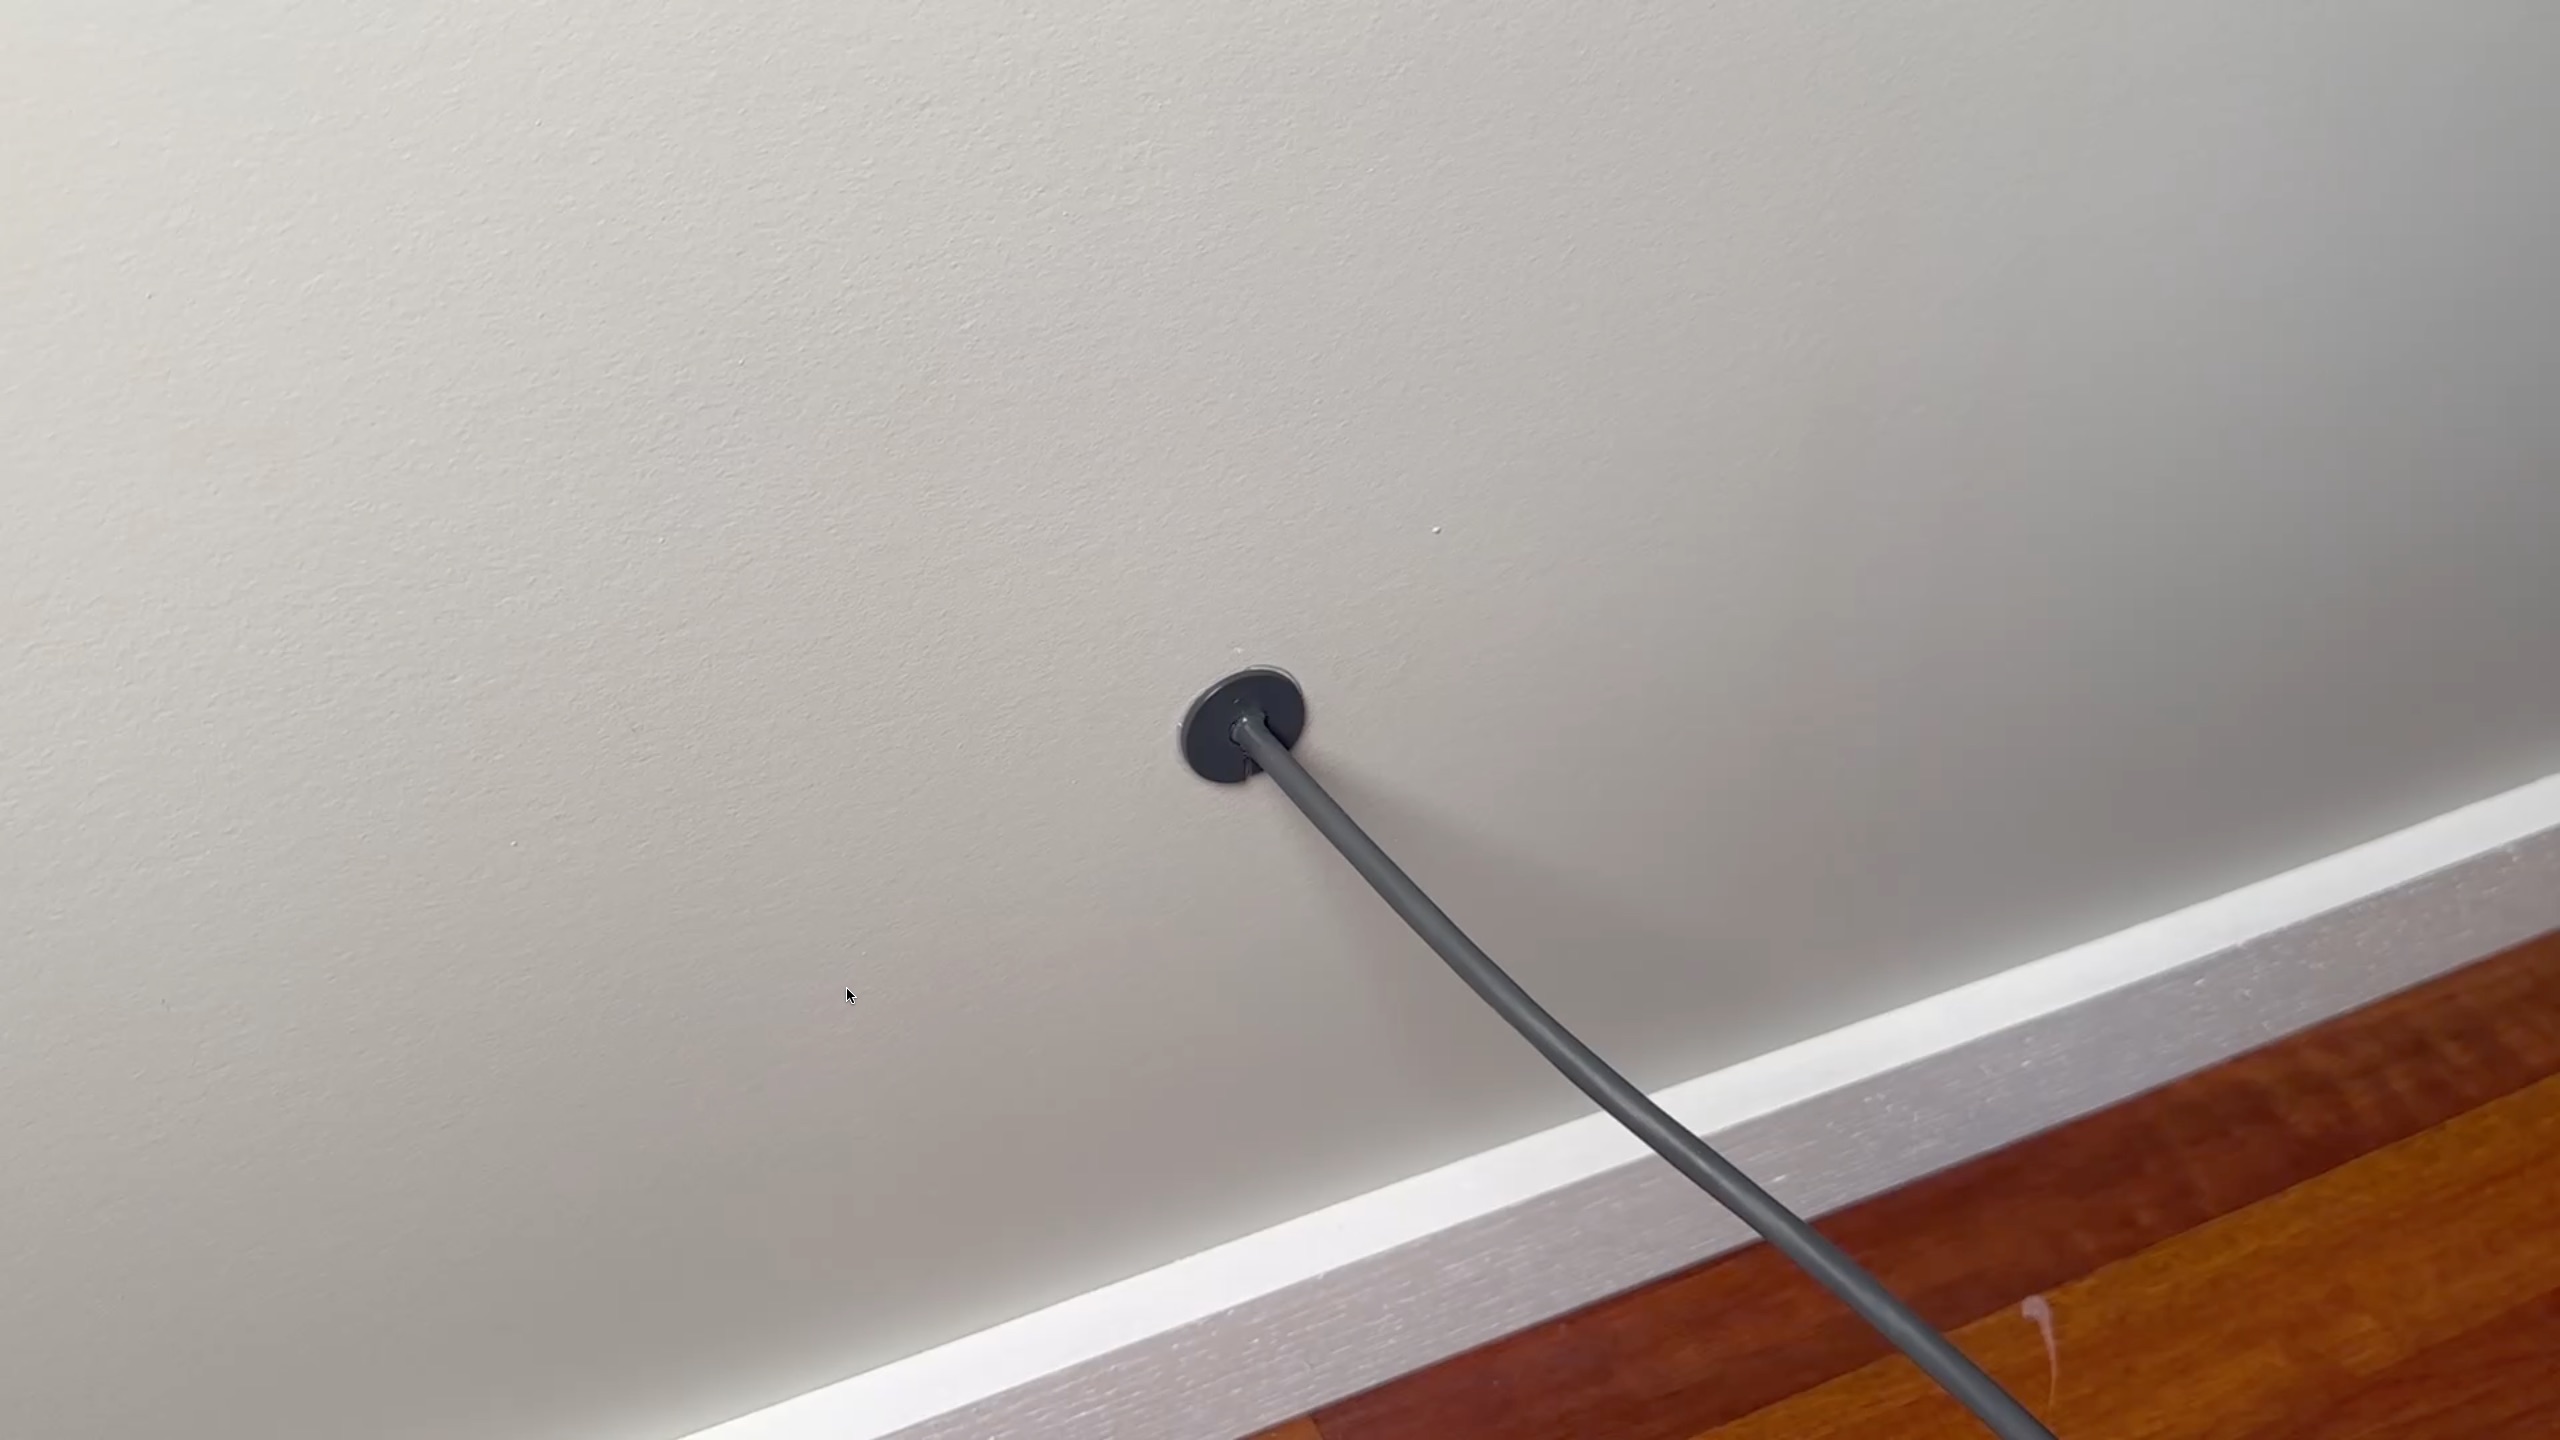
Since I installed Starlink on my roof, I chose to put the router in the room with the exterior wall that I mounted my dish to. This allowed me to route the cable down the side of the house, and then in through a small hole. Once inside, the cable will be able to easily reach the router that I positioned on a nearby cabinet.
The Standard kit includes 50′ of cable to go between the dish and the router. The cable needs to reach the router, so make sure you pick a spot close enough to the dish mounting location. If 50′ of cable isn’t enough, Starlink offers a 150′ cable, or you can plug in an aftermarket extension to the included 50′ cable.
Running The Cable And Plugging Everything In
For permanent setups, you’ll want to run the Starlink cable through an exterior wall, and route it as best you can to the router. You will need to drill a 3/4″ hole to accommodate the connectors on the cable. The connectors are the same on both ends, so it doesn’t matter which way you run the cable. You will just need to make sure you have enough to stretch between the dish location and the router location.
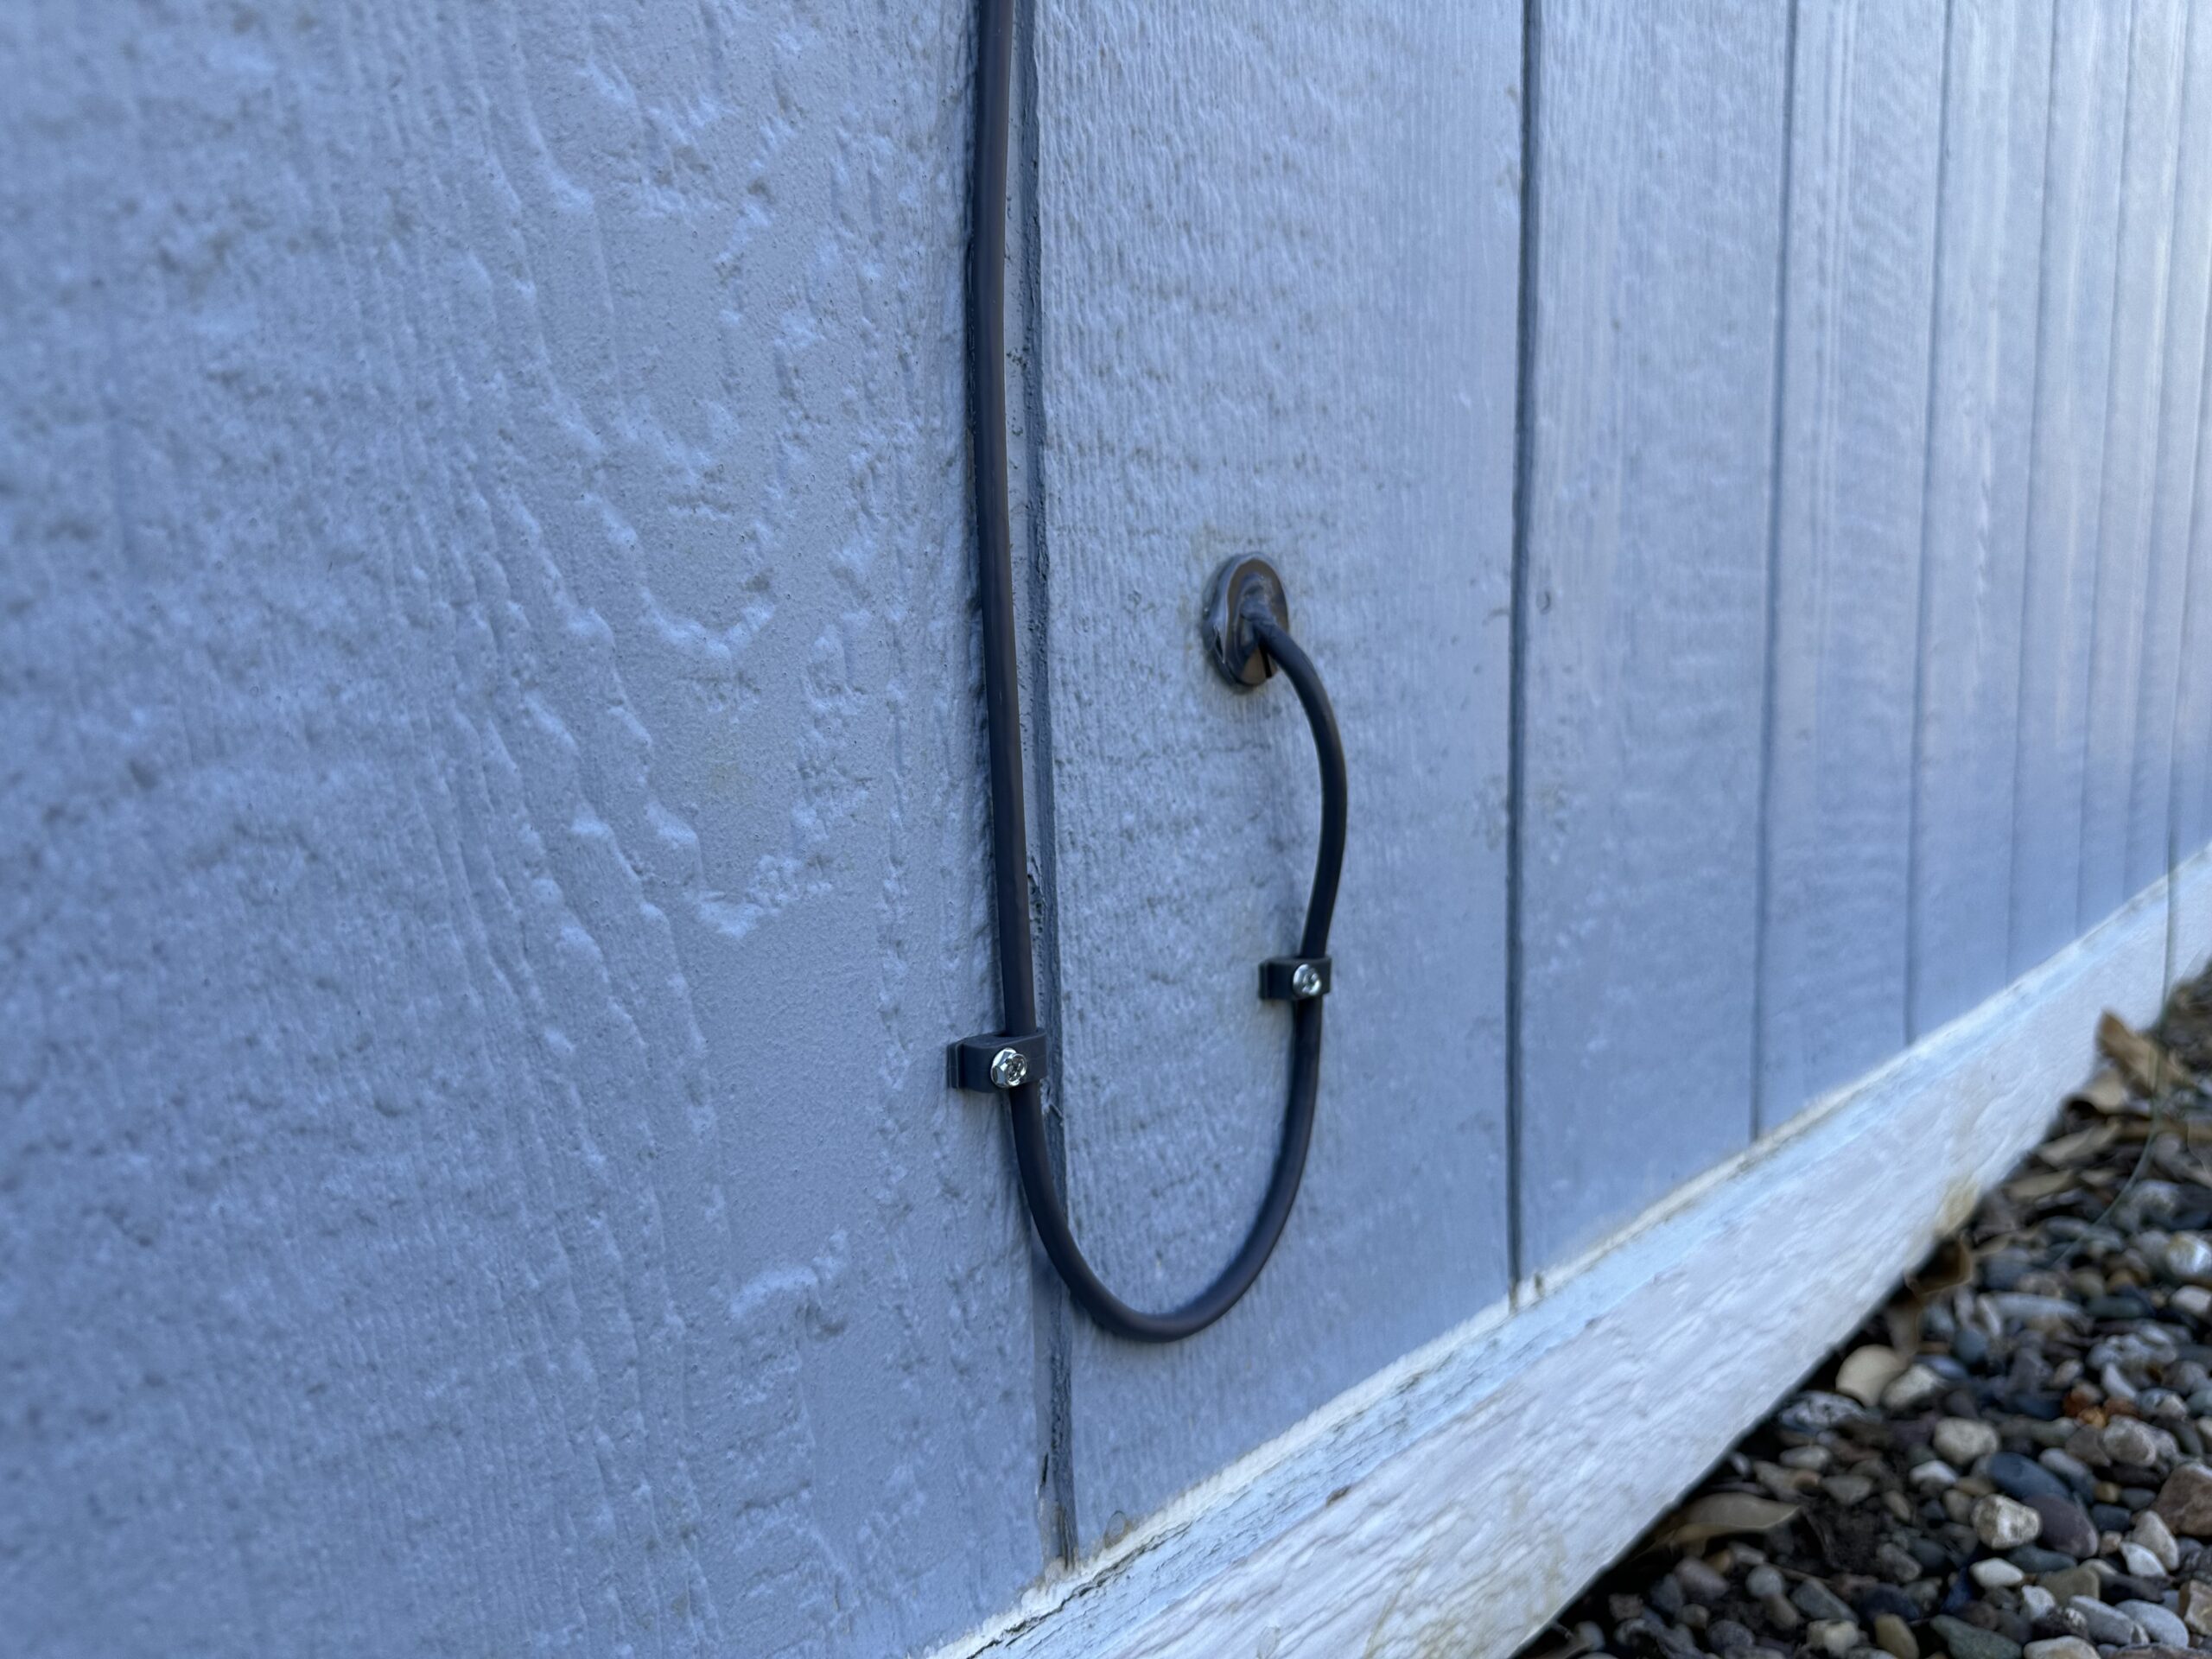
If drilling through a wall sounds scary, don’t worry! Like with mounting the dish, Starlink offers accessories to help. I opted to purchase the cable routing kit from Starlink to make running the cable simple. The kit includes everything you need, like the drill bit, grommets, and sealant. I highly recommend picking up the cable routing kit, it makes this step so easy. Be sure to check out my review and tutorial.
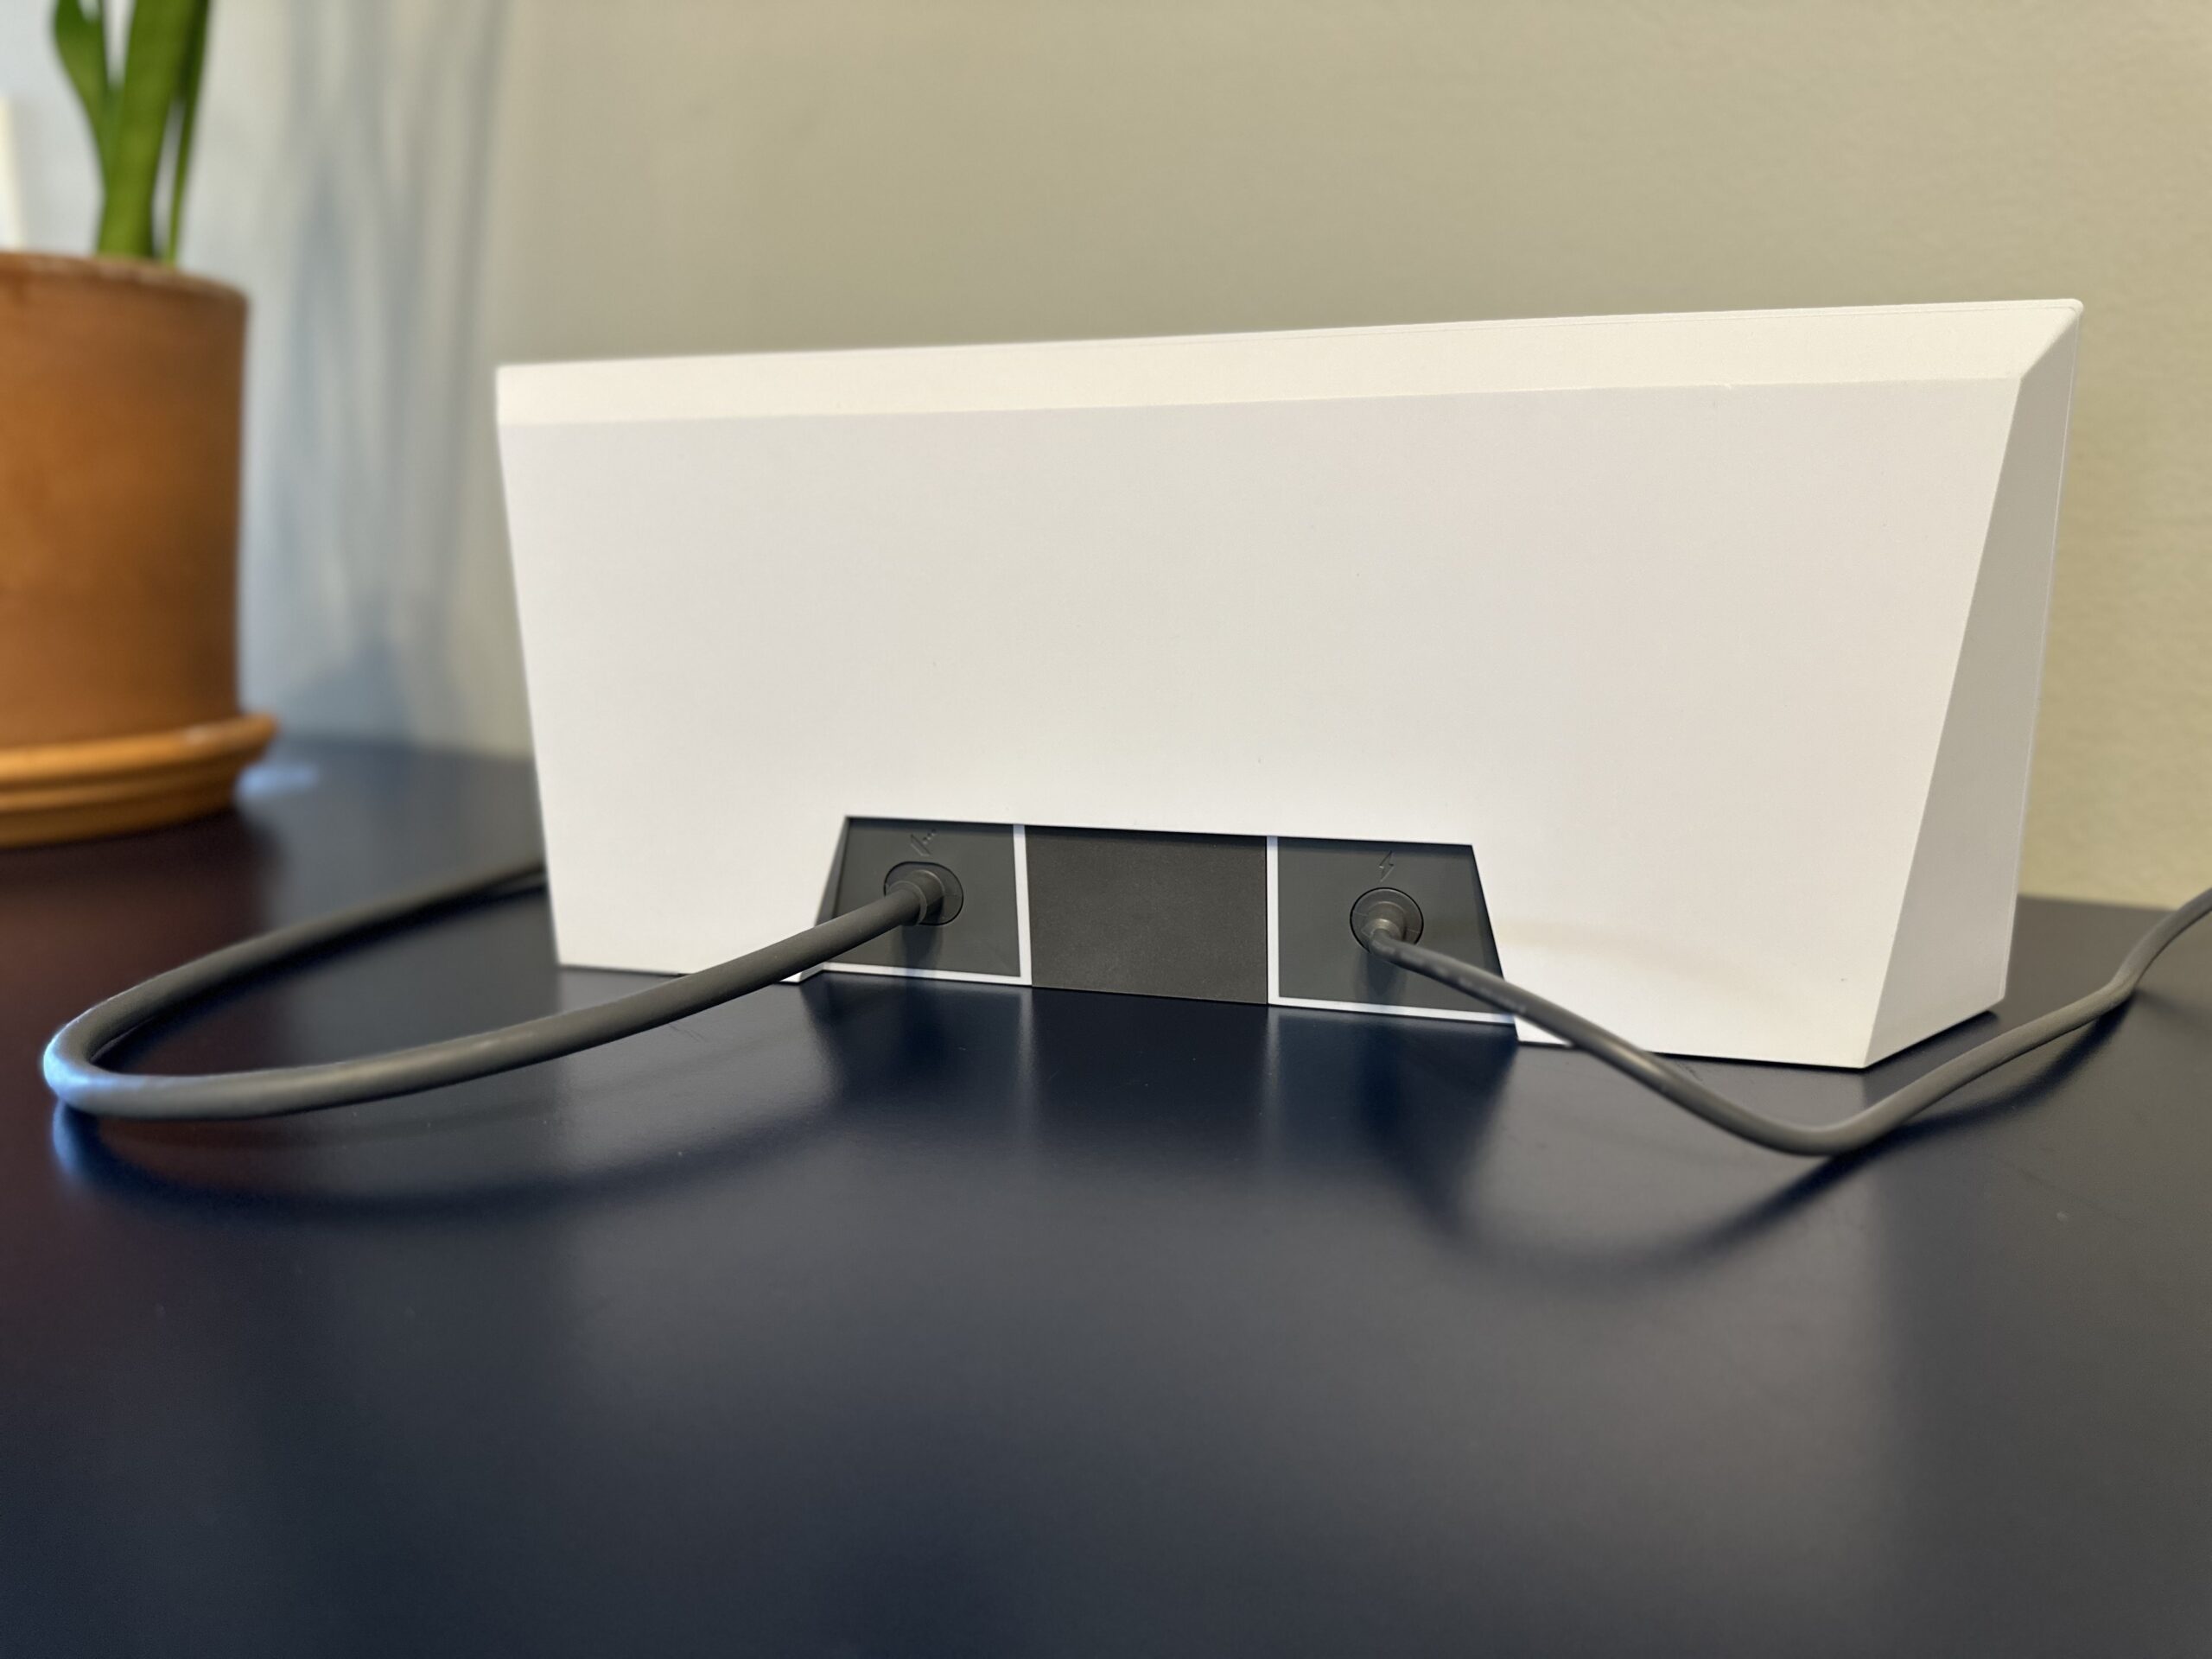
Once I routed the cable through my wall, I was able to hook everything up at the router. The Starlink cable from the dish plugs into the left port on the back of the router. The barrel connector from the power supply plugs into the port on the right. Finally, plug in the AC power cord to power the system up. Open up the app and tap My Starlink Is Powered to proceed with the setup.
Connecting To Wifi
The Gen 3 Wifi router has an LED status indicator on the front, in the bottom left corner. After I plugged in the power supply, I noticed the light start to blink, and then turn solid after several minutes. A blinking light means the router is trying to establish a connection to the internet. A solid light means everything is working. After you plug everything in, I recommend giving the system 10 minutes to boot up before proceeding.
After several minutes, I opened up the Starlink app and selected Open Settings to open up the Wifi settings on my phone. I selected the new STARLINK Wifi network that was showing up. STARLINK is the default, unsecured Wifi network. For now, it’s fine to proceed with the setup, you can change the name and add a password later.
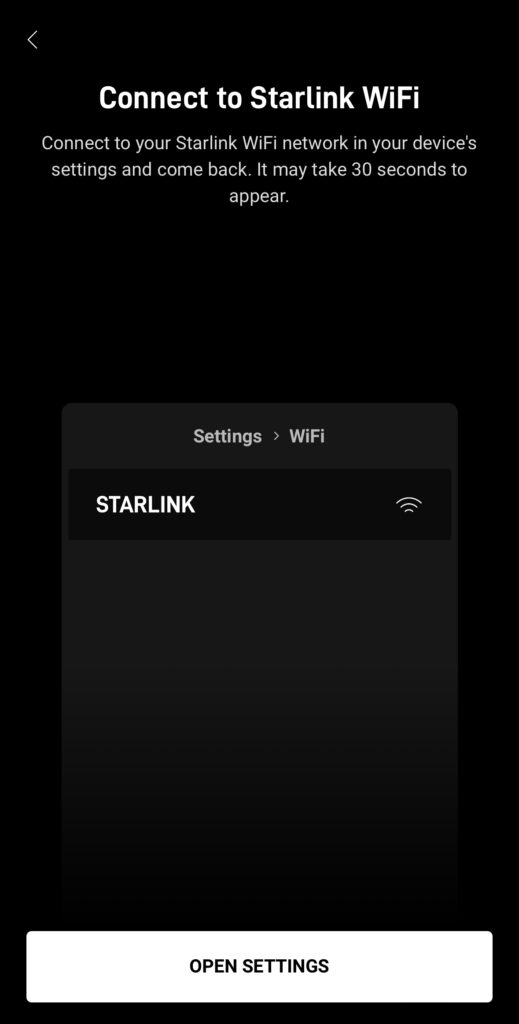
Once connected to the STARLINK Wifi network, switch back to the Starlink app and tap Continue. You might be interrupted by a prompt to log in to your Starlink account. Go ahead and log in if asked, otherwise just go back to the app to continue.
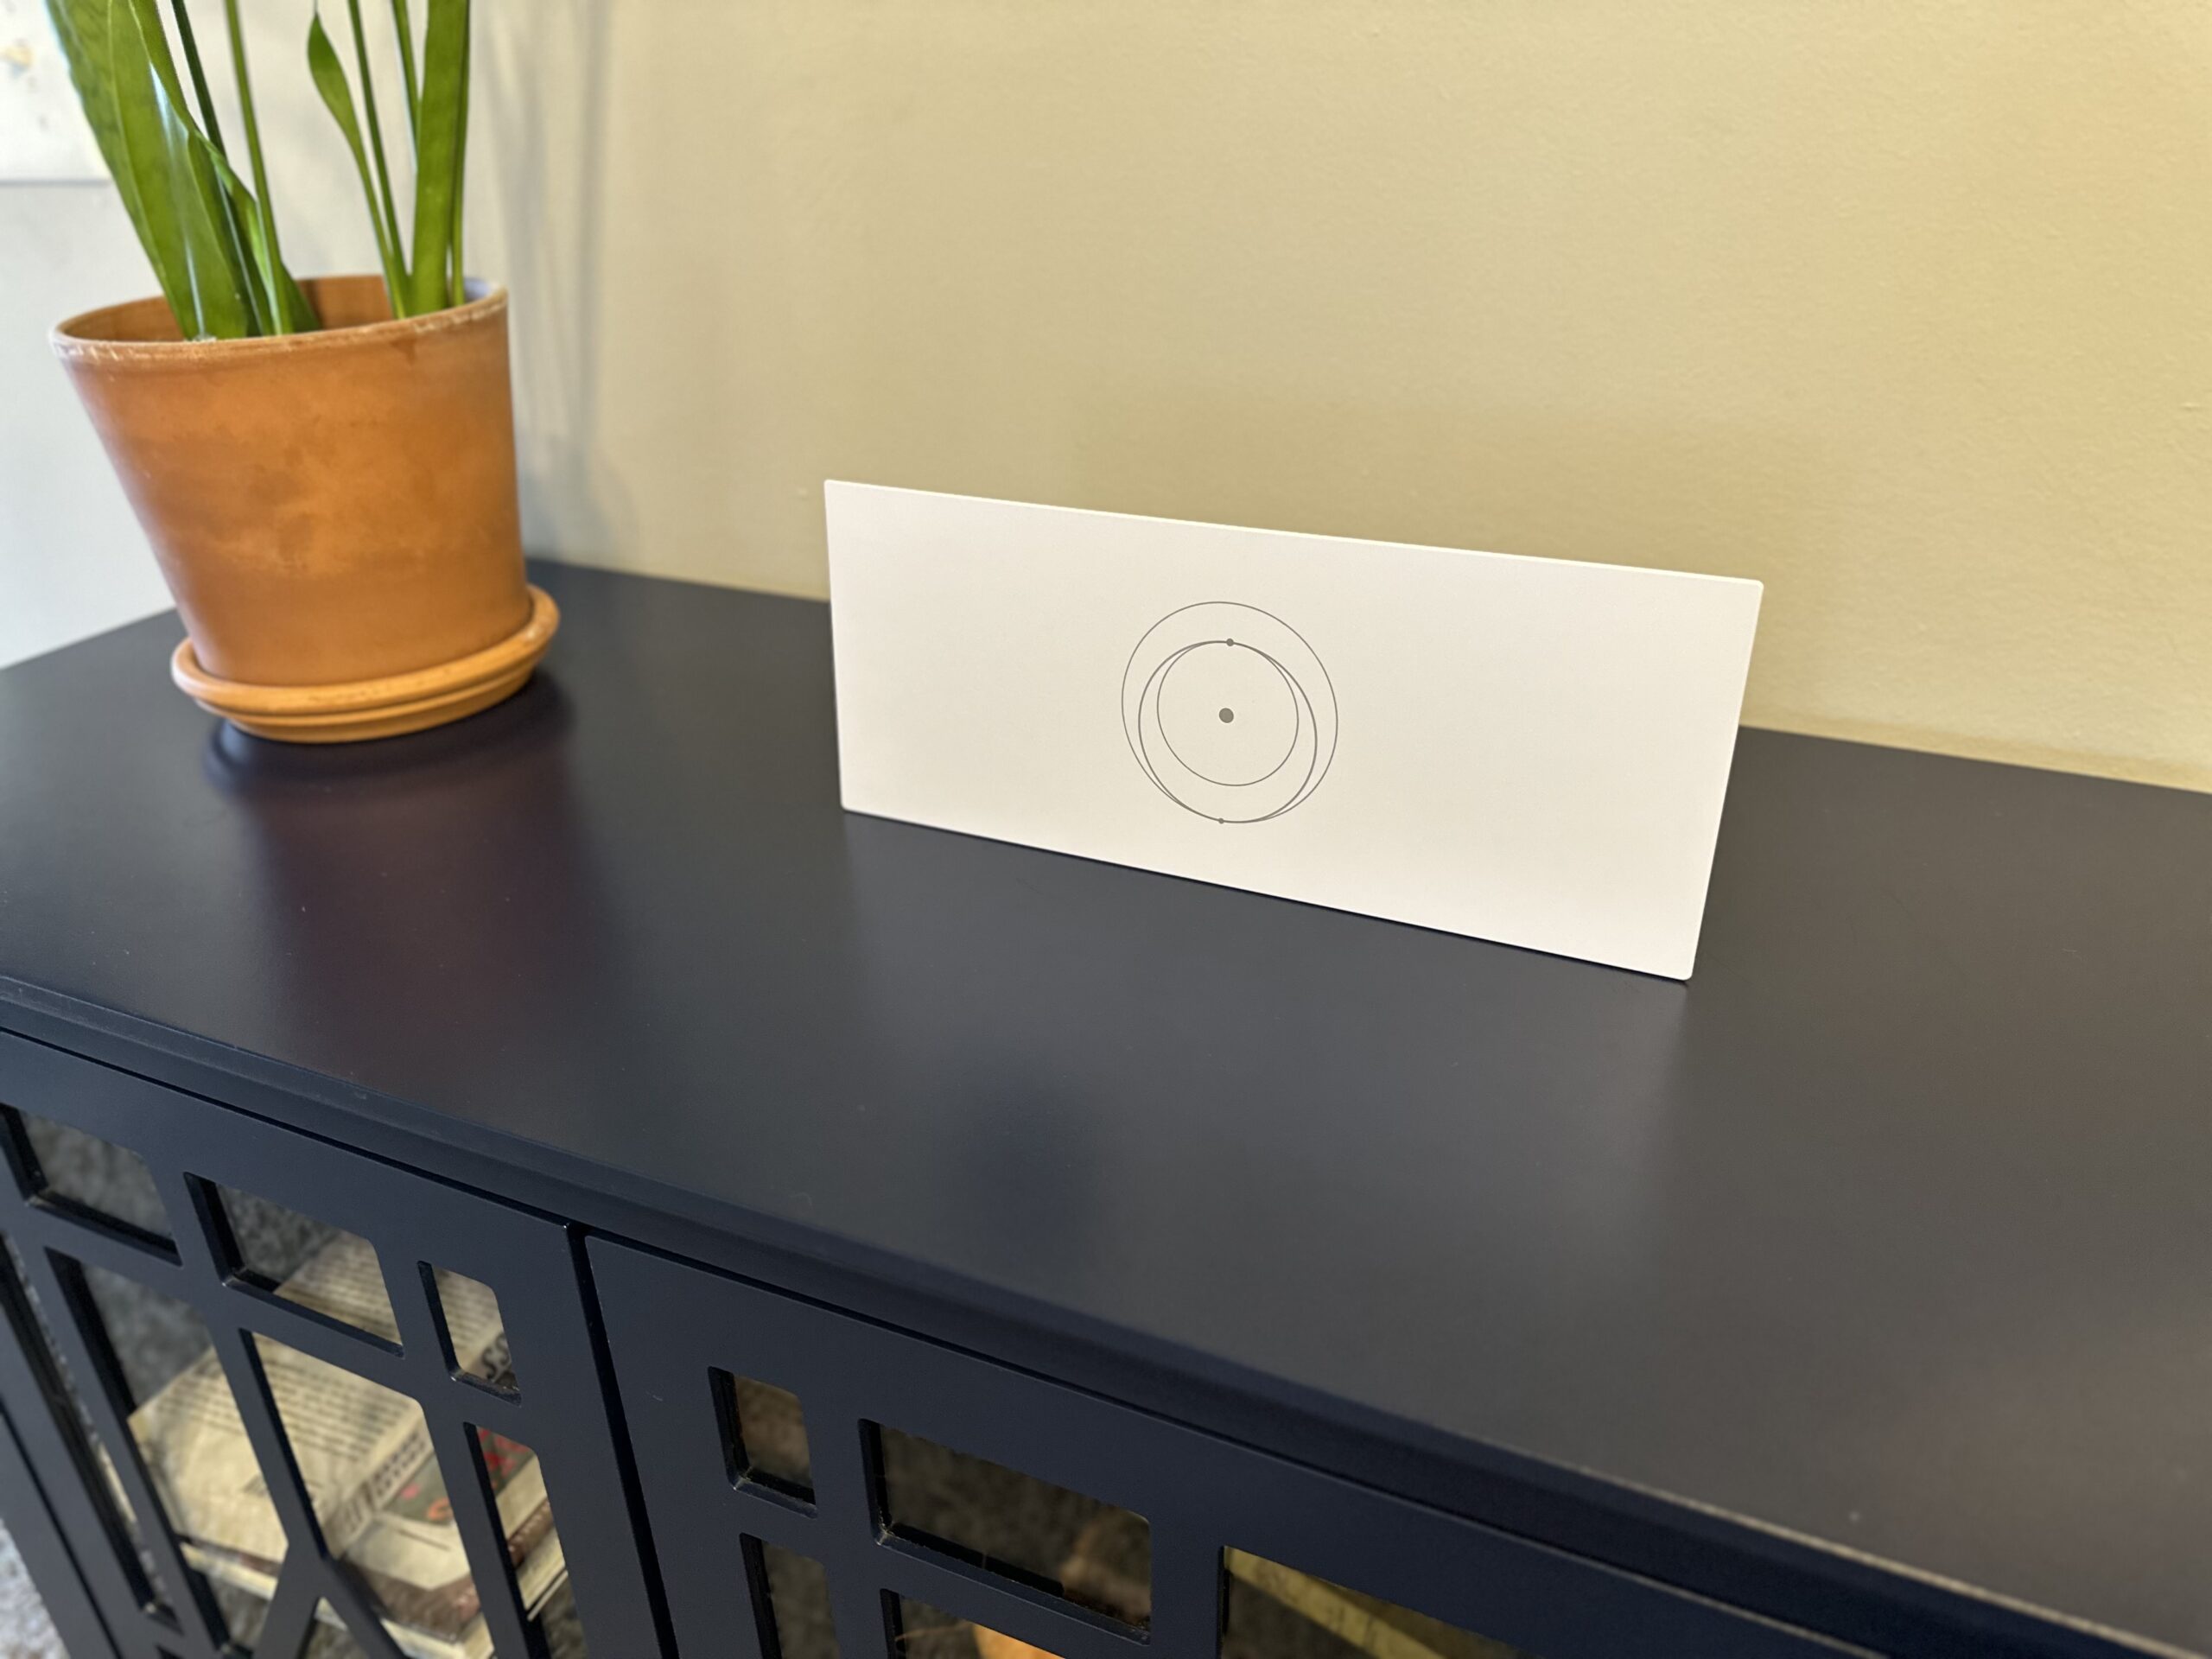
Aiming The Dish
With the app still open, I waited while the dish went through the start up process. During this time, the Starlink dish is talking to the satellites and determining its alignment. The Gen 3 Standard dish requires manual aiming if the alignment is too far off. After a few minutes, my Starlink connected, but I saw a message that I needed to adjust the alignment. I just tapped the message to bring up the alignment tool. If you don’t see any message about the alignment, you can ignore the rest of this section and continue to the next step.
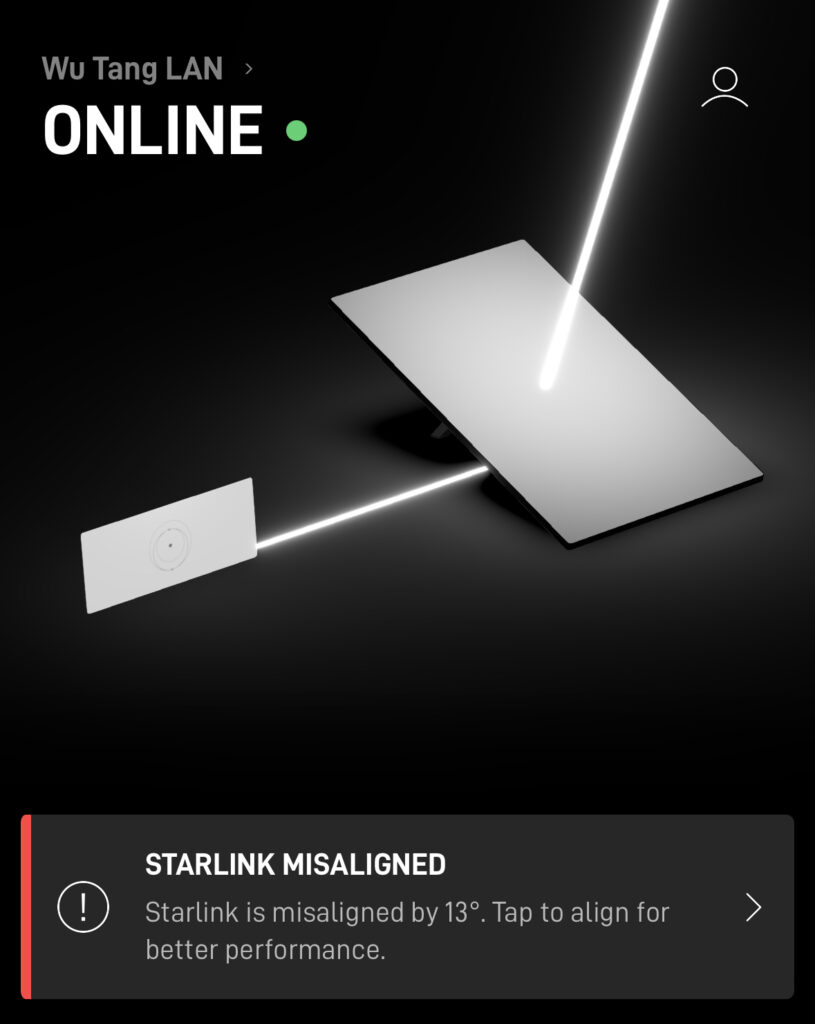
In the alignment tool you will notice a graphical representation of your dish, and a rectangular target area. The goal is to rotate your dish while watching the app, so that your dish lines up with the target. Whether your dish is installed on a permanent mount, or on the ground with the kickstand, it’s important to properly align the dish to get the best performance.

For more on aiming the dish, you can check out our in-depth tutorial here.
Monitor Your Connection
At this point in the setup I have already found a good spot for the dish, scanned for obstructions, mounted the dish, routed the cable, plugged everything in to the router, and completed the alignment. With all that done, Starlink is now running and connected to the internet. I could tell thanks to the information provided in the Starlink app, which guided my setup every step of the way.
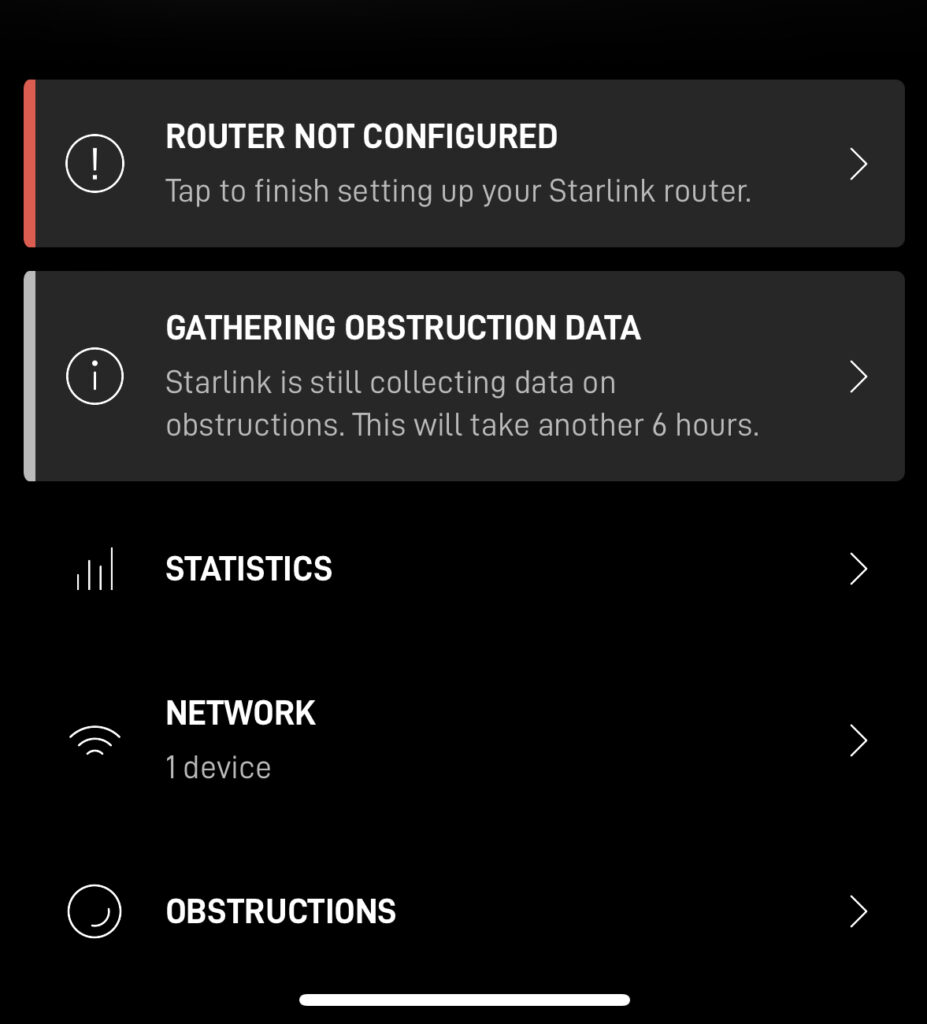
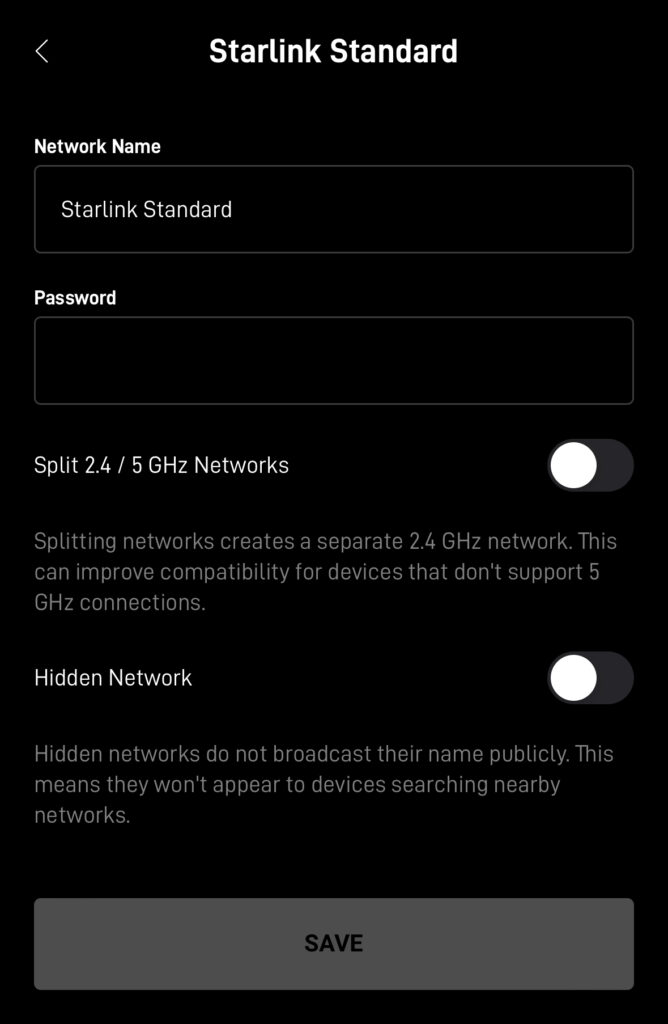
The Starlink app is your key to managing your system. There are a couple things you should do in the app as soon as you’ve finished the setup process. First, set a new Wifi name and password. Setting a password will secure your Wifi network so that only authorized people can use it. To configure my Wifi network, I just had to tap on the app message that said, Router Not Configured. I entered in a new network name and password, and then tapped Submit. You’ll have to open up the Wifi settings on your phone and reconnect to your new network.
The second thing you should do is log in to your Starlink account in the app, if you haven’t already. To do this, just tap on the profile icon in the upper right corner of the app. Use your Starlink account credentials to log in. Logging in allows you to access more things in the app, such as viewing data usage, billing info, etc.

Once you’ve logged in and secured your Wifi network, you are done setting up Starlink! Use the app to make sure your system status displays as Online. If not, I’ll show you how to get help in the next section. The app also contains tools to help you monitor your system:
Statistics – The Statistics section shows uptime, latency, and internet speed information over time.
Network – View connected devices and configure network settings.
Obstructions – After several hours, your obstruction map will fill in with data, allowing you to see if any objects have interrupted your Starlink service.
Speed Test – Check out how fast your new internet service is by running a speed test.
Settings – Change advanced settings, like custom DNS, content filtering, snow mode, and sleep schedule.
Support – View support documentation and request a service ticket.
Alignment – Access the alignment tool to make adjustments if necessary.
How To Get Help
If you ever need help with your system in the future, Starlink has a collection of troubleshooting articles on the support section of their website, or under the Support menu in the app. Browse topics or search for keywords related to your issue.
We also have an in-depth troubleshooting guide to help walk you through some of the most common issues and error messages that Starlink customers experience.
If none of those resources help, I recommend reaching out to Starlink support to have them take a look at your system. Starlink doesn’t have a phone number or email. Instead, you can create a support ticket on the website or in the app. To create a ticket in the app, tap Support in the menu. Select the category related to your issue. Starlink will present a relevant article. If the information doesn’t help, tap the thumbs down icon at the end of the article. You will be directed to fill out a ticket request.
For more information on contacting Starlink, check out this post.
Frequently Asked Questions
No, you don’t need cell service to set up Starlink. The app doesn’t require internet access to go through the setup process. Once your dish is connected to the Starlink satellites, you’ll have internet service. If your Starlink subscription is inactive, you’ll still be able to access Starlink.com and use the app to reactivate and manage your plan.
Starlink cables are not rated for direct burial. If you need to run the cable underground, you will need to install it in conduit.
The Gen 3 router is designed to be installed inside. If your situation requires the router to be installed outside, I recommend using a weatherproof box. More information can be found here.
The longest run possible from the dish to the router is 150 feet. You will need to purchase the longer cable from the Starlink shop on the website or in the app.
Official Starlink accessories for the Gen 3 Standard dish can be found at https://shop.starlink.com/. For help understanding all the accessories, we created a guide, which you can find here.
My Gen 3 system just came in and I can get on the Wifi with my phone, I can’t get my computer working through the ethernet. Do I need a separate router or can i plug my computer directly to the router, which isn’t working for some reason.