

The Starlink Gen 3 Standard dish needs to be manually pointed in the right direction. It’s best to perform the alignment during the initial setup process. Proper alignment is crucial for getting the best performance out of a Starlink system.
In this tutorial, I will explain what the Starlink alignment tool is, and walk you through how to use it to aim your dish. This guide is intended for users of the Gen 3 Standard dish. Manual alignment isn’t needed for older generations or other models.
Table of Contents
Which direction does Starlink point to?
When you aim the dish, you are pointing it at the area of the sky with the most available Starlink satellites. The exact direction is determined by your location. For most of my readers, who live in the United States, this direction will generally be north.
Starlink isn’t allowed to interfere with other satellite systems, such as those in geosynchronous orbit above the equator. To prevent issues, only certain satellites are allowed to communicate with your dish, depending on where you are on Earth. In the US, for example, much of the sky to the south is off limits to Starlink customers.
Pick a good location, without obstructions

Before you can align the dish, you need to pick a good location to set it up. Whether you are setting Starlink up temporarily for camping, or permanently mounting it to your home, it’s best to find a location that is free of obstructions. Obstructions can be trees, buildings, or anything else that blocks Starlink’s view of the sky.
You can use the Starlink app obstruction tool to easily scan locations for obstructions. The obstruction tool uses your phone camera to identify potential issues. If you need more info on how to check for obstructions using the Starlink app, check out this post.
Step 1: Power on Starlink, connect to Wifi
To begin the alignment process, apply power to your Starlink system. Everything needs to be hooked up properly before you can proceed. Starlink needs about 5-10 minutes to boot up, so give it a few minutes if you just plugged everything in.

Connect to the Starlink Wifi network and open the app. If this is the first time you’ve set up Starlink, you may be promoted to change your Wifi name and password. After your Wifi network is set up, connect to it, and follow the instructions in the app. Select your hardware version to continue to the alignment tool.
Step 2: Open the alignment tool in the app
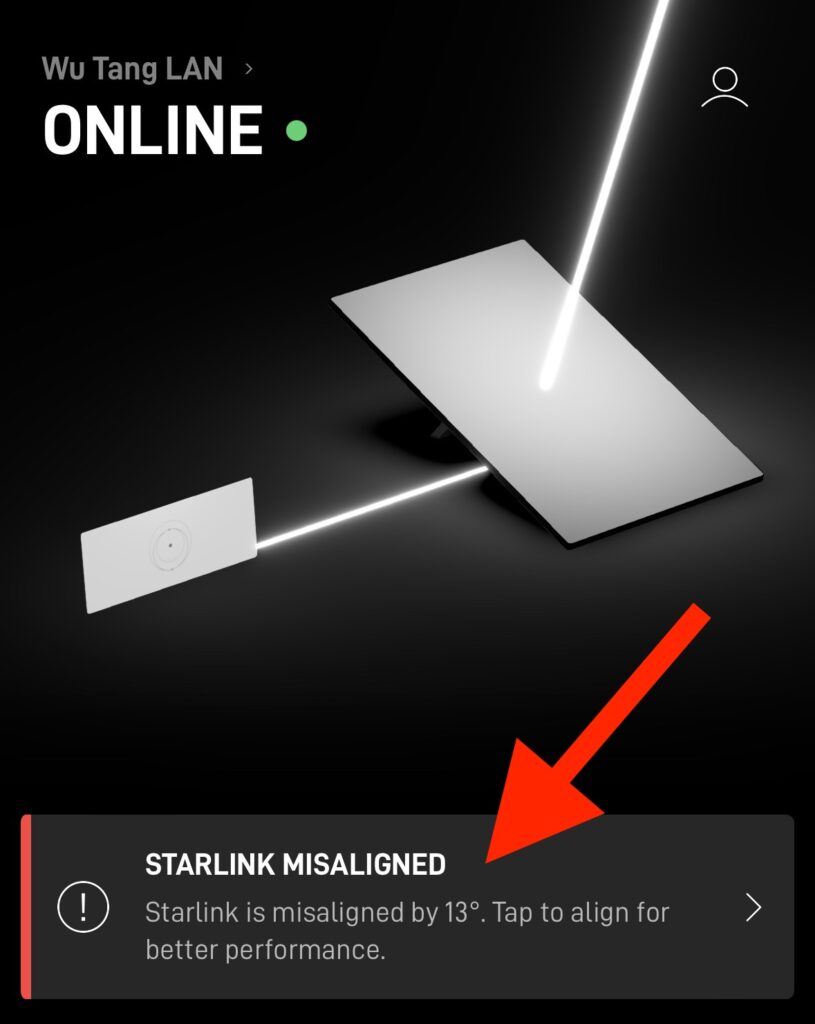
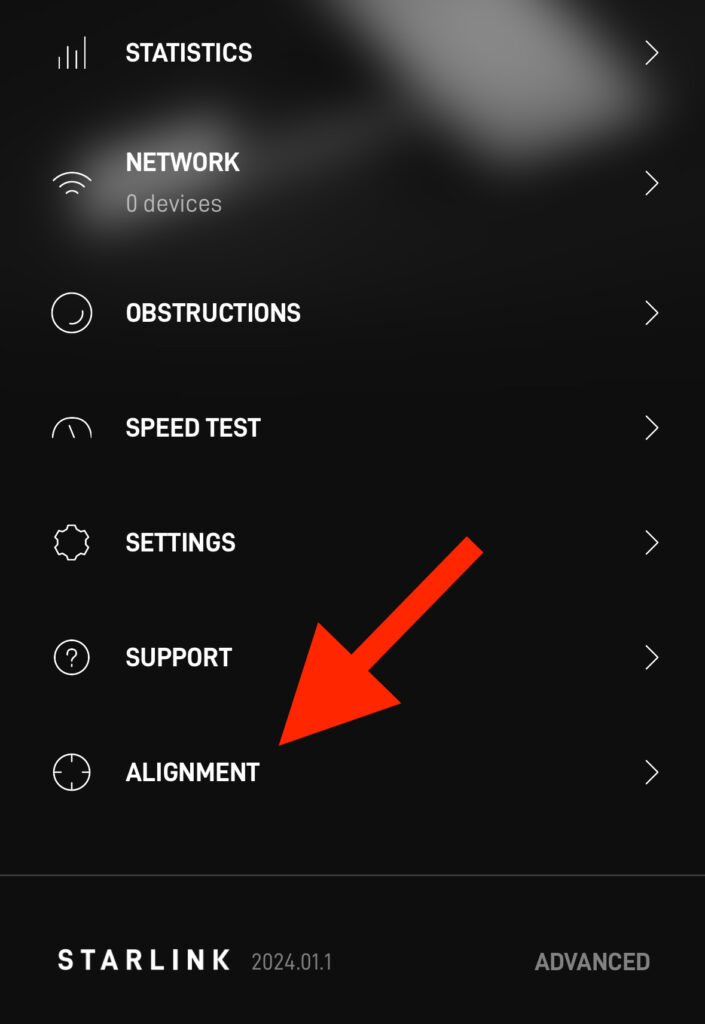
There are two ways to open the alignment tool in the Starlink app. If you see a message in the app that says, “Starlink Misaligned”, you can tap it to open the alignment tool. Otherwise, tap “Alignment” from the app menu, near the bottom.
Step 3: Rotate the dish until it is aligned
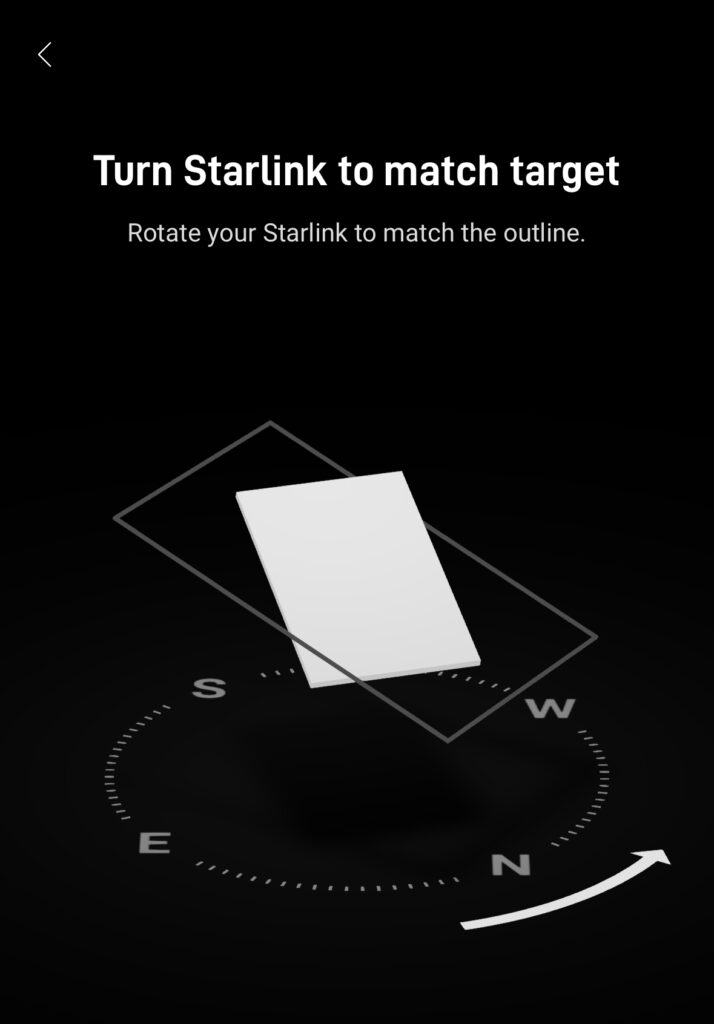
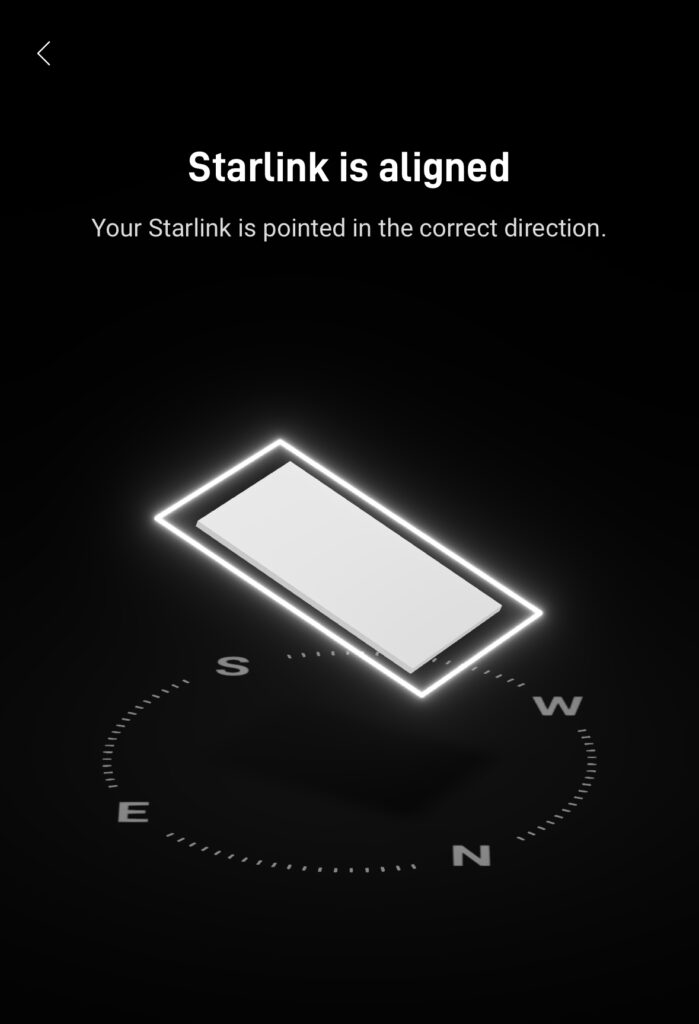
When you open the alignment tool, you can see the direction your dish is pointing in real-time. You will also notice an alignment target on the screen. To properly aim the dish, rotate it until the dish is fully contained in the target box. The dish needs to be within 5 degrees of the target direction to avoid the “Starlink Misaligned” error message.
Future adjustments
For permanent installations, alignment should be a one-time procedure. You won’t need to continually make adjustments. If the alignment ever exceeds 5 degrees of Starlink’s target direction, the app will notify you, and another manual adjustment will be necessary for optimal performance.
Starlink occasionally changes the direction your dish is supposed to point. With previous dish models, the motors performed the adjustment automatically. It’s still too early to know if Starlink will make similar tweaks for owners of the Gen 3 Standard dish.
More resources
You can find more information about aiming the Standard dish in the Starlink support portal. Starlink also has a short video demonstration of the alignment tool. If you need help from Starlink, this is also the place to create a support ticket.
Final thoughts
Since previous generations of Starlink hardware had motors, which aimed the dish automatically, I was a bit worried about Starlink’s decision to make the Gen 3 Standard non-actuated. But after setting it up, and going through the alignment process for myself, I don’t really think it’s a big deal.
The Starlink app alignment tool makes the process very simple. The real-time graphic is pretty cool, and I found the interface very user friendly. If you used this guide to aim your dish, I would love to hear your feedback on the process. Was it straightforward, or do you think Starlink should have kept the motors?
Is alignment going to be an issue for the Gen 3 Standard dish when it is permanently mountedon top of an RV? Assuming no overhead obstructions.
It shouldn’t be an issue. You’ll get the best performance if it’s pointed the correct way, but it will still work pointed any other direction. With a vehicle mount, it’s not practical to aim it in any one direction. Luckily, the 110 degree field of view makes most of the sky visible, even if it’s pointed the wrong way according to Starlink.
Can I update my residential system to the roam system?
I live in Northern Calif.
Roam and Residential use the same hardware options. This is the Gen 3 Standard dish, available for Roam in all US states, and available on Residential plans in some US states. Soon, it will expand to be the default option for both Residential and Roam. If you live in a state where it’s not available for Residential, you can either wait, or purchase it as Roam, and later change the plan type to Residential.
How can I get to the Dubai
If Starlink isn’t available in your country, you will have to find a way to order it in another place. You can subscribe to Global Roam to get it to work in most unsupported locations.