
The Starlink Standard kit includes a 50 ft. shielded Ethernet cable, which carries power and data from the router to the dish. For permanent home installations, the Starlink cable is usually routed through an exterior wall. If the dish mounting location is far away from where the router will be placed, 50′ of cable might not be long enough.
If you need a longer cable, there are a few options to consider. You can purchase the official 150′ cable directly from Starlink. A cheaper option is to buy an aftermarket Ethernet cable that meets the required specifications. The last option, which I will cover in this tutorial, is to make your own cable extension.
Extending the existing 50′ Starlink cable is the best of both worlds. You get to keep the OEM moisture seals from the Starlink cable, and you can extend it to virtually any distance you need, up to about 150 ft. The best part of this method is that it’s much cheaper than any other solution.
Table of Contents
Compatibility
This cable extension tutorial is only compatible with Gen 1 (Standard Circular) and Gen 3 (Standard) systems. Both of these models use standard Ethernet cables and RJ45 connectors. This tutorial is not compatible with the Gen 2 Standard Actuated, High Performance, or Flat High Performance models. The Gen 2 models use proprietary Starlink connectors, which won’t work for this method. If you have a Gen 2 system and need a longer cable, Starlink sells various lengths in their online shop.
Supplies needed

To create a cable extension for Starlink, you will need a few supplies. You should already have the 50′ Starlink cable from your Gen 3 Standard hardware kit. In addition to the included cable, you will need the following:
Waterproof RJ45 coupler
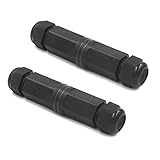
VCE waterproof RJ45 couplers – #CommissionsEarned
You will need a waterproof RJ45 coupler to connect the 50′ Starlink cable to an aftermarket Ethernet cable. The VCE female to female RJ45 coupler that I used came as a 2 pack, and is compatible with CAT5/CAT5E/CAT6 cable and connectors. The coupler is shielded, which is important for using it with Starlink.
Since most installations will require the cable to be run along a roof, or down an exterior wall, a waterproof coupler is essential. RJ45 couplers simply allow two Ethernet cables to connect together, with no cutting or splicing. It’s a cheap and reliable solution, that’s easy to service or change later on if you need to.
Shielded Ethernet cable

GearIT 50′ Ethernet cable – #CommissionsEarned
The other thing you will need is shielded Ethernet cable in the length that you need for your installation. Remember, we are creating a cable extension with the existing 50′ Starlink cable. So if your installation requires 150′ of cable in total, you will purchase the 100′ version. It’s important that the aftermarket Ethernet cable you use meets the following specs:
- Shielded
- Outdoor rated
- CAT5E/CAT6/CAT7
- RJ45 connectors
For this tutorial, I am using the 50 ft. GearIT CAT6 outdoor Ethernet cable, for a total length of 100′ when combined with the 50′ Starlink cable. GearIT also offers other lengths to suit any Starlink installation. I wouldn’t recommend going over 150 ft. in total length for any Starlink dish. The longer the cable, the higher the chance your dish will have issues with voltage drop.
The great thing about this method, compared to just buying the 150′ cable from Starlink, is that it’s way cheaper overall, and you get the exact amount of cable needed. With the OEM Starlink cables, they sell 50′ and 150′ lengths. If you only need 75′ for your install, you will be forced to buy the expensive 150′ cable, and waste most of it. By creating your own cable extension, you simply buy the amount of aftermarket cable you need to combine with the 50′ cable you already have.
Connect the 50′ Starlink cable to the dish
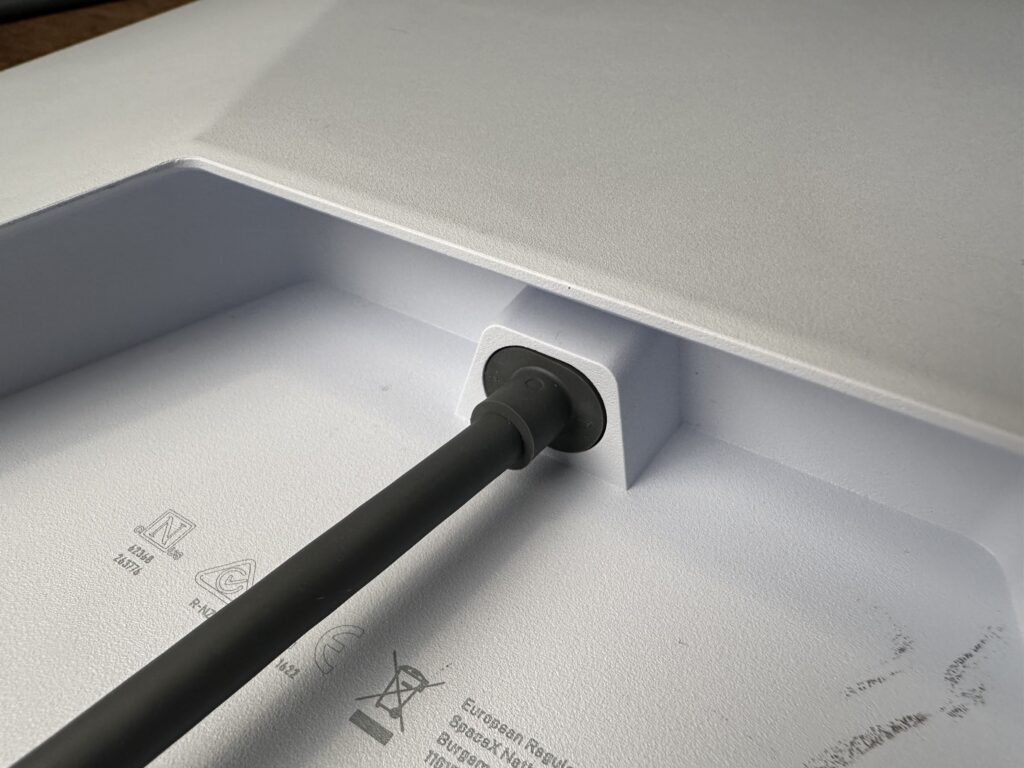
Plug one end of the included 50′ Starlink cable into the Gen 3 Standard dish. If you haven’t already, remove the kickstand by pulling up on the center tab with one hand, while pulling straight out on the kickstand with the other hand. Removing the kickstand, or any other mount adapter you may be using, reveals the Starlink cable connector.
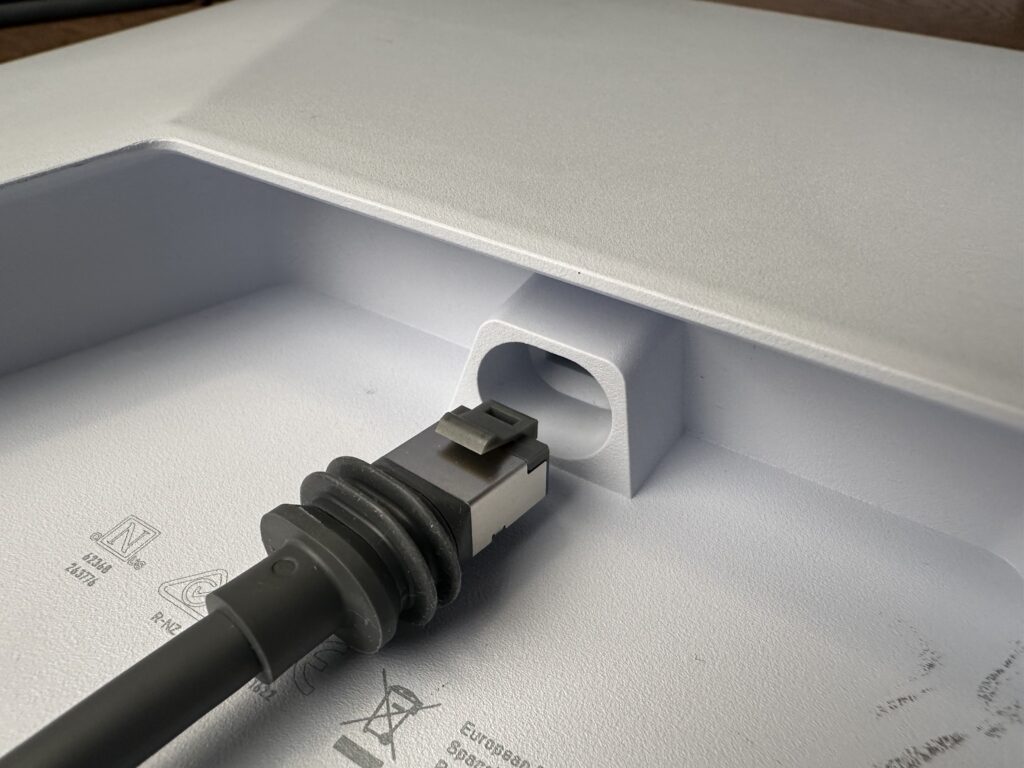
If you are wondering, the OEM Starlink cable is used on the dish side because of the custom moisture seals on both ends. Any RJ45 connector will connect to the dish, but I prefer to utilize the OEM cable so that the water seal can be maintained. If you use an aftermarket cable and plug it directly into the dish, you lose some of the water resistance.
Combine the cables
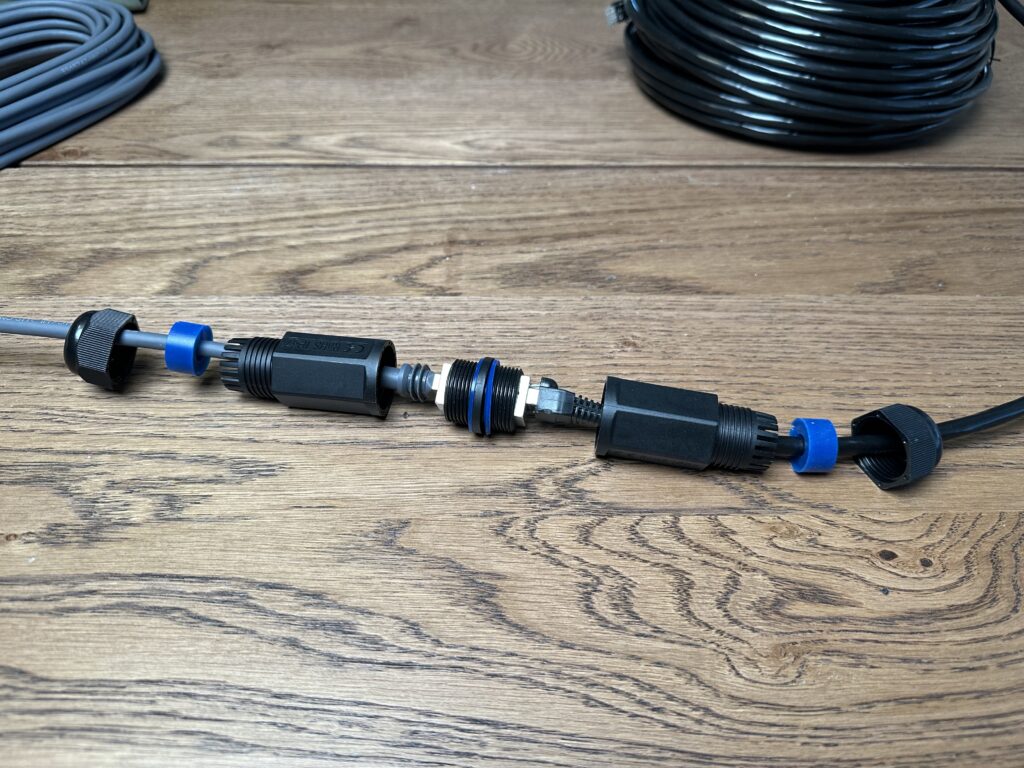
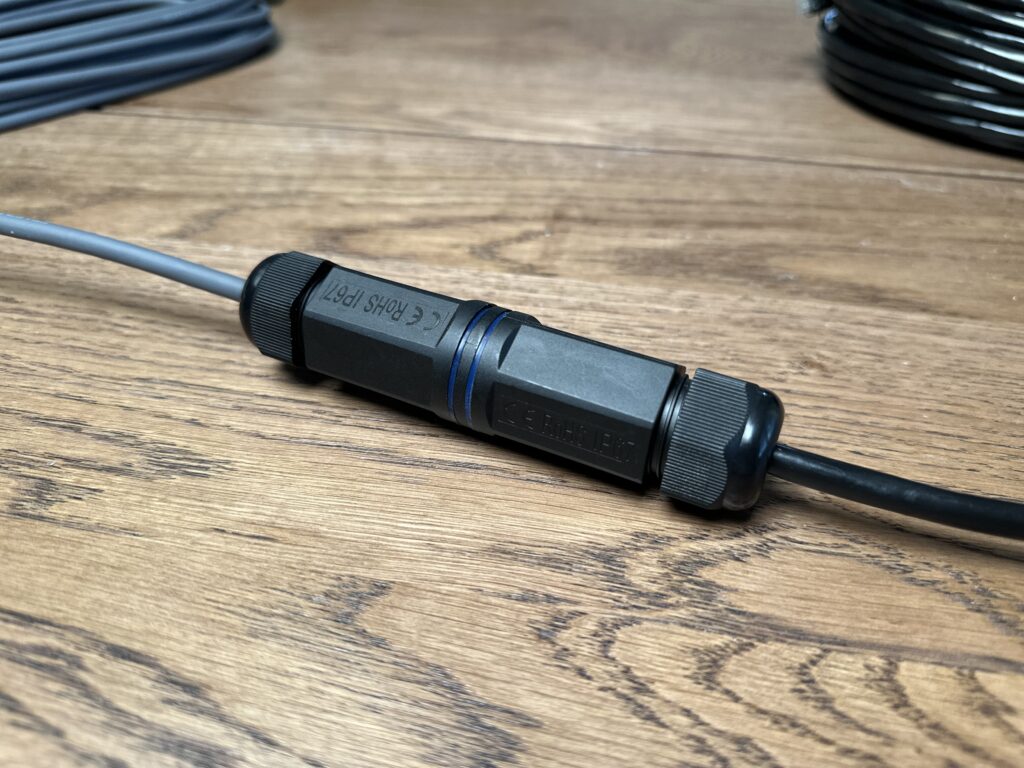
Next, use the waterproof RJ45 coupler to combine the 50′ Starlink cable to the aftermarket Ethernet cable. I recommend following the instructions of the specific coupler you purchase. For the VCE coupler that I am using, the design is pretty simple. Unscrew everything. On each end, feed the cable through the components in the order they were installed on the coupler to begin with. For the water seal, insert the cable through the cutout. Then, plug the connector into the coupler. Screw everything back together to complete the installation of the coupler.
Plug the aftermarket cable into the router

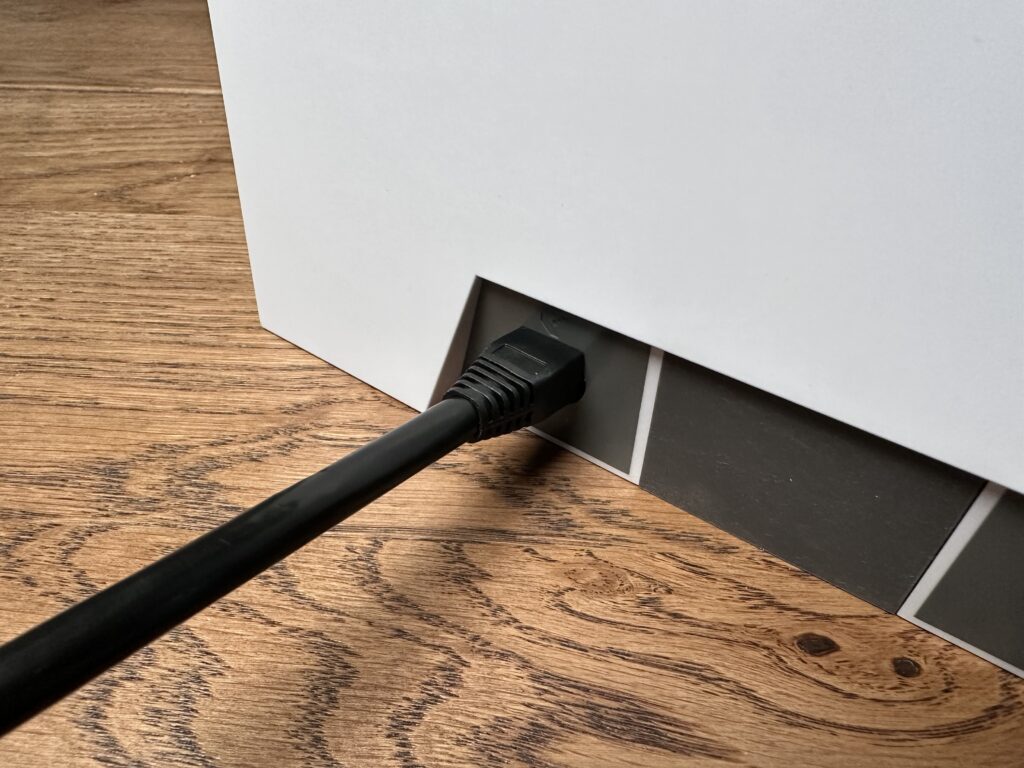
Now you are ready to connect your extended Starlink cable to the Gen 3 router. The dish connector is on the very left of the router. A typical Ethernet connector won’t fit into the router connector. I had to pull back on the strain relief jacket to provide enough clearance to seat the RJ45 connector. The strain relief just slides along the cable, so just move it back to reveal the RJ45 connector on your aftermarket Ethernet cable. Once the connector is seated, I just slide the jacket until it’s flush with the router. Or, you can just remove it completely if you want.
Keep in mind, the Starlink router RJ45 connector uses a passive latch design. That means that no cable will lock into place. It’s held in mainly by friction. To remove either the Starlink cable or an aftermarket Ethernet cable, just pull straight out. The same goes for the connector on the dish side.
Boot up Starlink
With everything hooked up, plug in power to the Starlink router to boot up your system. Allow about 10 minutes for everything to boot up. Connect to your Starlink Wifi network and check the Starlink app. Hopefully, the status is reading Online. Run quick speed test to make sure everything is working properly.
Troubleshooting cable issues
If you are getting a message about Starlink being unplugged or rebooting, wait several more minutes. If the message is still showing up, double check all the connections. Pay special attention to the 50′ Starlink cable connection at the waterproof coupler. The Starlink cable has a passive latch, so if you aren’t careful when assembling the coupler, it can come loose. Reboot the system, and the message should go away.
Still having issues? Make sure the aftermarket cable you bought is shielded. You can tell because the connector will be made out of metal, not plastic. Also be sure that the coupler you purchased is shielded. Triple check that the cable is seated on the dish and router.
If the issue persists, open the Starlink app. Tap on Advanced at the very bottom. Then tap on Debug Data. Under the Starlink Router section, look for the “Cable ping drop rate” and “Cable ping latency”.
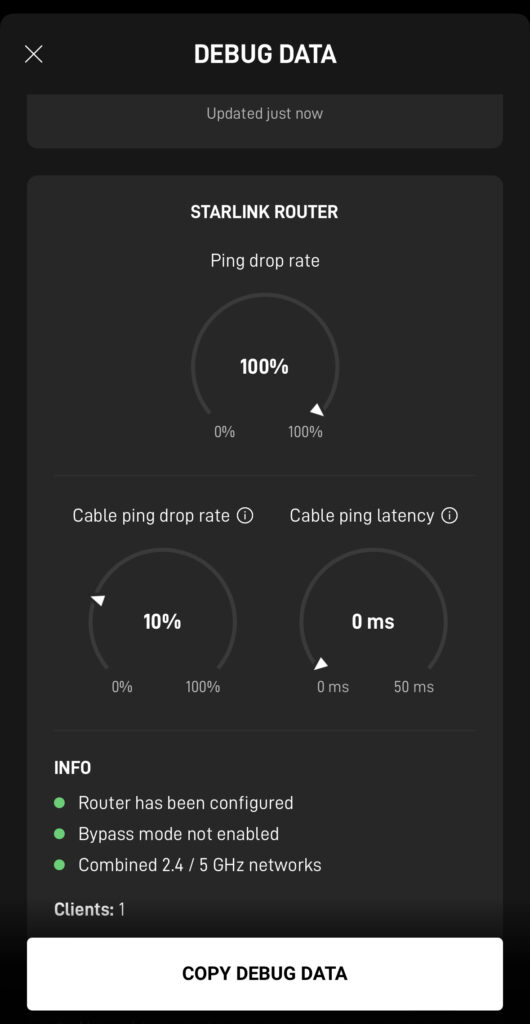
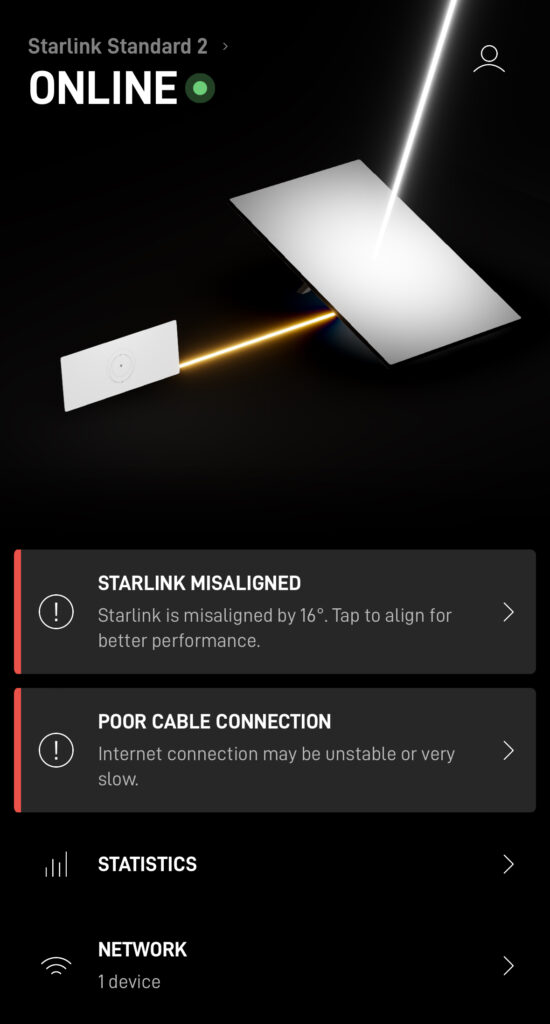
If your cable ping drop rate is anything above 1%, that indicates a problem with the cable. Most likely, it’s an issue with the aftermarket cable or coupler. If you use an aftermarket Ethernet cable that is too long, or low quality, you can have higher cable ping drop rates. This will impact the performance of your dish, and cause an error message in the Starlink app:
I recommend sticking with the shortest possible extension cable you can get away with for your installation. Anything over 150′ will likely result in issues, with 100-150′ being a grey area, depending on the quality of the aftermarket cable.
You can also check out our troubleshooting guide for further information on the various Starlink app error messages.
Final thoughts
Creating your own cable extension for Starlink is a great way to get the exact cable length you need for your installation, at a cheaper price compared to the OEM Starlink cables. If you combine the included 50′ Starlink cable with 25-100′ of aftermarket Ethernet cable, you can maintain the moisture seal at the dish, while not having to pay for extra cable you won’t use. The key to this project is the waterproof RJ45 coupler, which helps you connect two Ethernet cables without cutting or splicing.
Overall, I found this project to be straightforward and affordable, compared to just buying the 150′ Starlink cable for the Gen 3 Standard dish. I was able to create my own 100′ cable for about half the price of the OEM Starlink cable. Let me know what you think in the comments below. Is this worth the trouble, or will you just stick with the official 150′ cable from Starlink?
Greatn article!
If I wanted to use a flat ethernet cable to run it through the door of my van (when closed) would that work? Do I need to look out for anything specific with the cable or does any ethernet cable work?
I am a little worried about the power and the tiny cables, but I guess the original cable has equally tiny cables on the inside?
Thanks
Flat Ethernet cable should be fine. The only real requirement would be that it is shielded, and you probably want outdoor rated as well.
I have to run my cable across my lawn. I intended to use electrical plastic piping to protect the cable from getting up in my mower wheels. Good idea, or bad? Thanks
I would bury it with ground rated conduit if it were me.
Where to find an ethernet adaptor for V3 Starlink? Version 2 adaptors mot compatible?
You don’t need an Ethernet Adapter for Gen 3 because the router has Ethernet ports on the back.
Noah,
You are a great resource for the Starlink community.
We are trying to source a manufacturer to get 150 ft cables for our installs.
SpaceX / Starlink is often out and BestBuy does not have any.
Have you come across a reliable source for either the cables or the components?
Feel free to email me…
Matt
The cheapest way would be to buy spools of outdoor rated CAT5E or CAT6 from a local electronics supplier, and terminate your own ends using shielded RJ45 connectors. For off-the-shelf components, ordering from Amazon is cheap and easy. I’ve never had an issue with any cable I’ve purchased from them. This is for Gen 3 only, Gen 2 you are stuck with Starlink due to the proprietary connectors.
If you build a cable of a shorter length, say 10′, to connect to a through-wall connector, is there any issue with changing the cable impedance and affecting the signal? For instance, using the standard 15M cable from dishy to through wall junction, then a 3M cable from there to router…
Also, any suggestions on a thru-wall connector? Especially one that would maintain the OEM water resistance? Specifically for RV applications.
There would be no issues going with a shorter cable. Really any shielded Ethernet pass-thru connector will work. Plenty of results on Amazon designed for RV’s. It just depends on what style, color, etc. you are wanting. The main thing for Starlink is that it needs to be shielded for the dish to work properly.
Has anyone done this and used Gen 3 with additional cable per above ? I did a pinout check on the cable that came with my starlink dish (gen 3) and found it is wired as “straight-thru” meaning: 1-1, 2-2,3-3,4-4,5-5,6-6,7-7,8-8 Ethernet extension cables are not wired this way. It does not seem like this would work unless you crimp your own grounded connectors as straight-thru.
Standard Ethernet cables, like the one linked, are straight through, they don’t have any crossovers. You would have to buy a special type of Ethernet cable to get pairs flipped.
Are there simple plug-in Cat 6 connectors that can be used inside the house to splice gen 3 cable to an over the counter Cat 6 shielded cable?
Yep, tons of them on Amazon and basically any electronics supply store. You would be looking for “shielded Ethernet coupler”.
Perfect tutorial on how to get the right cable for gen 3. I just ordered the combo you suggested for a spare and having an extension while
rv camping.
What do you suggest for extending the gen 2 cable?
There isn’t a good method that doesn’t involve cutting or splicing. The best option with Gen 2 is to just purchase the 75′ or 150′ cable from the shop. The proprietary connectors make Gen 2 unfriendly for aftermarket cable extensions.