
Starlink has been offering the Ridgeline Mount since the early days of the service, starting with the version for the original Gen 1 circular dish. Shortly after Gen 2 came out, they released an updated version for the new hardware. Now that Gen 3 is here, Starlink has updated the popular Ridgeline Mount again.
In this post, I will be going over all the details of the Gen 3 Ridgeline Mount. I’ll let you know what this mount is for, what comes in the kit, and how to install it. I will also give you my thoughts and impressions along the way, and tell you if I recommend the Ridgeline Mount. Let’s start off with what this mount is all about.
Video review and tutorial
Note: Some ad blockers will block our video player. If you don’t see the video, try disabling your ad blocker, and then reload the page.
You can also view the full video on YouTube if you prefer. The text version of the review continues below.
The “no drilling required” mounting option
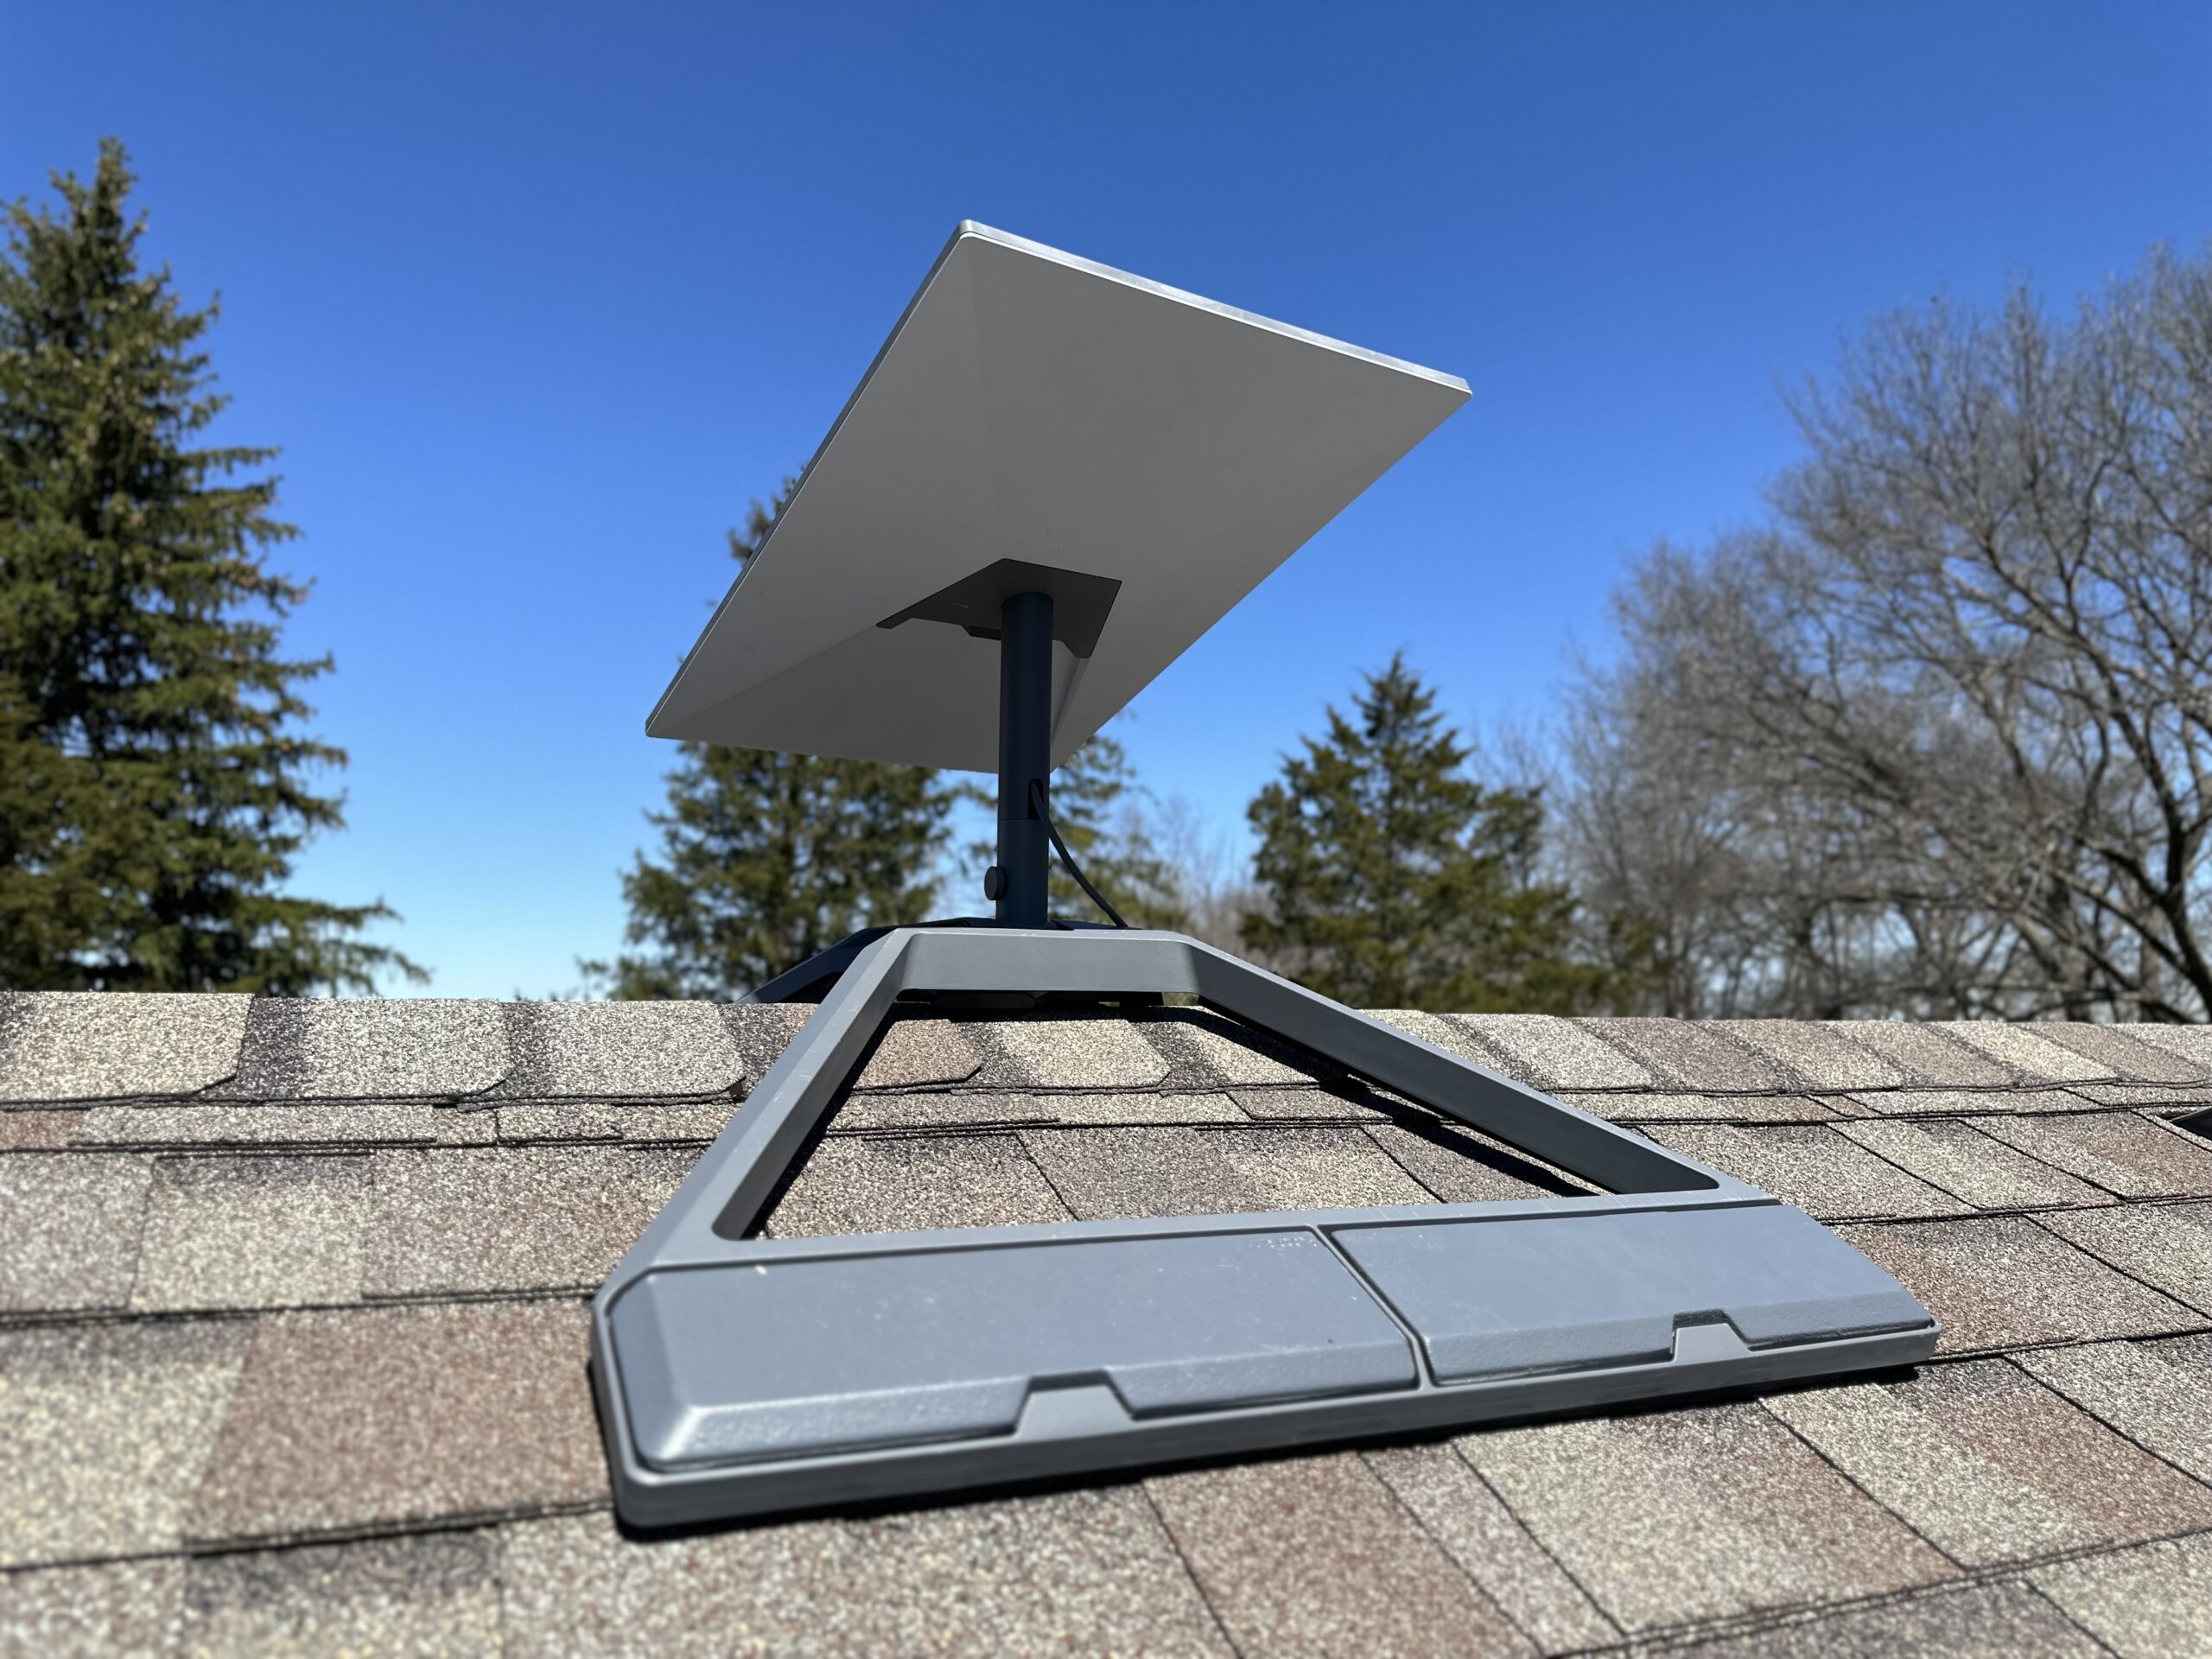
The Gen 3 Ridgeline Mount is a versatile option for people who don’t want to drill holes in their roof. Basically, the mount works by weighing the dish down so that it can’t move, with no fasteners required to actually secure it to the roof. The kit includes four ballasts that weigh around 11 pounds each.
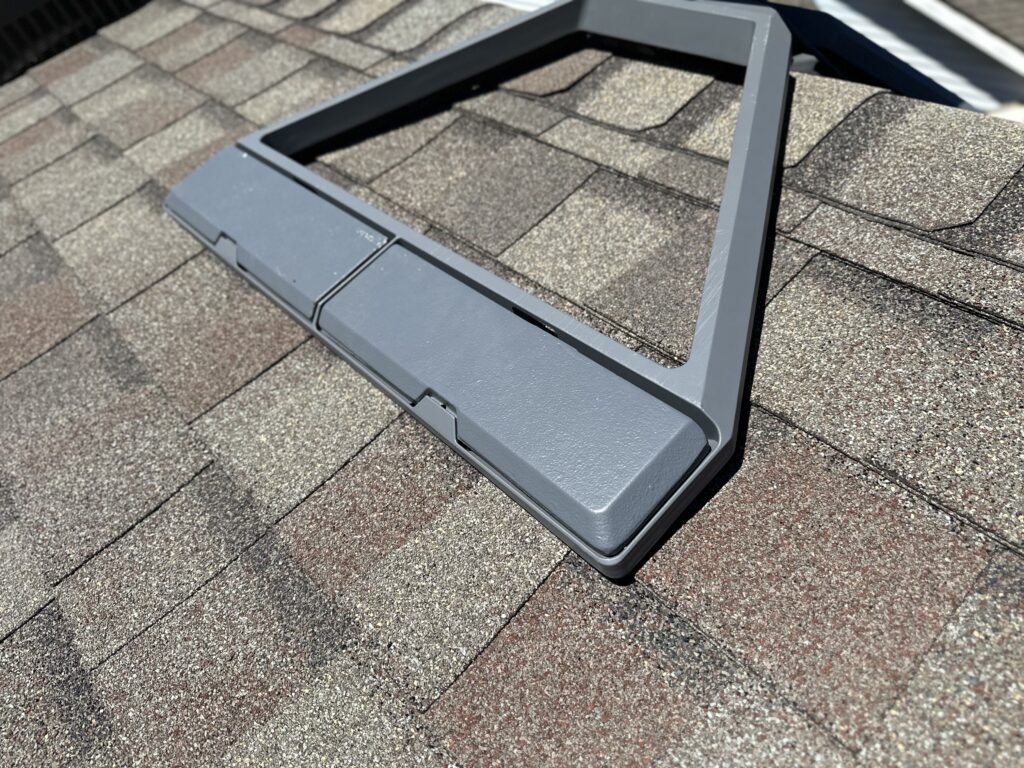
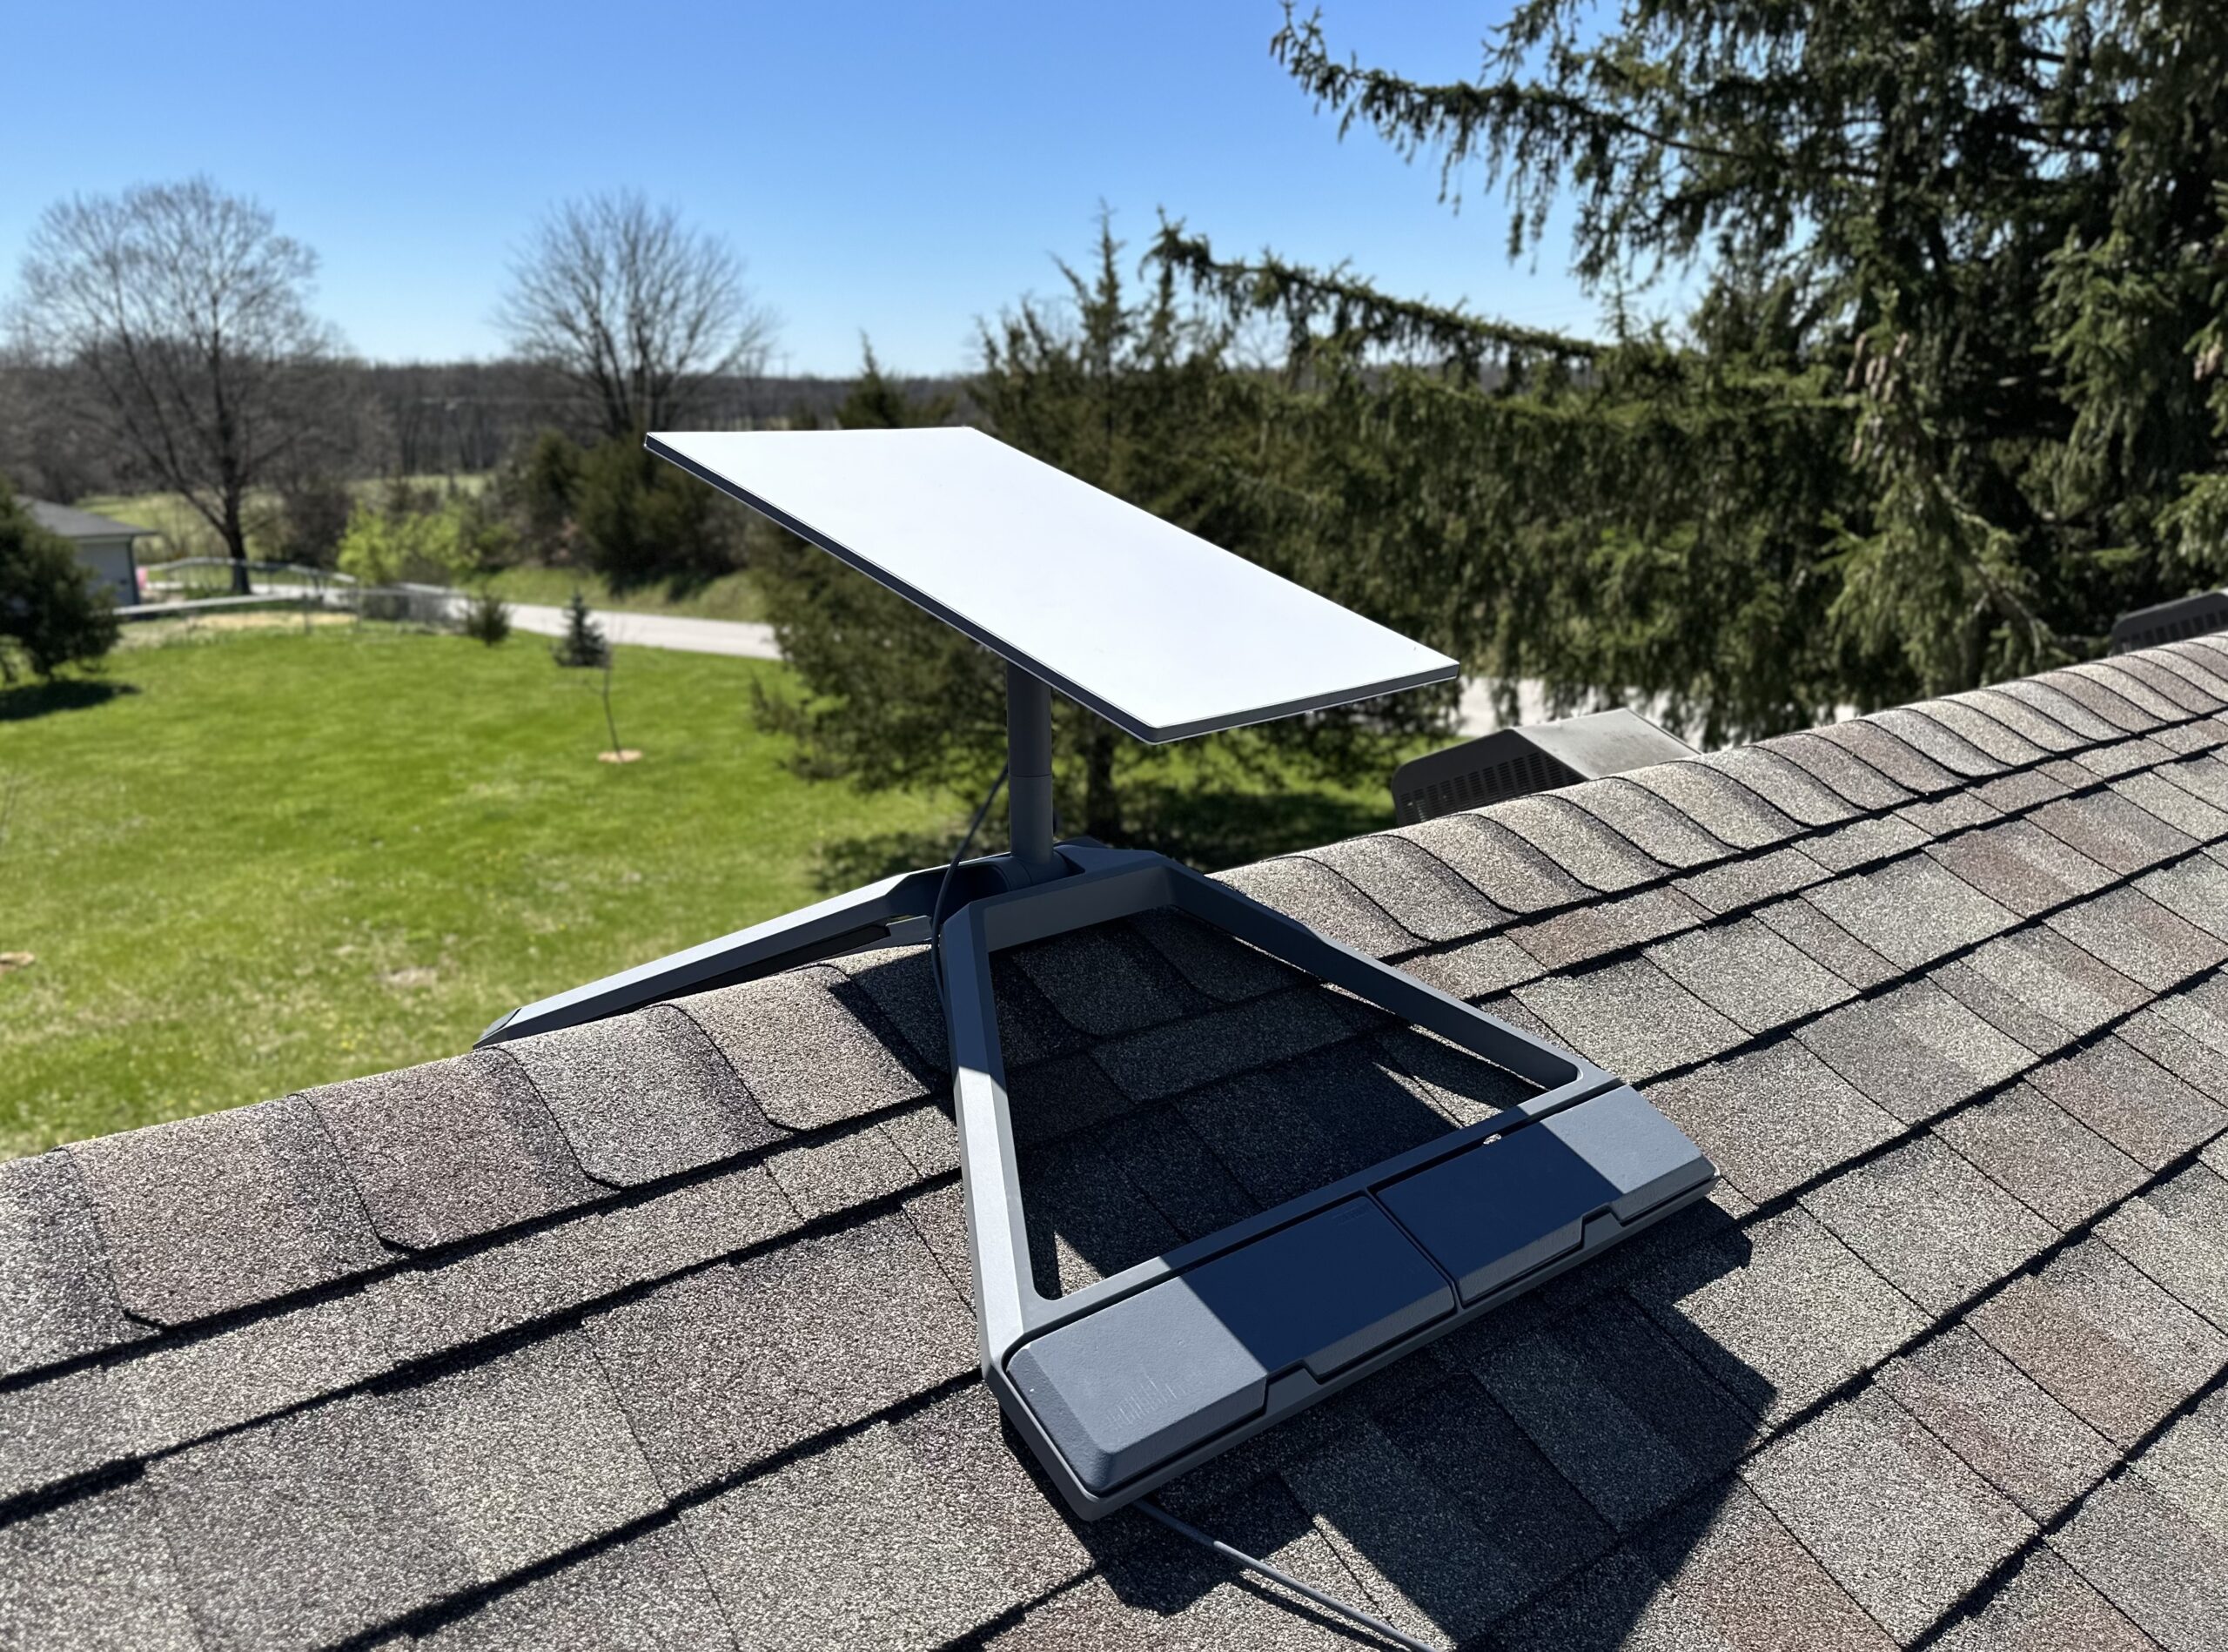
It’s called the “Ridgeline Mount” because it is designed to be installed at the very peak of your roof, known as the ridge. The two legs of the mount are adjustable, and straddle the ridge, creating a stable platform to install the Starlink dish. Since the legs are adjustable to virtually any angle, the Ridgeline Mount can also be used on a flat roof.
Cost and availability
The Gen 3 Ridgeline Mount costs $250, and can be purchased directly from Starlink. Current customers can purchase the mount from the Starlink shop. If you aren’t a Starlink customer yet, you can add the mount to your Starlink order, or access the Starlink shop after you’ve created your account.
Gen 3 hasn’t finished rolling out worldwide, so availability of the Gen 3 Ridgeline Mount will vary. Customers in the US and Australia were the first to have access to the new Gen 3 dish and accessories. I recommend checking the Starlink shop on your account to see if you can purchase this new mount.
Unboxing the kit
The Ridgeline Mount kit includes everything you need to complete the installation. In the box you will find the mount itself, a mast section, an adapter plate for the Gen 3 dish, some cable routing clips, and instructions. Starlink ships the ballast weights separately. On my order, the mount kit arrived a few days before the ballasts.
Installation process
Now that I’ve covered what the Ridgeline Mount is, I’m going to walk you through the installation process. I decided to install the mount on the roof of my detached garage. My garage is pretty typical, with wood construction and a moderate pitch shingle roof. It’s the perfect roof for the Ridgeline Mount, but Starlink says it works with virtually any type of roof.
Step 1: Assembling the mast

First, I prepared the Gen 3 dish and cable. From the Ridgeline Mount kit, I joined the dish adapter plate and mast section together. They only connect one way, so it’s impossible to do it wrong. Four plastic tabs lock the pieces together. Warning – It’s very hard to separate these pieces once you’ve snapped them together! On the Gen 3 dish, I removed the kickstand, it’s not needed with this new mount.
Once the mast and adapter plate were together, I took one end of the Gen 3 Starlink cable and routed it through the small slot at the bottom of the mast piece. I fed the cable up through the mast, and then out the top of the adapter plate. With the cable routed through the mast, I plugged it in to the Gen 3 dish. Then, the adapter plate from the Ridgeline Mount slid into place on the Gen 3 dish. You’ll hear it snap into place as the two plastic tabs engage. I set the dish and cable aside as I prepared the rest of the mount kit.
Step 2: Putting the Ridgeline Mount in place

Next, I transported the Ridgeline Mount to the location I wanted to put it on the roof. Tip: Lock the mount in a closed position and sling it over your shoulder. The shape of the mount allows you to easily carry it like this. By slinging it over my shoulder, I was able to safely climb up the ladder to my roof using two hands.
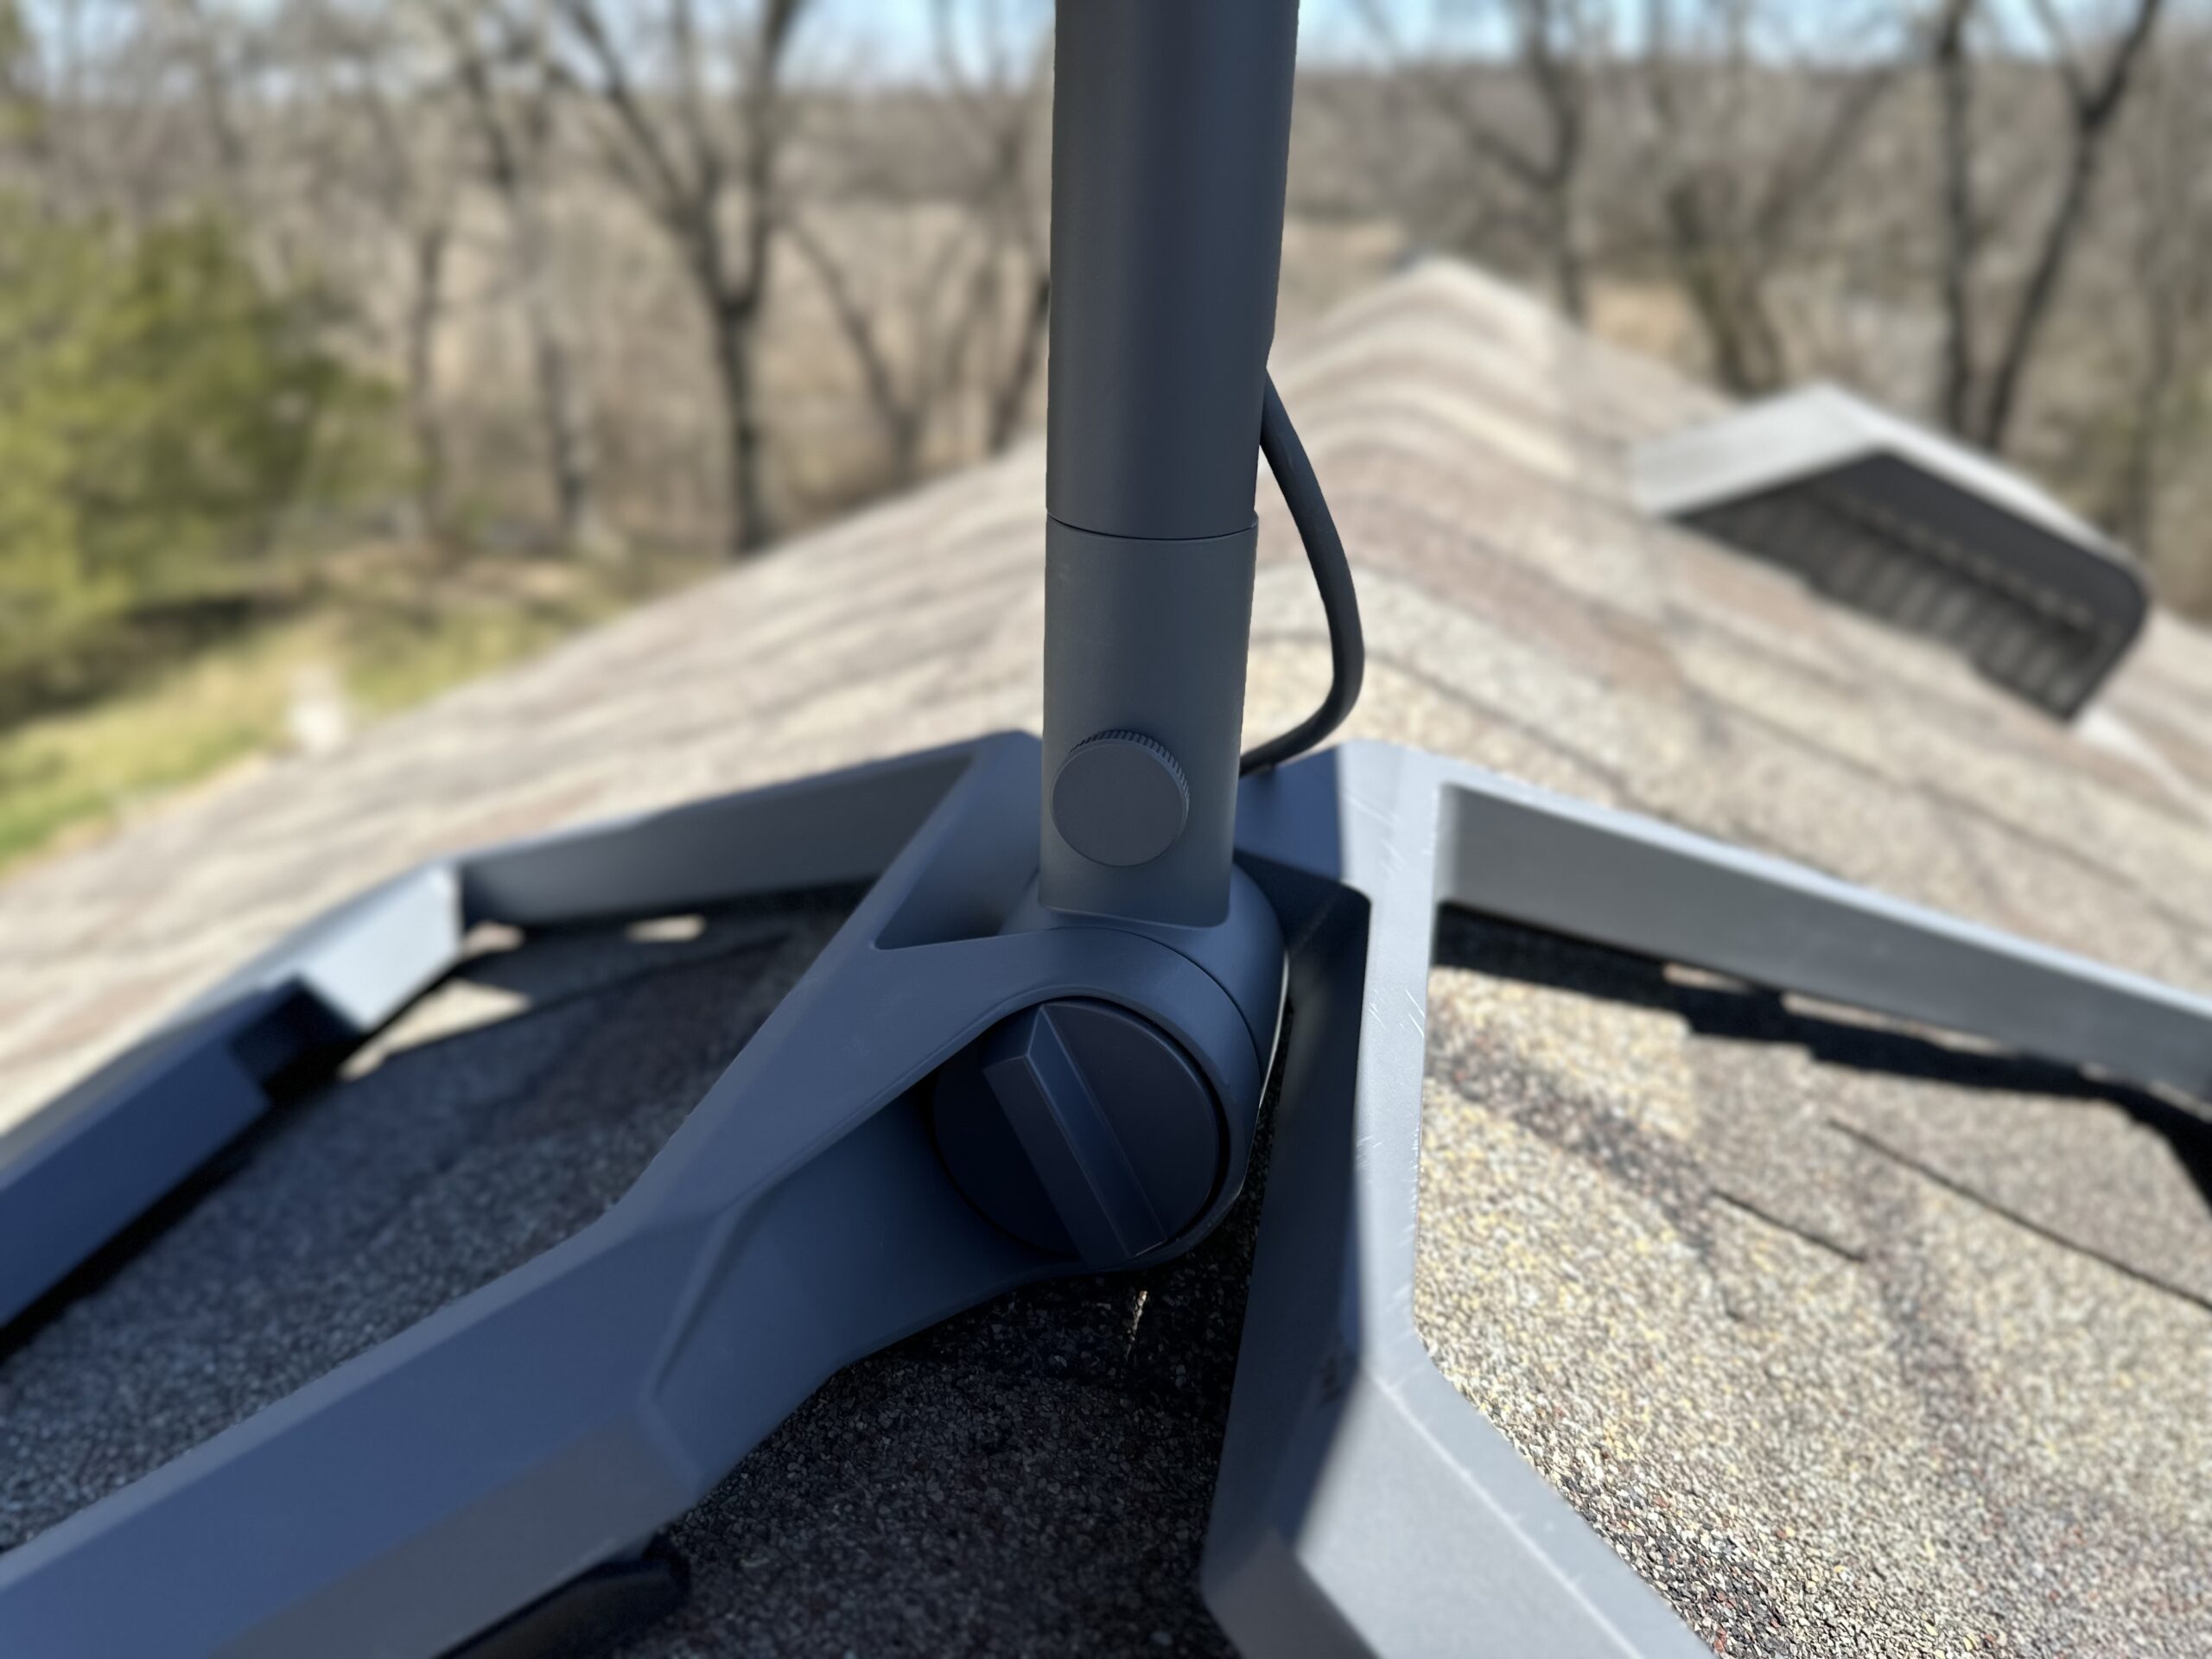
Once I was at the ridge, I loosened the knob on the mount so I could deploy the legs. The idea is to have both legs completely flat against the shingles, with the mount tube pointing straight up on the ridge. When I was happy with how it was positioned, I tightened the knob to lock the legs in place. I double checked that the mount tube that accepts the mast was completely vertical before moving on.
Step 3: Install the ballasts
With the Ridgeline Mount in place, it’s time for the ballast weights. What I ended up doing is carrying one ballast at a time up the ladder. This seemed like the safest way. I placed each ballast on the roof near the ladder, and then retrieved the next, until they were all up on the roof. Then, I could safely climb up on the roof without having to worry about carrying the weights at the same time.
Now on the roof, I installed each ballast in the holders on the legs of the Ridgeline Mount. There is a beveled edge on each ballast, and that side goes outward, matching the beveling on the mount itself. The ballasts simply drop into place. There is a cutout on the bottom of the ballast holders if you ever need to get them back out.
Step 4: Place the dish on the mount
At this point I had the Ridgeline Mount installed on the ridge, and the legs tightened down. All four ballasts were in place. Now I could place the Gen 3 dish (with mast/adapter plate already installed) on the mount. I carried the dish and cable up the ladder and to the location of the mount. In previous versions of the Ridgeline Mount, Starlink included a nice carrying bag. It made climbing the ladder with the dish a bit easier. With the Gen 3 version, Starlink decided not to include a carrying bag. So just exercise caution when trying to carry the dish up the ladder.
The mast slides down into the Ridgeline Mount post. If it doesn’t slide right in, try loosening the knob. The knob on the side of the mount tube allows you to easily loosen the mast to aim the dish, and tighten it to lock it into position. Once the dish was installed, I didn’t tighten it down just yet. I still needed to manually aim the Gen 3 dish. But what I did do was route the cable down the side of my garage, through the wall, and then to my Gen 3 router.
Step 5: Aim the dish
The last step of installing the Gen 3 Ridgeline Mount was to aim the dish. With Gen 3, there are no motors, so you have to manually rotate the dish according to the Starlink app. The process is pretty simple. I have a complete tutorial if you want more info.
With the knob on the mount post loosened, I opened the Starlink app. If you tap on Alignment in the menu, it brings up a graphic of the dish, and tells you if it’s properly aligned or not. My dish wasn’t aligned, so I just rotated it until the app said it was good. Then I tightened the adjustment knob, and that’s it for installation!
Review
The Gen 3 version of the Ridgeline Mount kit is very similar to the Gen 2 version I previously reviewed. Changes include the mount post (for compatibility with Gen 3) and a slightly different rubber padding on the bottom of the mount. I had the Gen 2 Ridgeline Mount installed for almost a year. In that time, I had zero issues or complaints. It handled rain, snow, the summer heat, and the winter cold. We get storms with up to 50-60 mph wind gusts, and it didn’t budge at all.
Although I can’t comment on the long term performance of the Gen 3 version, it’s safe to say that it should perform just as good, as it’s the same design. Starlink says the Gen 3 Ridgeline Mount can handle up to 50 mph winds. I’m assuming they mean sustained, so I’m sure it can handle even higher gusts.
This mount is very easy to install, and extremely versatile. It’s a great way to avoid having to put holes in your roof or on the exterior wall. The Ridgeline Mount adapts to virtually any roof.
There are two downsides that I can think of. First, the cost. At $250, it’s almost half the price of the Starlink kit. That’s a pretty big investment to make, although I would argue it’s cheap insurance against water leaks in the future. The second downside is if you have a roof with ridge vents. The Ridgeline Mount isn’t going to play nice with ridge vents, especially if they sit up quite a bit higher than the roof. You can probably still make it work, but the legs won’t lay completely flat.
Overall, this is a great mount, and I highly recommend it if you are wanting to avoid drilling holes. When Gen 3 first came out, people were wondering when the new Ridgeline Mount would be released for it. It’s just so versatile and easy to install just about anywhere, so I totally get why it’s a popular Starlink mounting option. If you have any feedback or questions about the Gen 3 Ridgeline Mount, let me know in the comments below!
Check out our guide to other Starlink mounting options
What is the wind rating on the Gen 3 Ridgeline Mount? In my area, wind gusts can get up to 65-70 mph. I was debating on setting the dish on a pole in ground but learned about the Ridgeline Mount. I don’t care to get up on roof & take this down if is unable to withstand high winds.
They don’t assign a rating but I believe they’ve said just about all mounts can easily handle up to 50-60 mph wind. Getting up to 70 mph I would be sightly worried, but I honestly don’t believe anything would happen. The mount itself would not move at all. It’s the connection between the dish and the mounting plate adapter that I would be worried about snapping. With Gen 3, it wouldn’t really matter which mount you go with because they all use that same mounting plate adapter to snap into the dish.
I previously ordered the Ridgeline Mount for my Gen3 Starlink and separately ordered a Pipe Adapter kit but no mast came with it or, was available for it at that time. Is the mast now an option that can be purchased or should it have come with the Ridgeline Mount or the Pipe Adapter kit? I shave yet to install my Ridgeline mount on my roof because it doesn’t have a mast to make it work
I recommend returning the Gen 2 Ridgeline Mount and Pipe Adapter, and then ordering the Gen 3 version of the Ridgeline Mount. Gen 3 compatible mounts will come with the mast section you need. The Pipe Adapter is the exception, since it’s designed to be installed on a 3rd party mast.