
Measure twice, cut once. Isn’t that the saying? If you are going to DIY any part of your Starlink mounting or installation project, a good set of measurements is a great resource. In this guide I will provide the most commonly requested dimensions for the Standard (rectangular) Starlink kit.
I’ll provide dimensions for the Starlink dish, mounting base, router, and cable. If you are building some kind of custom mount, hopefully this helps you plan your design more efficiently. If there are any dimensions missing from this guide that you think would be helpful, leave a comment or send me an email.
Table of Contents
Dish
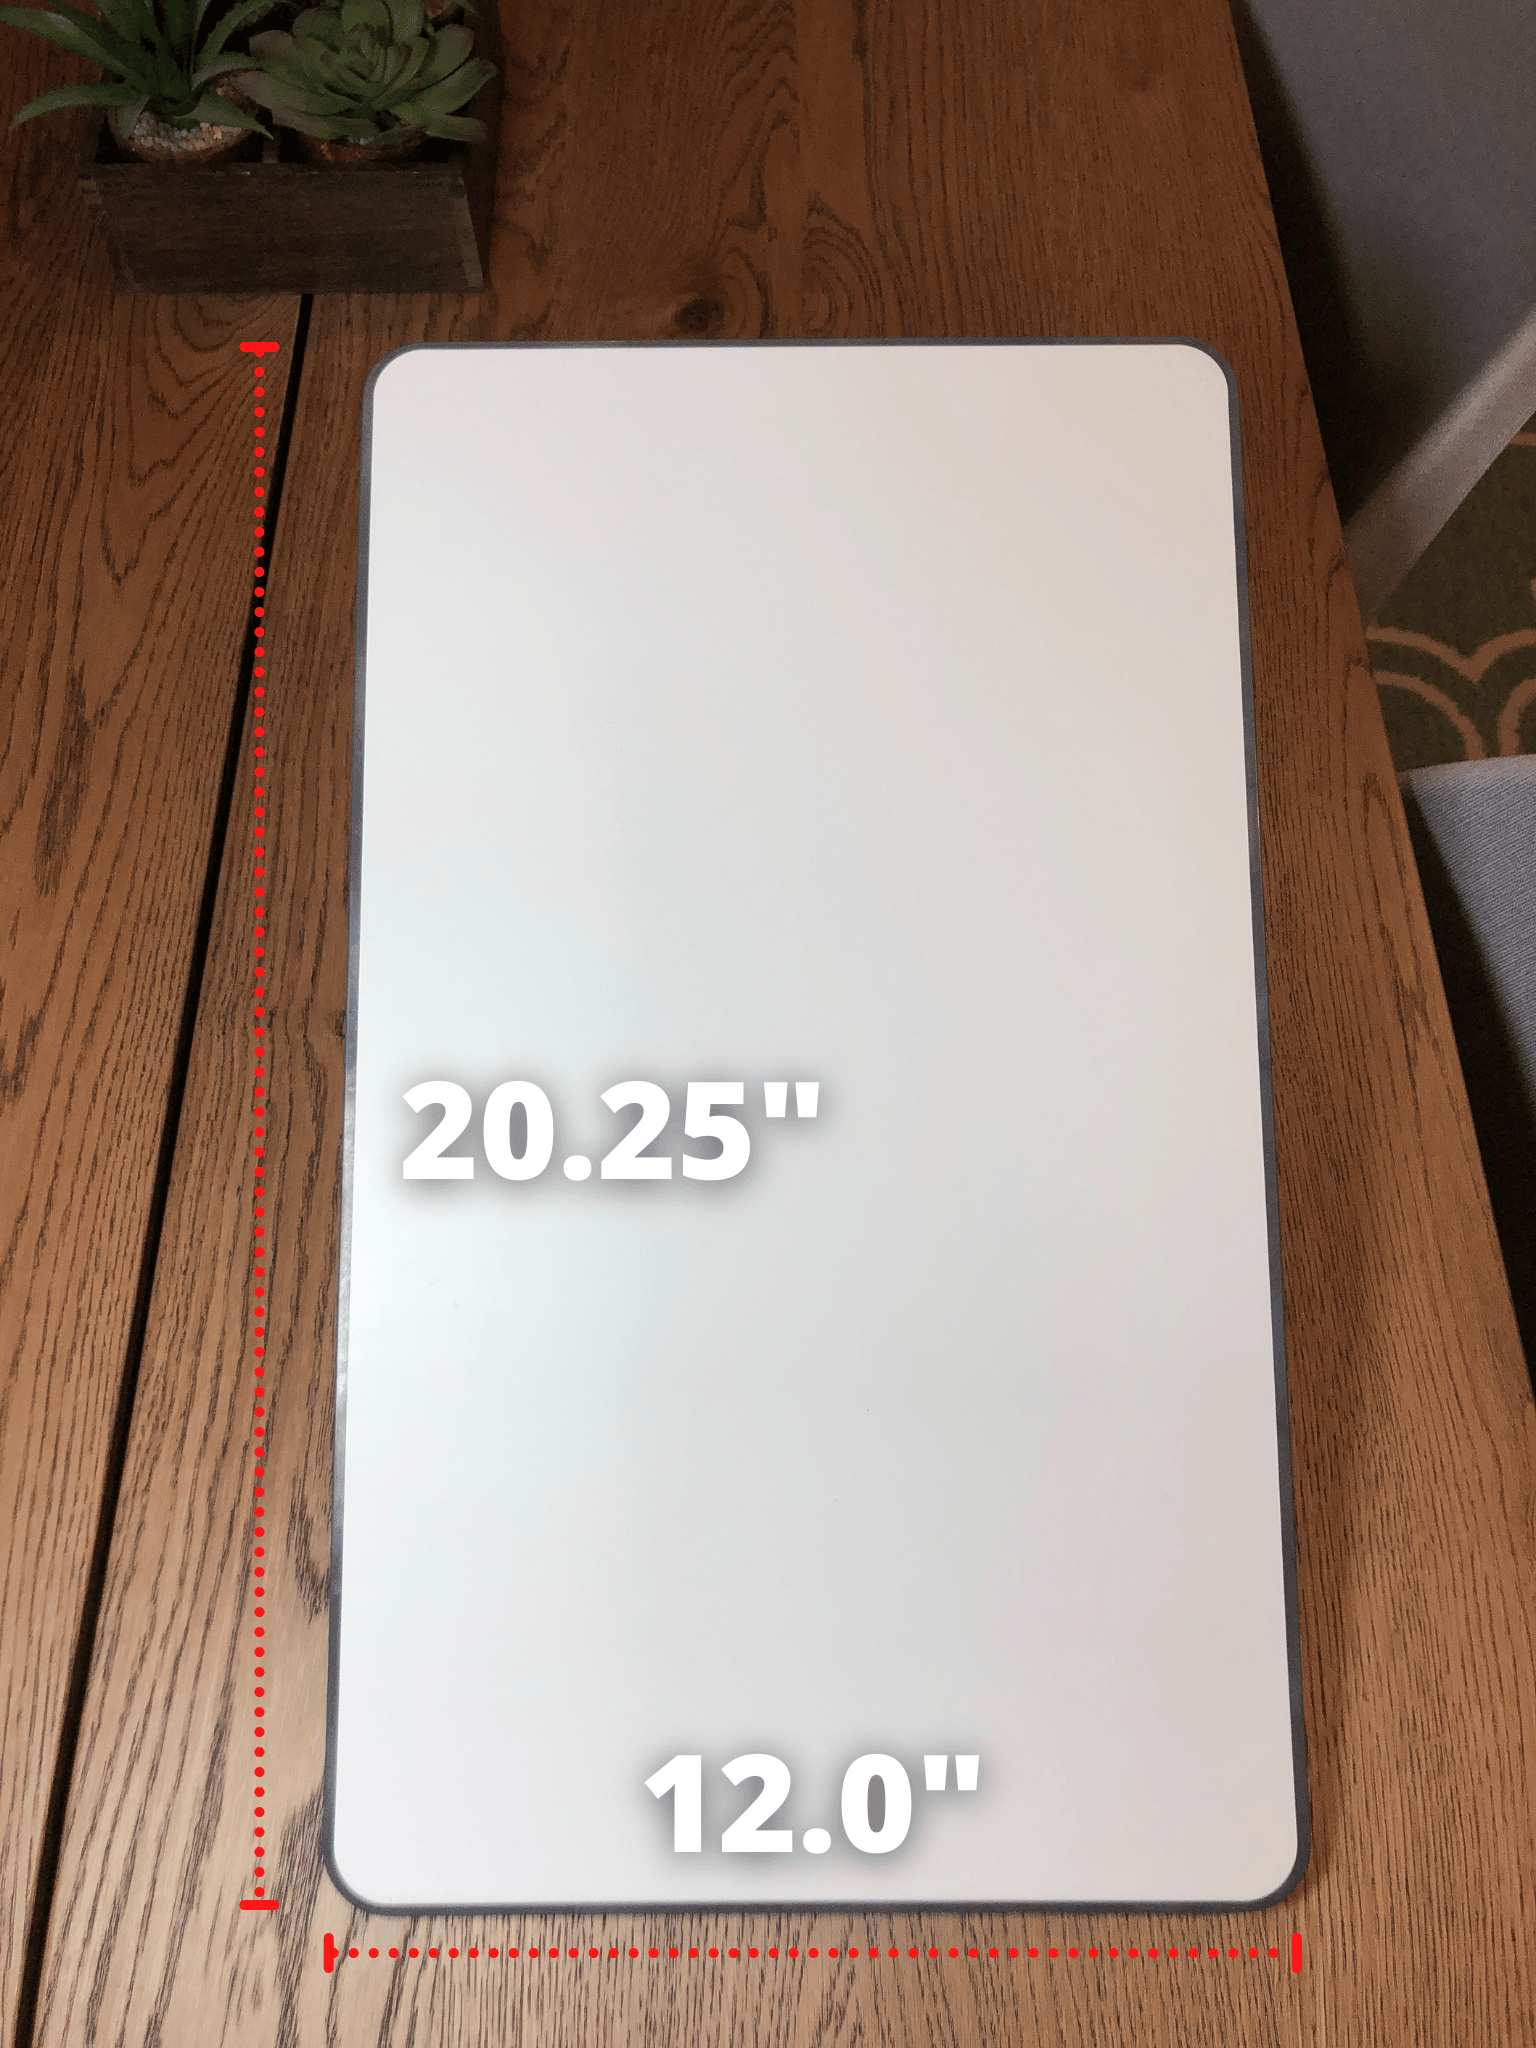
The Standard Starlink dish measures in at 20.25 inches long by 12.0 inches wide. (514.35 mm x 305 mm)
Mast

The outside diameter of the mast insert (the narrow part that inserts into the base) is 1.34 inches (34 mm). The outside diameter of the rest of the mast is 1.5 inches (38 mm).

The Starlink dish mast, from where it goes into the dish, is 10.75 inches (273 mm) long.
Mounting Base
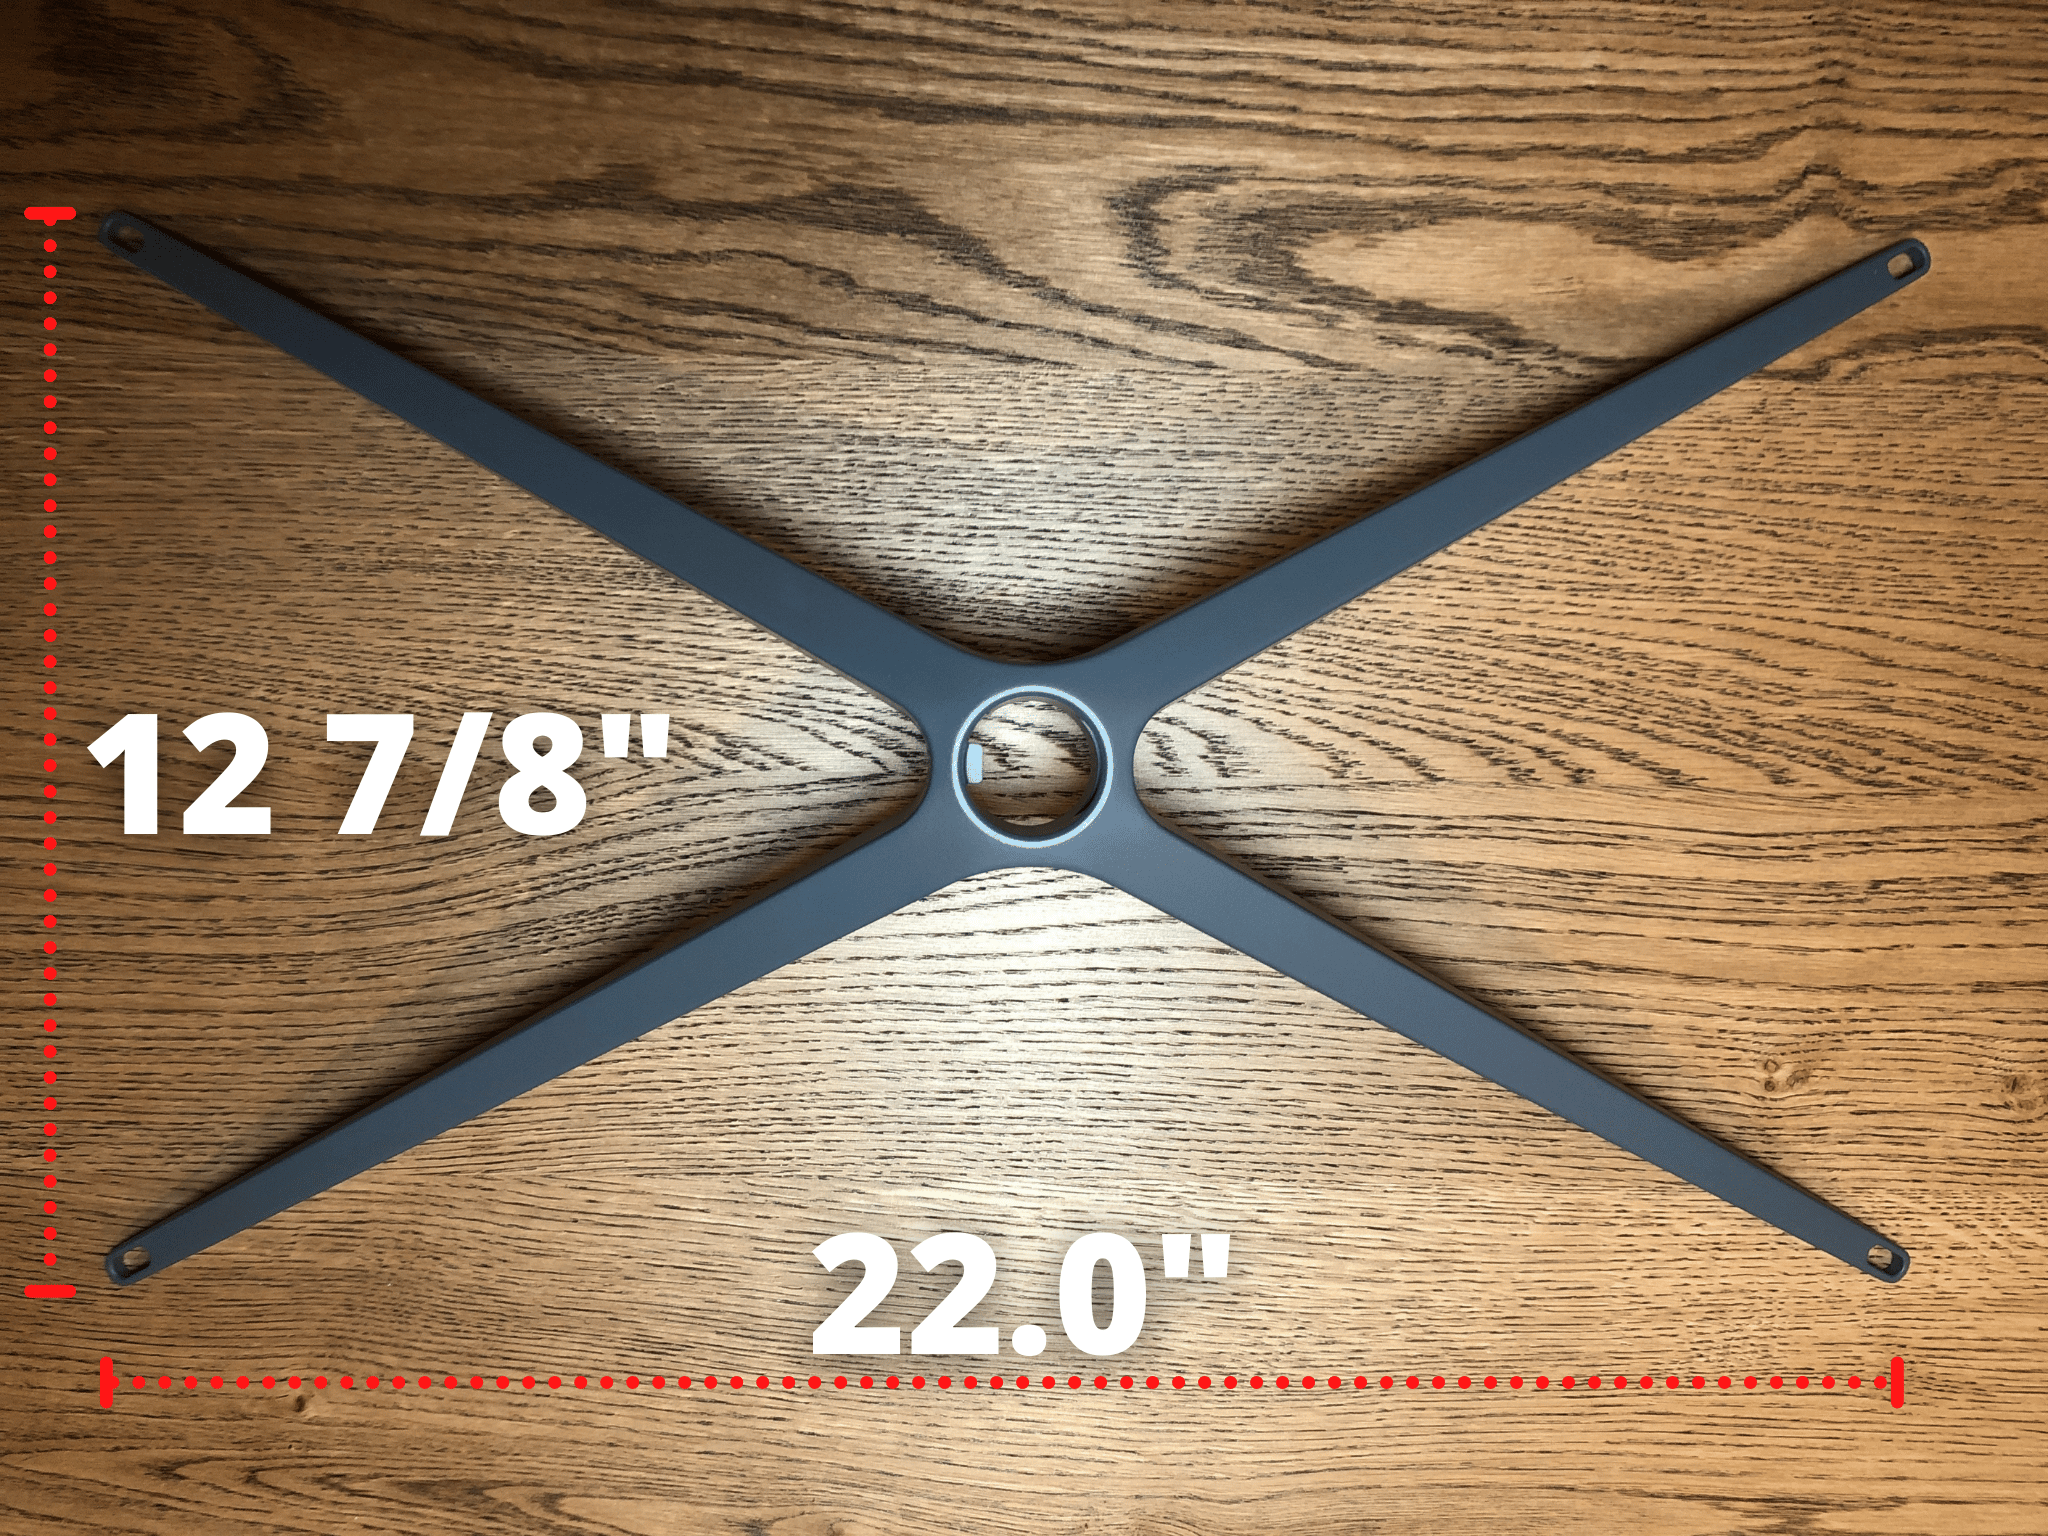
The footprint of the Starlink mounting base measures 22.0 inches by 12 7/8 inches. It is 4.75 inches tall. (559 x 327 x 120.65 mm)
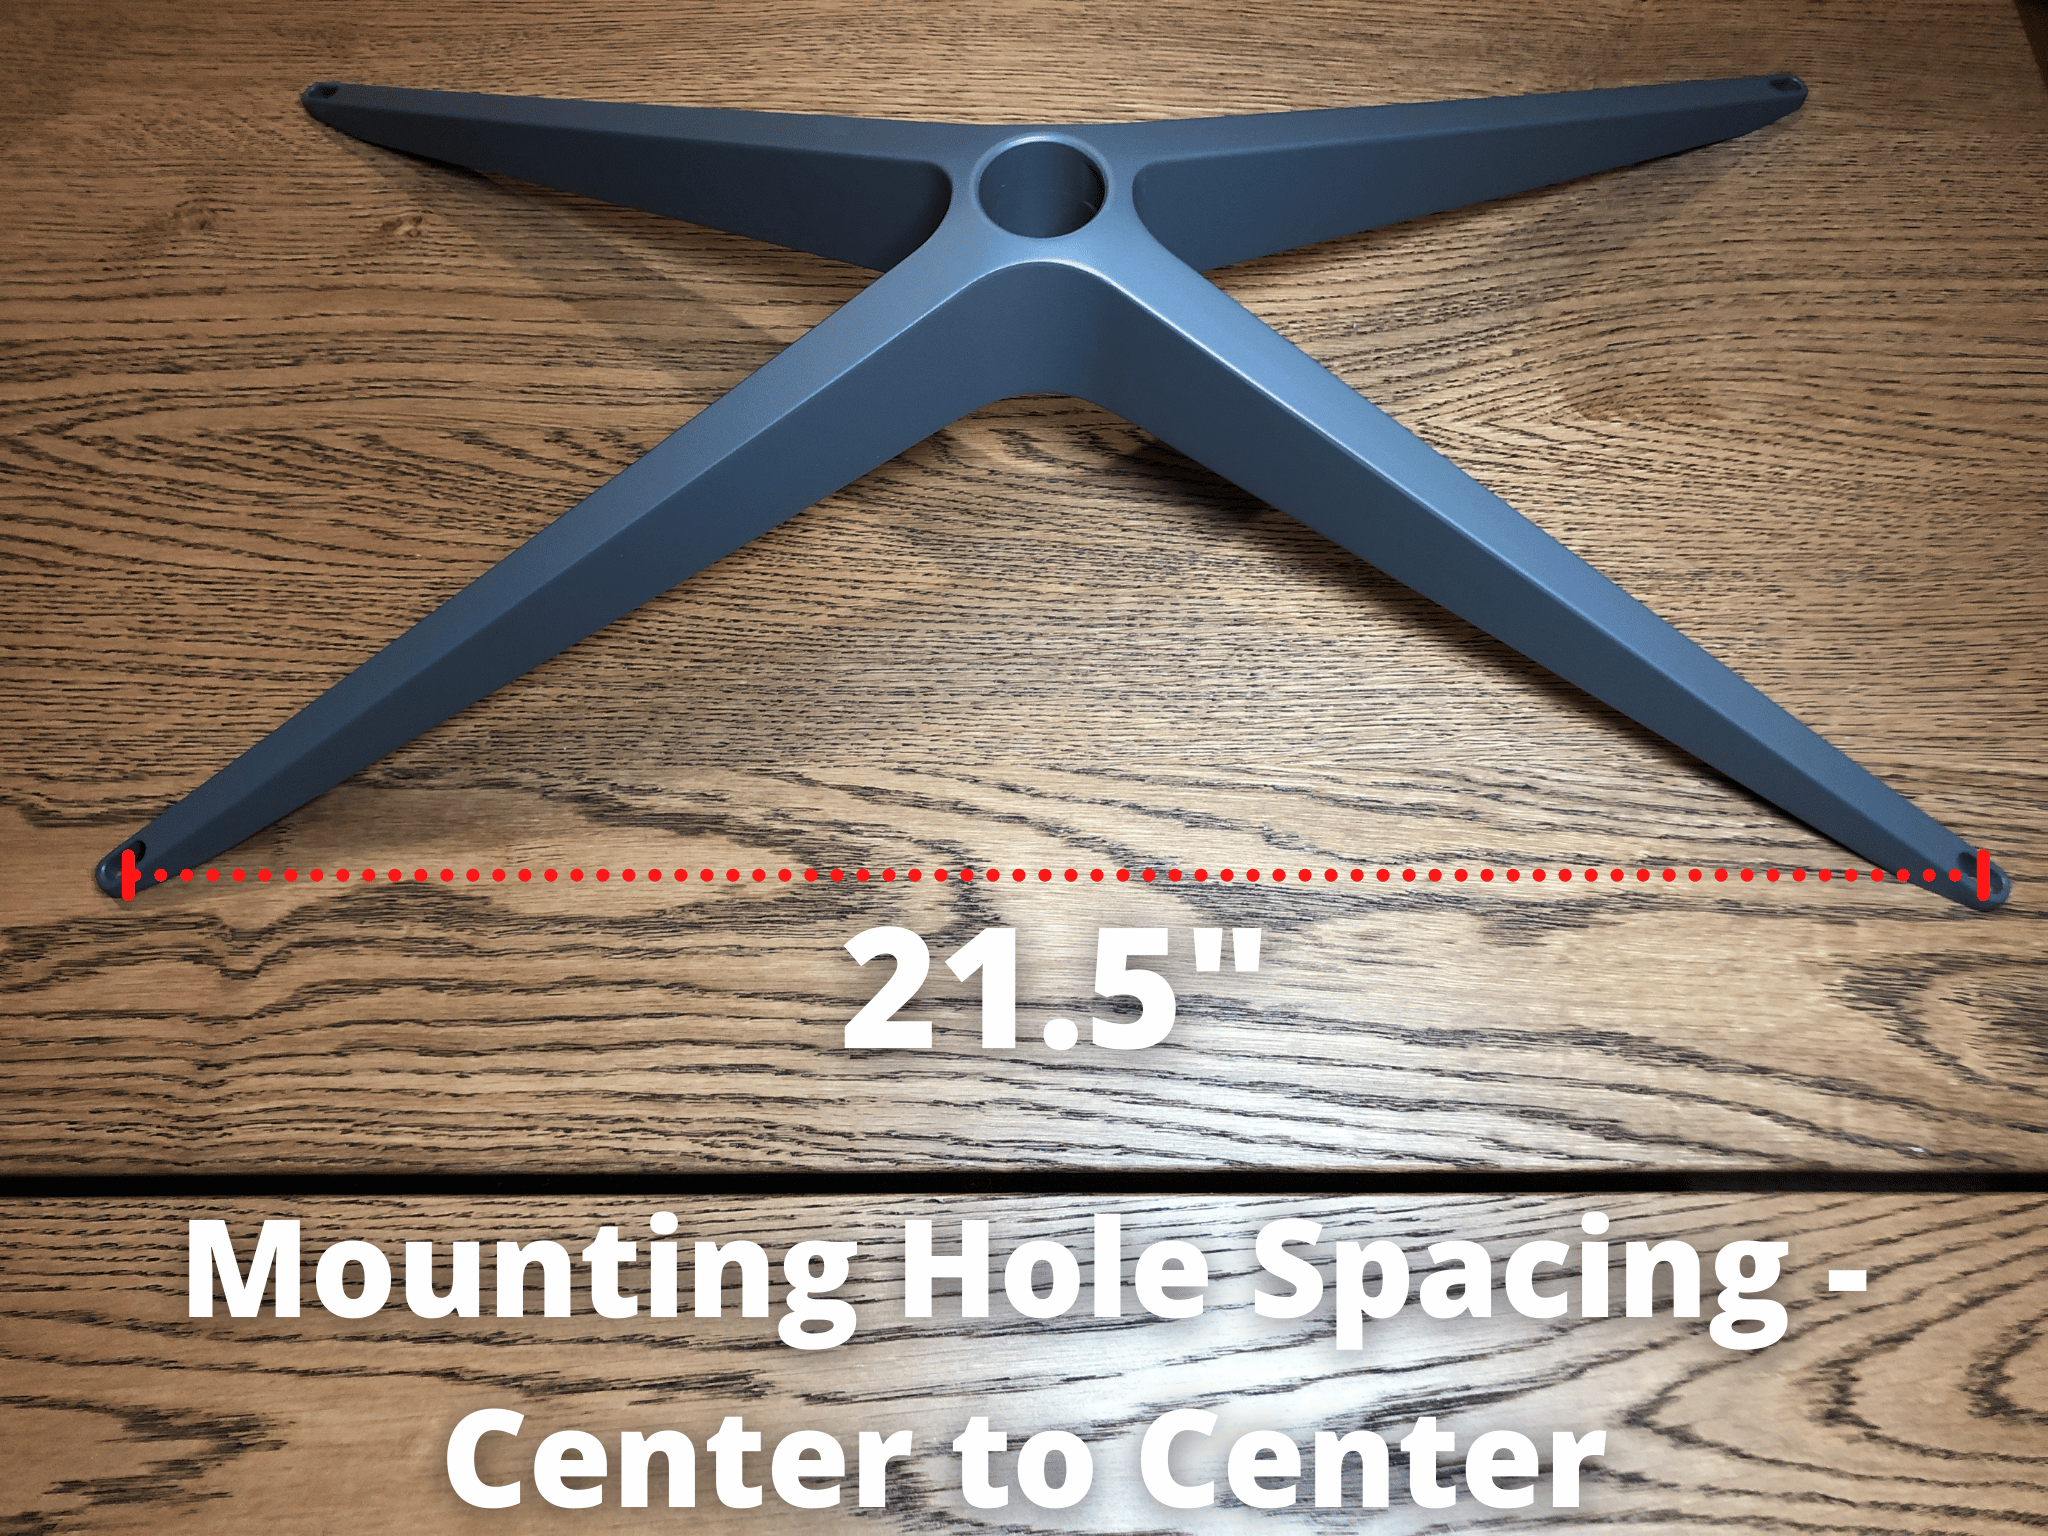
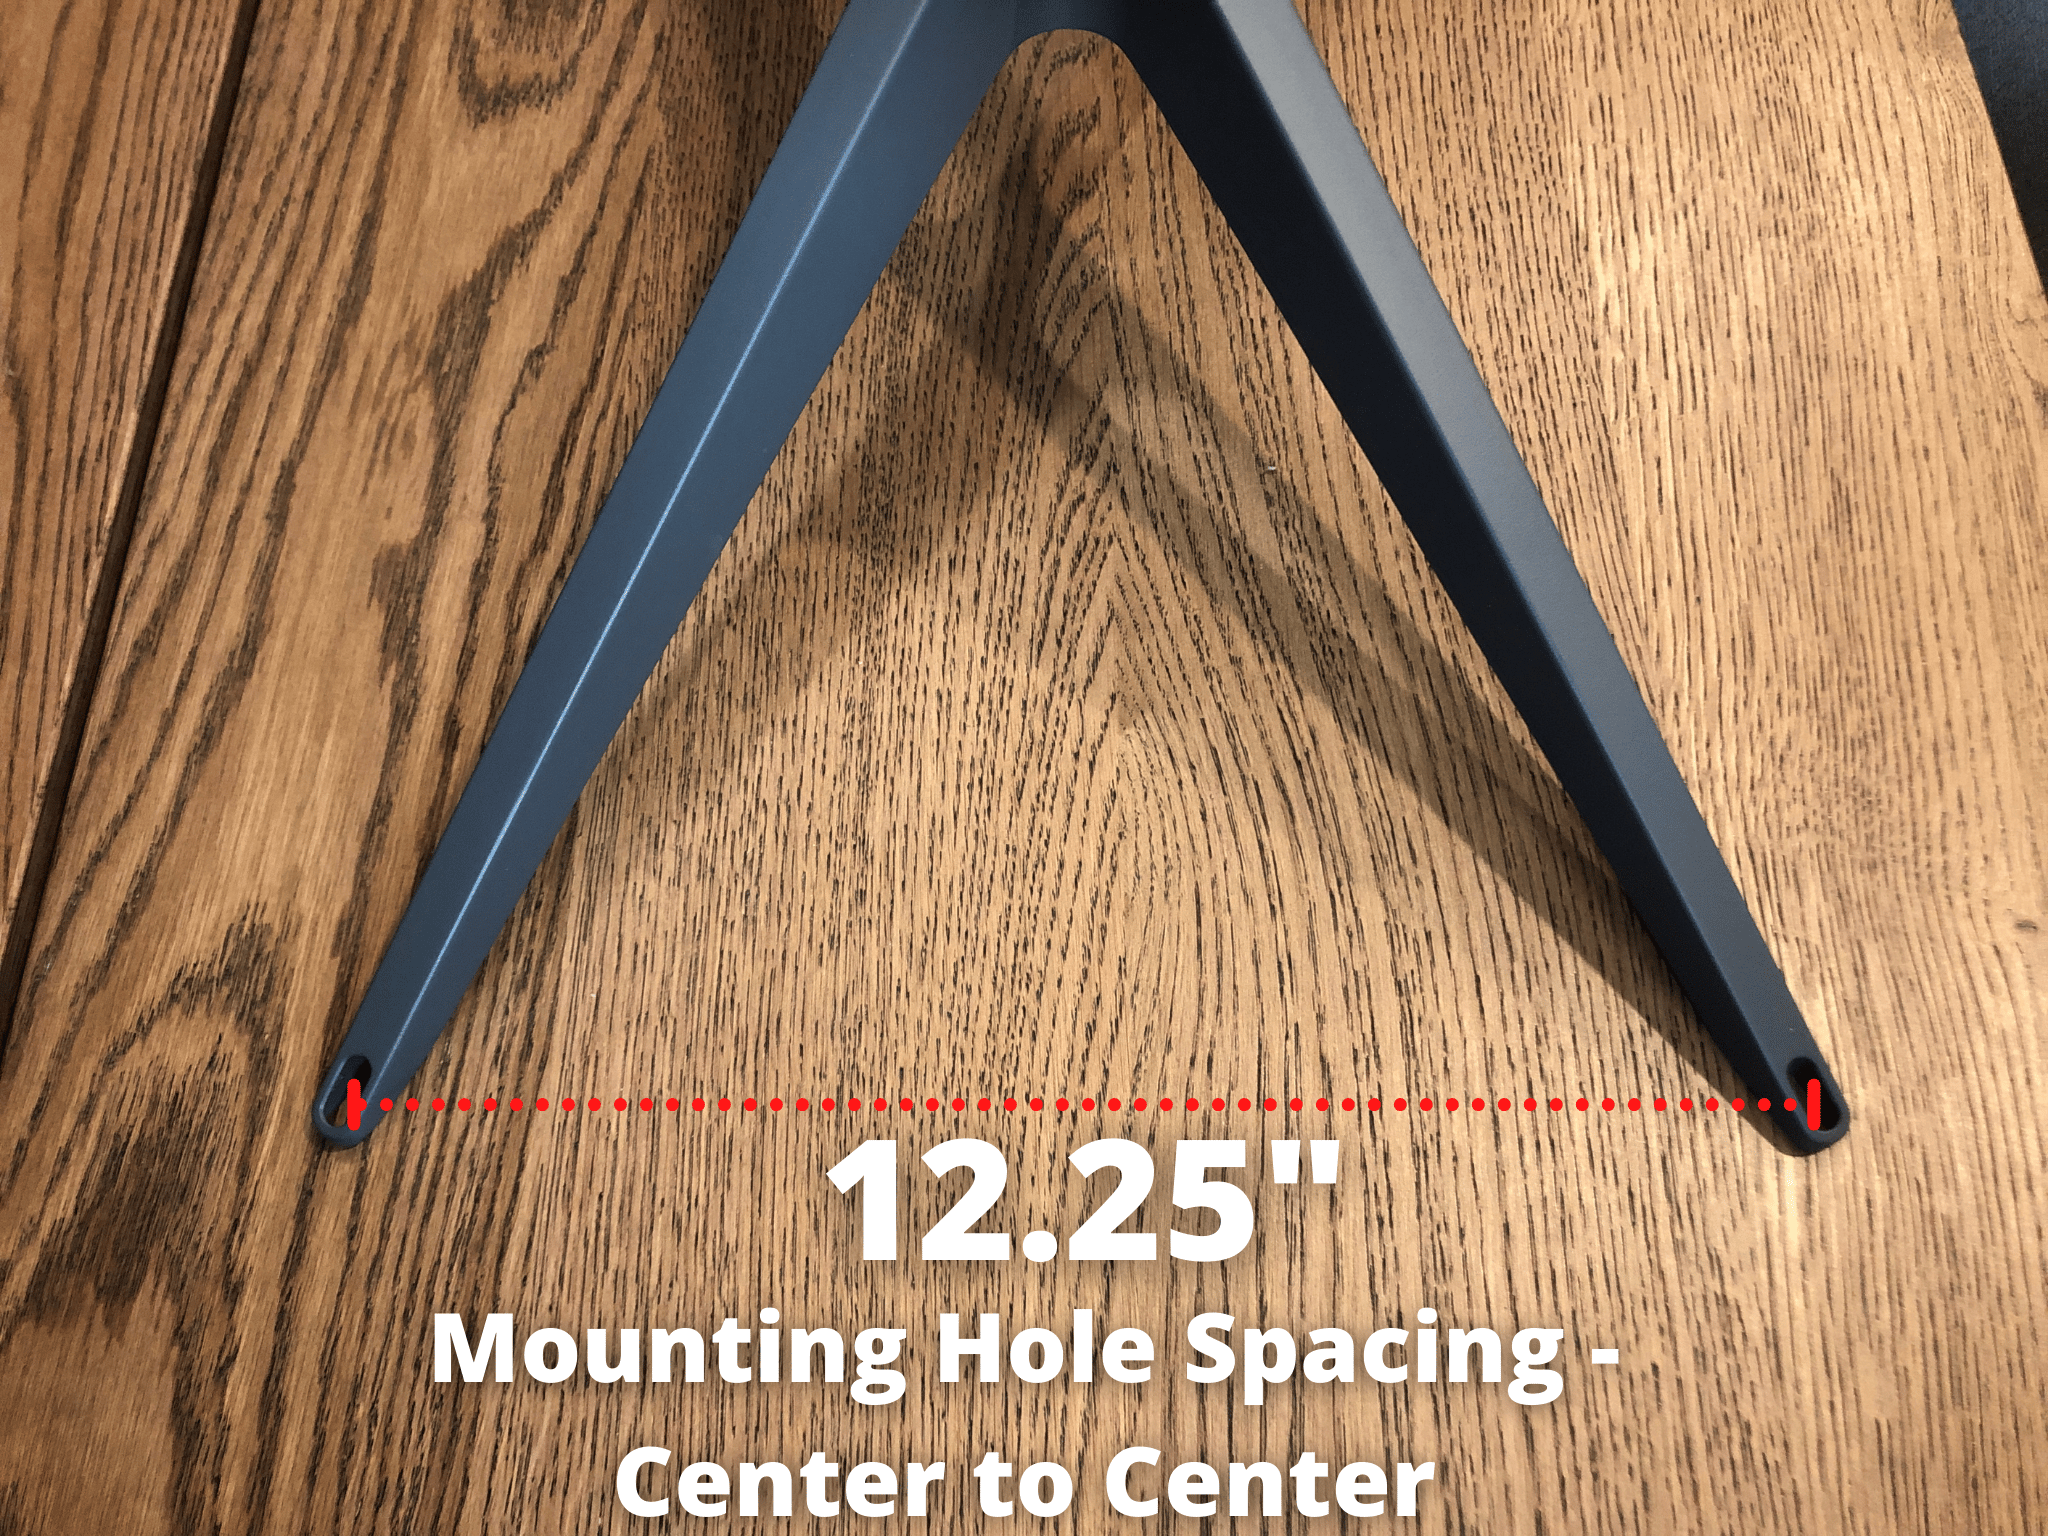
The spacing for the mounting holes is 21.5 inches (546 mm) on the long side, and 12.25 inches (311.15 mm) on the shorter side. This is measured center to center.
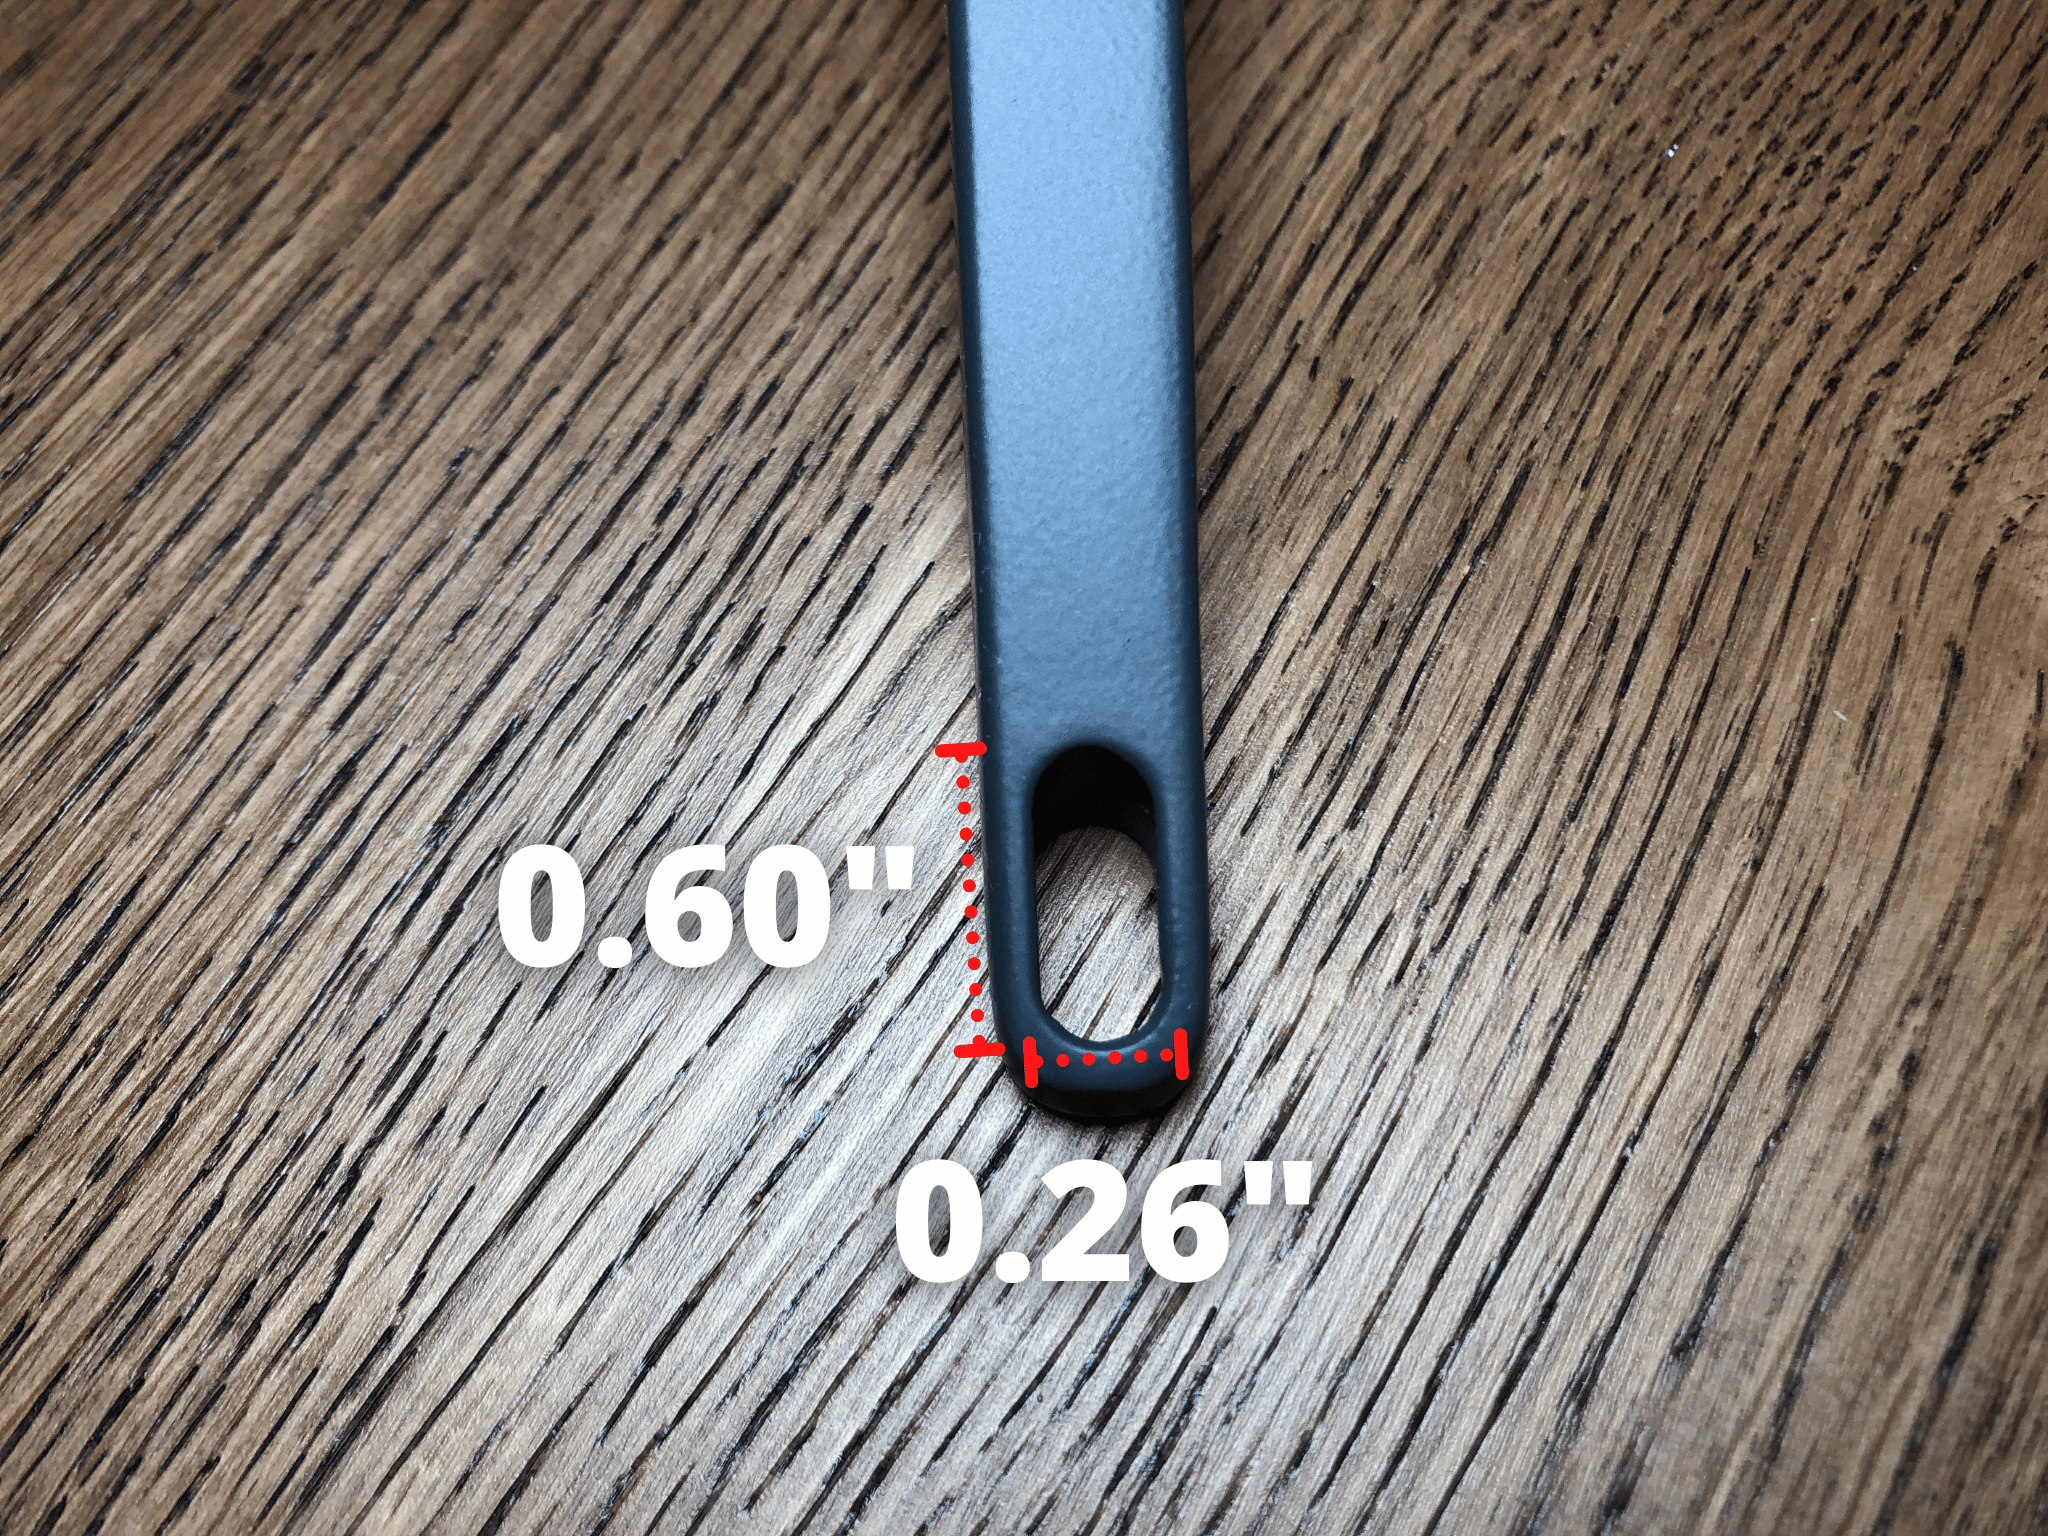
The mounting holes are oblong and the dimensions are 0.60 inches tall by 0.26 inches wide (15.24 x 6.6 mm). A 1/4 inch or M6 screw/bolt would fit perfectly through these mounting holes.
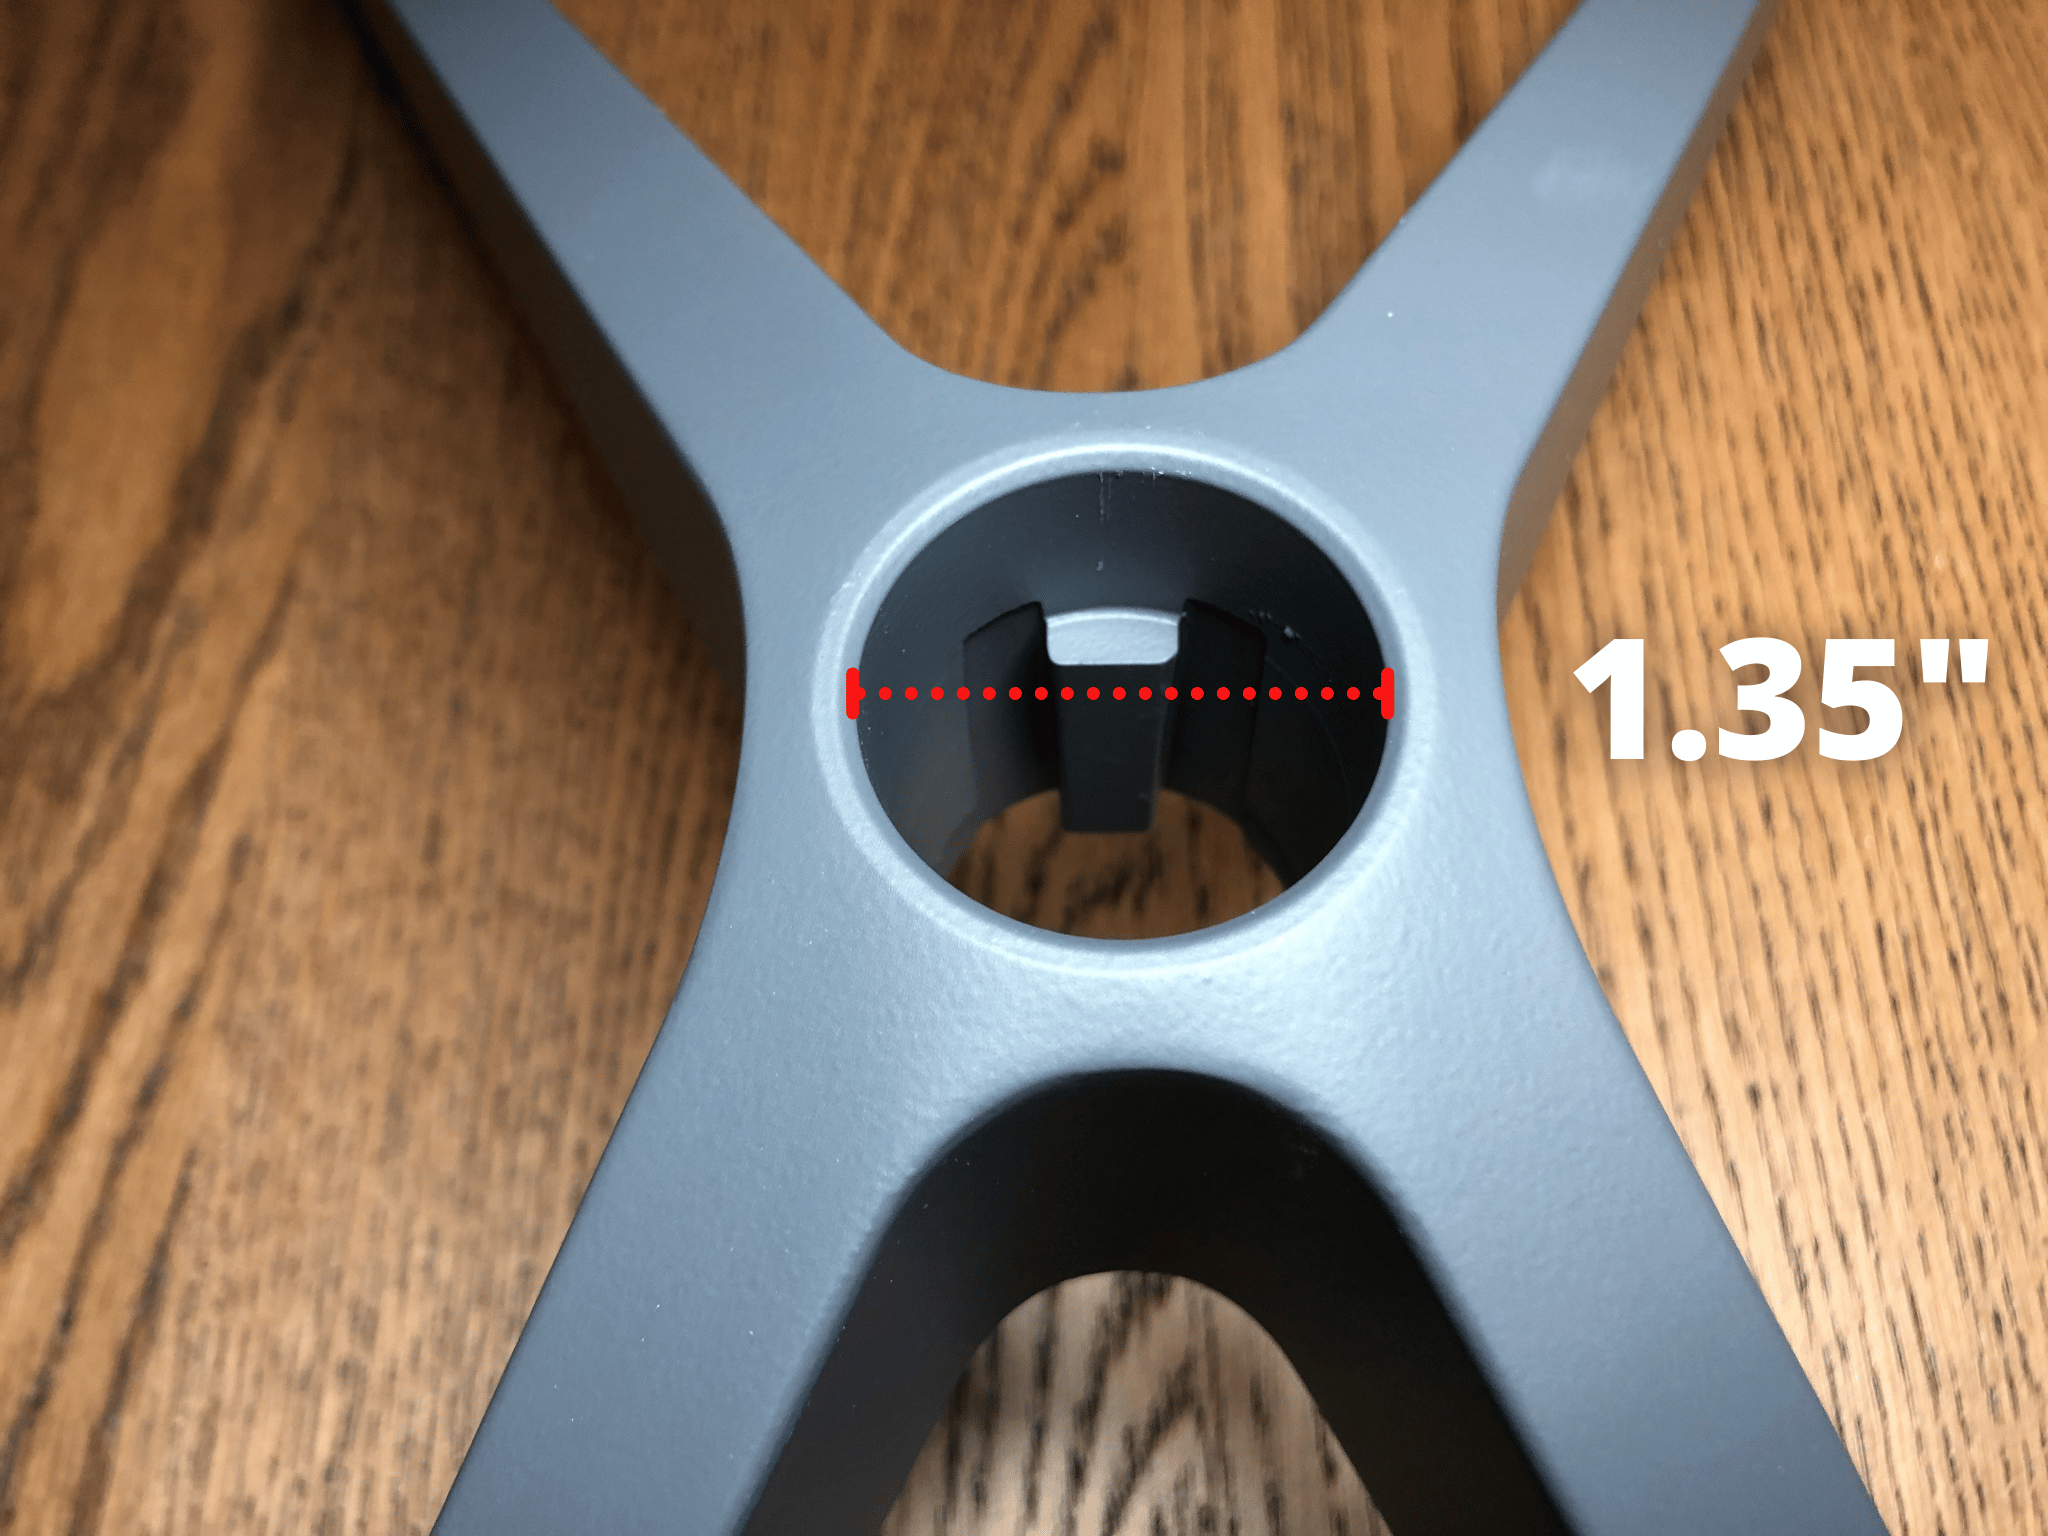
The inside diameter of the mounting base mast opening is 1.35 inches (34.29 mm).
Cable
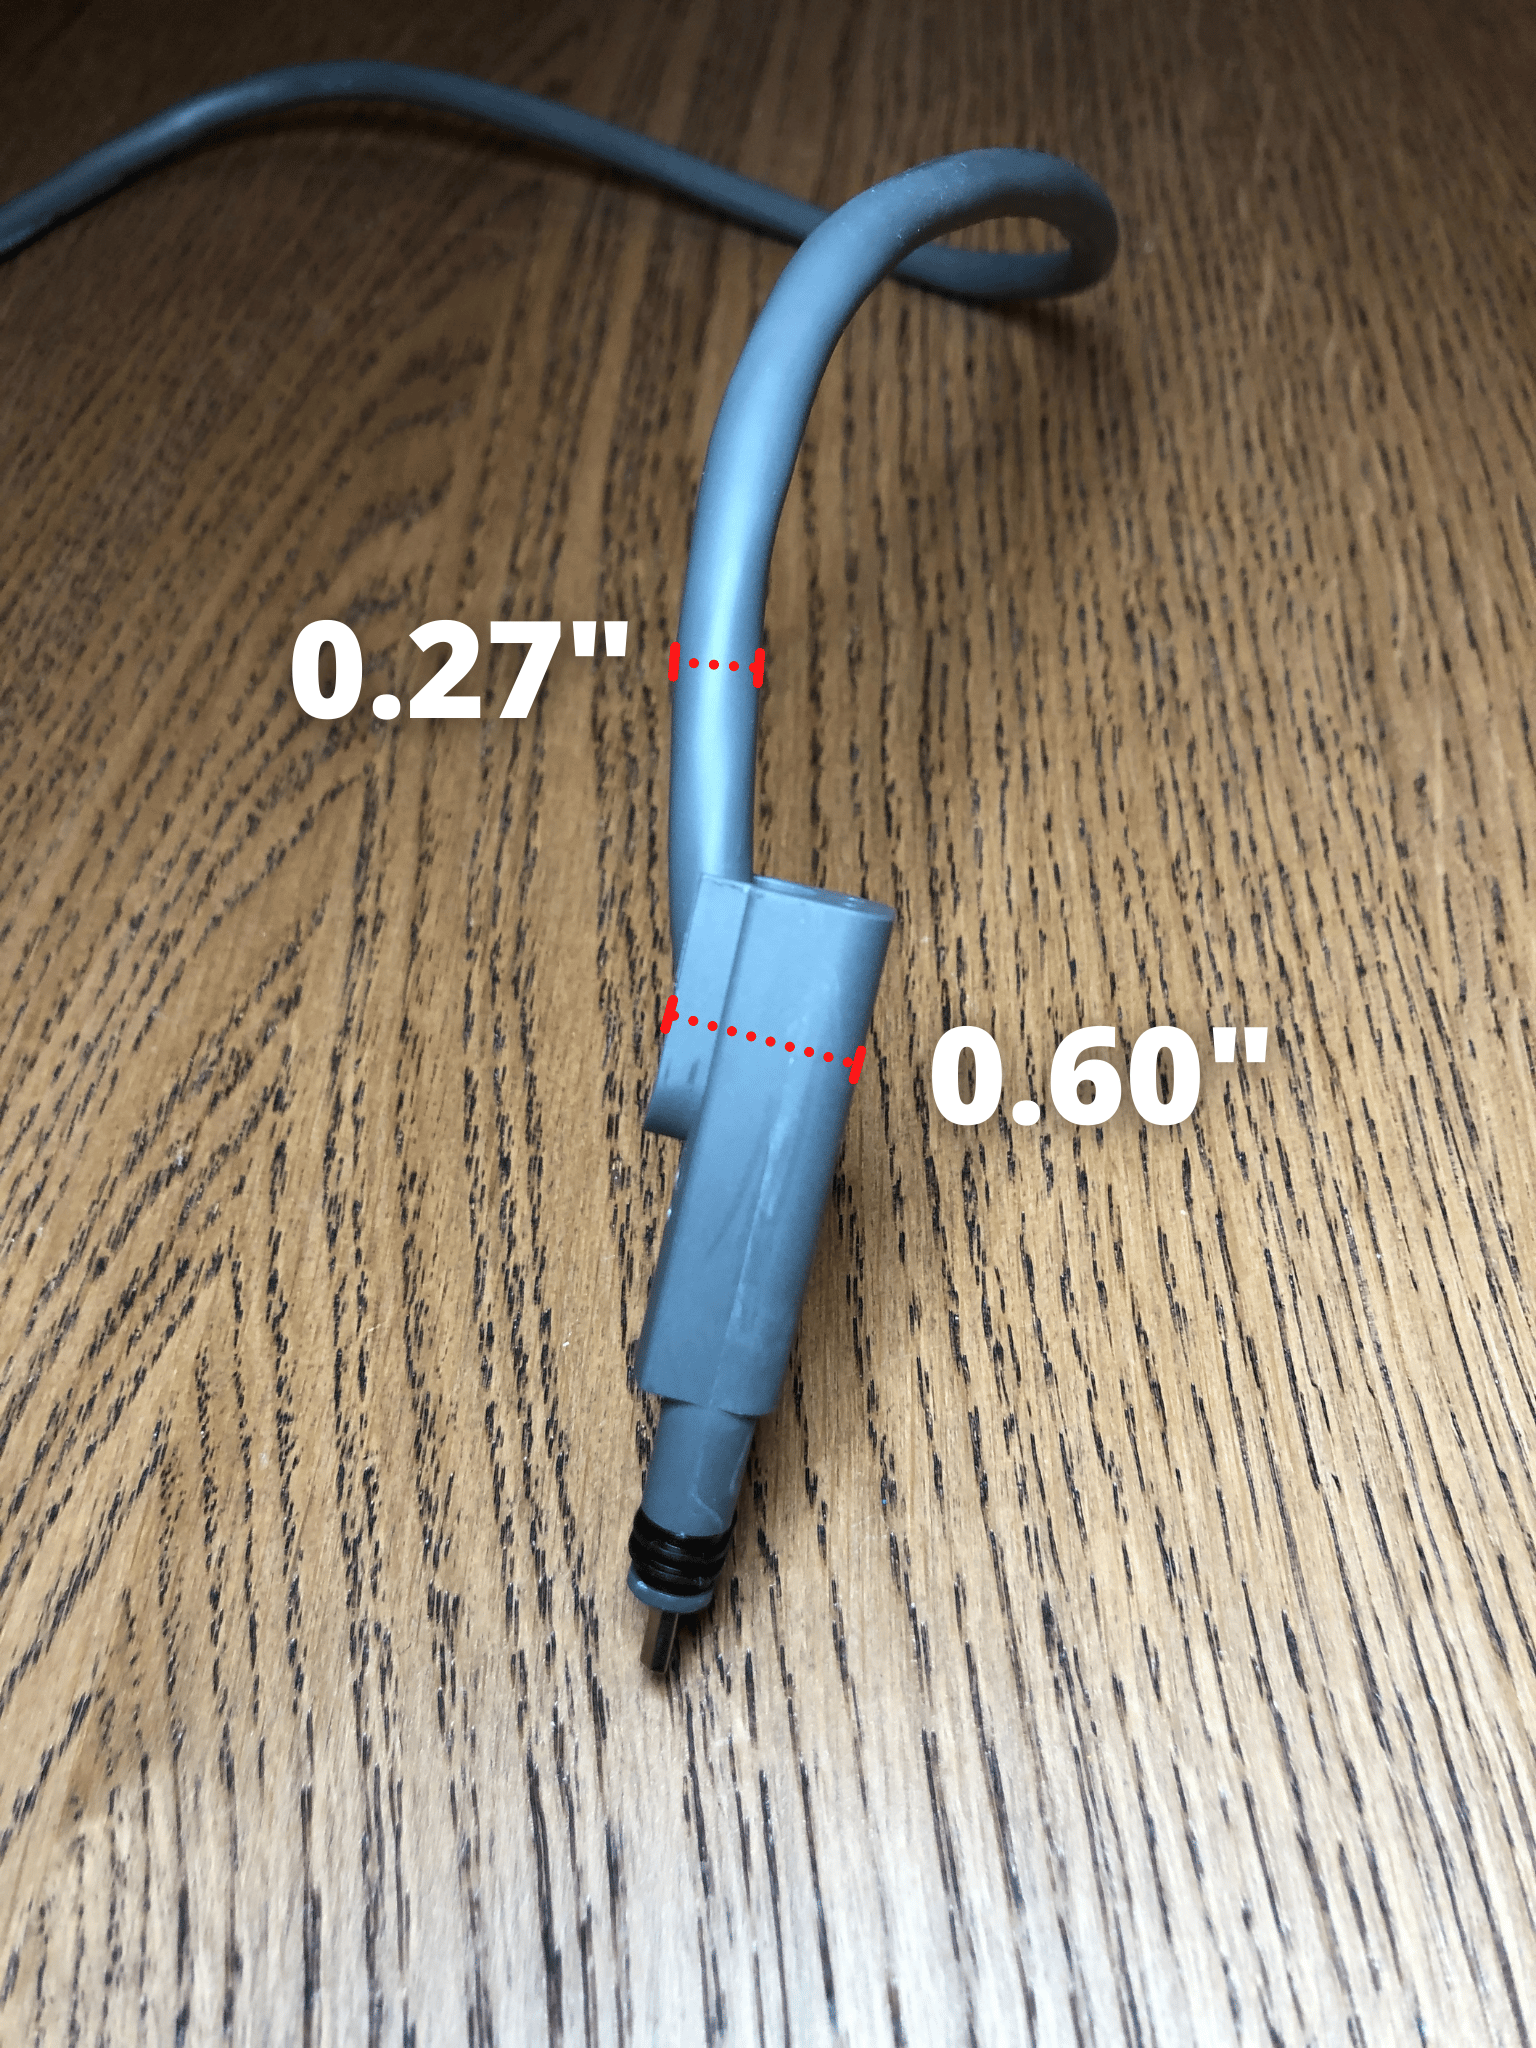
For the cable, the narrow end is the dish side connector. The maximum diameter of this connector is 0.60 inches (15.24 mm). If you need to drill a hole through a wall for the cable, a 3/4″ drill or spade bit should be enough. The cable itself has a diameter of 0.27 inches (6.86 mm).
Router
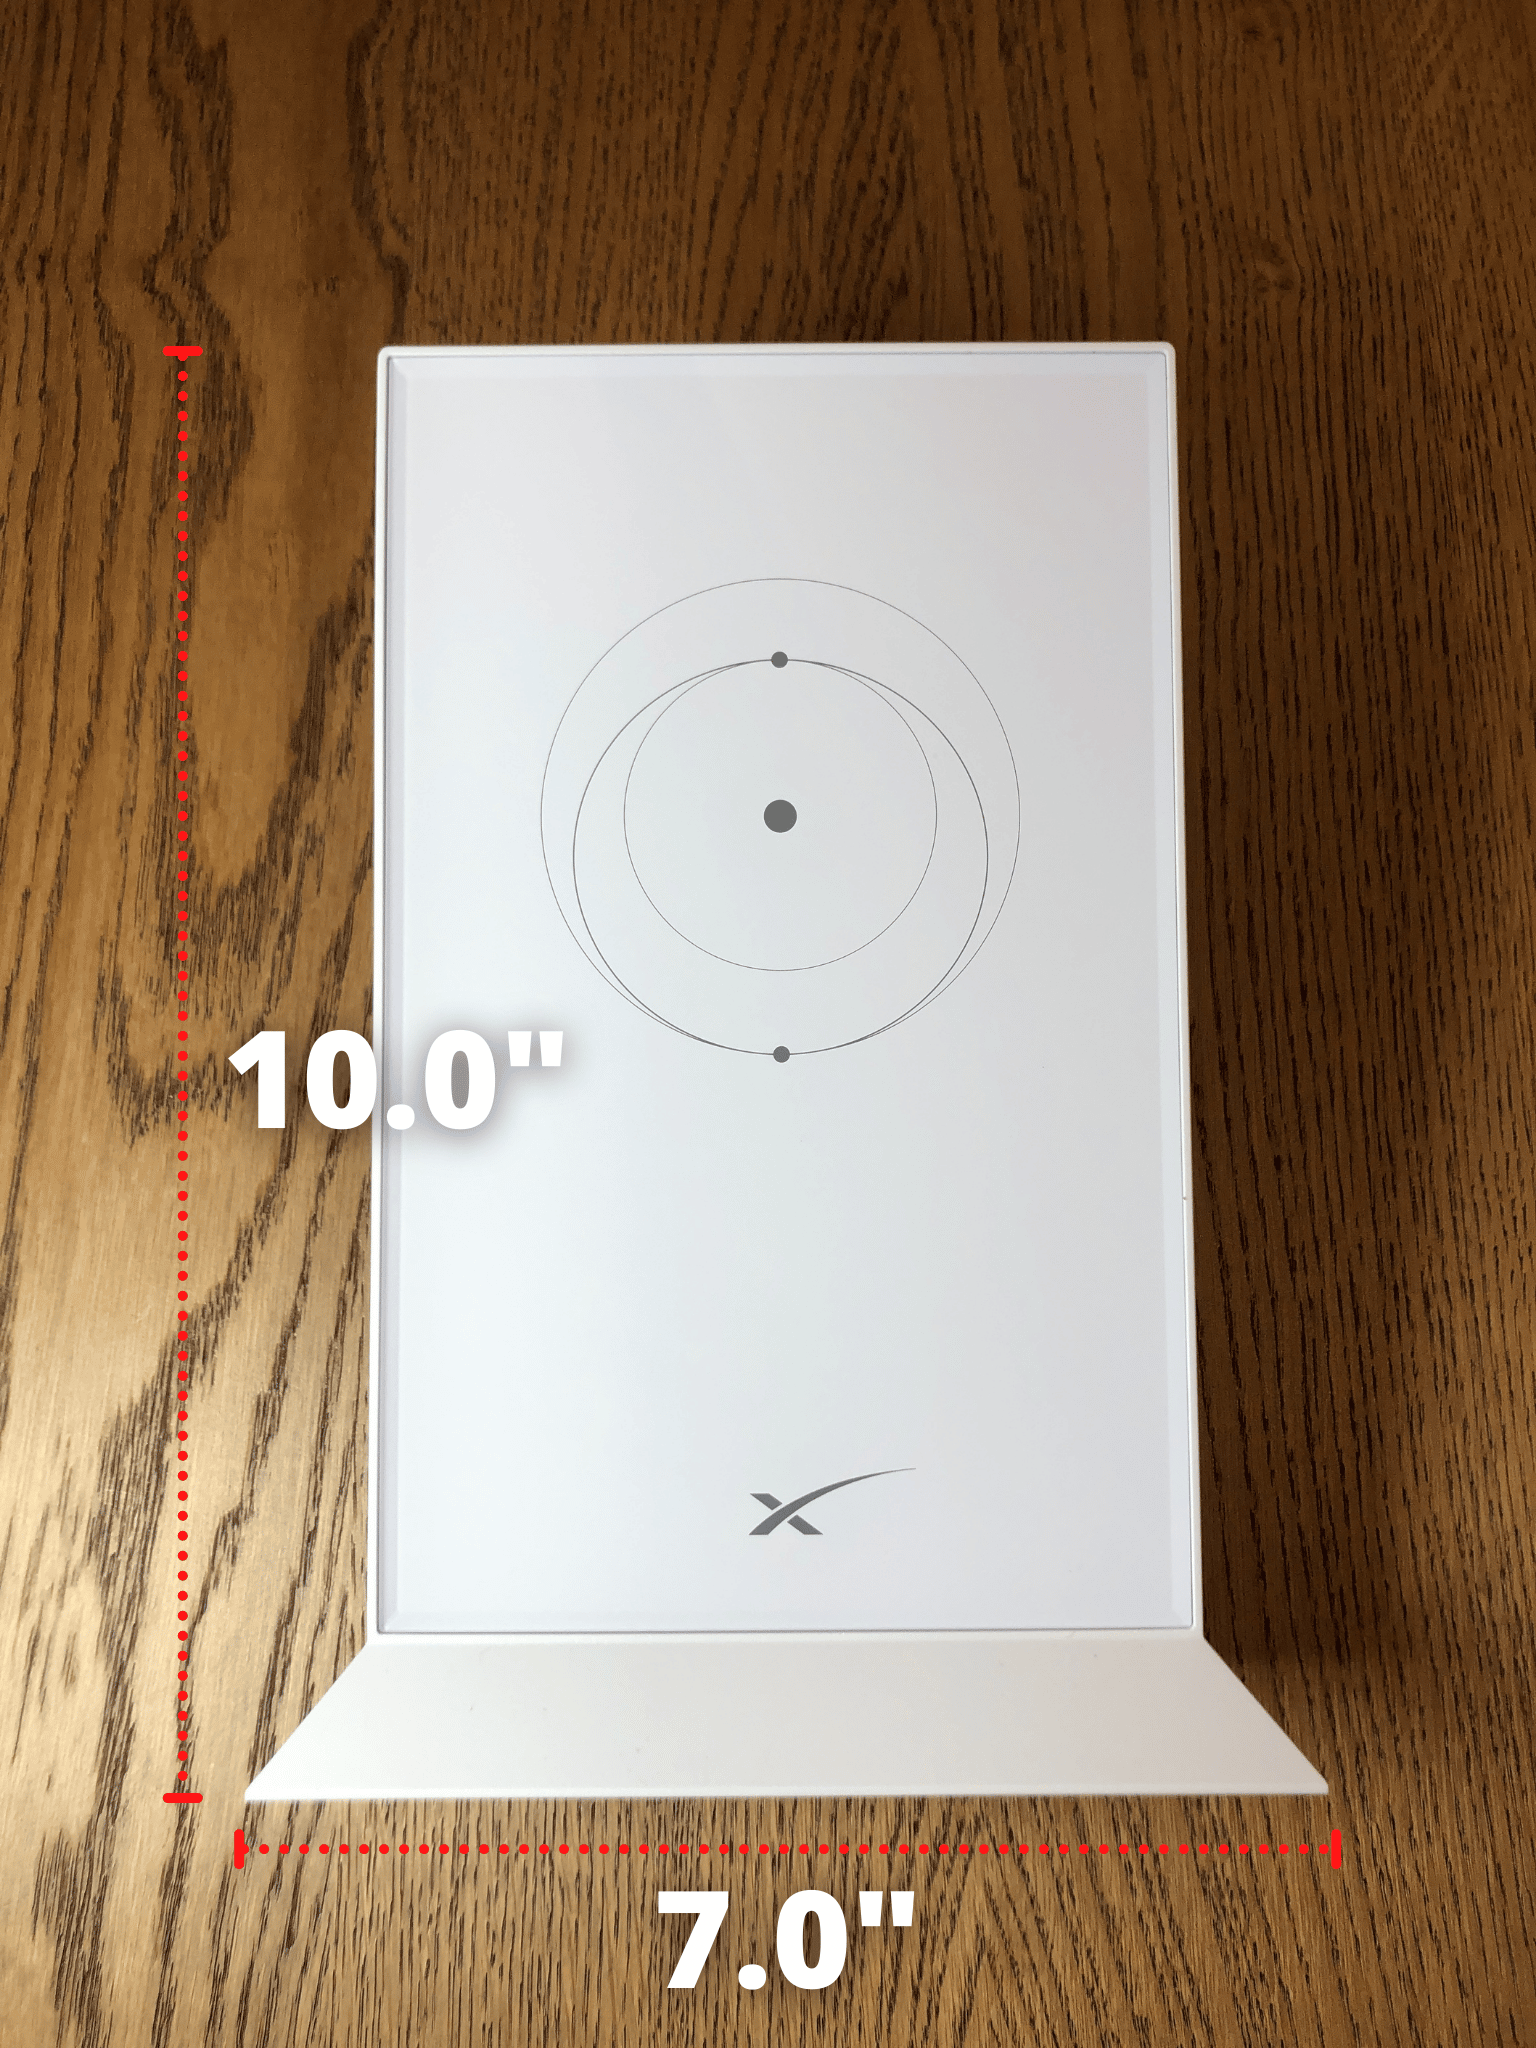
The Gen 2 router measures in at 7.0 inches (177.8 mm) wide by 10.0 inches (254 mm) tall by 2.5 inches (63.5 mm) deep.
Shipping Box
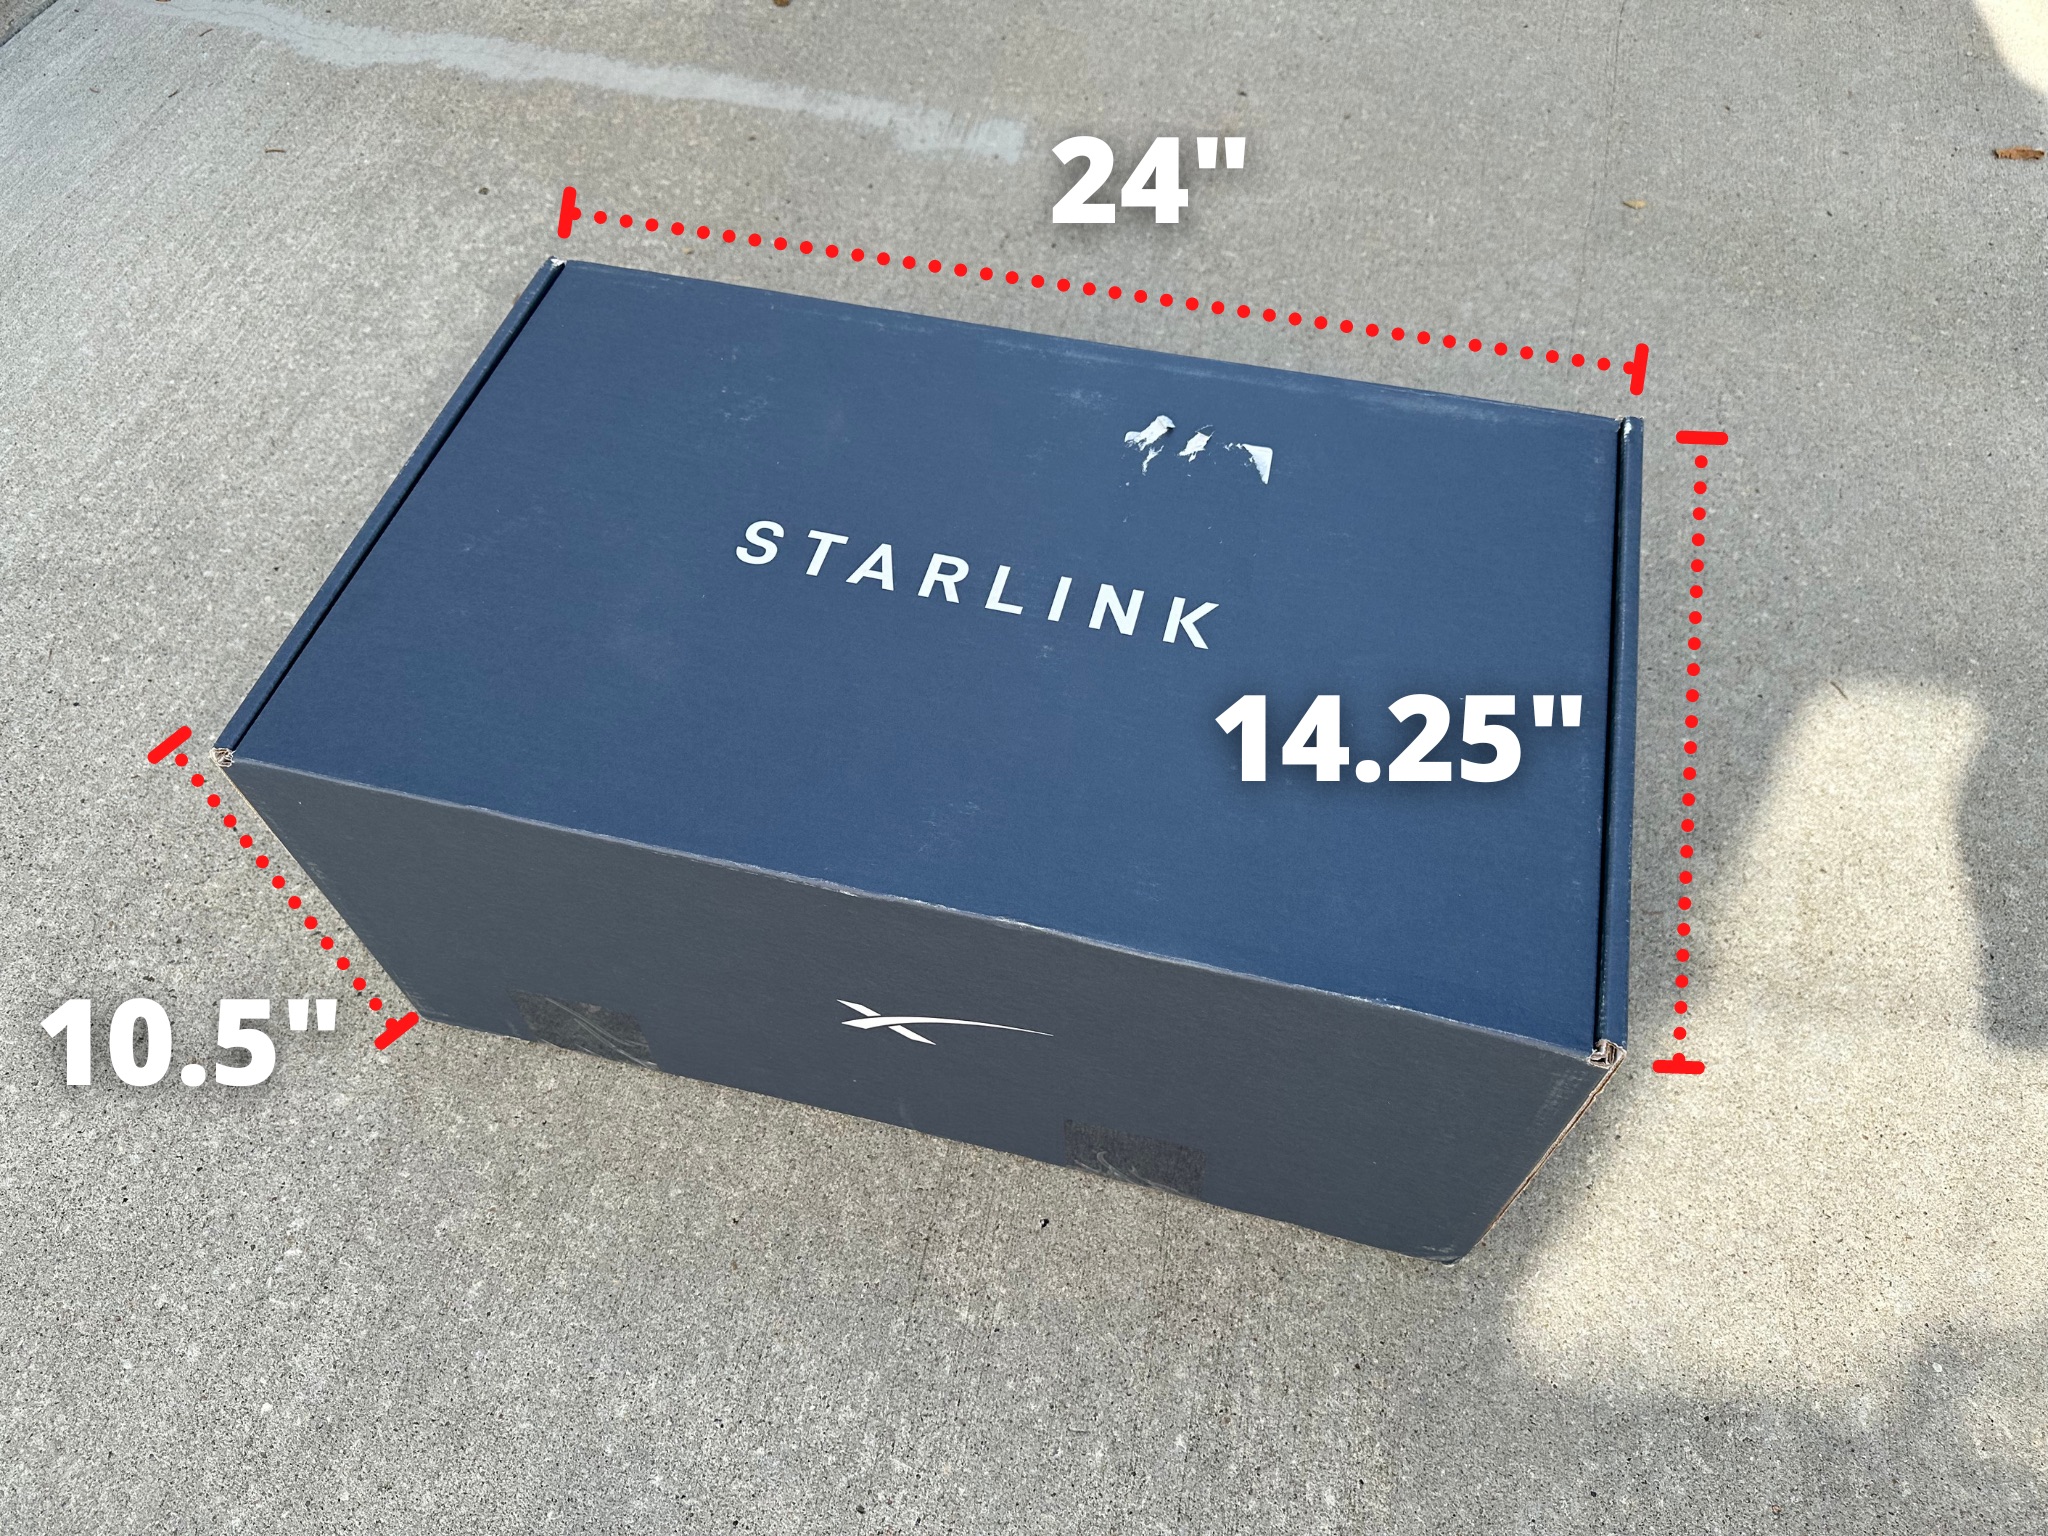
The box that the Standard Starlink hardware kit ships in has the following measurments:
Dimensions: 24” x 14.25” x 10.5” (609.6 x 362 x 266.7 mm)
Weight: 23.2 lbs
Related: Starlink Cable Lengths
gracias!
Once again, this page has come through with exactly what I needed! Thank you so much 🙂
Awesome! Thanks for doing the leg work.
Good day,
I live in western Patagonia, Argentina. The property goes right up to the border with Chile. We NEED internet on the estancia and want starliink and have gotten in line paying the initial payment. I am now in Canada – can i buy the roaming model, get it shipped to me here, Ontario, and carry down to argentina and have it work? thanks so much for the help.
Yes, but you’ll need Global Roam if you want to bring it to a different continent. You can request Starlink to change your main country on the account as well, if you want to switch to Regional Roam at some point.
Thanks Noah,
A further question, if you please, for clarification sake; Argentina apparently won’t, yet, allow old Elon to operate, so we are hoping that since Chile is happening, and our lands go up to the border with Chile, to be able to use it there. Furthermore; can we change to probably a lesser monthly fee once we are installed and operating?
thanks so much,
Ashley
It will likely work even without official approval in the country. Starlink coverage is global and it works in many places where the service isn’t offered. The plans that you can switch to depend on what services are available at the service address. Without official support, you are stuck with Global Roam.
Roaming is N.America only
Global is what you will need
I’m in New Zealand and even we have roaming.
Hello – I am in the UK. I have a gen 2 SL. I need to drill through brick to bring the cable from the outside in. Can you please tell me how wide the hole should be /drill size?
Also can I purchase the grommets from somewhere other than SL as I am not using their kit
3/4 inch (19mm) is the recommended hole size for the Starlink connector.
For the Standard dish model? There are two ends of the cable, one is straight, one is at an angle. The straight side is the dish side, that should be routed through the wall. It hasn’t changed to my knowledge on the Standard rectangular dish.
Please note that when the dishy is inserted into the Starlink pipe adapter, the design responsible engineers failed at performing a basic and simple tolerance stack-up analysis. I sincerely doubt if they did one. They probably didn’t perform a DFMEA either. At any rate, in my case, when the dishy shaft is inserted into the pipe adapter, there is an approximate 1mm gap between the dishy shaft step and the pipe adapter top edge and similarly another approximate 1mm gap between the end of the fully installed cable plug and the dishy shaft step, giving a total of 2mm. Therefore, when inserting the dishy shaft into the pipe adapter, do NOT rely on the pipe adapter to sufficiently push the cable plug into the dishy plug receptacle. In my case it stopped 2mm short of electrically engaging the dishy and there was no signal at the router. To resolve the issue, I used a zip-tie to firmly clamp the cable at the step in the pipe adapter causing excess cable above that step to “push” the plug into the dishy plug receptacle, electrically connecting the cable to the dishy. And yes, I AM a retired design release degreed engineer with 42yrs experience. So far, I am NOT impressed with Starlink quality of design. Indeed, they DO make a high-quality shipping box. 😉
Making a functional pipe adapter isn’t rocket science, but one would think they could actually get something so stupid/simple correct.
Could you please make a short YouTube video of this? Explaining with your hands or something, I’d really appreciate it
The Starlink cable is labeled “CAT5E PATCH CABLE” and “CMX Outdoor-CMR 75°C FTP 4PR 24AWG”. It has a very nice, weather resistant polyethylene sheath. Within the outer sheath is metal foil shielding intended to isolate signal wires from EMF (electromagnetic field) interference. Within the shielding is a stranded, tinned copper drain wire. Next are 4 twisted wire pairs of signal wires wrapped within a thin plastic film. These are 24AWG stranded, not tinned copper wires. Insulation OD is Ø1.05mm. As far as I can tell, the only physical difference between the Starlink cable and a typical CAT5e patch cable are the proprietary end connectors. If your cable is damaged or too long/short, cable overall length can be adjusted by cutting the cable and affixing CAT5e/CAT6 Shielded, 24AWG-compatible RJ45 [male] connectors at each cut end. Use Pass Through RJ45 connectors to easily manage color-coded signal wires. The drain wire should be attached to RJ45 [male] connector shielding or intentionally left long enough to connect to earth ground AT ONE END ONLY. Join cable ends using IP67 “waterproof” CAT5e/CAT6 Shielded RJ45 female-female coupler(s) compatible with the cable diameter.
NOTE: Please be aware that ethernet cable has length limitations that may degrade signal strength and/or add noise. Use of aforementioned cable modifications may void your warranty. This information is provided for entertainment purposes only. Not responsible for any damage to any equipment.
If I want to store Starlink in a drawer how deep does it have to be?
The dish or the router?
Assuming the Starlink dishy is STOWED, place the flat face of the dishy on a planar surface and measure the perpendicular height, call it “h”, from that plane to the uppermost edge of the shaft. Also measure the perpendicular opening, call it “o”, from the bottom of the drawer to the top edge of the drawer opening. Of course, if o – h ≤ 0, it won’t fit in a “face-down” orientation. As an alternative, the total height of the STOWED dishy may be less if laid on its side, viz. with the dishy long edge against a planar surface and the end of the shaft extending in a desired direction and abutting the same planar surface. Of course, the drawer must have sufficient horizontal depth to accommodate a STOWED dishy in this orientation.
Is there a straight pole to extend the antenna height? I bought a long wall mount but it does not extend too far from the eaves. If there is at least an 18 inch extender that will clear my roof. Thanks!
Starlink doesn’t sell an extension. Nothing is going to be plug and play with the OEM mount, but you could try to DIY something with a trip to the hardware store. Personally I would return the long wall mount and go with a longer J mount like the Winegard DS3000. It’s nearly 40 inches length on the mast. More info here:
https://www.starlinkhardware.com/guide-to-using-a-j-mount-with-starlink/
Beware of products described as “universal”. Too often something labeled as being “universal” does NOT fit ANYTHING without some sort of modification. “Fettle to fit…”
Can you tell me if the mast is in the exact center of the antenna footprint. I want to make a plate the size of the antenna and bore a 1.5 hole do drop mast through.
Almost centered. After the router had positioned the dishy perpendicular to its shaf during stow, I cut the power, removed the dishy, placed it face down on a flat, level surface and measured the distance from the dishy bottom edge to the shaft centerline: 26.8 cm (10.6in). Your dishy may vary due to component manufacturing tolerances. My dishy measures 51.5 cm x 30.4 cm (20.3 in x 12.0 in).
Thank you for providing this. I needed to know the size of the cable ends (running through conduit) and don’t have cable with me.
Hope it helped you! You’ll want to use the dish side cable end to route through the conduit, as it is better shaped and a smaller diameter. It’s about 0.6″ for the connector, so you’ll want at least 3/4 inside diameter on the conduit.
A couple of dimensions that would be helpful for me would be the length of the insert on the mounting post at the base, and the distance from the center of rotation (rather than the edge of the pivot) to that flange that it will rest on. It’s really that dimension that matters when trying to determine if the dish will clear an obstruction when installed on one of the mounts.
As it relates to the axis of rotation of the dishy, the writer recommends that shaft length be measured in the shaft plane colinear with the axis of dishy rotation. Shaft length is therefore measured from the _highest_ point of the shaft opening in the collar relative to the dishy shaft diameter in that plane. Measuring by this criteria, overall shaft length measures 26.9 cm (10.59 in). The length from the shaft diameter step to the shaft end is 5.5 cm (2.17 in). Using some additional measurements and handbook equations of mensuration, the length from the highest point of the shaft opening in the collar to the axis of collar rotation is approximately 3.5 cm (1.38 in). The functional length of the shaft, that is, from the axis of rotation to the diameter step of the shaft, is 29.0 cm (11.42 in). Lastly, another relevant piece of data is the stowed angle of the dishy (from horizontal). I measured it as approximately 67.7°.
Does anyone know if a shorter extension (1′ to 2′ with the proper fitting) is available to raise the antenna? I do note a pole mount available from Starlink with adaptors and a larger diameter mast but only need to raise a few feet (or less) from an existing (Starlink) mount bolted to the facia of a porch.
I don’t know of anything that will work out of the box. You would have to purchase some 1.5″ pipe and use clamps or bolts to secure everything together.
Take this down. 5/8 is not enough. And it is not good advice.
I updated the recommendation to 3/4 in. Fortunately, I can just edit the post instead of taking the whole thing down! Thanks for pointing out the error.
Can the ground pole sections be used to extend the height using standard base for rectangular starlink?
No, all the Starlink mounting accessories are designed to replace the standard base.
THANK YOU for providing this info – very much appreciated! Can you tell me what the dimensions and weight of the shipping box are? We’re in a weird situation and trying to decide if we can fly with our new Starlink in a carry on bag. Thanks!!
Shipping box: 24”x14.25”x10.5”
Weight: 23.2 lbs
You should’ve included the box dimensions in the original article. Believe it or not, It’s a very vital information for people in situations like me lol
Sorry about that! I intended to snap a picture and include these dimensions but never got around to it. I’ll edit the post now.
The Starlink dishy assembly, all by itself, weighs 6.4 pounds. (Weighed on a calibrated balance type scale.)
Thanks! This is good info to include. I have this on my to-do list to measure all the weights of the individual items in the kit.
What is the weight of the naked Starlink dishy assembly? In other words, NO cable, NO metal base, NO router, and NO packaging materials?