
The Wifi router that comes with every Starlink kit works great for most people. It has the basic features you would expect from any Wifi router, and the performance is good for small areas. But what if you have an existing router you want to use with Starlink? Or maybe you are looking to upgrade to an aftermarket router for more features and performance? To use a different router with Starlink, you will need to know about bypass mode.
Bypass mode turns off the Wifi and routing functions of the Starlink router, so that 3rd party networking equipment can take over. With Starlink, you can’t just swap out one router for another. Bypass mode is needed because the Starlink router powers the dish, so it needs to stay connected. Bypass mode allows the Starlink router to remain in place as the power supply, while a 3rd party router handles Wifi and network management.
In this guide, I will walk you through how to turn on bypass mode. This tutorial is intended for Gen 2 “Standard Actuated” and Gen 3 “Standard” Starlink models. If necessary for your dish, I will also explain what accessories are required to use your own router. At the end, I’ll answer some common questions I get regarding bypass mode and 3rd party routers.
Note: This article may contain affiliate links for the products mentioned
Table of Contents
Video tutorial
Note: Some ad blockers will block our video player. If you don’t see the video, try disabling your ad blocker, and then reload the page.
Accessories required
Since bypass mode turns off all Wifi and router functions on the Starlink router, you will need to supply your own. Virtually any 3rd party router will work with Starlink. You can use an existing router that you have laying around, or you can purchase a new Wifi router or mesh system. For this guide, I’m using the eero Pro 6E mesh system, but the process is the same for almost any 3rd party router.

Gen 2 Standard Actuated – Starlink Ethernet Adapter required for bypass mode. More information below.
Gen 3 Standard – no additional accessories required. Proceed to the next section.
If you have the Gen 2 Standard Actuated dish, you will need to purchase the Starlink Ethernet Adapter accessory in order to use a 3rd party router. The Gen 2 router does not have a built-in Ethernet port to connect other devices. When installed between the dish and the Gen 2 router, the Ethernet Adapter accessory gives you access to an Ethernet LAN port, allowing you to connect a 3rd party router.
The Ethernet Adapter costs $25, and is available in the Starlink shop. For more details, like how to install it, be sure to check out our full review. The Ethernet Adapter is only required for the Gen 2 Standard Actuated dish. If you have any other Starlink version, it is not necessary.
Connect your 3rd party router to Starlink
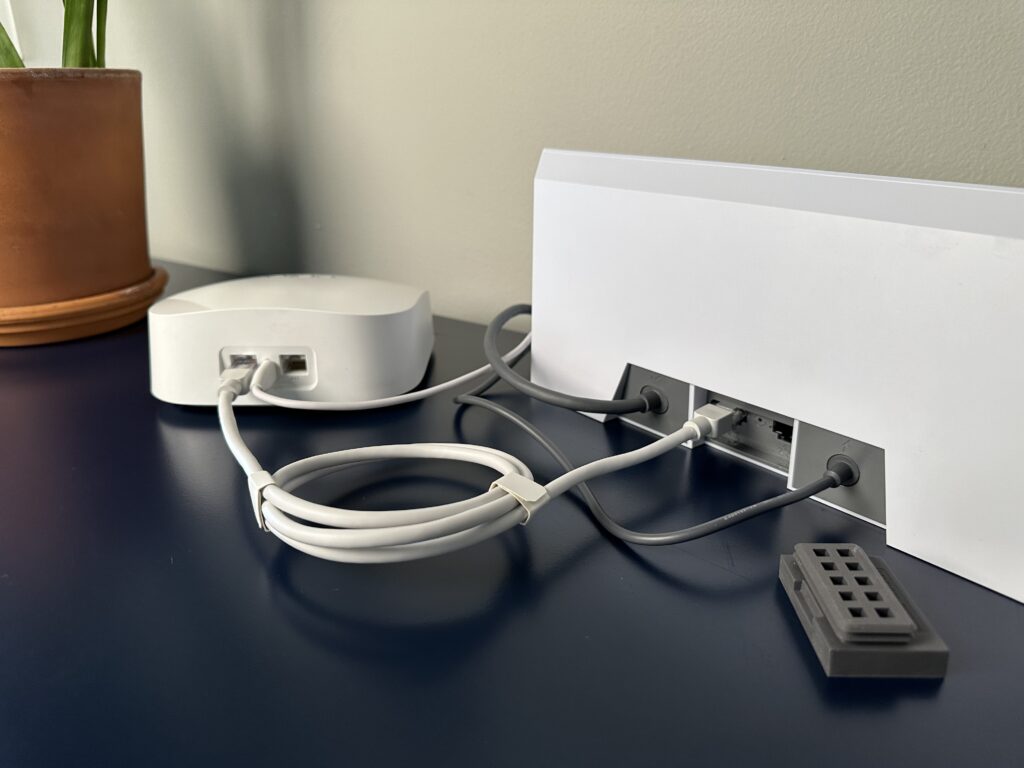
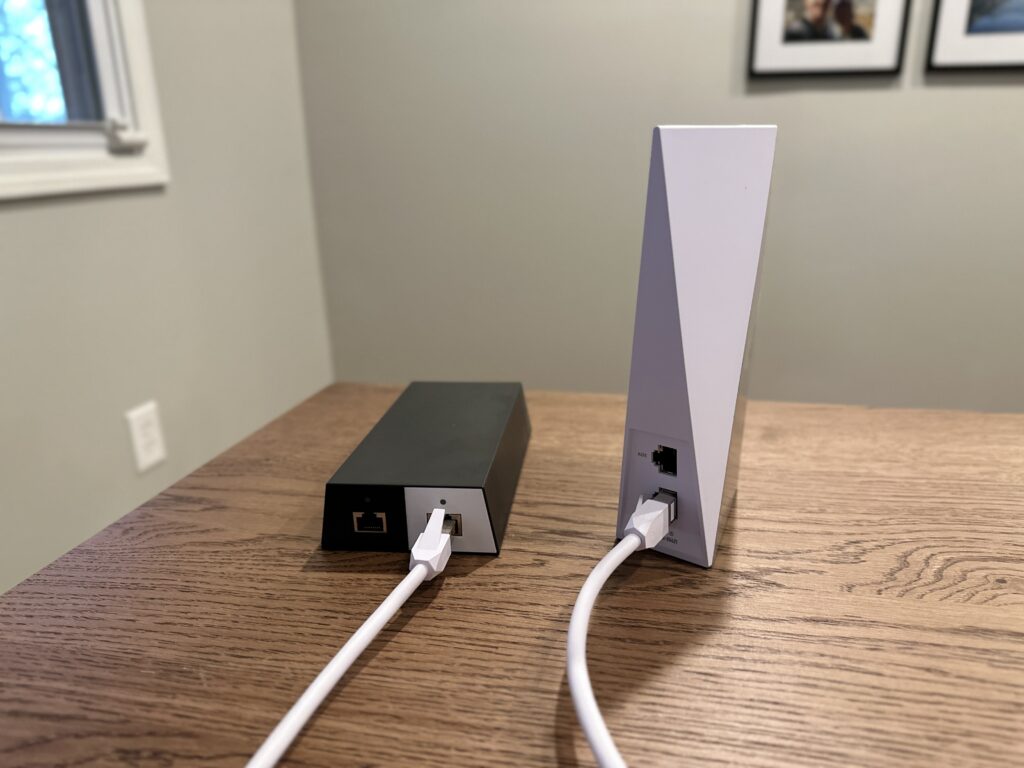
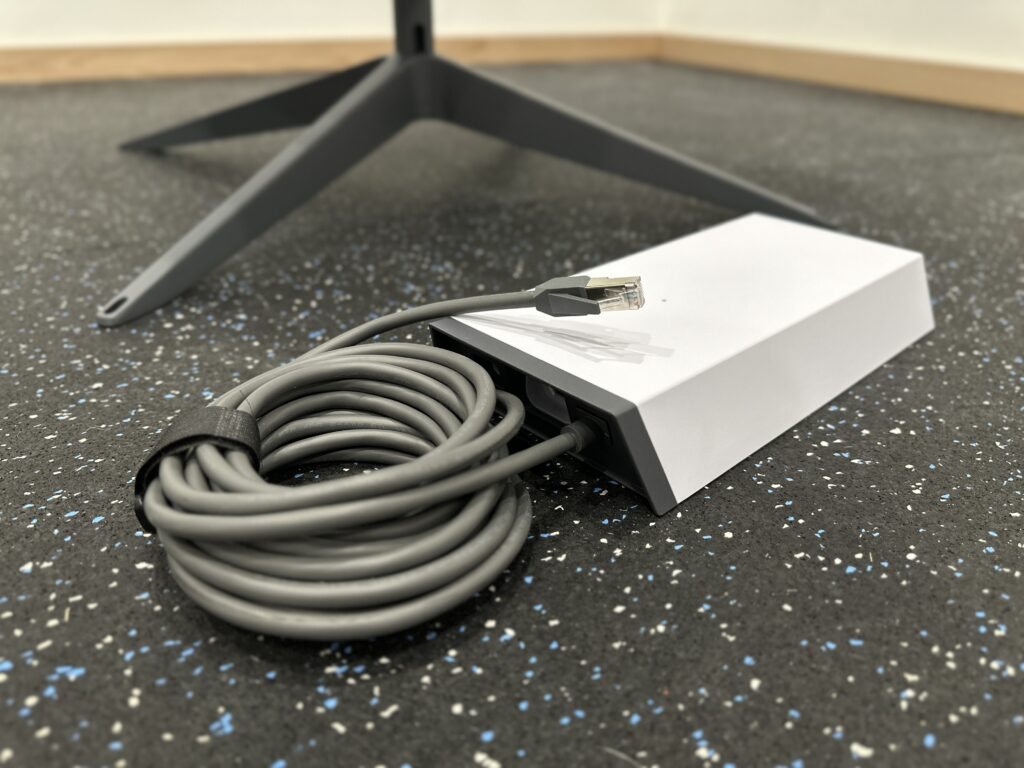
To connect your 3rd party router to Starlink, use the short Ethernet cable that was included with your aftermarket router. One end will plug into the Internet/WAN port on your 3rd party router. The other end will connect to the Starlink router Ethernet LAN port.
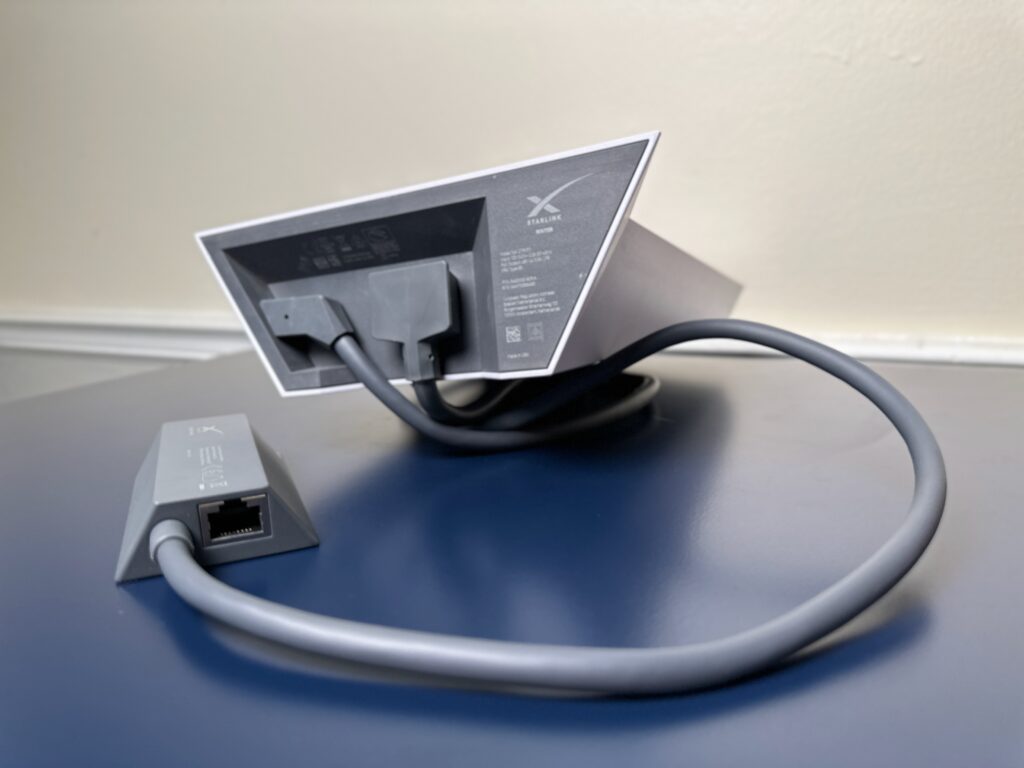
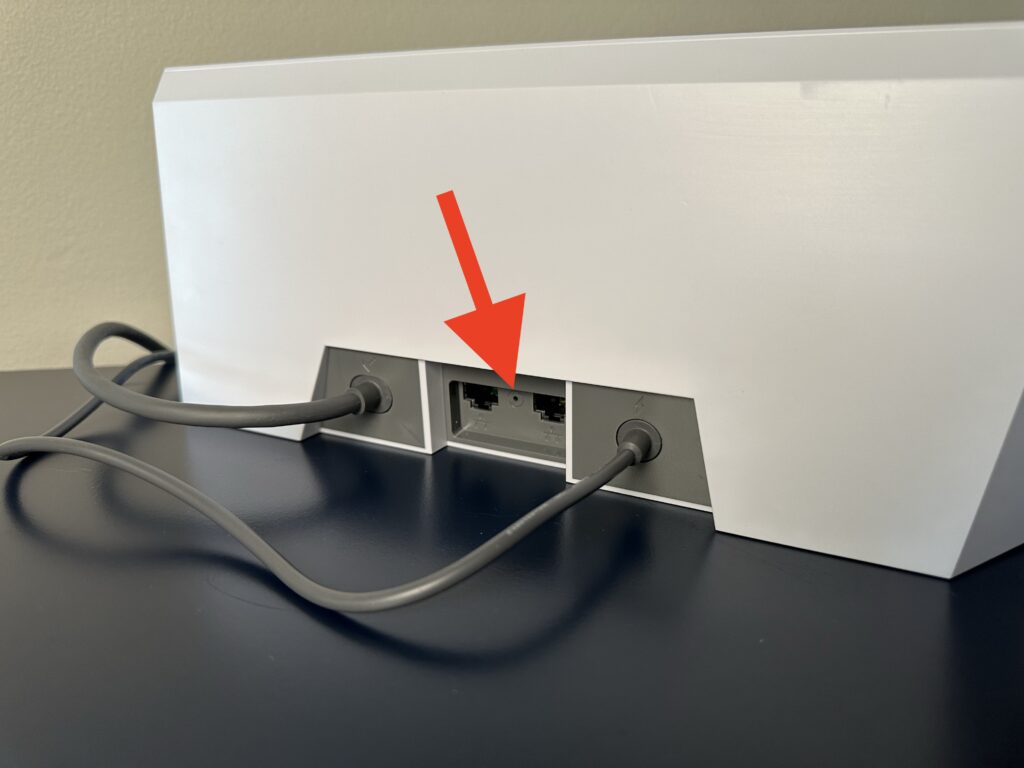
If you have a Gen 3 router, the two Ethernet LAN ports are hidden behind a cover on the back. The cover pulls off to reveal two ports. You can plug your router into either one of them.
If you have a Gen 2 router, you will need to install the Ethernet Adapter accessory first. Unplug the Starlink cable from the Gen 2 router, then plug in the Ethernet Adapter. The Starlink cable plugs into the Ethernet Adapter. Now, you’ll have access to a single Ethernet LAN port, which you will use to plug in your 3rd party router.
Configure your 3rd party router
If you haven’t already done so, plug in the power for your 3rd party router to turn it on. Before you can begin to use it as a router, you need to go through the setup process. The setup process varies by manufacturer and model, so be sure to follow the instructions for your particular router.
I’m using the Amazon eero Pro 6E as my router. I downloaded the eero app, which made the setup process really easy. All I had to do was give my Wifi network a name and password. I configured a few additional features, like a guest network. I’ve previously used TP-Link routers, and they had a similar app to handle the installation and configuration.
Once your 3rd party router is configured, connect to its Wifi network, and make sure you have internet access. At this point, you will notice that you have two Wifi networks: The Starlink Wifi network, and the Wifi network from your 3rd party router. Having two routers connected to one internet source means your network is double NAT. While it can work this way, having two NAT configurations isn’t ideal. That’s why we will enable bypass mode on the Starlink router in the next section.
To learn more about double NAT, check out this article from Netgear.
Enable bypass mode

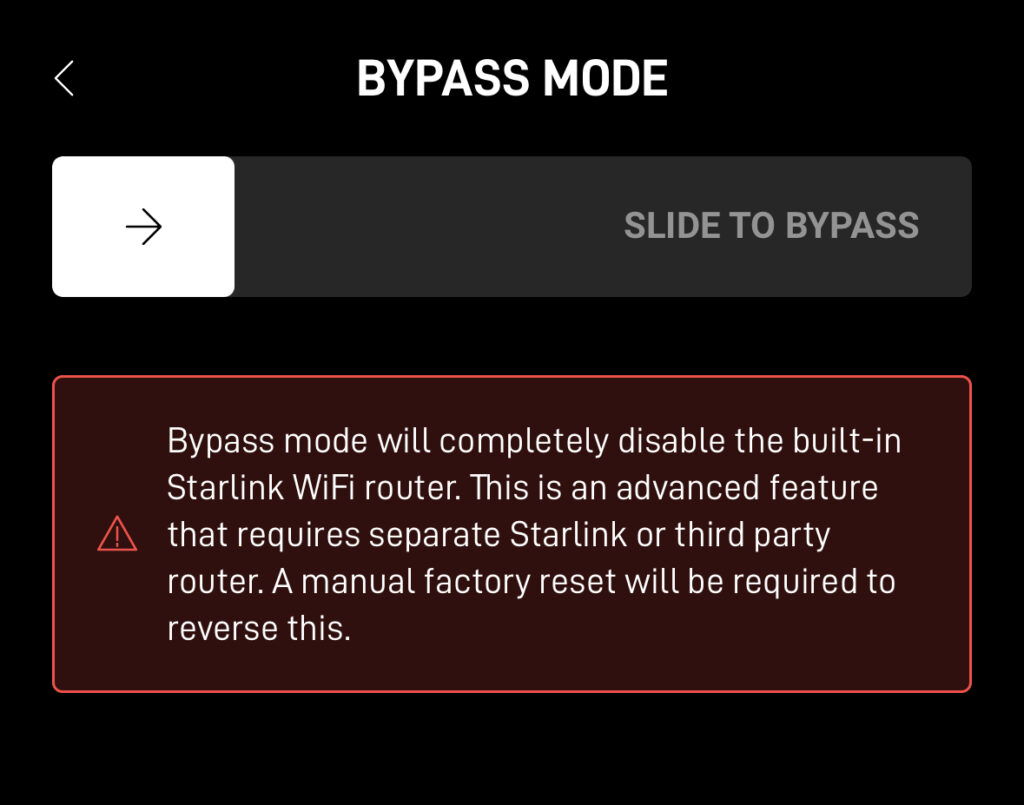
Once your 3rd party router is connected and working, you can put the Starlink router in bypass mode by following these steps:
- Open up the Starlink app
- Tap Settings
- Scroll down and tap Bypass Mode
- Slide the toggle to the right
- When prompted, confirm you want to continue by tapping OK
When you turn on bypass mode, the app will become disconnected from your Starlink dish. Initially, you might see a status of Disconnected on the main screen of the Starlink app. I recommend closing out of the app and waiting several minutes.
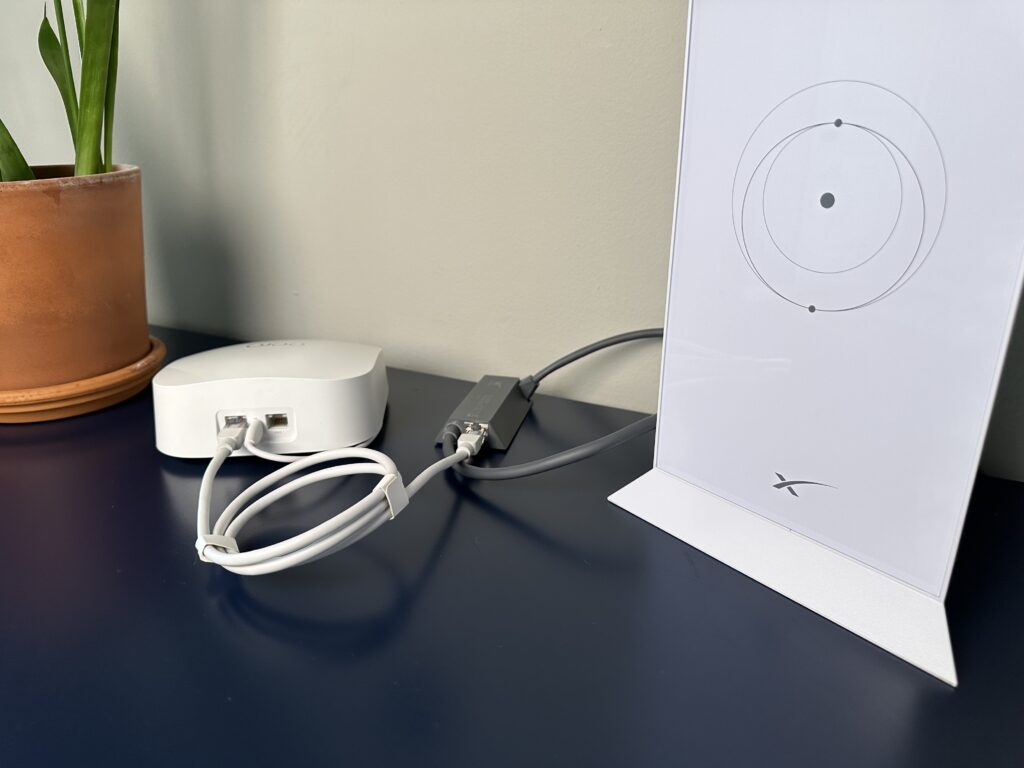
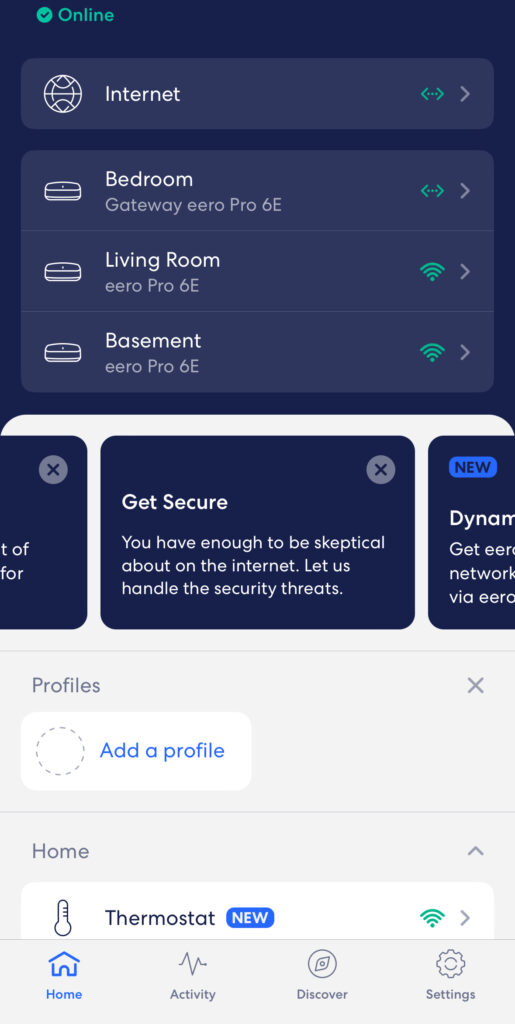
After a few minutes, double check that you are still connected to your 3rd party router Wifi network. Open up the Starlink app and check to see if the status says Online. Notice how a router no longer appears in the graphic.
If the app still says Disconnected/Offline, check to see if you have internet from your 3rd party Wifi network. If you do, Starlink is working properly, you just need to configure a static route to your dish (I’ll tell you how in the next section). If the app can’t connect to the dish through your new Wifi network, adding a static route will fix the issue, allowing you to manage your dish from the app again.
Managing your Starlink in bypass mode
Even though the Starlink router is now in bypass mode, you can still access most of the dish settings from either the app, or the Starlink web interface. You’ll need to be on a device that is connected to your 3rd party router Wifi network. If you aren’t familiar with the web interface, it can be accessed from a web browser by visiting:
http://dishy.starlink.com
or
http://192.168.100.1
If the Starlink app isn’t connecting, but you have internet on your 3rd party router Wifi network, try to access Starlink using the web interface from your device first, and then try the app. If neither the app or web interface is connecting, you may have to create a static route in your router configuration settings:
Network destination: 192.168.100.0
Subnet Mask: 255.255.255.0
Gateway: 192.168.100.1
Interface: WAN
Turning off bypass mode
If you ever need to go back to using the Starlink router, turn off bypass mode by performing a factory reset of the Starlink router. A factory reset will restore the Starlink router to the default settings, allowing you to configure a new Starlink Wifi network and password.
To factory reset a Gen 3 router, just press the reset button on the back of the router, located between the two Ethernet ports.
To factory reset the Gen 2 Starlink router, unplug and plug in the power cable 6 times in a row, waiting a couple seconds in between each power cycle.
If successful, a new Wifi network, STARLINK, should appear after a few minutes. Connect to the new network, open the Starlink app, and configure a new name and password. After you set a new Wifi network name and password, connect to your new network, and open the Starlink app to confirm everything is working again.
For more information on the factory reset procedure, check out our tutorial.
What about other Starlink dish models?
Bypass mode is only necessary when using a 3rd party router with the Gen 2 Standard Actuated and Gen 3 Standard dish models. In these two models, the router and dish power supply are integrated into one unit. Bypass mode is not necessary for the original Gen 1 round dish, the Gen 2 High Performance dish, or the Gen 2 Flat High Performance dish.
The Starlink router for those models can be completely removed from the system, and replaced with a 3rd party router. Bypass mode isn’t necessary when you can simply unplug the Starlink router. To use a 3rd party router on the Gen 1 round dish, remove the Starlink router and plug in your own router to the Starlink power supply Ethernet port. On the Gen 2 High Performance and Flat High Performance models, use the included Starlink Ethernet cable to plug in your own router to the power supply.
Frequently Asked Questions
If you are trying to disable just the Wifi signal, you will still need a 3rd party router, or advanced networking knowledge. Bypass mode turns off the Starlink router Wifi signal, DHCP, and other network functions. In bypass mode, devices that you connect directly to the Ethernet LAN ports on the Starlink router won’t be assigned an IP address, and won’t be able to connect to the internet. You can get around this by manually assigning IP addresses on your devices, or by purchasing a 3rd party router that allows you to disable Wifi only.
Bypass mode isn’t strictly required when using a 3rd party router with Starlink. If you don’t turn on bypass mode, both routers will be trying to manage the network. In some cases, this will work fine. In other cases, you might notice odd behavior with your devices.
Bypass mode turns the Starlink router into basically just a POE injector to power the dish. Like the name implies, data from the dish will bypass the Starlink router, and proceed directly to your 3rd party equipment. A factory reset is required because the router interface in the app is disabled, so there is no way to update the bypass mode setting.
Hi Noah, I wonder if you can help me.
I just bought a Starlink set (router is Gen2) and I live in the countryside, in a two-storey house. Therefore, to have wifi connection all over the place, I think I’d need to use two routers, one on each floor: the Starlink router and a 3rd party router to be connected through the Ethernet adapter.
Would that work? Please advise.
Many thanks,
Giulio
I have tried using both ports on a Gen3 router (Mesh mode) to create two different networks (house 1 and house 2), but it seems it can only connect one network (house 1). Is there a way for both ports to work?
Both ports should have LAN and internet access. How is your system set up? I assume a Gen 3 dish/router, with the Starlink router in bypass mode? House 1 has a 3rd party router connected via LAN port 1, house 2 has a 3rd party router connected via LAN port 2? Keep in mind, having two “routers” functioning on the same WAN connection will cause a double NAT situation, which can have some weird side effects. I would first verify internet access through both Gen 3 LAN ports by connecting a PC directly, and then troubleshooting from there. Once you know it’s not the Gen 3 router causing issues, it will be possible to configure the routers so they both have access.
Hi Noah,
Thanks for the comprehensive write up.
I currently have a VPN enabled router (behind my modem).
Will Starlink support the same setup using its Ethernet adapter?
Thanks in advance.
Yes, virtually any router will do if you have the Ethernet Adapter to be able to plug it in. You should be able to just swap out internet providers going into the router.
Hi, l’m about to receive my kit, i’ve a doubt. I’ve an old router that is WAG320N linksys by cieco that i would lire to keep as my router bypassing the starlink one. Now the question is since I have to set up ethernet port 1 as WAN instead of LAN is it necessary to put username and password on WAN port page set up ?
Hi Noah,
We’ve had our Gen 2 Standard set up for a month or so now. I’m using the TP-Link AX10/AX1500 that works great with the Starlink router in bypass mode. I want to use only ethernet if possible and leave the WiFi off most of the time. Even with WiFi turned off on the AX1500, the Starlink router still pegs my Acoustimeter at 6.0V/m and 100,000 uW/m2 (max. readings), seems like turning it off on the AX1500 has no effect on the Starlink router at all. Is there any way to turn it off? If I put a Faraday cover over it what effect would that have?
I am subscribed to your newsletter on a different email and computer, this one happens to be photography.
Thank Noah.
Dean
Bonjour,
merci pour toutes ces explications.
Lorsqu’on active le mode Bypass je n’ai pas de DHCP sur la pate WAN de mon routeur …
Je dois renseigner sur ma pate WAN une adresse IP en 192.168.100.x ?
Ou c’est juste parce que je n’ai pas l’adaptateur ethernet mais un répéteur wifi ?
Merci d’avance pour votre retour.
Thanks for all info, just question , in by pass mode with home routeur , can I can continue to use Starlink WIFI module
Gen 2 wifi
Bypass mode disables Wifi on the Starlink router, so only bypass if you have your own Wifi router to use.
My read on this post and others is that regardless of bypass use of an external router or POE supply, the provided Gen 2 (in my case) router is still required for system operation, i.e. the Starlink router firmware is required for the dish to operate even if one had an external router and a POE supply?
The Starlink router is only required as a POE supply, the router firmware isn’t necessary for operation of the system or Starlink app. The dish has its own firmware. If you have your own POE supply for the dish, you can remove the Starlink router completely.
Thank you.
Once I put the Starlink into Bypass mode, it would not work and provide internet through the new router. Help!
If the Ethernet Adapter works fine, but stops providing internet to the new router when you enable bypass mode, it could be a bad Starlink router.
Thanks for the video, good stuff!
Just a quick one, I struggle to access my Synology NAS remotely…even when on the same network. Could this be because I need to run Starlink in bypass mode?
Current set-up is Starlink TO ethernet adaptor TO tp-link switch TO NAS & desktop.
Would appreciate any pointers here!
Rgds
Andrew
You wouldn’t need to enable bypass mode unless you have another router running on your network. Check the settings on the switch to make sure everything is on the same VLAN.
Hi Noah, Thanks for all your good information on this site. I am a new Starlink user. I ordered the ethernet adapter and connected my TP Link Deco Mesh setup and put the Starlink Router in Bypass mode and it killed my speed. From 190 to 25MB. I disconnected and Factory reset the Starlink Router and speed was back. Redid the bypass and speeds dropped back to 25MB. Factory reset again and back to 190MB. Any thoughts on this? Thanks.
Seems others have had similar experiences.
https://www.reddit.com/r/Starlink/comments/130q5or/internet_speed_significantly_lower_when_starlink/?rdt=52572
Try your 3rd party router without bypass mode being on. Any improvement?
I have the business high performance therefore should not need the router at all, nor the adapter. What needs to be done once I plug the Starlink Ethernet cable into the power supply?
One end plugs into the power supply, the other end plugs into your 3rd party router.
I’ve got the original Starlink and bought a few original Starlink Mesh Wifi Routers as well. I initially thought this would work well, however I’ve placed the main router on the top floor (three floor house) and these meshes connect to each other as a chain (to the ground floor); the design is bad because the performance degrades (the signal is strong, but speed is reduced overall).
I’ve also got an Archer router and though to just connect it via ethernet port to my Starlink. I did that and it worked, but the original Starlink Mesh Wifi Routers stopped working.
My question is, is there a way of making it work when both Starlink original routers allow a seamless connection AND at the same time to be able to connect to another router (via Wifi) on the ground floor that is connected to the original Starlink Router via ethernet cable?
The two mesh systems won’t work together. You could just use the Starlink mesh, and put your 3rd party router in access point/bridge mode so that it doesn’t act as a router, just a Wifi repeater basically.
Thanks for your reply, Noah.
I’ve done that and I confirm it does work as a repeater; not ideal that I need to switch to another network, but actually good enough.
Is it possible to connect Star Link in my GL-Inet router with vpn installed using Starlink router in bypass mode.
@Noah Clarke
Starlink can connect to pretty much any router. Just plug the cable in to your router’s WAN port, from the Ethernet Adapter of Starlink.
My wan port needs username and password. Which one shall i Use?
I’m not sure, I would refer to the router documentation to see what those should be.
Noah, I have setup my Dish router in bypass mode and have normal traffic moving through. However, while I can use my phone connected via WiFi to connect to the Starlink app, I cannot connect to dishy.starlink.com or 192.168.100.1. I had followed your instructions to add a static route and believe I correctly did so in my Ubiquiti Edge router (model 12). I use port 9 as my WAN port and have a flat 192.168.1/24 single subnet in use. I looked at my static route list today and saw below list.
I do not recall some of the steps I performed when setting up my router (guided by a recommended setup approach that Ubiquiti supplied. I just changed from a different ISP to Starlink and added the 192.168.100.0/24 entry per your article.
Any ideas why dishy. and 100.1 do not work?
Dest Next Hop Interface Route type
0.0.0.0/0 100.64.0.1 ETH9 static
100.64.0.0/10 ETH9 Connected
127.0.0.0/8 LO Connected
192.168.1.0/24 SWITCH0 Connected
192.168.100.0/24 ETH9 Static
Thanks
Jordan
Hi,
I have the 1st generation dish and therefore I do not have the bypass router option. I have connected a mikrotik and the internet works perfectly. But there remains a problem: I cannot access the mikrotik ddns from outside and portforward is not working. If instead of a Mikrotik I use an Asus it doesn’t even let establish its DDNS: it warns of double NAT.
how can I solve it?
I believe you would need a public IPv4 address to directly access your network from outside, and also to use port forwarding. With Gen 1, bypassing the router means simply unplugging the Starlink router and plugging your own in its place. No software setting.
I tried following the port forwarding instructions but still am not able to get it to work. I tested if an IPv6 address is available which it is.
Do I need to make a note of this address and add it somewhere in the 3rd party router settings?
thx
Are you trying to forward ports on your 3rd party router, or just trying to be able to use the app/admin page for Starlink? If the latter, you need to set a static route with the settings in the article. If that still isn’t working, I recommend reaching out to support for your router manufacturer to get clarification on what setting changes need to be made to access the WAN modem (Starlink dish).
I’m trying to run the Starlink (V2) to the WAN2 port of my Ubiquity USG-P3. My current ISP is on WAN1. Has anyone been successful doing this?.
YES, we have it set to failover then pulled the WAN 1 connection and it works. CGNAT blows my remote support contract for this customer though!
Can the High Performance power supply/cable be used with a regular flat dish to eliminate the Starlink router?
No, the cable, connectors, and power supply from the High Performance are not compatible with the Standard rectangular dish.
Hi I have bought a TP-link Archer C54 I have it working but it is very slow 24mbps as opposed to Starlink 150+. I have put it in bypass mode, have I done something wrong?
Run the speed test standing close the the router. Make sure you are connected to the 5ghz band, not 2.4 (slower). Also, connect a laptop or PC directly to the LAN port on the router and run a speed test using Ethernet instead of Wifi. Any difference? Constant slow speeds even over Ethernet could mean the router or the Ethernet Adapter are bad. The Starlink router can also cause issues and could be defective (it still handles the Ethernet Adapter data even in bypass mode).
I tested for a month the starlink router speeds over 200, today I connected the Ethernet to my home mesh the speed tops at 100mb/s then tried bypass then went to normal 200 then suddenly it dropped again to 100 then I reset the mesh and went back to normal 150+mb/s.. There seems to be a slight glitch with that Ethernet from starlink and they don’t really seem to support you once you go the other way using third party routers.. Hope it helps my conn is fine now
Hi, does the content filtering works in bypass mode ?
No, you would need to set up content filtering on your 3rd party router (most of them have these controls).
Hi Noah,
Does the content filtering still works in bypass mode ?
No, you would need to set up content filtering on your 3rd party router. The Starlink app content filtering setting applies to the Starlink router.
Some settings within the app even though it allowed me to config starlink says I need to login, where can I obtain these credentials?
It’s your Starlink account that you set up when you ordered. It will be your email and whatever password you created. If you need to reset your password, you can go to the Starlink.com website and use the forgot password tool on the login page.
Starlink High Performance system into a 3rd party router.
My router requires settings in order to talk to the Starlink system. I’ve plugged the POE ethernet connection into the WAN port on the router, but can’t find any documentation on the appropriate settings.
Look in the router manual. I’m not sure what it would need from Starlink to connect.
Thanks for the article, very useful!
May I ask if can use Ethernet adapter only on my Mesh router? I want to connect my security camera hub station on a particular location.
Yes, the Ethernet Adapter can connect to a Starlink mesh node to provide a hardwire connection for devices.
Starlink High Performance system into a 3rd party router.
My router (Sophos UTM9) requires settings in order to talk to the Starlink system. I’ve plugged the POE ethernet connection into the WAN port on the router, but can’t find any documentation on the appropriate settings.
Many thanks, Noah, for your Tutorial on setting up Starlink for 12v power supply and using a third party router. It has helped me immensely! With Starlink up and operating at high speed with its standard router, I now need to put Starlink in bypass mode so that I can connect my third party router. However, no matter what I seem to do in the Starlink App, I continue to get the message “you must be logged in with the account associated with this router to update settings”. I am logged in to my account but it gives me the same message no matter what settings I try to access. I have tried uninstalling and then reinstalling the App to no avail. Perhaps you or one of your followers might be able to assist me or has had the same issue trying to change their settings and found a solution? Cheers from ‘downunder’. Phillip
You’ve tried what I was going to recommend, which is uninstalling and reinstalling the app. I’ve also seen situations where people log out of the app, and then visit the website from their web browser. Log in there. And then go back to the app and try to log in again. Finally, sometimes people have multiple accounts. For example, if you pre-ordered many years ago, sometimes people forget they have an old pre-order account that automatically gets logged in. Since they bought hardware later on a different email, you get the error because the hardware on your network isn’t associated with the account.
Thanks for your very speedy response Noah.
Your advice got me thinking about what I had been doing when I was installing the Starlink dish and router, i.e. a mixture of logging into my Starlink account from both a web browser as well as from the App. Although reinstalling the App had not fixed my inability to access the Starlink router’s bypass setting, I noticed though that I was still able to access the “Factory Reset” setting for the Starlink router. I did a factory reset, logged into my Starlink account through the App and … bingo!! Access to the setting to bypass the Starlink router was now available. Having activated the bypass, my third party router, a TP-Link Archer AX10 AX1500 WiFi 6, was then immediately able to connect straight to the dish through
my Dishy Cable Adapter and POE Injector. I had a download speed of 306. Mbps!
Thank you very much for steering me in the right direction and I hope this solution can assist others with similar Starlink App menu access problems.
Cheers from Downunder. Phillip
Hi Noah,
Thank you for the article. I have a slightly different question. I moved into a house where the Starlink hardware and router are still there. However, despite many efforts to contact Starlink, no responses. The old owner transferred the account to me too but I can’t activate it. It doesn’t recognise the numbers like KIT etc. Any suggestions?
It is the hardware ID number that is transferred, not the account. If you can log in to the old owners account, make sure to cancel and then transfer the equipment out of the account. Then, you should be able to take the KIT# and activate it on a new plan. We have a full guide here:
https://www.starlinkhardware.com/how-to-buy-sell-and-transfer-a-used-starlink/
Hi There
We run a Synology Nass at my office and would like to run one at home to do daily back ups at home off site. we have star link at home but my IT guy can’t make it work.(saying the technology is not compatible) is there a fix for this , maybe a different router, only thing is i have just paid for a second mess router,
any ideas?
It probably has to do with accessing your Starlink network remotely. Since Starlink doesn’t provide public IP addresses, many services like this don’t work with Starlink. One workaround is using a VPN connection on your home network that gives you a dedicated IP address, that can be accessed remotely.
You can also “bypass” the starlink with a SSH tunel using a free AWS account. Just run a VM that has a ssh server and you can forward ports from your home network
Do I need to bypass the SL router to send the signal to an out building on our property? I have a bridge that we’ve been using with the old internet service and a 2nd router in the other building. How do I make this work in both places?
No, you don’t need to bypass if you just have an access point in another building. My recommendation would be to configure the router in the building in access point mode, and keep the Starlink router as-is.
I bought a house with starlink in place. The dish is on the roof but the seller took the router and power supply. How do I order a new router and power supply and activate the account?
You can activate the dish on a new plan if you have the KIT# or the Terminal ID, assuming the previous owner cancelled and transferred the equipment out of their account. Once you activate it, you’ll have access to the online shop, where you can purchase a new router. If it’s the round dish, you can create a support ticket and see if Starlink support will send you one.
I have house with a remote barn with its own router. I have run an Ethernet cable to that building – there is no chance of Wi-Fi interference due to the distance. I plugged in the Ethernet cable for that building into the SL Ethernet adapter port and the remote building Wi-Fi works great but – even with no one over there using bandwidth – the SL Wi-Fi in my house got spotty and slow. I did NOT adjust the bandwidth setting. Any ideas?
Are you running the barn router in “access point” mode? To extend the existing Wifi signal? If you have it set up as a separate router, it could be an issue caused by having two routers on the same network.
Stupid question. If I bypass the Starlink router, will the dish still be able to melt snow?
Yes, you will still have control over the dish settings like snow melt.
Do you need to have the ethernet adapter connected or the 3rd party router configured before you see the bypass option? I just set up my new SL kit and everything works fine, but I don’t see that option in the settings section. I am hesitant to order my 3rd party router and access points until I know for sure this is still an option…
It looks like they’ve changed the app a bit since I wrote this, but the bypass option should still be under Settings. It’s under the Router tab. You might not see it if you are remotely connected to your Starlink. Make sure your device is on the Starlink Wifi network to enable bypass.
Bonjour, je n’arrive pas à configurer les appreils qui ont beseoin de UPNP, via un 3eme router
Hi I didn’t do the bypass just connected the google mesh router to the starting router, and it works but a couple of hours later the Google Mesh will be lost internet, I need to plug out Starlink router then will be fine but a couple of hours later, google mesh lost internet again. Is that because of I don’t do the bypass?
Having two routers can cause issues. You could try bypass mode and see if that works. Otherwise, it could be a problem with the Google router, or possibly the Starlink Ethernet Adapter giving you issues.
Hi! I am having the same issue. I have the high performance dish and router. I then connected my Google home router (and mesh system) so I can effectively get internet in the whole house. The Google router internet comes in and out ALL the time. Does anyone have experience with the Google mesh system with Starlink? And how do you set it up to not have this issue?
Is the Google router plugged directly into the High Performance power supply? What does the Starlink app say? Any outages or obstructions?
Interesting questions for you… I’m part of the IT team for a non-profit that hosts events, approx. 4-5, each year in mainly rural locations with very spotty limited cell service. We would like to provide internet for our guests (around 150-200) but also leave enough bandwidth for credit card processing. I’m certain I would have to use a 3rd party router for QOS purposes along with some line-of-site access points. Would the Starlink Roam plan work in my situation or am I barking up the wrong tree? Since there’s no SL salesperson I can talk to, I appreciate any info/suggestions you can provide.
The Roam service and dish would provide very limited bandwidth with that amount of people. But I think as long as you prioritize the vendor CC processing, it would at least provide some basic connectivity for the guests. Mobile Priority (Mobility) would be a better option. The dish hardware is better and you’ll have Starlink traffic priority over other users in the area. Also, I believe since this is for non-profit use, you would technically need Mobile Priority anyway to be complaint with the terms of service.
Using your existing router, you can use QoS (Quality of Service) features to prioritize your credit card processing. There are many factors, though, just be advised of that. This would be true of any setup you might have, separate from Starlink, even.
If I do this, will the new third party router work with the Starlink Mesh nodes? I would like to use a better router for my system. The SL router is in a utility room in the garage and there are several walls between it and the main living area of the house. I’m hoping a third party router (I have a brand new TP-Link AC1900 router) will send out a stronger signal to the Mesh nodes.
No, the Starlink Mesh Nodes are only compatible with the Starlink router.
Hi Again ! Seems obvious to me but that doesn’t mean much. Once I set up my router I can make all my computer connections wired as opposed to wireless. Or does it merely mean my computer connections will still be wireless it is just that the wireless signal will be from my router? I think the former is the case. Thanks!!!!
Either one can be the case, depending on what your needs are. The wireless signal will come from your own router after bypassing the Starlink one, and you can also plug all your devices into your own router directly if you want. Usually, aftermarket routers have at least 2 additional LAN ports to use if you don’t want your devices on the wireless network.
Thanks!!
I used the ethernet adapter from starlink- ethernet cable to a master bridge- to a slave bridge, ethernet cable to a router in my garage 300 ft away. Works great but when I have internet in the garage, I have no internet in the house. When I unplug the ethernet cable from the starlink adapter, I have no internet in the garage but have internet in he house. How do I fix this, so I have internet in the garage and house at the same time??
Hi, your blog and the video tutorial was helpful. I tried the procedure by connecting Starlink with a secondary router Asus RT N65U through Starlink ethernet adapter and enabling bypass mode. And I performed your procedure four times but I am still facing double NAT problem. I am getting the following message:
“IP conflict detected. Click Next to get a new IP address.”
“Router’s updated IP address: 192.168.2.1″
And the starlink wifi don’t go away.
Do you think the skylink router is faulty? Or should I keep trying more?
Thanks
If enabling bypass mode isn’t disabling the Starlink router Wifi, it sounds like a problem with either the router, or perhaps your account/app. I would recommend doing a factory reset of the router and trying again. If it still doesn’t work, contact support.
I purchased the Yaosheng Dishy Cable Adapter that eliminates the need to hack a Starlink Ethernet Adapter, via Amazon. Took three weeks to arrive. Removed my hacked Starlink Adapter. The Yaosheng adapter works. I have noticed a decrease in performance. I need to go back and try the Starlink adapter to test if its the Yaosheng
I used everything else the same. I am using a Tycon POE injector, and 110V-48V 144W AC-DC power supply vice a buck converter. I have Starlink connected to a Google Nest WiFi Pro 6e 3 node mesh. Peak with the Yaosheng is around 50 mps. A few weeks ago with the Starlink adapter it was 140-150. Not sure if Yaosheng is cause yet, but easy to switch back. Starlink is a backup ISP, so not a must do test to check speed.
Good to know that it works, let us know if it was the Yaosheng causing the speed issue.
I’m already using a second router (double NAT) without issues. What would happen if I entered bypass mode and then later on simply switched off bypass mode without resetting anything and just rebooting? Also, doesn’t bypass mode have to be off in order for my dishy to receive updates?
Bypass mode doesn’t affect firmware updates. The actual firmware and internet modem are contained in the dish itself. The only way to turn off bypass mode is to factory reset the router, so you would have to be at the physical router in order to power cycle it 6 times.
are you using both the Starlink wifi router and a third party router simultaneously?
Why do I ask? I am in the process of moving into a new home build. Hoping to us both the Starlink router and a third party router connected via ethernet to the ethernet adapter. Still good 8 months out from moving in.
I’m using both simultaneously and usually getting 150+ Mbps down. Ten times better than the Verizon LTE that I had beforehand. Not having any issues one-year on but will try bypass mode to see if my speeds increase.
This doesn’t work for me. No mater what router I use or switch when I enter bypass mode the eithernet adaptor also stops. It works great when not in bypass mode and I can have wifi 6 from the 3rd party one but still sucks I can’t turn off or hide the SL wifi.
I would put in a support ticket with Starlink. Sounds like a faulty router to me.
These routers are failing constantly lately. I would recommend bypassing them off the start. They can’t manage a multitude of devices. I can’t believe how poor the quality is of this device. Initially it seemed to work ok but as they have pushed these software updates it seems the device is struggling to assign dynamic ips. Especially when power outages occur. Noah what is your opinion of this I ve been building p2p bridges off this router and the results are not good….
I mainly use the Gen 1 router and round dish. I’ve used the Gen 2 router mainly in brief testing so I can’t really comment about the firmware updates. In my Roam kit, I bypassed the router completely with the DC conversion. It looks like they are getting ready to introduce a better router for the Gen 3 hardware coming in the future.
Hi Noah.
I do have same issue.
Tried three different 3d party routers, two replacement ethernet adapter and replacement SL router with no luck. If WIFI on SL router “ON” – ethernet adapter has got internet, as soon I put SL router in “Bridge mode’ – no internet from ethernet adapter.
Best Regards.
Alex.
That’s very odd. I’m not sure what to recommend if you have replaced everything already. Bypass mode on the Starlink router shouldn’t disable the Ethernet Adapter (Starlink created bypass mode specifically for use with the Ethernet Adapter and 3rd party routers). Has Starlink commented on the situation with any recommendations since you have replaced everything?
Can you get into the bypass mode from any other way but the Website. We are locked out of the Website
Connect your ethernet cable directly from your computer to the starlink ethernet brick and go to either http://dishy.starlink.com or http://192.168.100.1 from a web browser. There is no login since its a local path (not to the internet, just to the starlink). Most routers will use 192.168.0.1 so it will block you from getting to the starlink that way. If so, just use http://dishy.starlink.com.