

If you like to take road trips like I do, you’ve probably been in many situations where cell service isn’t available, sometimes for hours. In remote areas of the United States, even if you have cell service, usually it’s only good for calls or texts. Mostly, I just want internet for music and podcasts. But internet access also allows me to communicate with friends, family, and emergency services if needed.
Starlink offers a great solution for staying connected in remote areas, even on the road. Did you know Starlink dishes work while driving? Yep, even at 80 mph, a Starlink dish can maintain a connection to the Starlink satellite network. It’s incredible technology when you really think about it. With a simple Starlink kit, you have access to high speed internet, virtually anywhere on Earth.
In this post, I’m going to detail my own Starlink vehicle setup. I’ll share the products I used, my vehicle mounting method, and explain how in-motion data works.
Table of Contents
Requirements and goals
Mounting a Starlink dish to a vehicle is nothing new. People have been doing it for years. But I had a specific set of requirements for my own setup.
- I didn’t want to permanently mount or install anything, including the dish or power supply. I wanted to be able to easily remove all the equipment.
- I decided I didn’t want to mess with a DC power supply. I didn’t want to make any changes to the Starlink equipment, everything had to be plug and play.
- Nothing was to be mounted externally. Usually, people mount the dish on their vehicle roof, because that provides the best signal. I didn’t want a dish on my roof, mainly because it creates aerodynamic drag and doesn’t look good on a car. It looks fine on an RV or overlanding rig, but not on a Tesla.
My goal was to get high speed internet and Wifi for road trips in remote areas of the country. My Tesla Model Y can connect to Wifi for navigation, music streaming, etc. I would also be connecting several phones, tablets, and a laptop to the Starlink Wifi network.
I don’t need 100% reliable internet in a moving vehicle. With the requirements I had, it wasn’t going to happen. Mounting the dish inside would mean reduced performance and reliability, and I accepted that. I was mainly concerned about navigation, music streaming, and being able to quickly Google nearby attractions and things to do. None of those activities require a completely stable Starlink connection. A few outages a minute wouldn’t even be noticeable for the most part.
Products used
Keep in mind, I’m writing about my own setup in my Tesla Model Y. Different vehicles might require different gear. If you are going to replicate this setup, just be prepared to make adjustments. I’m posting this to document my own project, but I know it will be useful as inspiration for others. Here is what I used for my Starlink vehicle setup:
- Starlink Standard (Gen 3) hardware kit – I chose the Gen 3 Standard dish because it can lay flat without modification. It also has a higher field of view compared to Gen 2. The Wifi router is also much better. I paired my Standard dish with the Mobile (Roam) service plan.
- 300W pure sine wave inverter – I didn’t want to mess with a DC power supply, so I just bought a pure sine wave inverter that plugs into a 12V car outlet. The inverter changes the DC power from the vehicle battery to 120V AC power, allowing you to plug in equipment like you would at home. Having a pure sine wave inverter is important for running Starlink.
- Bungee cords – I didn’t want to permanently mount the dish to my vehicle, so I picked up an assortment of bungee cords to secure it in place inside the vehicle.
Mounting location for the dish
The main challenge of this project was finding a good place for the Gen 3 Standard dish. In my requirements, I said I didn’t want to mount the dish in the optimal location, which is on top of the car. How in the heck was I expecting to use Starlink, if I wasn’t willing to mount it on the vehicle?!
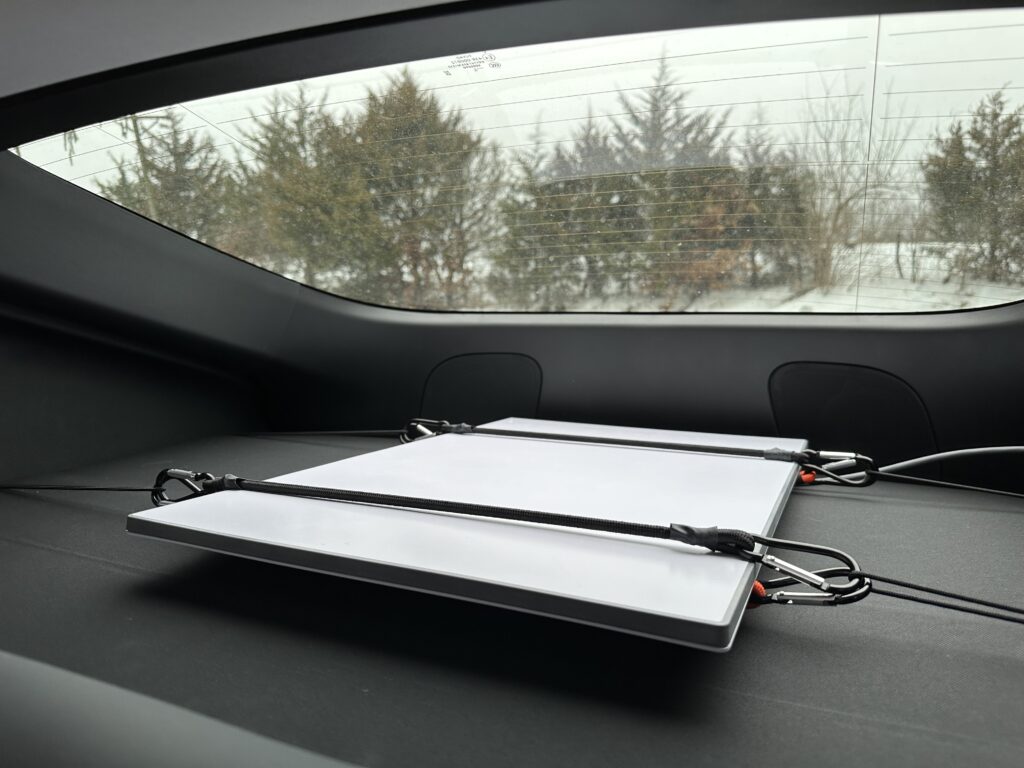
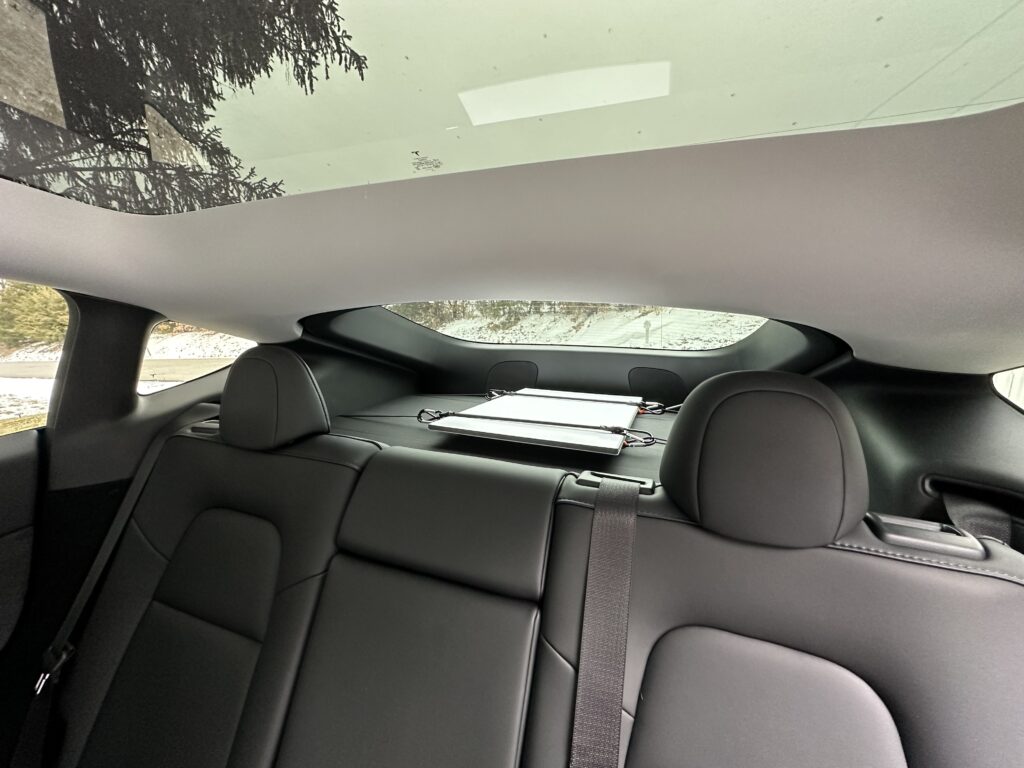
Fortunately, Starlink dishes will still work through glass, fiberglass, and other materials. My design involved placing the dish flat on the cargo cover shelf in the back hatch, directly under the large rear window. The window provides enough visibility for the dish to maintain a relatively stable connection.
If you have a hatchback or sedan, this mounting method might work great for you too. The Tesla Model Y is specifically compatible with this mounting method, thanks to the sturdy cargo cover, and rear 12V outlet. I was able to use some bungee cords to secure the dish flat against the cargo cover.
Powering the Starlink system
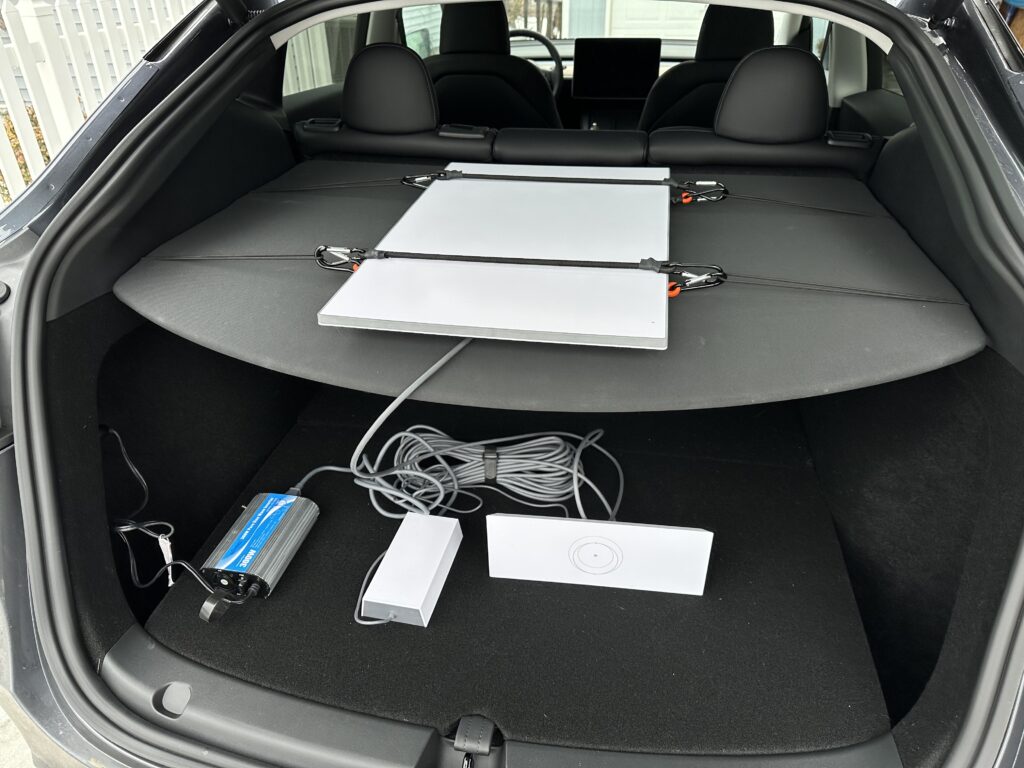
The Tesla Model Y has a 12V outlet right in the back hatch area, so powering the dish and Wifi router was very easy. The 300W inverter I purchased has a car adapter plug. I plugged it in to the 12V outlet, and plugged the Starlink Gen 3 power supply into one of the outlets on the inverter.

My Tesla has convenient storage pockets on either side of the hatch, so I was able to place the inverter, power supply, router, and excess cable neatly out of the way. The inverter has a fan and requires good ventilation, so I made sure nothing was obstructing the vents.
Using Starlink in-motion
It’s important to understand the requirements for using a Starlink dish in-motion. Starlink only sells one model that is approved for in-motion use, the Flat High Performance dish. Using any other Starlink model in-motion could void your warranty if anything is damaged.
Warranty issues aside, the Gen 3 Standard dish does work in-motion. You just need to make sure you have either the Mobile Priority service plan, or have the Mobile (Roam) service plan with Mobile Priority data toggled on. Since I only use the dish in-motion when required, I keep a regular Roam subscription, and just toggle Mobile Priority data on and off as necessary. When you opt-in to Mobile Priority data on the Roam plan, you pay for each GB of data you use, in addition to your regular monthly subscription fee.
If you try to use a Starlink dish above 10 mph, and you aren’t using Mobile Priority data, it will disconnect from the satellites and give you an error message in the app. You might be asking, how do I opt-in to Mobile Priority data if I lose cell service? To get around that issue, I toggle it on before leaving on my trip, and just keep the Starlink dish powered off until I need it. That way, in-motion is always enabled, but I’m not paying for expensive data while the dish is powered off.
First test and my impressions
After I hooked everything up, I sat in my driveway for a few minutes to make sure the dish would actually connect to the satellites. Once a connection was established, I ran a speed test. I was able to get 90 Mbps just sitting in my driveway, with the dish inside the car! Confident it would work while moving, I ran an errand about 10 miles away to test out the setup. I configured my Tesla to use the Starlink Wifi network for music streaming and navigation during the short trip.
During my initial test, I had a passenger monitor the Starlink connection statistics in the app. Occasionally, they would run a speed test. To my surprise, the setup was surprisingly reliable and consistent. I had a few drops per minute, mainly because the glass and roof block the view of a lot of the sky. But even with the occasional drops, music streaming and navigation worked flawlessly through the Starlink connection. I did a mix of driving, from stop and go city, up to about 80 mph on the freeway. The connection worked great for the entire drive. Most of the speed tests delivered download speeds above 50 Mbps, often going over 100 Mbps.
Final thoughts
In my limited testing, I found that the Gen 3 Standard dish worked great, even through the rear glass of my Tesla Model Y. I was honestly expecting more obstructions and outages due to the mounting location, but it was surprisingly stable enough for music streaming and web browsing.
Based on my initial testing, I’ll be using this exact setup for future road trips in the spring and summer. The great thing about my setup is that the cargo area remains usable, because the dish sits on the cargo cover, out of the way. The router and power supply are also tucked out of sight. It’s almost as if Starlink was built into the car, with how seamless everything came together.
I’ll be sure to post an update when I have the chance to put this setup through its paces on a real road trip. For now, I’d love to hear your feedback. I would also enjoy hearing about your own Starlink vehicle project or ideas.
What voltage does your Model Y have? Is it newer with the lithium battery at 16v or older 12v lead acid low voltage battery?
16V. I did a bit of research in the Tesla forums to find this specific inverter, where people reported success with the 16V battery.
Good read! Did you try to power starlink dish V3 directly from 12V/48V?
No, I haven’t worked on a DC power supply. I saw another project on Reddit where someone found there is very little power savings by going DC for Gen 3. I probably won’t go that route, as the inverter is cheaper and easier.