
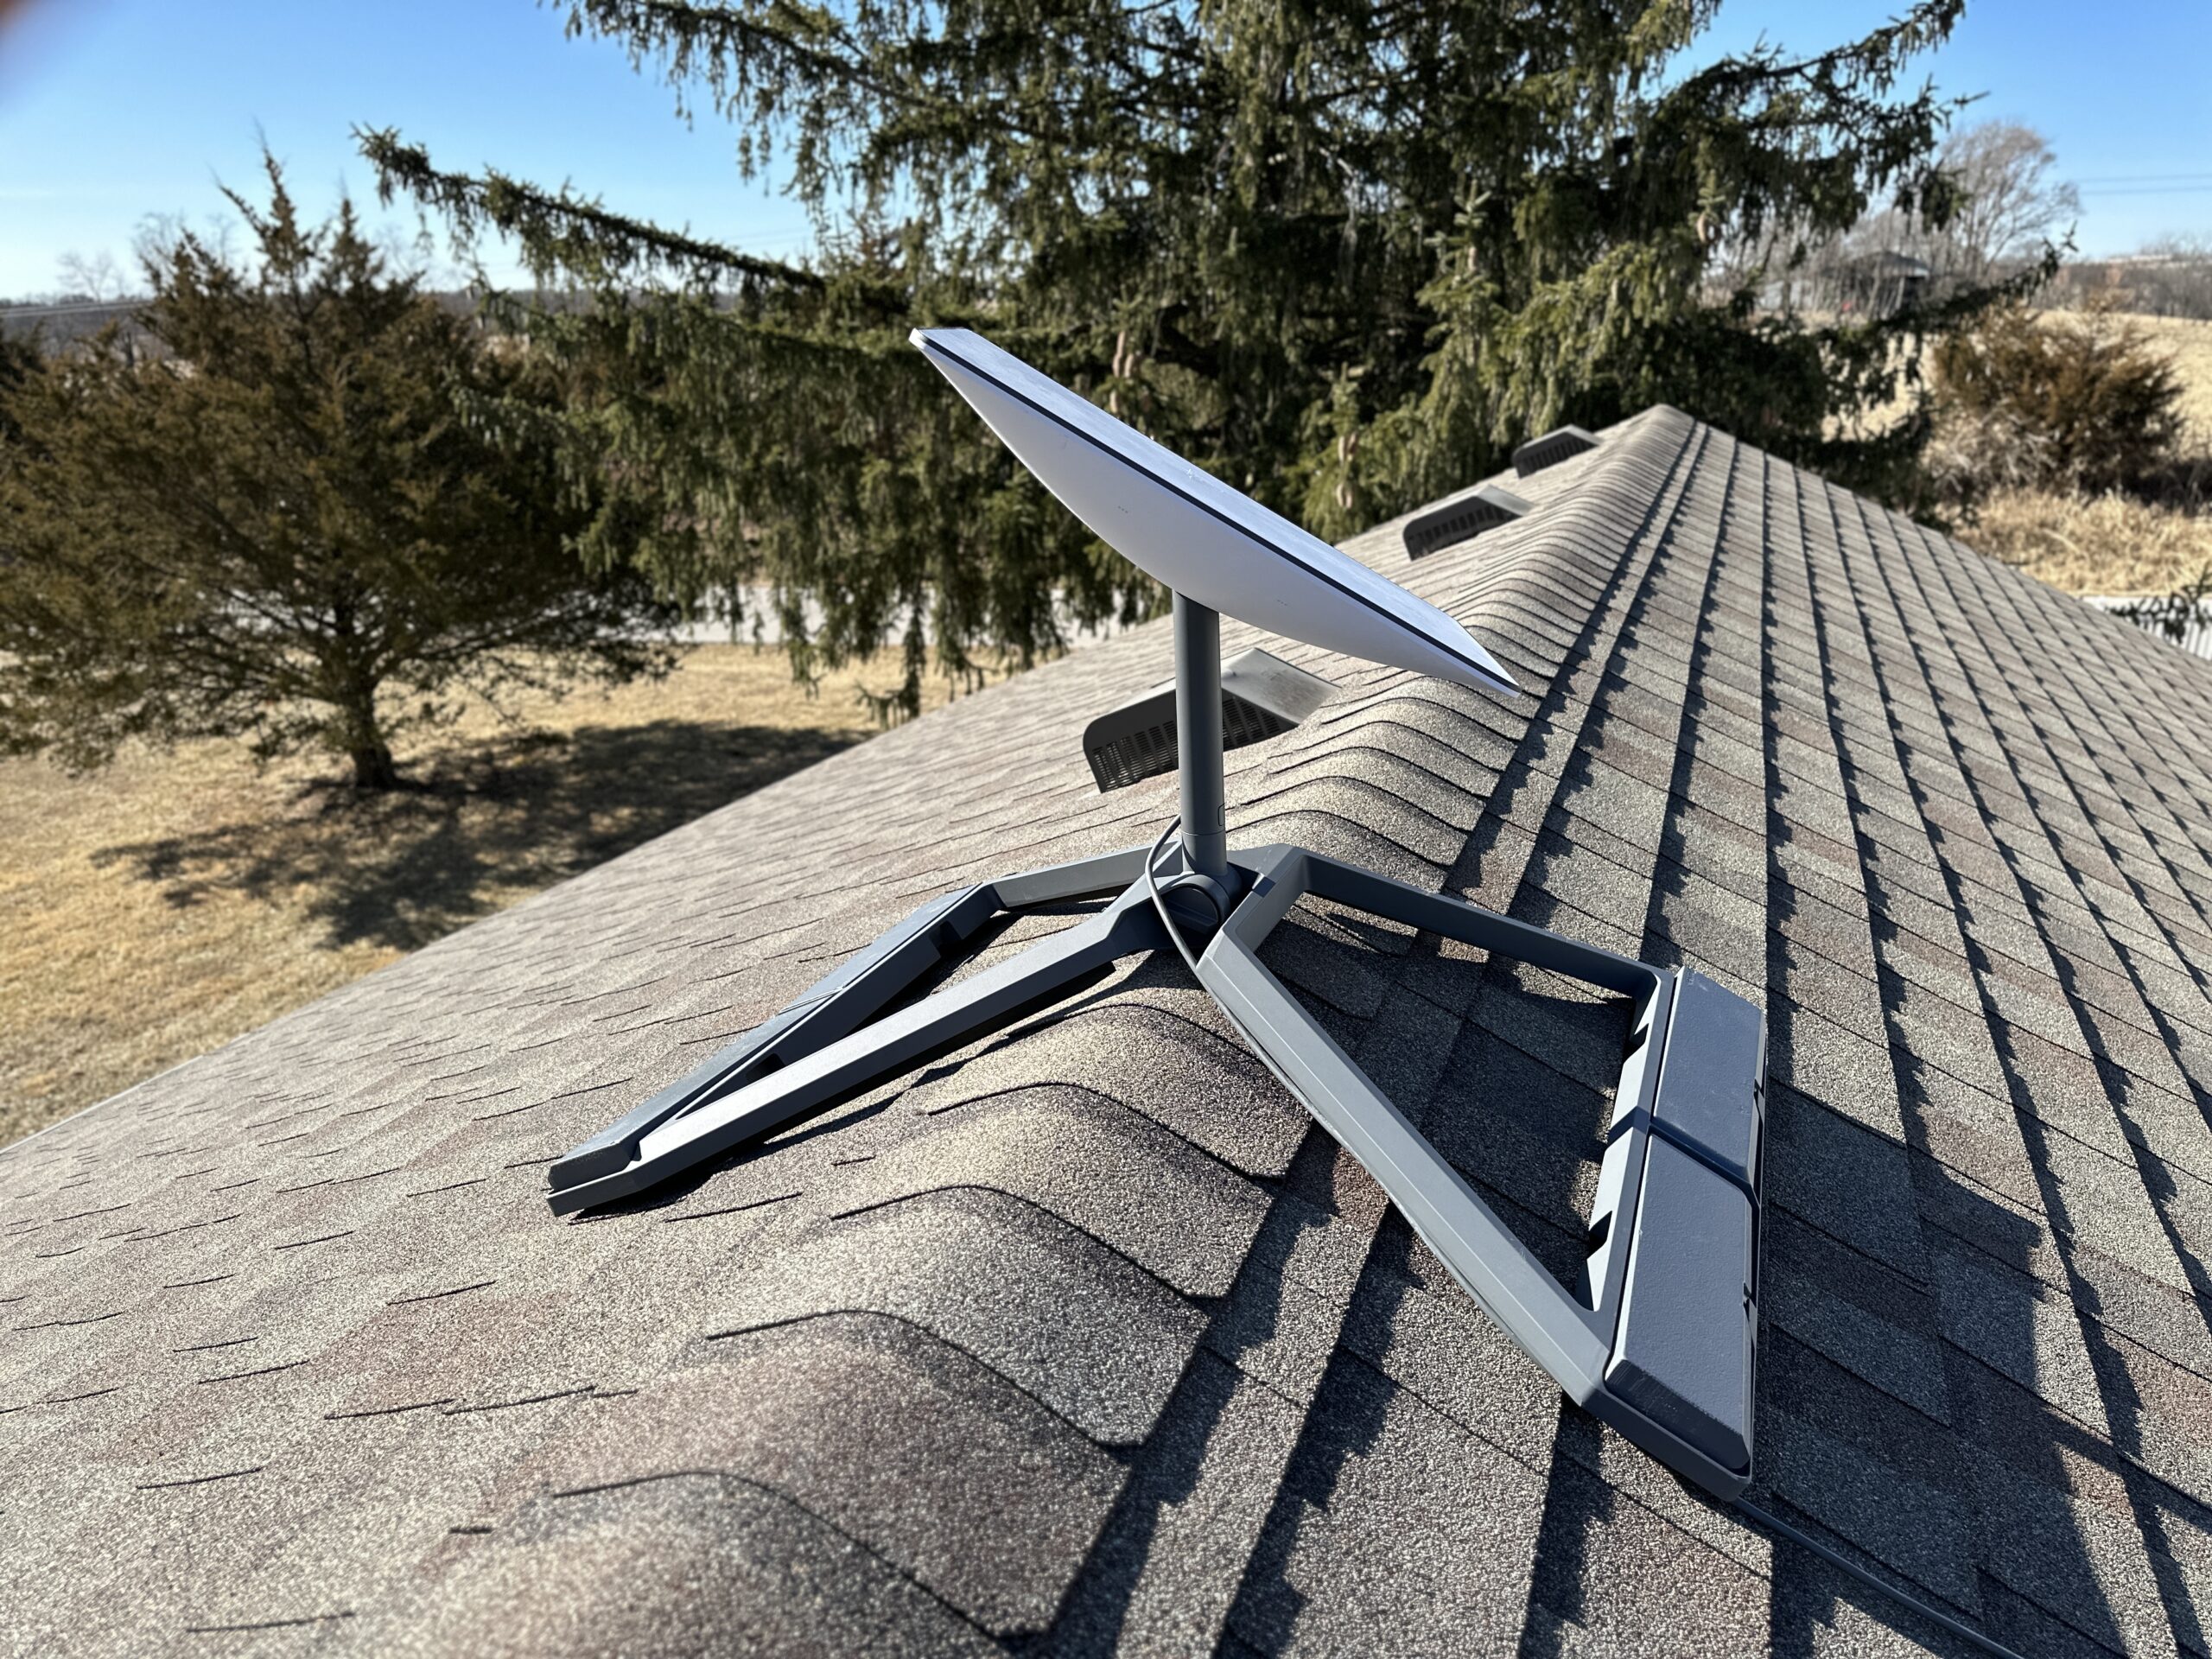
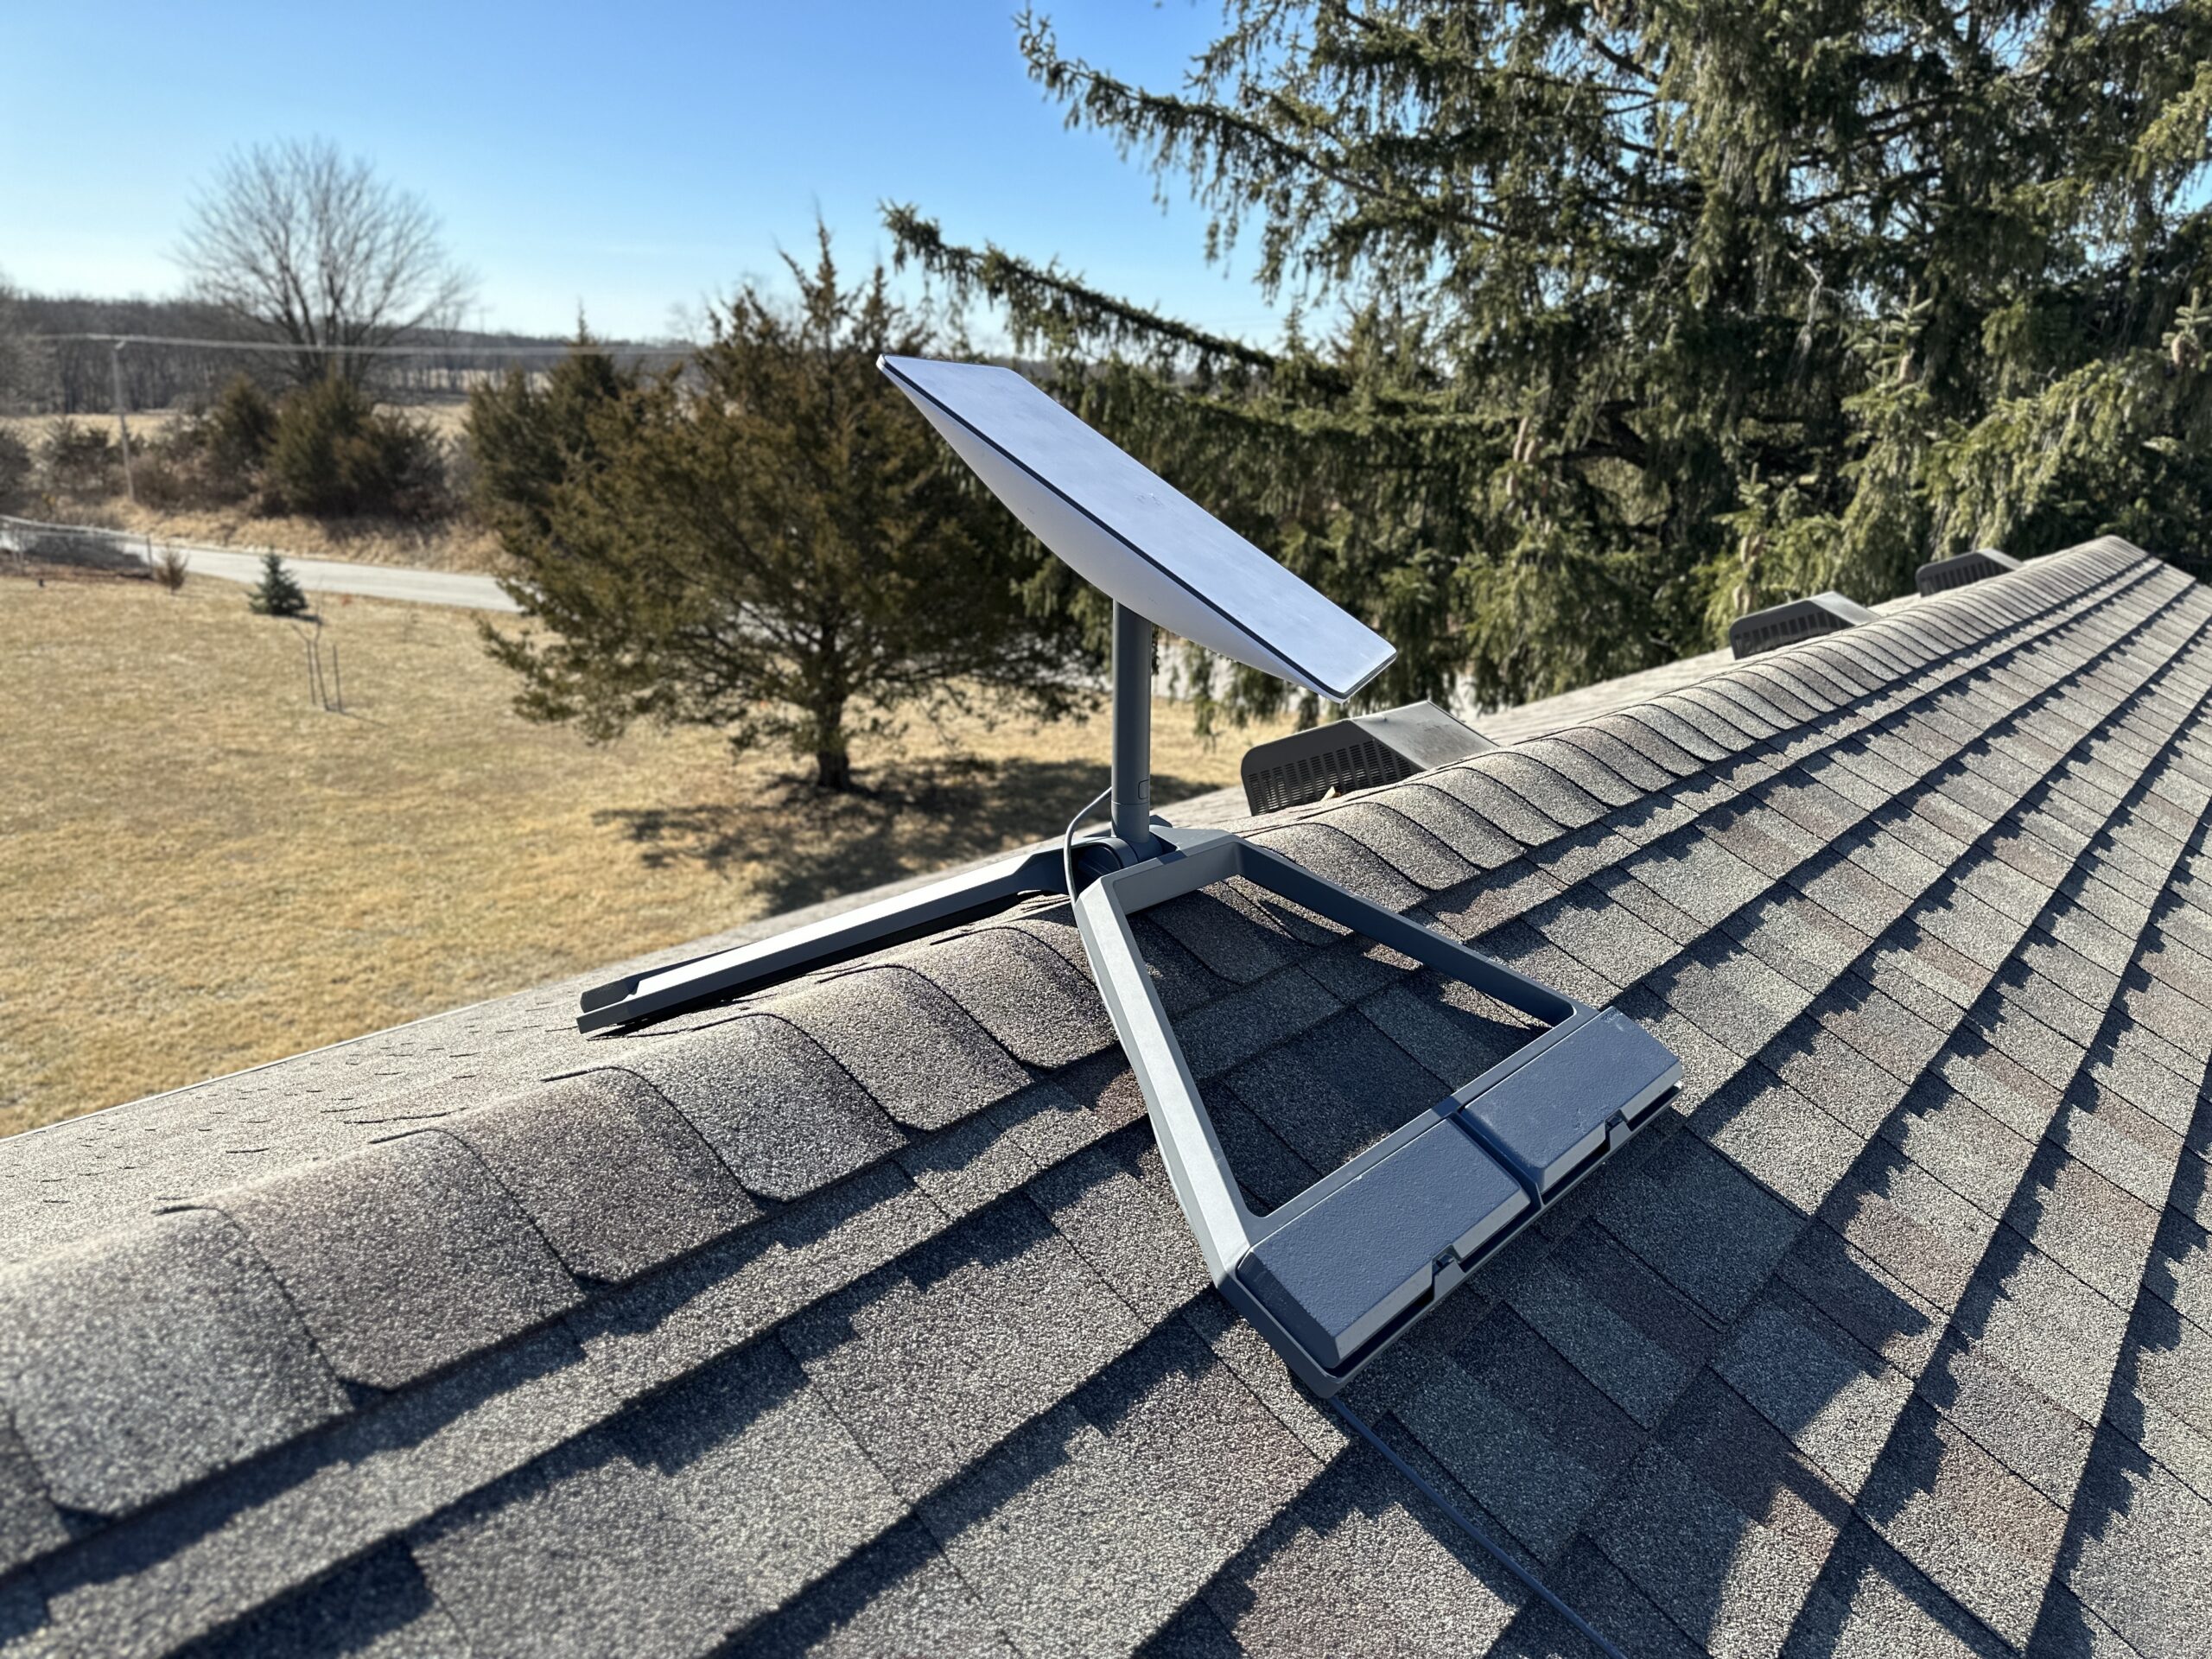
The Starlink Ridgeline Mount Kit is a non-penetrating roof mount that is designed to work with virtually any roof style, pitched or flat. On a pitched roof, you simply install it at the ridgeline. The base adjusts to almost any angle. It can also be configured to sit on a flat roof. No drilling required! Ballast weights hold the mount to the roof.
I’m pretty excited to take a look at this new mount. I have a Residential Starlink and an RV Starlink dish. I like to keep my RV dish powered on so the firmware can stay up-to-date. The Starlink Ridgeline Mount will allow me to install my RV unit on my garage roof, without worrying about drilling holes. And I will be able to move the mount around in the future if I need to.
In this article, I will show you how to set up and install the Ridgeline Mount. I will also do a review, giving you my impressions on the quality and functionality of the mount. I’ve also included a video covering the installation process.
Table of Contents
Installation Video
Note: Some ad blockers will block our video player. If you don’t see the video, try disabling your ad blocker, and then reload the page.
Where To Buy
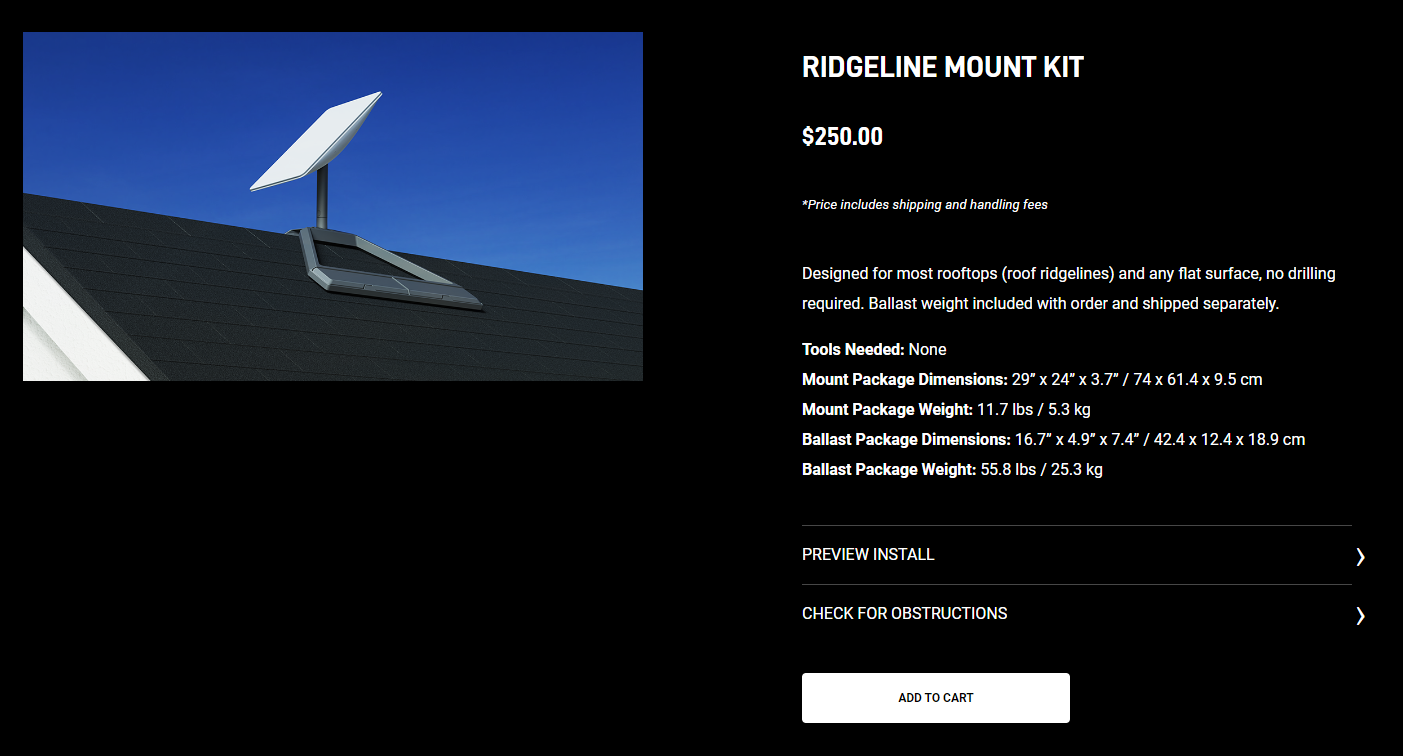
The Ridgeline Mount Kit is available directly from Starlink for $250. You will need a Starlink account to be able to view the linked page and purchase the mount.
Kit Contents
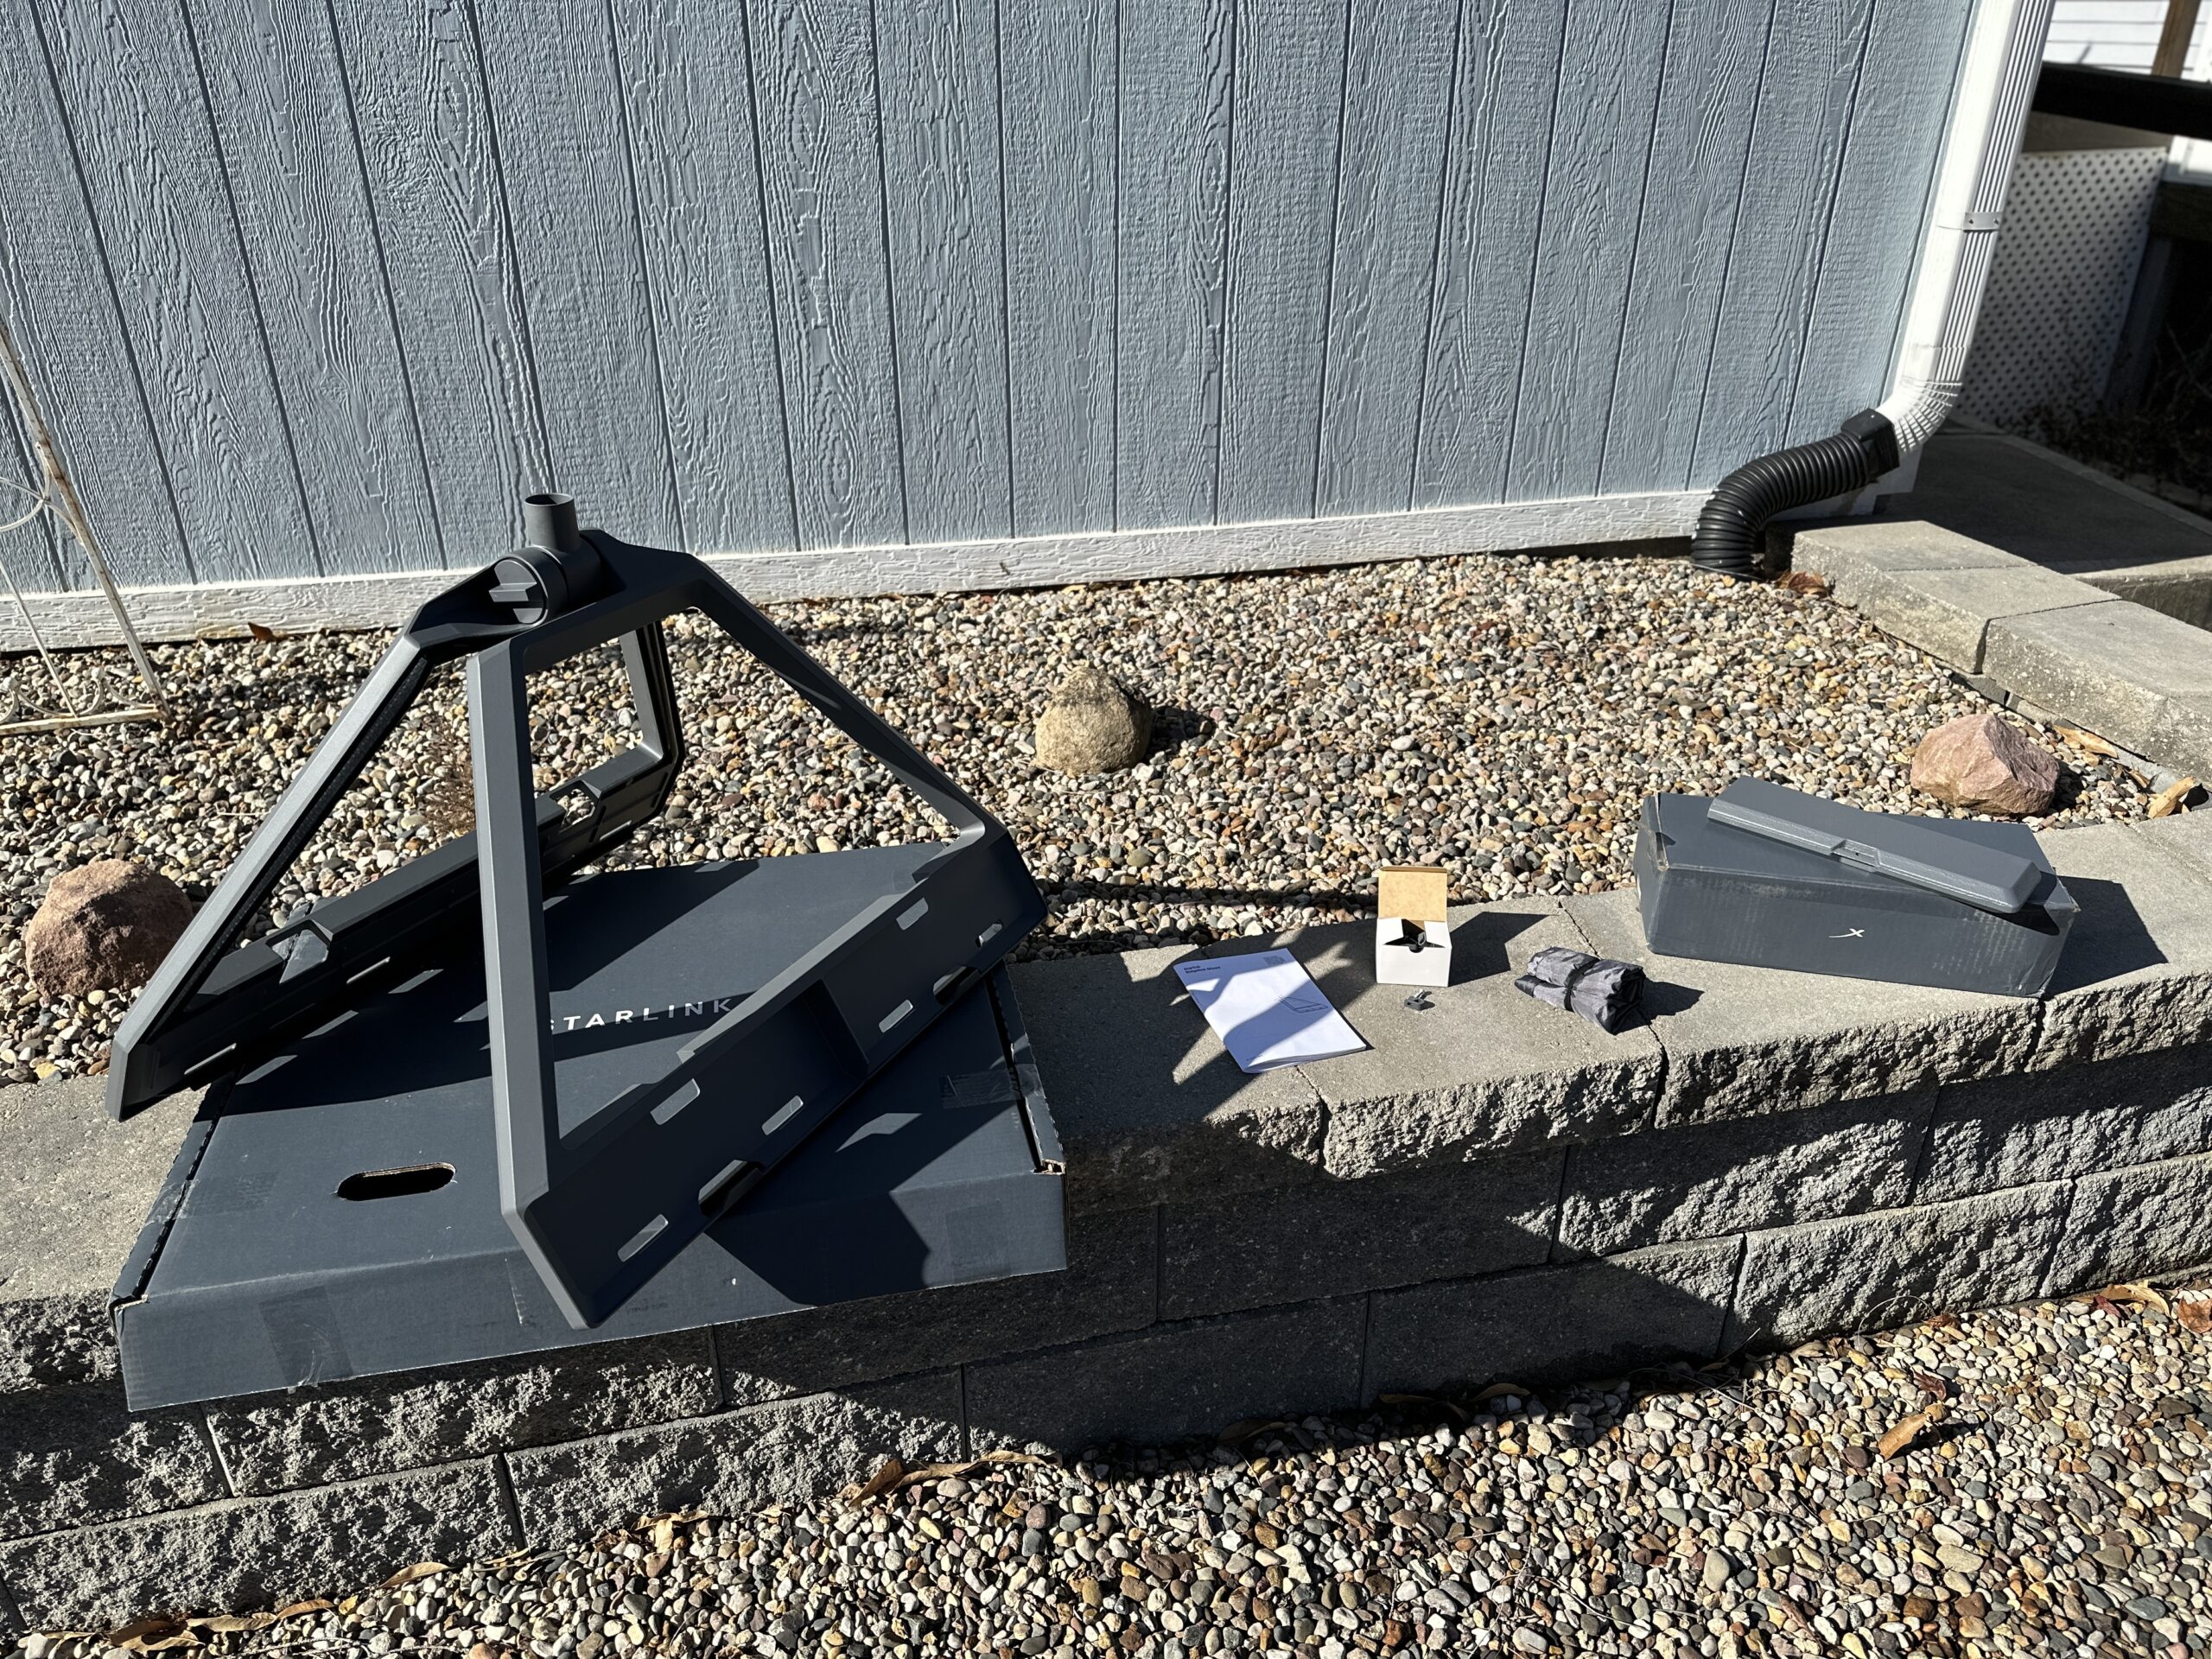
The Starlink Ridgeline Mount Kit is pretty simple and contains 4 pieces:
- Mounting base
- Wall clips
- Carry bag
- Weights
The ballast weights ship separately, so if you get your Ridgeline Mount and don’t see any weights in the box, that is why! In my case, the weights shipped a week later than the mount.
Installation
I’m going to assume you already have your Starlink unit set up and running. If not, check out our Starlink setup guide to get started. Once you have found a suitable location that is free of obstructions, you can start the process to install the Ridgeline Mount Kit.
Step 1 – Unplug the router
Unplug the router AC power cord to power down your Starlink dish. This allows you to safely unplug the Starlink cable so that you can install the dish on the new mount.
Step 2 – Carry the Ridgeline Mount to the roof
The Ridgeline Mount comes folded up, ready to transport. Don’t add the weights yet! Keep it folded and carry it up to the desired location on your roof. Also, the carry bag included in the kit is for the dish, not for the mount.
Step 3 – Unfold the mount
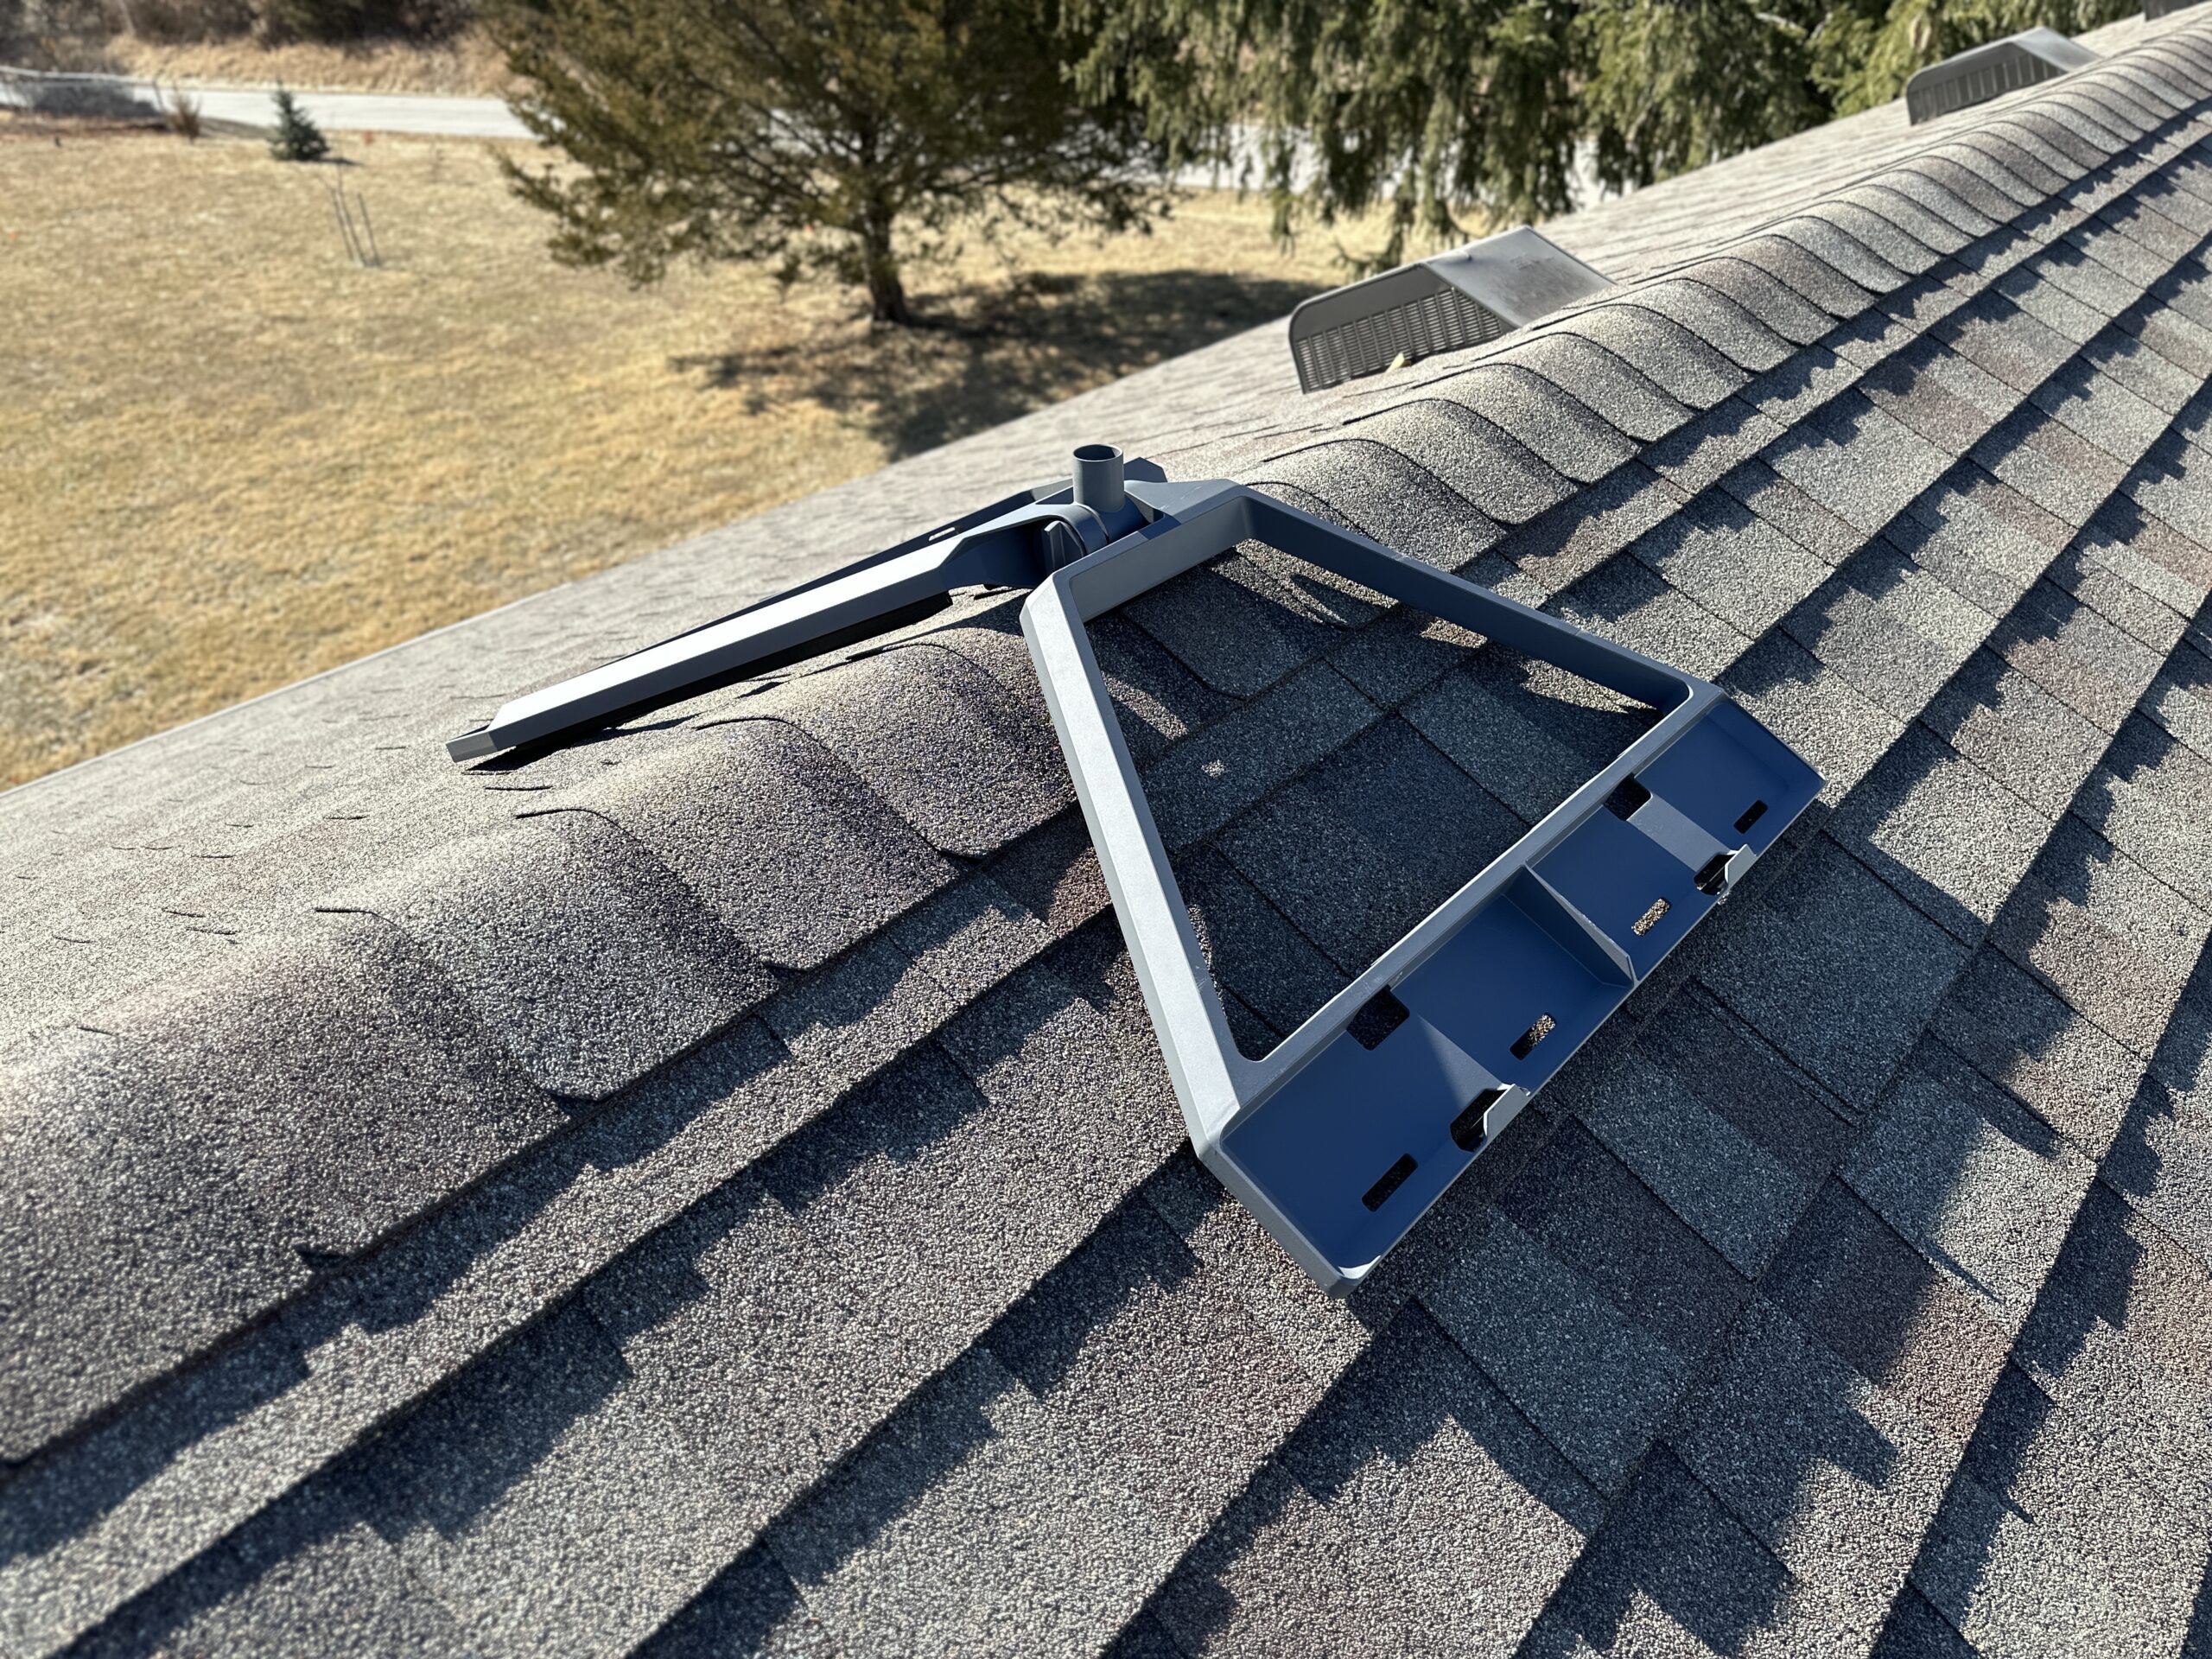
Rotate the center arm knob counterclockwise to loosen the mount. Unfold the trays and install it on the roof, making sure each side tray is flush up against the roof. The Ridgeline Mount can be installed at the peak of a roof, or anywhere on a flat roof.
Step 4 – Align the mounting arm
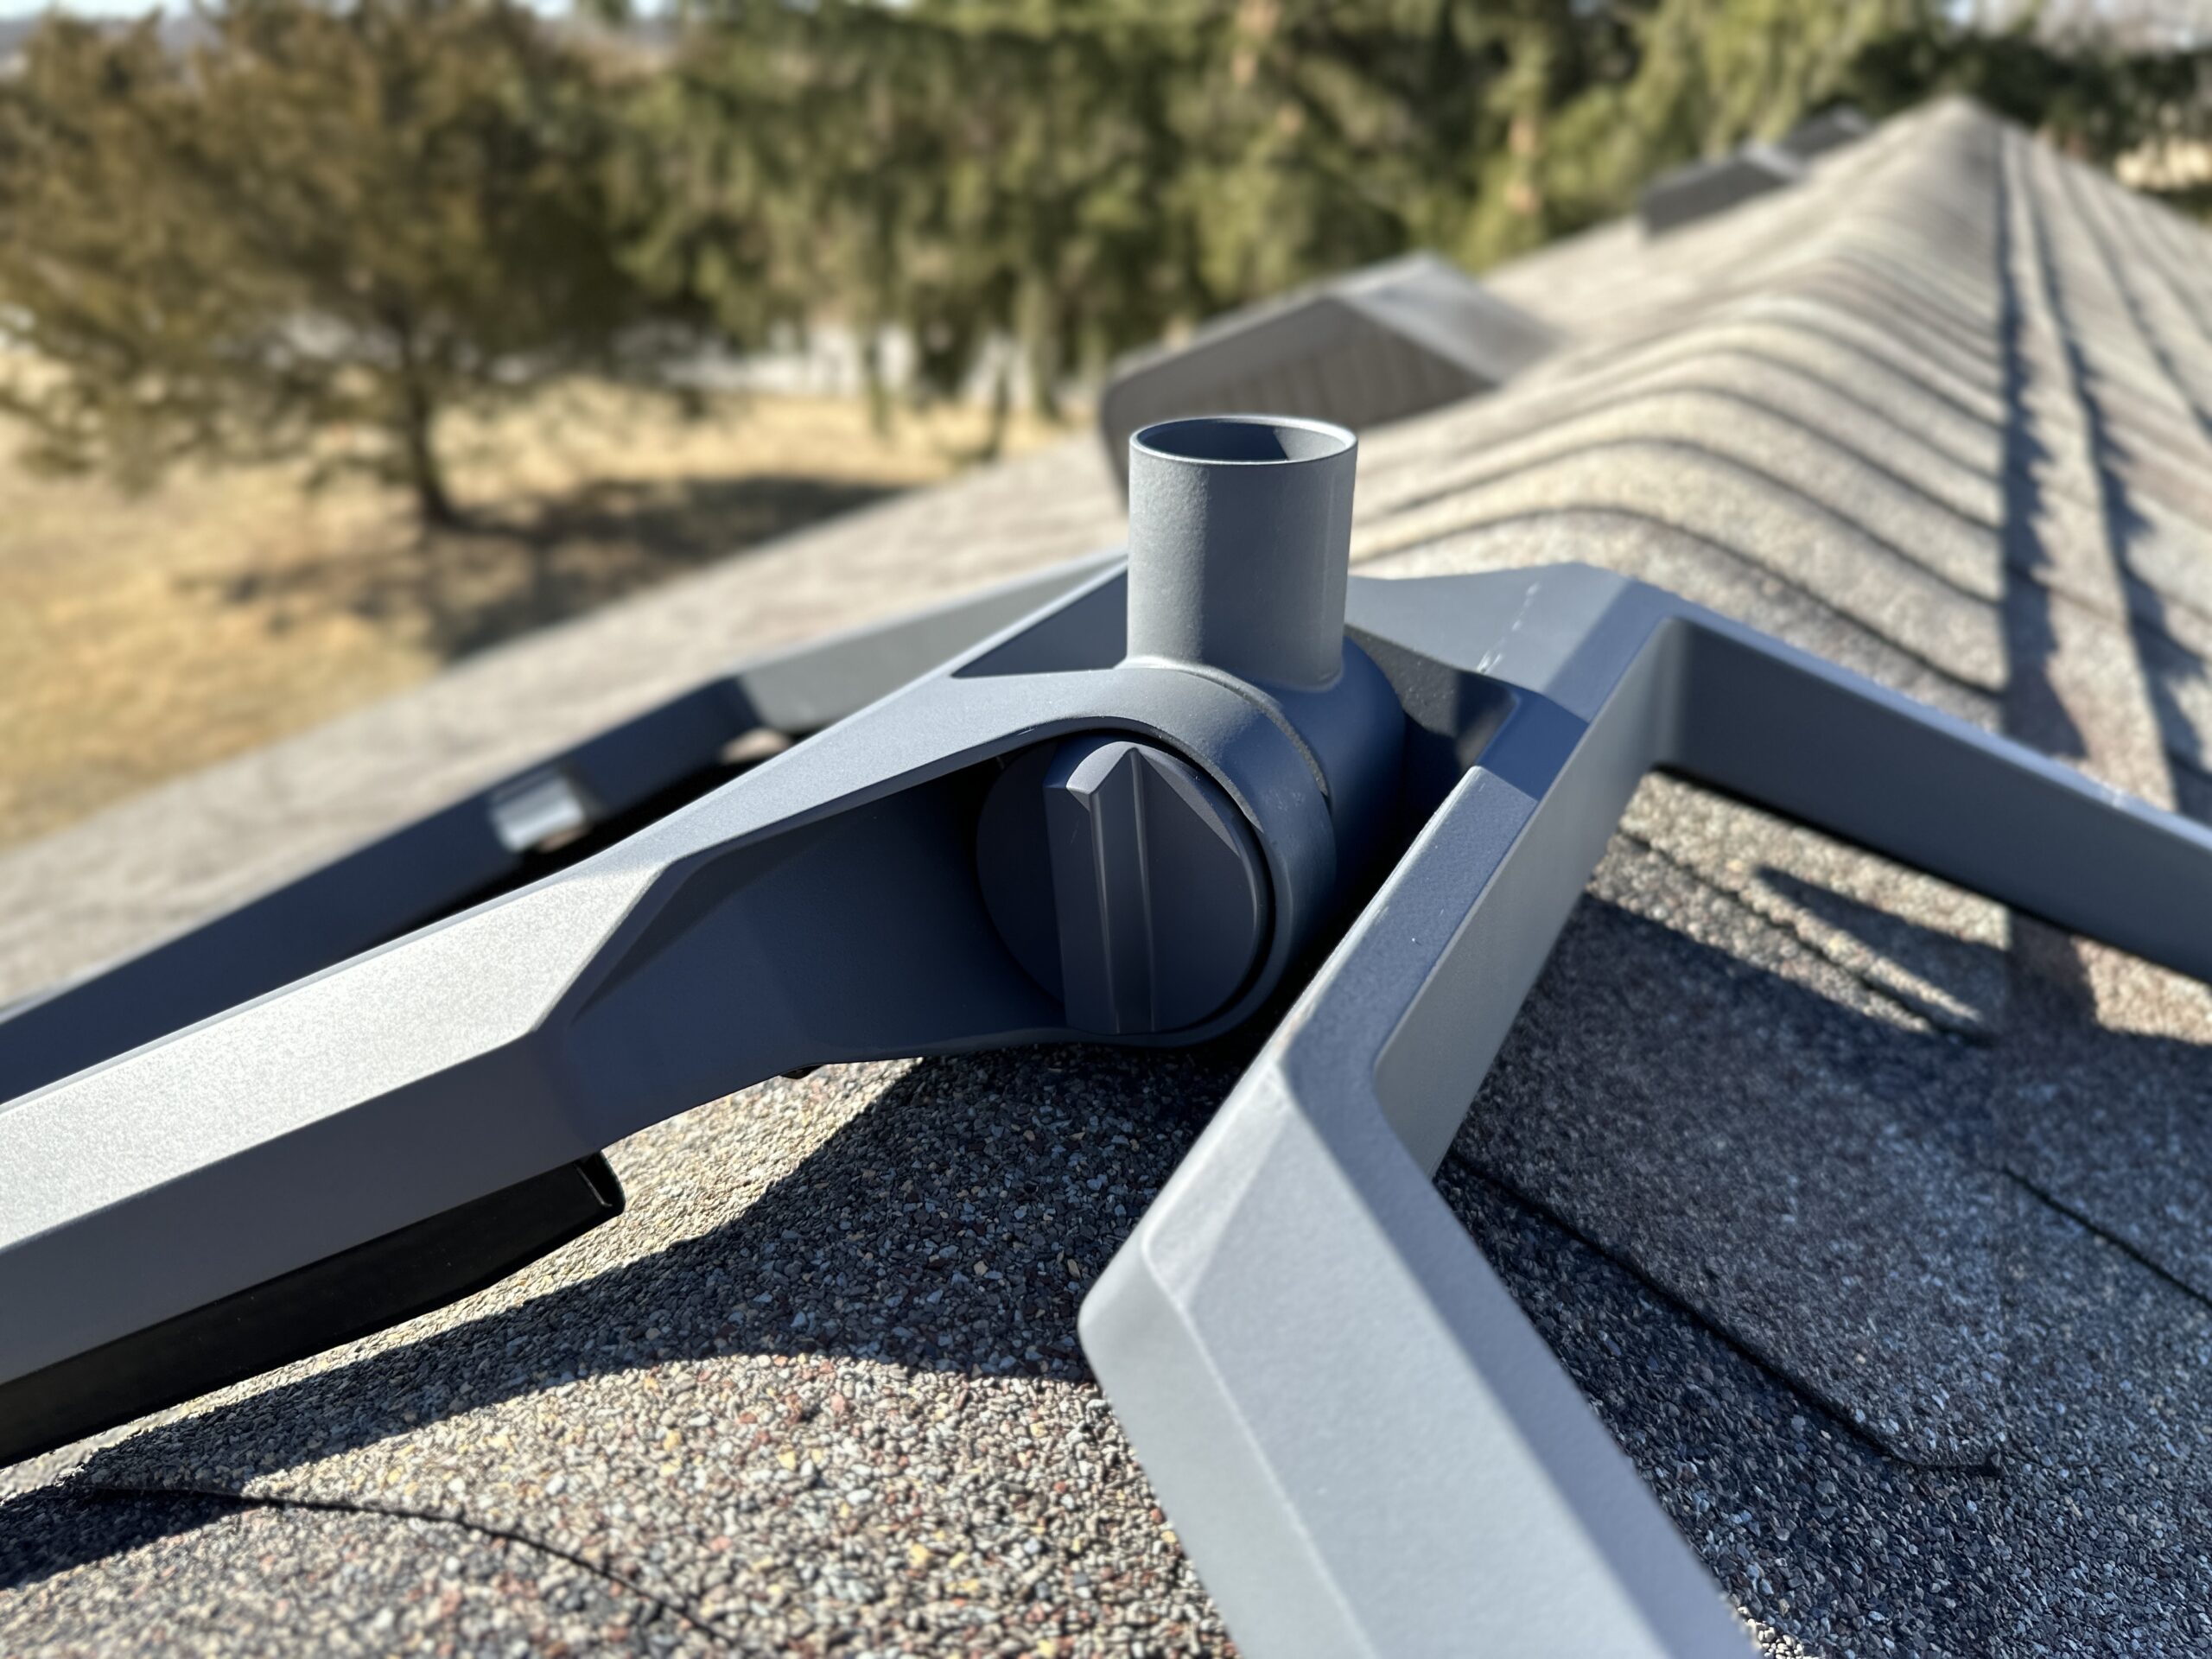
The center mounting arm, where you will insert the Starlink dish mast, needs to be angled within 5 degrees of vertical. With the center arm knob still loosened, orient the mounting arm to vertical. Then rotate the center arm knob clockwise to tighten everything up.
Step 5 – Install the ballast weights
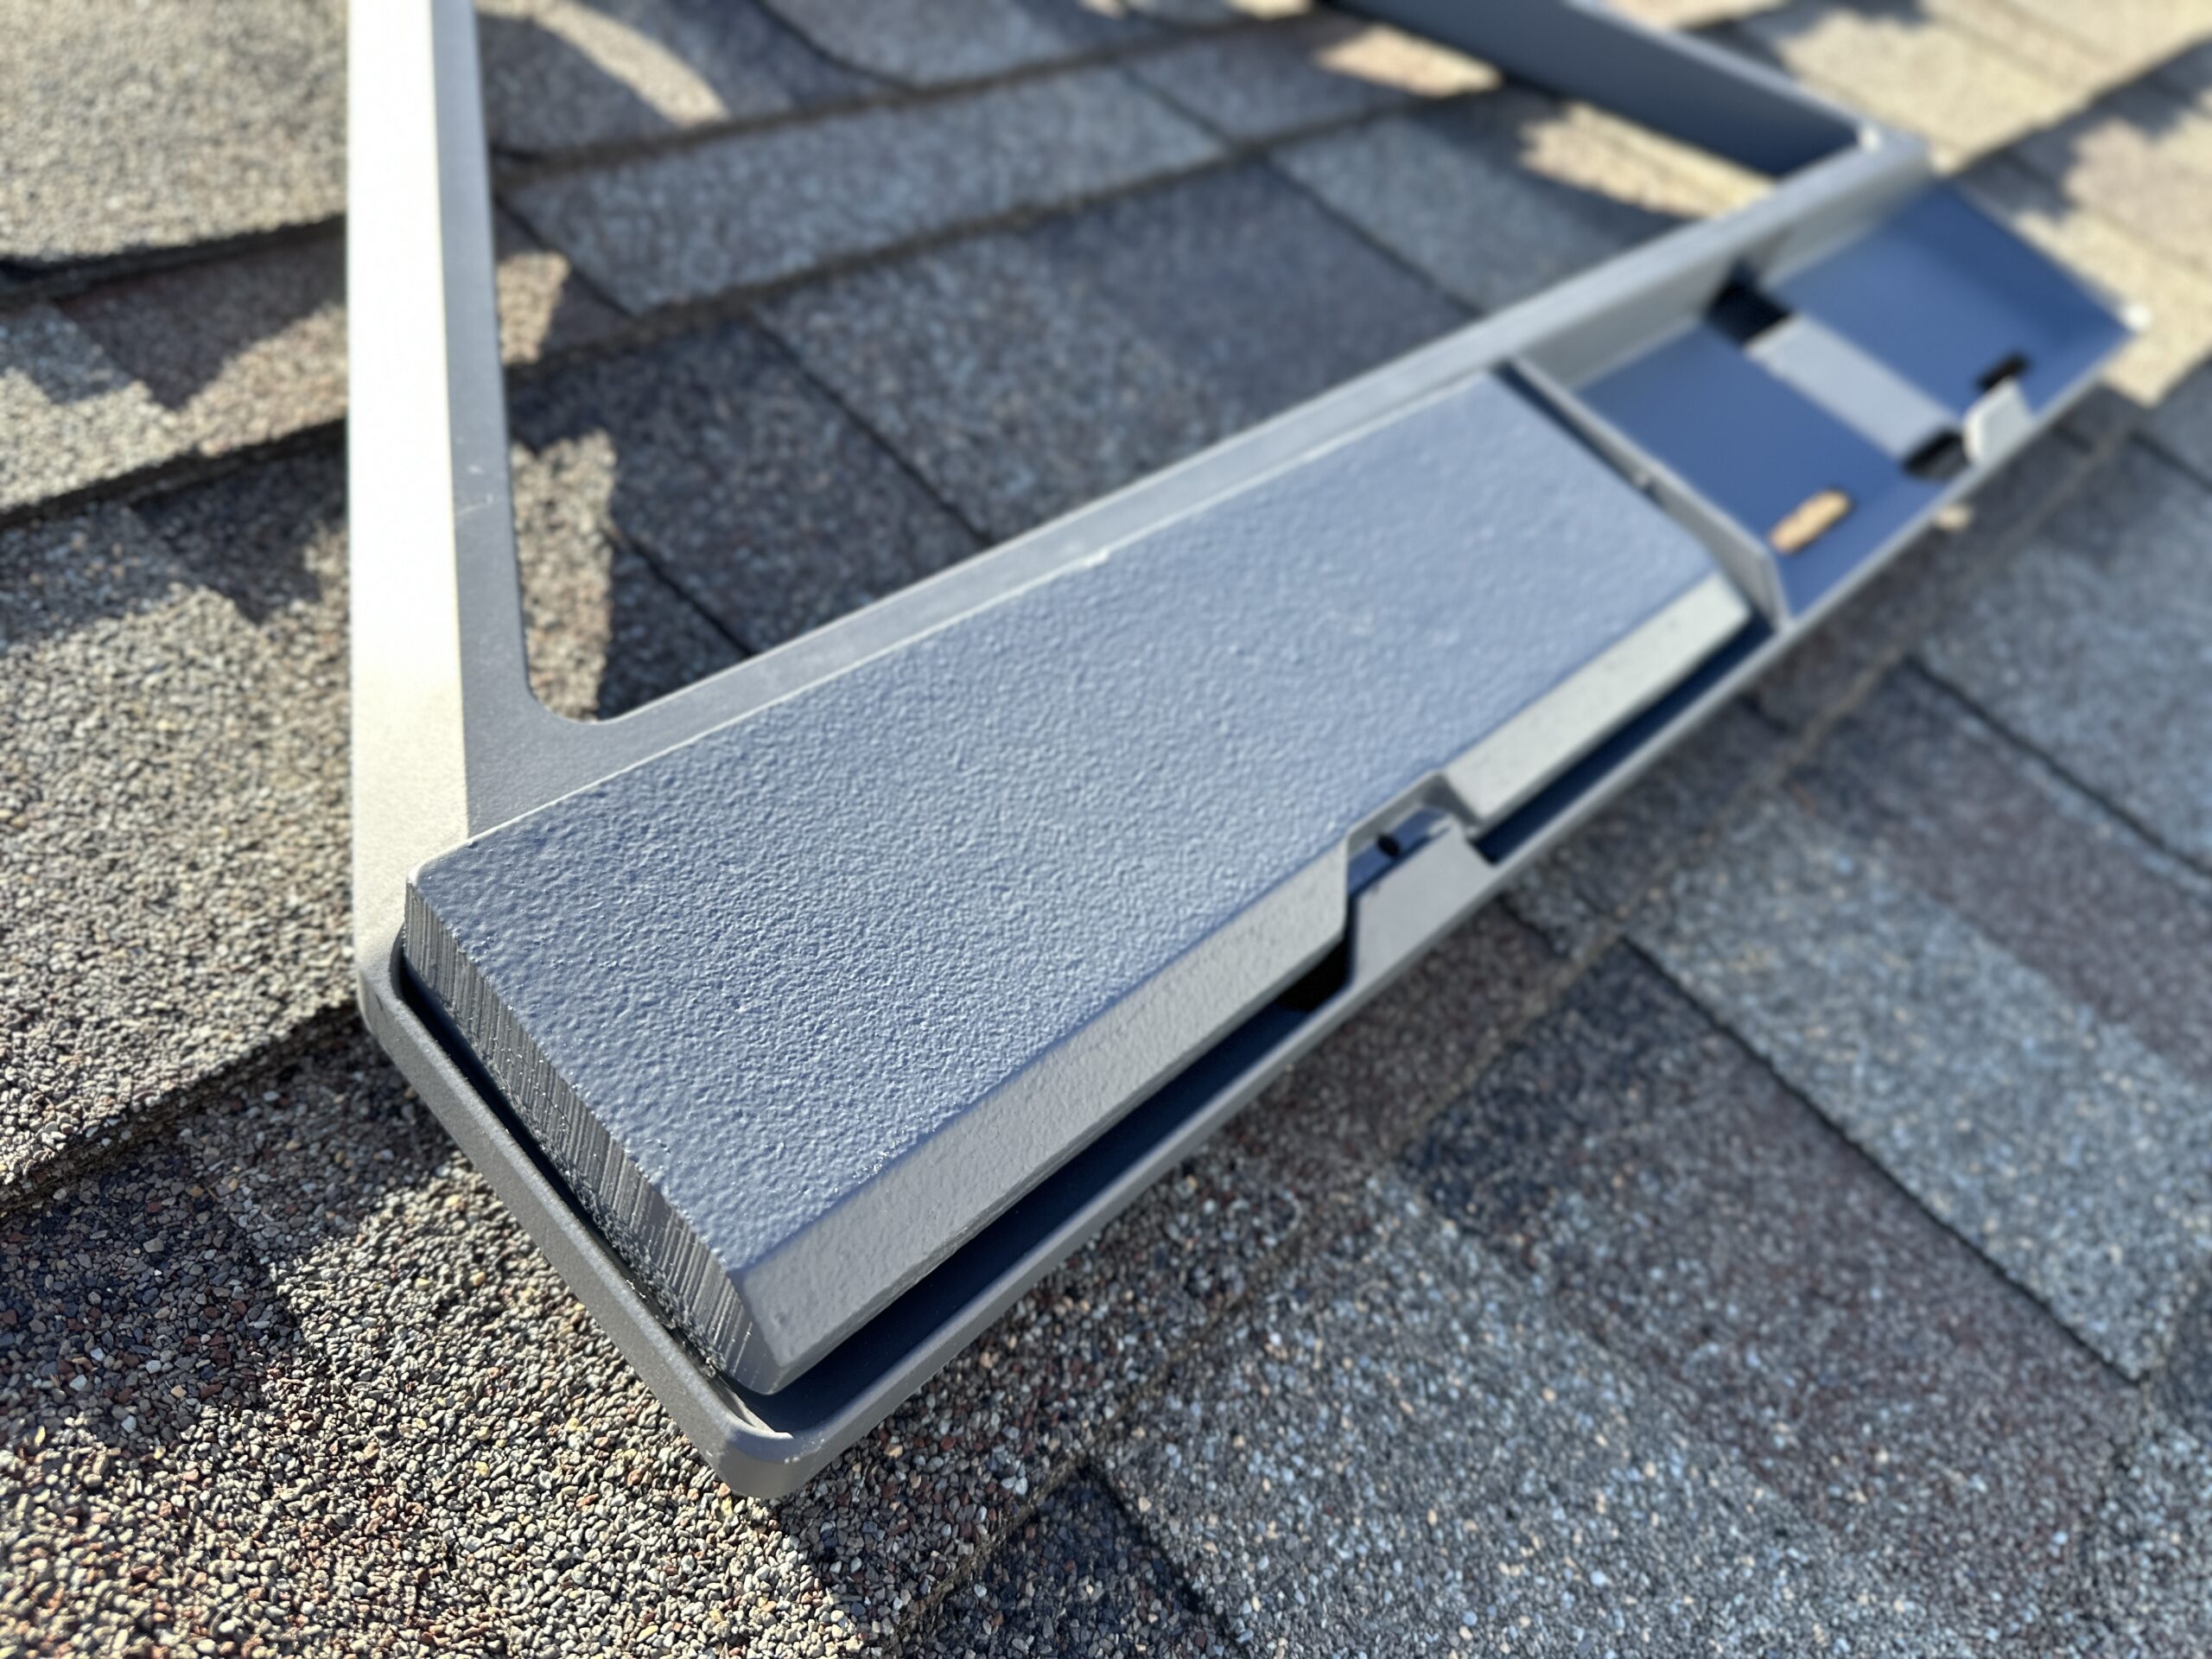
Carry each ballast weight up to the mount, one at a time. Each one is about 13 lbs, for a total weight of over 50 lbs holding down the mount. Remember, the included carry bag is for the dish only, not the weights! Insert each weight by angling it from the top of the mount downward, until the mounting tab aligns with the notch in the ballast. All four weights must be used.
Step 6 – Route the Starlink cable

Unplug the cable from the dish and router. Route the cable, using the dish connector side, from inside to outside. You can use the included wall clips to secure the cable to the side of your home.
Step 7 – Install the Starlink dish
Use the included carry bag to safely transport your Starlink dish up to the mount. Once there, the dish mast will slide into the Ridgeline Mount center arm, snapping into place. Verify that the Starlink mast is within 5 degrees of vertical, and that everything is tight and secure.
With the mount and dish installed, you can go back into the house and plug everything in. Give the system a few minutes to boot up. Check the Starlink app to make sure your dish is online and connected. You will want to check back in about 12 hours to make sure there are no obstructions.
Review
Initial Impressions
This is a high quality mount. It’s made of aluminum, with nice details like rubber padding to protect the roof. The locking mechanism is simple but clever. It allows this mount to be installed on virtually any roof angle. Since it’s an official Starlink mount, the antenna mast fits and locks right in. It matches the color and finish of the rest of the Starlink hardware.
How Does It Compare To Alternatives?
I’ve previously recommended aftermarket non-penetrating roof mounts, but I can’t really do that anymore. At $250, from the Starlink shop, this Starlink Ridgeline Mount seems expensive, but keep in mind that price includes everything you need, including shipping. With the 3rd party ridgeline/non-penetrating mounts, you have to buy a J-mount and ballast weights, in addition to the mount itself.
What I Liked
- All in one kit, no additional materials or tools needed
- Sleek, clean design that matches the other Starlink hardware
- Easy to install, easy to move if you need to
- High quality materials and good build quality
- Adjustable for any roof pitch, even flat roofs
What I Didn’t Like
- Pretty expensive at $250
- Starlink doesn’t provide any wind rating specification
- I wish I had the ability to purchase a mast extension to raise the dish a few feet
Final Thoughts
Overall, I can easily recommend the Starlink Ridgeline Mount Kit to anyone seeking a non-penetrating roof mount. It’s a high quality mount that is simple to install. It can adapt to just about any roof shape or angle, even flat roofs. That makes it super versatile. What brings great value to this $250 mount is the included weights. With most aftermarket mounts like this, you need to provide sandbags or concrete blocks. The Starlink solution is much cleaner, lower profile, and easier.
Is there any way to purchase just the pipe mast for the GEN2 ridgeline mount and use it with the GEN3 Mount?
No, they don’t sell just the single components out of a kit. It wouldn’t work anyway, since the Gen 2 mount doesn’t accept the Gen 3 mast pipe.
Where do you get the pole between the dish and the ridgeline mount? I purchased the pole adapter for the dish, I purchased the ridgeline mount also. There isn’t a piece of pipe that connects the two that I have been able to find.
The hardware being offered at the time of this post was the Gen 2 Standard Actuated dish, which had a built in mast. That’s the pole you are seeing. Sounds like you got the newer Gen 3 dish, which doesn’t have a mast. The Ridgeline Mount is a Gen 2 accessory, and isn’t directly compatible with the Gen 3 dish. You can, however, just use the pole adapter and mount it to the short pole area on the Ridgeline Mount. Assuming you purchased the correct Gen 3 Pipe Adapter, and not the one for Gen 2.
Thank you for the reply. I did source an aluminum rigid pipe which fit snuggly to the pole adapter for the Gen 3 dish but it’s a sloppy fit at the base.
I think I will have to drip and tap 6 1/4-20 holes. I will stack two and then space 2 more every 60 degrees around the pipe. Then pinch the mount pipe with the bolts. I will make sure to have jam nuts on the bolts also to keep them the bolts from backing out.
In my opinion it’s a whole lot of customer engineering, but I guess it was problematic as an offering from Starlink.
What is the diameter of the pole to use with the mount?
I purchased the standard pipe adapter for my Gen 3 Starlink to use with the Ridgeline mount but it didn’t come with a mast or pipe to connect the mount to the Gen 3. Is there a compatible mast for the GEN2 Ridgeline mount that can be purchased to use for the Gen3 mount?
You can connect the Gen 3 Pipe Adapter directly to the short stub of mast on the Gen 2 Ridgeline Mount. Otherwise, you can return both accessories you ordered, and then order the Gen 3 Ridgeline Mount that just came out.
Thanks for the great information. My question is can the antenna point in any direction in reference to the ridge line of the roof or does it just point perpendicular to the ridge line as has been shown in your post? For the location i am looking at it would have to point in the same direction as the ridge line. Thanks
The Gen 2 Starlink antenna has motors and can rotate and tilt on its own, so no manual aiming required. Just install it on the mount, power it on, and it will automatically move to the ideal position.
Can the Standard Starlink (Gen 3) mounted to the Ridgeline Mount Kit be oriented ANY direction (N S W or E) and not just perpendicular to the ridgeline? Thank you
The app will tell you which direction to aim the dish. Gen 3 isn’t compatible with the Ridgeline Mount out of the box. You would need the Gen 3 Pipe Adapter to make it work with the Ridgeline Mount.
Outstanding review. I’m off to “invest” another $250 in this project.
Thanks, appreciate the feedback. I still have no complaints or issues with my Ridgeline mount after all these months. It’s a great investment if you don’t want to drill holes in your house!
I have forgotten my password. How do I find it or get a new one?
There is a forgot your password link on the login page on the website. You can reset your password via email or phone #.
Is there a risk of the weights falling out if the angle of the roof is too steep?
No, there are little tabs on the bottom that would hold them in, even for a steep angle.
“what brings great value is the included weights”….problem is, they ship separately or not at all in my case, at least so far. I have been waiting since sept 5th for the ballasts (weights). No longer receive updates or cancel/ re-order notifications. Any insight into how to resolve ? The starlink support site does not answer this or provide a contact to do so.
You can create a support ticket to see if Starlink can provide an ETA:
https://www.starlinkhardware.com/how-to-contact-starlink-customer-support/
Hello,
Do you know if the Mount is able to be returned if I don’t like it or it doesn’t work as expected?
Yes, Starlink has a refund policy that covers this mount in addition to virtually anything else ordered directly from Starlink.
Hi there! I am looking for a CAD drawing of the Starlink Ridgeline Mount Kit. Is it available?
Not that I know of, but you might try to reach out to Starlink support to see if they could provide it.
I Just Purchased a Ridge mount for my Starlink Service dish gen 2. It was advertised at $250.00 and I have been charged $735.00. I am very unhappy, please refund my money
My blog isn’t associated with Starlink. You will have to contact Starlink directly for any billing issues or order returns.
Thanks for the great info. Can you provide a bit more detail on what you mean by short ridge vents? I’d really like to try this type of mount if possible. Thanks, Morgan S.
If the vent is only an inch or so above the roof it might work, that is what I mean by short. The legs can adjust to accommodate some slight surface variation, but with most ridge vents, the Ridgeline Mount won’t be compatible. Worst case you can try it out and send it back for a refund if it doesn’t work for your particular roof.
Has anyone tried using the Ridgeline mount on a roof with ridge vents? It appears the “legs” will not lie flat against the roof. Think that would be a problem?
It won’t generally work with ridge vents unless they are very short.
Hi All, do You know if the Ridgeline Mount Kit is available for purchasing in Europe? On the Starlink website it is available for purchasing only in USA. Please help me 🙂
If it’s not on the Starlink shop, it isn’t available in your region.
I ordered a Starlink and ridgeline kit last week and the ridgeline kit arrived today in France without any problems. However the ballast weights did not arrive, so based on the review above I guess the weights will arrive later.
Yes, they ship separately from the mount itself. You should have a separate tracking number in your order history on the Starlink website if you want to track it.
Does this work for the roam (round) antennae? It seemed to only be for the flat/residential one on the Starlink website.
It’s only for the current generation of Starlink models. The round dish is not compatible.
Looks like the perfect solution, But I cannot find it anywhere to buy. I am in Ontario, Canada.
It might not be available in all markets. If you don’t see it in the online shop at Starlink.com, it’s not available in your market at this time.
How long is the cable that comes with the StarLink unit? Do I need to order an extension cable for this setup?
It comes with a 50′ cable. 75′ and 150′ cables are also available if you need additional length for your installation location.
You should be able to request the length of cable you require. I need more then 50′. Now I am stuck with a 50′ cable that I cannot use and I have to buy a longer one. You should also be abel to request the type of mount you want.
Would this ridgeline mount work on a metal roof with snow and ice and winds 55mph?
Yes, should be ok. It has a rubber edge to sort of hold it in place even on a metal roof, and there is more than 60 lbs. total weight holding it down. It has survived several nice 60 mph+ gusts since I’ve installed it. Hasn’t moved an inch or been any trouble so far for me.
Is it only available in USA shop? I don’t see it in Poland shop. How can I buy it?
It might not be available in all markets. It’s the first product in the shop when I look from my account.
For a metal roof would there be as simple way to add a couple of 100lb anti-scratch Neodymium rubber coated magnets to it? I was originally going to just add 4 magnets to the standard stand but don’t want it to look unprofessional. This new ridgeline mount with the magnets would really secure it.
Not necessary in my opinion. The rubber + weight is enough to hold it securely in place.
We live in a very windy prairie area with a metal roof. Do you think this would work? Our roof has a pitch but not a very steep one.
Starlink says that this mount isn’t designed for high winds. I’ve had mine installed for several months now, through severe thunderstorms with wind gusts over 60 mph. It hasn’t moved. I think you would be fine. If you wanted some additional insurance, you could add some weight.
What do you think about putting some liquid nails under the rubber pads for mounting on a steel roof?
The rubber pads come off pretty easily. They are just meant to protect the roof surface and prevent the mount from sliding around. With the weight of the ballasts holding it down, I don’t see any reason to glue the mount down to a metal roof.
I tied two more than 50 pound landscaping bricks to the legs of my starlink and sat it on the ridge of my roof, it hasn’t budged in storms. this looks nice but doesn’t seem worth more than two big bricks and some serious paracord I tied to mine.
Thanks for this — it looks like a good option for some of us. Until now I was planning to go go with one of the third-party non-penetrating solutions for my barn roof. But I think I’ll switch to this one — when and if Starlink ever gets around to making the service available again in my neck of the Wisconsin woods.. I also hope that there will be a way to add a mast extension, although I’m not sure that I need it. The total ballast weight seems borderline for when you have strong winds. I’d like to figure out a way to either weight down a bit more or secure the the entire assembly in some other fashion.
With the dish, mount, and weights, it’s probably over 70 lbs. I’ve had it installed for weeks now, through some 50-60 mph gusts. No issues at all.
Where do I purchase a home starlink? And how long is the wait now?
You can purchase and view availability from Starlink.com
I would not be able to do that one. I have a very tall metal roof. I would need a crane to put it up there.
Ya if you can’t climb up to the ridgeline it would be difficult to install. Luckily the mount base itself is pretty light, it’s aluminum. And you can carry each of the 13 lb weights up one-by-one. But non of that helps if the pitch is too steep or you can’t access the roof in the first place.
Thank you! Is there a wind rating?
Starlink hasn’t assigned any kind of wind specification or wind rating to this mount.
I’m thinking this might not work with standing seam steel roof. Any ideas?
It should work fine. There are rubber channels that sit between the roof surface and the metal on the mount. The rubber, combined with the weight, would grip enough to the roof in my opinion. And the rubber protects the steel roof.