
Starlink is incredibly popular in rural areas, allowing people to finally get connected with high speed broadband internet. Rural properties often have multiple structures, like garages, shops, and barns. It’s important to stay connected these days, no matter where you might be working on the property.
I get this question all the time from readers: How do I get my Starlink Wifi signal from one building to another? The router that comes each Starlink kit only covers about 3,200 sq. ft. Most outbuildings are far away from the main house, making mesh systems and Wifi extenders impractical.
In this guide, I will break down two methods you can use to extend Starlink over long distances, such as between an outbuilding and the main house. I’ll explain how each method works, cover the pros and cons, and give you recommendations on equipment to purchase.
Table of Contents
Use cases
Before I jump in too far, let me give you a few scenarios where you might need to cover long distances. The first use case is when the Starlink dish needs to be installed in a location far away from your home. Maybe you live in an area with a lot of trees, and the roof of your barn, 200 feet away from the house, is the only good spot without obstructions. The Starlink cable only extends up to about 150′, so a different solution is needed in this situation.
Another scenario: Starlink is installed on the roof of your house, but you need Wifi in a shop building to run security cameras. The shop is more than 100 feet away, so the Wifi signal is going to have a tough time reaching that far. How do you get a signal over that long of a distance?
If you don’t need to span a large distance, consider trying a mesh solution first. Mesh systems or Wifi extenders might be best for detached garages and larger homes, where you don’t need to extend the signal more than 100 feet. But if you need coverage to extend to a location far away, here are two solutions to think about.
Note: This article may contain affiliate links for the products mentioned
Solution #1 – Ethernet connection
The first method is to run Ethernet cable from one building to another. With modern CAT6 cable, you are limited to about 300 feet (100 meters). If that limitation fits your situation, running cable is worth considering.
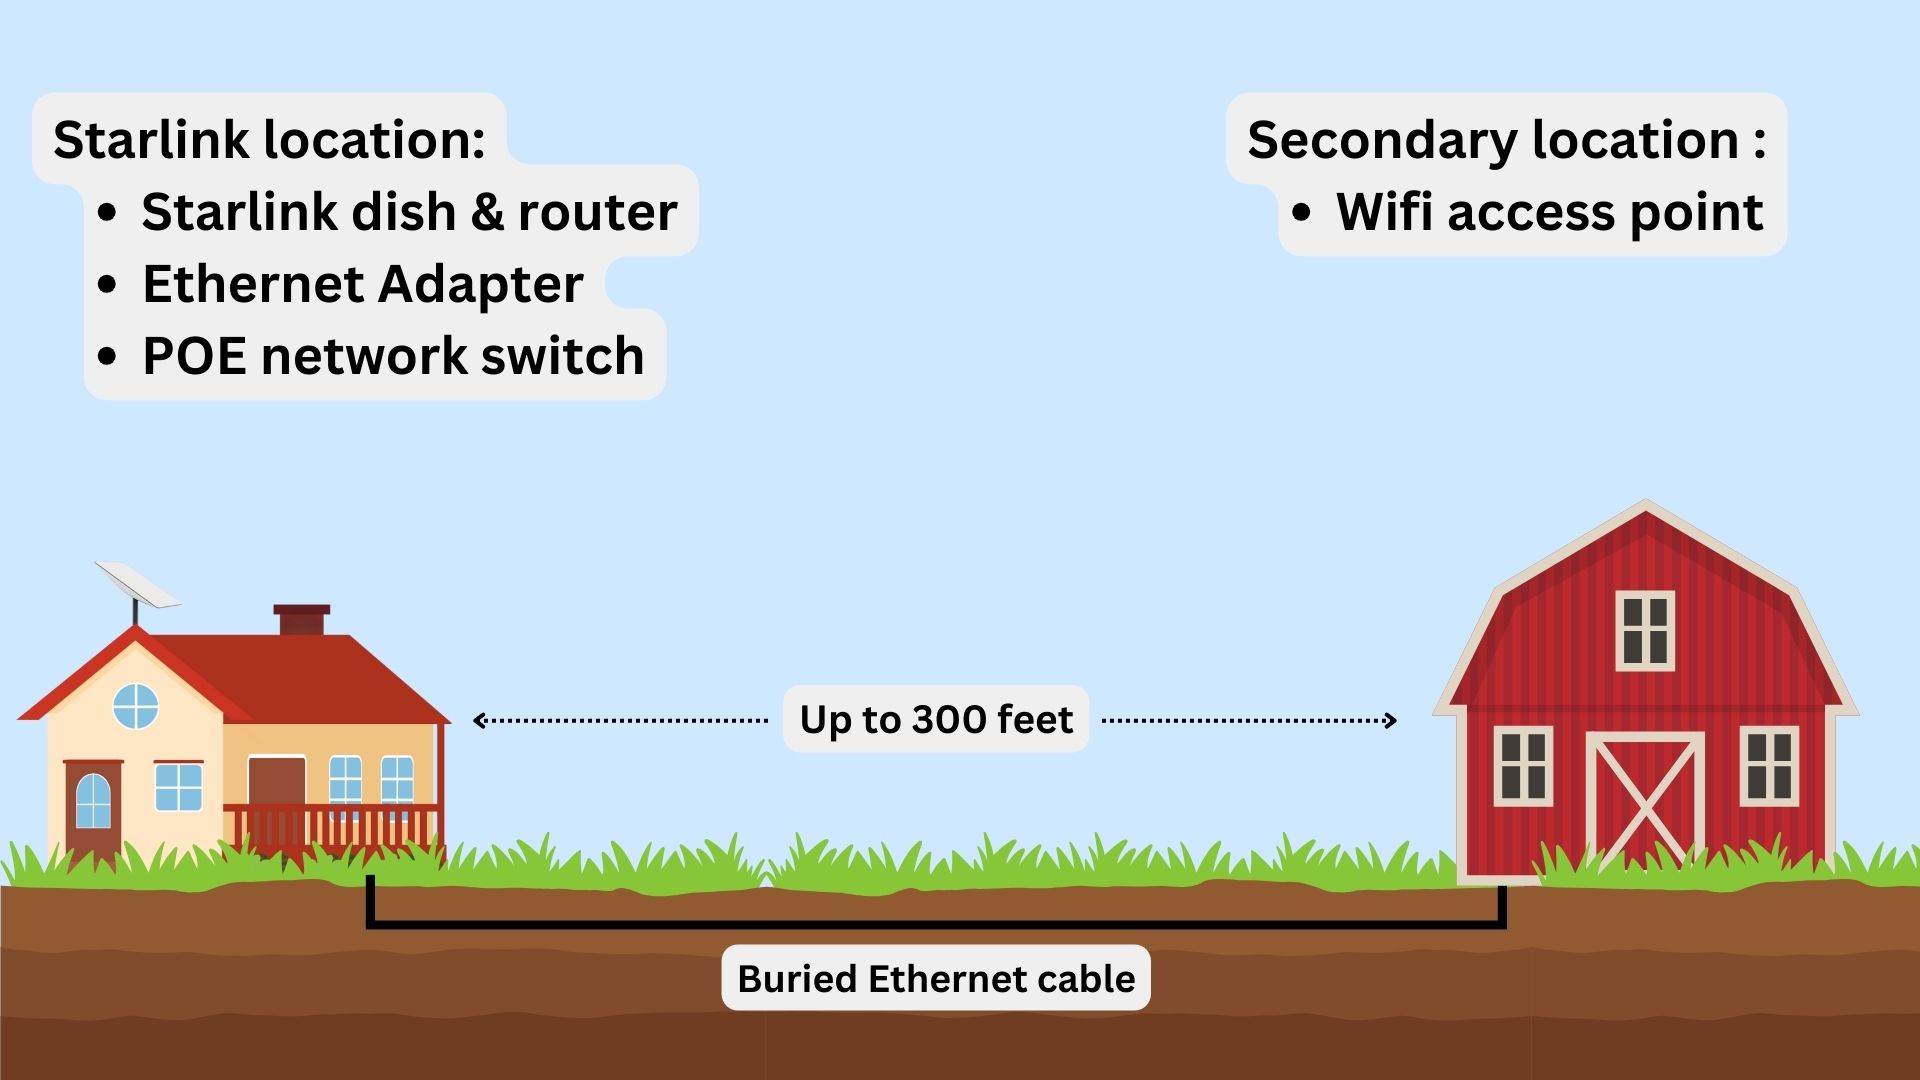
This solution involves burying Ethernet cable, either in conduit or direct burial, between the two buildings you want to connect. At the location with the Starlink router, you’ll install a network switch. At the other building, you’ll install a Wifi access point. Each access point will need a cable run back to the switch.
Equipment needed
Starlink Ethernet Adapter – Applies to the Gen 2 Standard Actuated dish only. The Ethernet Adapter is needed to gain access to an Ethernet port on the Starlink router. Check out our review for more info.
POE network switch – A POE (power over Ethernet) network switch allows you to connect and power multiple Wifi access points and other devices on your network. You’ll plug the switch into the Starlink router, and then plug devices into the switch.
Wifi access point – Wifi access points are like Wifi routers that just repeat an existing Wifi network. In this case, the Wifi network from the main Starlink router. You will install an access point in each building where you want Wifi coverage. They plug into the POE switch, which provides power and data.
CAT5E/6/7 cable and connectors – To connect everything, you will need some Ethernet cable. You can use CAT5E, CAT6, or CAT7 cable that is rated for direct burial. Each run from the network switch can be up to about 300 feet. You will need a run for each access point you intend to install. In addition to the cable, you will need some shielded RJ45 connectors, and the tools required to install them on each end of the cable runs.
Pros and cons
Hardwiring two buildings together is the best solution for reliability and performance. The big performance advantage comes with some downsides, though. For starters, burying a cable and routing it through walls is labor intensive, and can get expensive if you can’t do it yourself.
You are also limited to about 300 feet of distance. If you need more than that, running fiber is an option if you still want to be hardwired. Running fiber is out of the scope of this guide, but it is worth considering for longer distances.
I can’t deny the simplicity of the Ethernet solution as another pro. Since everything is buried and hardwired, you won’t have to worry about adjusting wireless antennas, latency, throughput, or weather. It’s also easy to upgrade and expand your equipment over time.
Solution #2 – Wireless Ethernet bridge/point-to-point connection
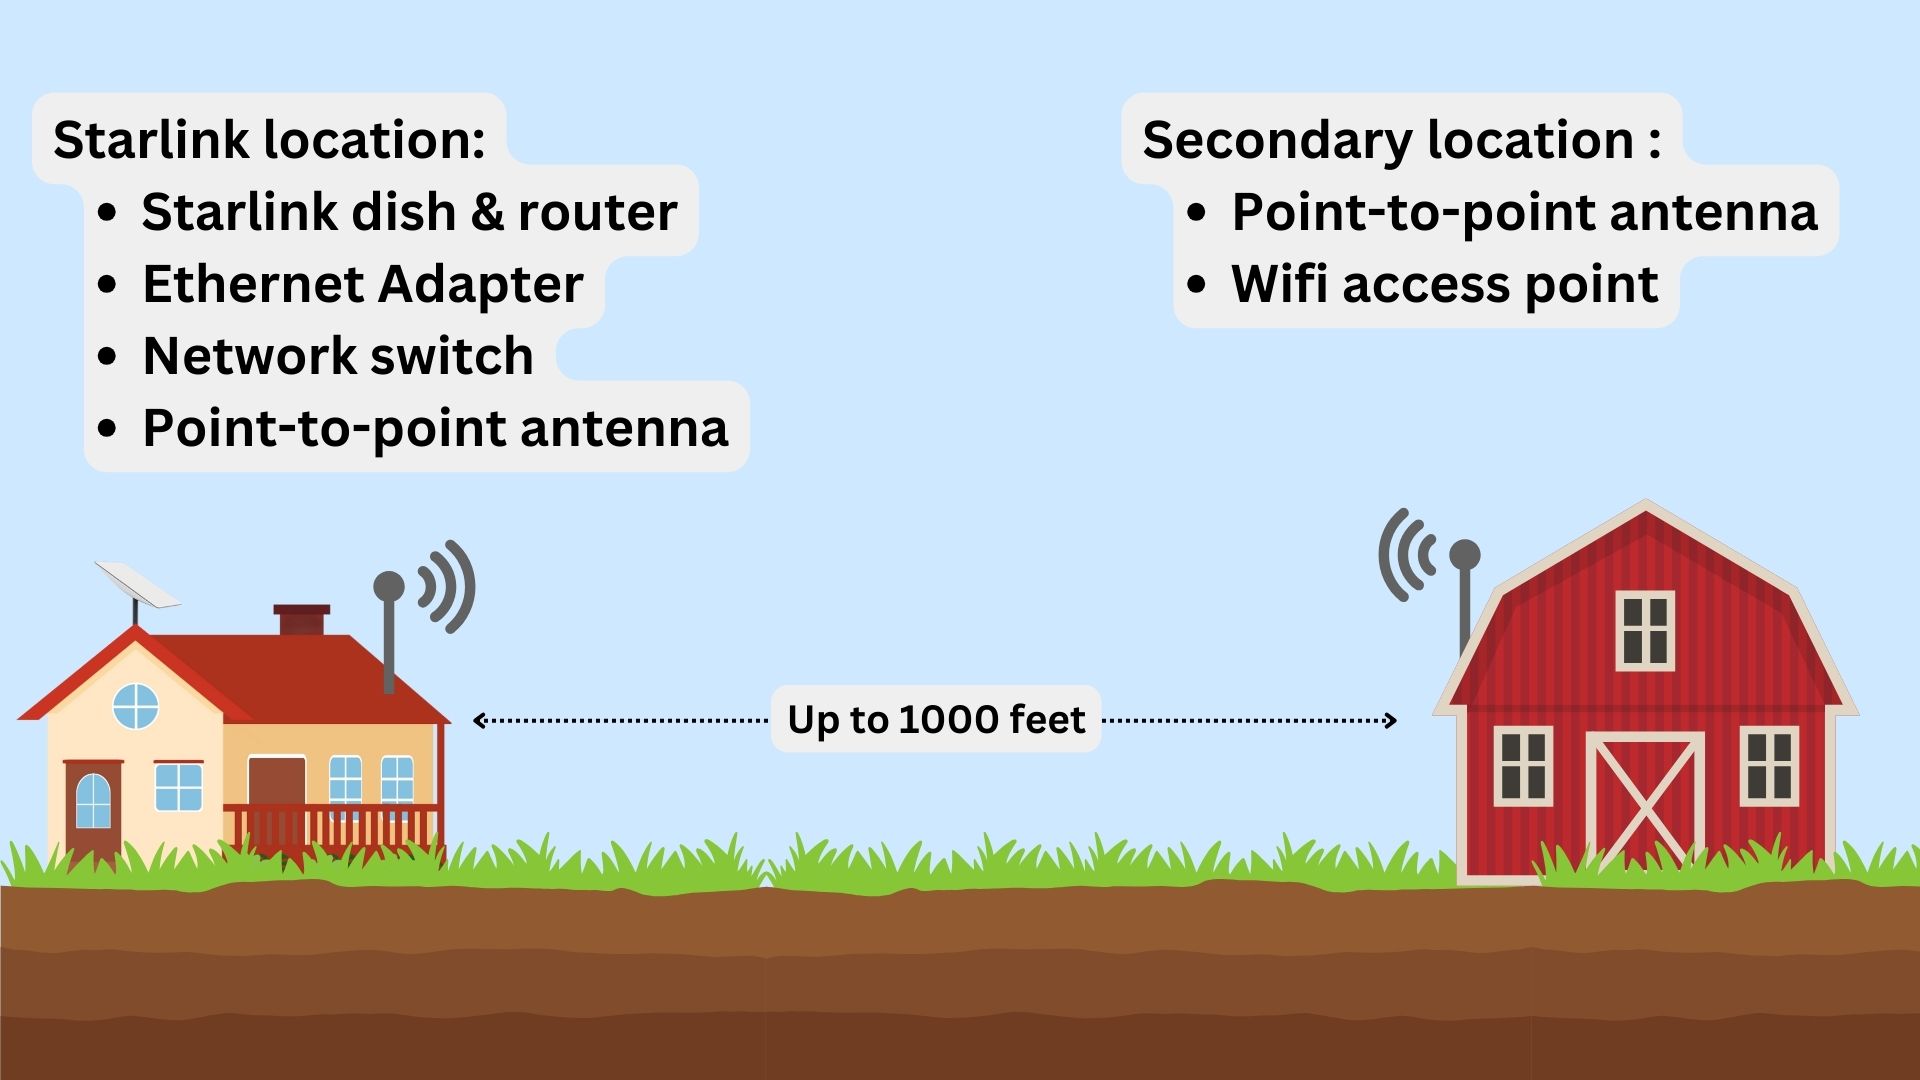
The second method I recommend for connecting two buildings over a long distance is using a wireless Ethernet bridge system, also called wireless point-to-point. As the name implies, this solution allows you to avoid running cable. Wireless Ethernet bridges consist of two antennas, one for each building. They take a standard Ethernet LAN connection, like from a network switch, and send the data wirelessly to the other antenna. When it arrives, the signal is converted back, so you can hook up a Wifi access point.
Wireless Ethernet bridges can span a variety is distances, and typically require a good line of sight. Whether you need to extend the signal 50 feet or 500 feet, there are antennas out there that will handle the job. This solution is what I recommend to most people due to the low cost and simple installation.
Equipment needed
Starlink Ethernet Adapter – If you have the Gen 2 Standard Actuated Starlink dish, you will need to purchase the Ethernet Adapter to gain access to an Ethernet port. The Ethernet Adapter is not needed for the Gen 3 Standard kit.
Network switch – To connect all the devices required, you will need a network switch. It can be a POE (power over Ethernet) model if you want to power devices, like security cameras, from the switch. You’ll connect the Starlink router and the wireless Ethernet bridge antenna to the switch so everything can be on the same local network (LAN).
Wifi access point – In the other building, you will install a Wifi access point. An access point essentially repeats the Wifi network from the Starlink router. It’s like a Wifi router, but simplified to only broadcast the Wifi network it receives from the switch it’s plugged into.
Point-to-point wireless Ethernet bridge – The wireless Ethernet bridge is the key component of this method. Consisting of two antennas (one for each building), it sends data at high speeds, completely wirelessly, from one place to another. Depending on the manufacturer and model, these wireless point-to-point systems can send a signal across 1000 feet or more.
Pros and cons
Unlike running Ethernet cable, a wireless Ethernet bridge is simple to install, and can span longer distances. The equipment is also cheaper, since you don’t have to buy all the cable and connectors, or special tools for crimping and digging trenches.
As for cons, point-to-point systems usually need a clear line of sight. If you are trying to connect a building through trees, you might run into performance and reliability issues. Since the antennas are installed outdoors, wind, weather, and other environmental factors can affect performance.
This solution might not be ideal if you need to connect multiple buildings together, since you would need a pair of antennas for each building. Running cable to all the buildings might be more practical.
Final thoughts
If you need to extend Starlink Wifi coverage over long distances, running Ethernet cable and wireless point-to-point systems are two great options. You’ll need additional network gear, like a switch, no matter which solution you choose.
Hardwired Ethernet cable is the best method for performance and reliability, but it’s expensive and difficult to install. Wireless Ethernet bridges can span longer distances and are easier to setup, but you need a clear line of sight.
I hope you learned something from this guide. As always, please leave a comment below if you have any feedback or questions!
Ok, for distances over 300Ft/100Meters, consider :
Eth. adapter -> POE switch 48V ->
up to 300Ft Cat6a cable -> POE *powered* switch ->
up to 300Ft Cat6a cable.
Just need some box to safely put away the switch halfway…
Thank you for this info. 1. So, can I hook the switch from my Gen 2 (I have the adapter from Starlink) to a router, then from the router to my 250′ away pole barn? 2. Or can I just go directly from a switch and run a cable under ground to my pole barn? I am able to run that much cable underground.
You would go with #1 if you want to have a Wifi router in the barn. The Starlink router would be providing Wifi in the house. Plug the switch into the Ethernet Adapter, then run the cable from the switch to the barn. At the barn, the end of the cable plugs into the 3rd party Wifi router, configured as an access point. 250′ of buried cable will work. It’s when you get closer to 300′ that you can run into issues. Also, if you don’t plan on needing to plug in any devices to Ethernet in the house, and don’t need POE in the barn, you can skip the switch and just take the run directly from the Ethernet Adapter to the router in the barn.
Frankly, I am amazed at the range of the Starlink routers themselves. My main router sits in a closed bedroom. I bought another Starlink router and put it downstairs in my daylight basement/game room. I then connected a Netgear Nighthawk range extender. This setup is in western North Carolina, plenty of trees. I installed two wireless Google Nest cameras. One at the end of my driveway, another further down the road on the approach to our property. I keep them charged with Wasserstein Solar Panels. This is at least 200 feet from our house. Additionally, I can make calls, play Pandora, etc. What’s funny is when I look to see which router is connected to the Nest cams it is the main router behind a closed door. I am now in Florida and I get notifications for everything that goes up the road.
Bridges are slower than switches. Any wi-fi mesh 6 works great.. just get the ethernet adapter.. and plug in the rest as needed. I have 3 buildings running on them. they work awesome. 2 doubles wides are about 200 ft away from the main router, and no outside antenna. Works great. I’m using tp-links stuff. The more routers/bridges you use.. the slower it will be. Use a router at the main location.. and extenders at the remote buildings. Stick with the mesh 6 stuff. It uses the available bandwidth as needed on the fly. Just a normal guys oppinion
200 ft of range is impressive! If you don’t have a lot of trees (density) between the buildings, mesh would be an option to consider. Thanks for sharing.
When describing solutions it would be helpful to include an indicative cost of each solution and recommended products
Recommended products are linked in the equipment needed sections. It’s hard to estimate a price because each individual install will vary based on a number of factors. I will look into adding a minimum price based on the recommended products, though, with a note that says the more AP’s and distance, the higher the cost. Thank you for the feedback.
A drawing of the network topography would be SPLENDID too!
Question!! two mobile homes about 230 feet apart. clear line of site, we have NDemand at his house and I use the WiFi at mine seems to work pretty good most of the time. Will StarLink wifi coverage work from that distance without Bridges?
What kind of Wifi router does he have?! That’s impressive that you can get reliable performance at that distance. Starlink Wifi wouldn’t be fast or reliable at 230 feet. You might pick up the signal, but you’ll have very slow speeds and probably a lot of packet loss. You could try installing an outdoor Wifi access point if you don’t want to go the wireless bridge route.
I went ahead and bought a wireless Bridge. had a puter guru help set it up.. I have clear pathway from each bridge dish. waiting to order Starlink, will be using a J pole mount on same 4X4 the bridge dish is on the lower part of the 4×4 pole and I have J mount on the top of pole.. so I guess I should be set..???? Right??
I have two new NightHawk routers distance between two moble homes is about 230 ft.
I have a wireless bridge over 100 feet working almost two years. I think that your scheme leaves out many practical details including the examples of bridging equipment and how to set it up so that dishy signals are passed through the network correctly to the router. I have a gen 1 dish and power supply and a gen 3 router. I am using a TP-Link CPE710 setup.
At the time I did it, Starlink Engineering could not tell me how to set things up correctly. A worked example would be a real help!
It depends a lot on which product is purchased and how everything is hooked up. It sounds like you set up the Gen 1 dish and power supply in a separate place than the router? Using the wireless bridge to send data back to the router? Most people aren’t going to be doing that, since the newer Starlink versions are more integrated, and the power supply can’t really be separated from the router. For the most part, there should be no advanced settings required. If you have any information about your setup that you think would help, please share.