
Starlink has updated their account system to support multiple users. This new feature, previously reserved for enterprise customers, is now available for consumer accounts. Customers will now be able to add additional contacts to their account, like family members, a backup email address, or even tenants.
In this article, I will go over the update, explaining what it means to add additional users to your Starlink account. I will also walk you through the process of adding an additional contact. Finally, I’ll cover some of the limitations and nuances you should know about.
Starlink allows you to add contacts to your account
This update to the Starlink account management system allows Residential customers to add multiple contacts to their account. There are several situations where this might come in handy. For example, you might want to add your spouse, or another family member, who can manage the account in your absence.
Another scenario is one that I get asked about a lot from readers. Let’s say you are a small business owner, using the Residential service plan. The employee that originally set up the Starlink account is no longer employed. Your service is still going thanks to automatic payments, but the business is essentially locked out of the account without having the credentials from the previous employee. Now, with this update, you can add multiple employees who can administer the account, reducing the chances of running into issues in the future.
If you rent out a house that uses Starlink for internet access, you can now add your tenant as a contact on the account. Your tenant can add their payment info and handle all the billing. This makes transitioning to a new tenant seamless. Just delete the previous tenant, and add a new one, who can then take over billing responsibilities.
User permissions
Starlink has a role-based access control (RBAC) system. When you add additional users, you can assign roles to the account to customize what they have access to. For example, a user with the Technical and Support roles will be able to view equipment settings and create support tickets, but won’t be able to make payments or buy accessories.
In total, there are nine roles to choose from, and users can be assigned multiple roles to really customize their permissions:
Admin – Each account requires at least one Admin. The Admin role has full permissions for the Starlink account.
Technical – Technical users have the ability to manage service plans and equipment. They can reboot, stow, configure the IP policy, etc.
Technical Read Only – This role has read only access to information about service plans and equipment settings.
Billing – The Billing role has access to anything that impacts your monthly bill, like making payments, ordering accessories, viewing invoices, canceling service, etc.
Billing Read Only – The read only version of the Billing role can view invoices and orders, but cannot make changes or place orders.
Support – The Support role has the ability to create service tickets. All users will have access to the support FAQ section, but the ability to create and respond to tickets requires the Support role. This will often be combined with the Technical role.
Support Read Only – The read only version of Support can view past support tickets, but can’t respond to open tickets or create new ones.
User Management – The User Management role can add and edit users on the Starlink account, and edit the role-based permissions.
User Management Read Only – Can only view users and roles.
For more information on what each role does, check out this section of the Starlink support FAQ.
How to add a user to your account
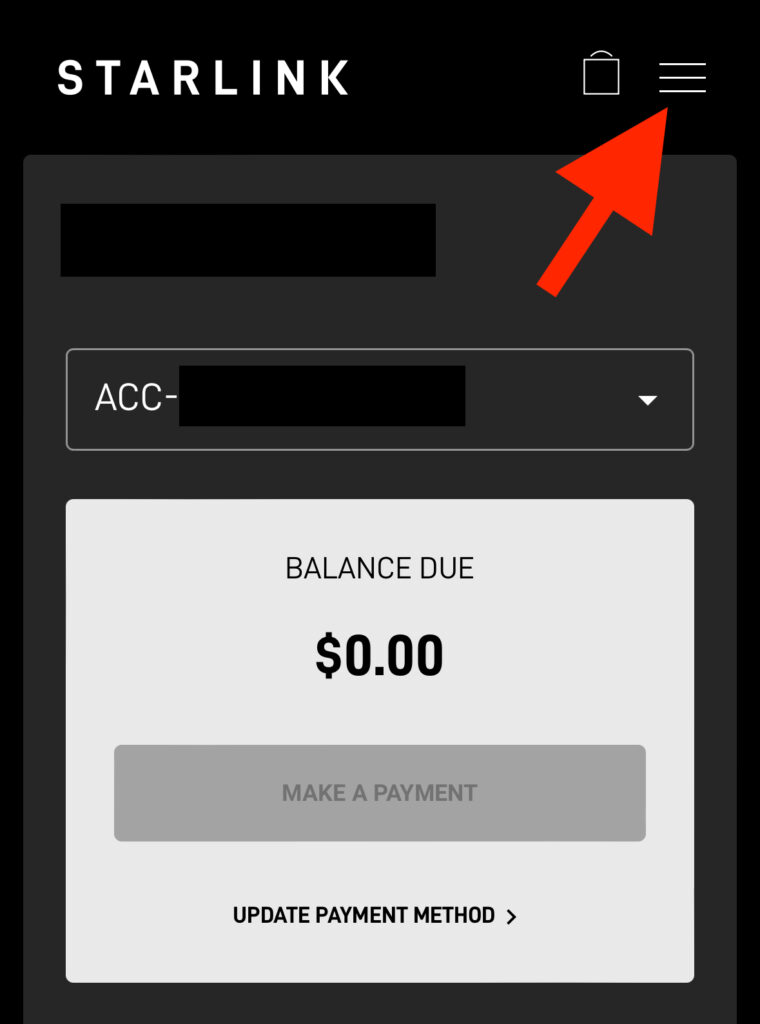
To add a new user to your Starlink account, log in to your account dashboard on Starlink.com. Once logged in, tap the menu icon in the upper right corner of the page.
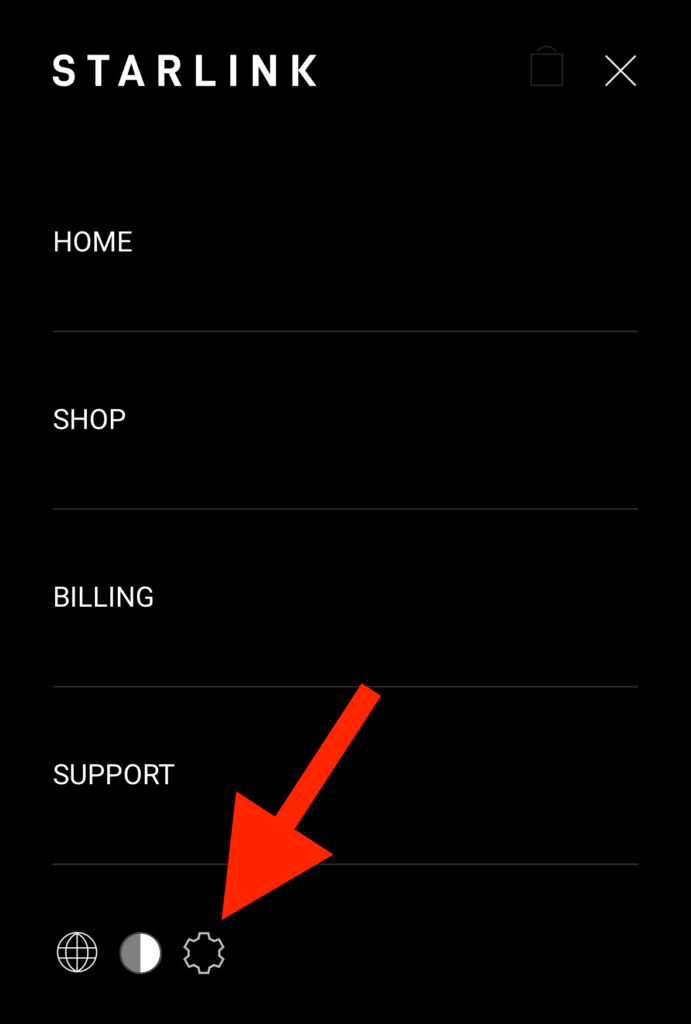
Near the bottom of the menu, tap on the gear icon to open up user preferences.
A list of users is displayed. If you haven’t added any other users, you will be the only account contact shown. To add a new contact, tap the “Add User” button.

Fill out the contact information for the new user. You will also need to select one or more roles for the new user. Tap “Add User” after you’ve finished filling out the info.

After you’ve added the user to your account, Starlink will send an email to the new contact. The email contains a link to finish setting up the account by setting a password. The new user must set their own password from the email, you will not be able to do it for them.
How to edit or remove a user
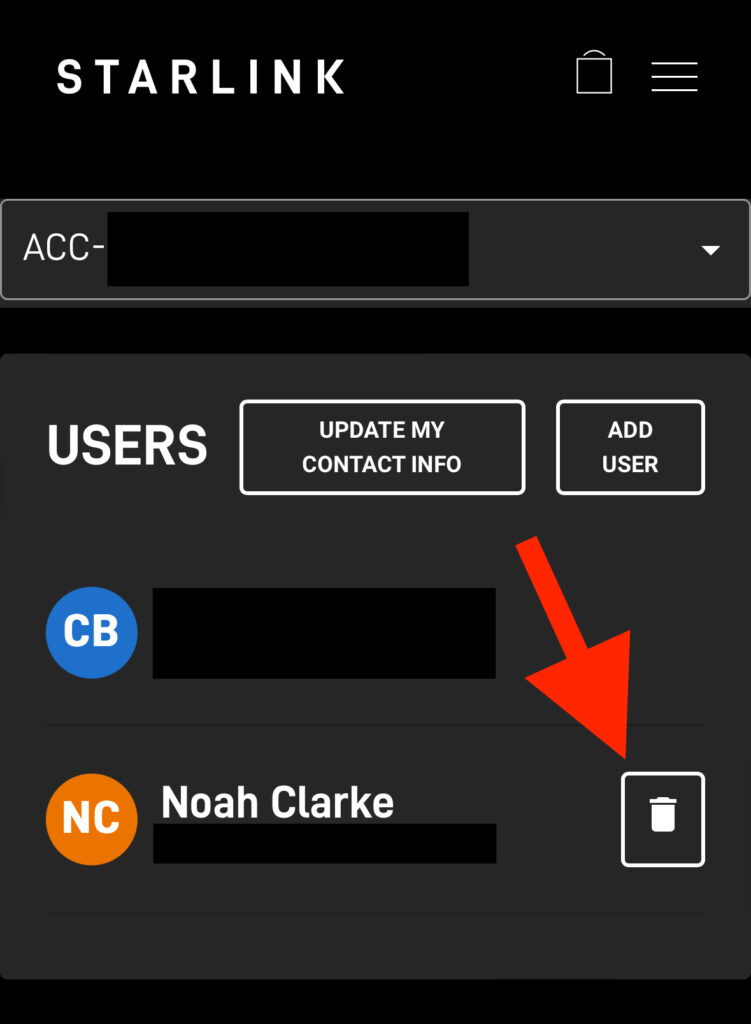
Editing or removing a user from your Starlink account is simple. Log in to your account dashboard and navigate to the user preferences page. Reference the previous section if you need help getting there. In the list of users, tap the edit icon to change the contact information or roles for a user. Tap the trashcan icon next to the user you wish to remove from the account.
Maximum number of users
Starlink has restricted Residential accounts to a maximum of 3 users, including the original account owner. Once you hit 3 users, you will not be able to add more until you remove one.
Final thoughts
The ability to add additional users creates some flexibility in the management of Residential Starlink accounts. I think the best use case for additional users is adding a family member to the account, so they can control it if the original owner becomes unavailable. Another good idea is to add a backup email address that you have access to. If you ever get locked out, you can always access your Starlink account from the backup user profile.
What do you think of this change? Who will you be adding as users to your account? I’d love to hear from you in the comments below!
Hi ,
Been trying to add a user over couple days now, is this still working from your end?
Yes it is still working for me. I would try to clear your browser cache.
If we add a new user, can that user also have the Starlink App on his/her telephone?
As a parallel question, can I put the APP on a second telephone and access the system using the same credentials as I use actually without adding myself as a second user?
Yes to both questions. When you add another profile, they have all the same abilities as the original account holder, including app usage.
I wish the Starlink app would allow you to temporarily disable a device without having to change the password every time.
It would be nice, and it’s one of the reasons people go with aftermarket routers instead of using the very limited Starlink router.